If your apartment is cold in winter, your heating radiators most likely need to be replaced. Traditional batteries made of cast iron or steel become dirty over time.
The coolant moves through old appliances in a thin stream and does not provide thermal energy sufficient for normal heating of the home. To improve the thermal conditions, it is worth dismantling old equipment and installing new ones, but for optimal results you need to know how to do the job correctly.
In this material we will talk about how to properly dismantle old radiators and install new devices in their place.
The initial stage of replacing heating radiators
If your house is connected to central heating, then first of all you will have to go to the maintenance service, where you need to coordinate the upcoming work on replacing the batteries in the apartment.
Here, specialists will give you all the calculations and be able to name the required number of sections specifically for your apartment. Although you can also do the calculations yourself.
Before making calculations, you need to collect some information:
- Determine the type of boiler room used. This may be a central or individual system.
- Two- or one-pipe heating system.
- Characteristics of supply pipes and coolant.
The most common radiator models are bimetallic or aluminum, which is explained by their reliability and long service life. Before making calculations, you need to decide on the type of battery.
You should also take into account the maximum pressure, temperature and heat output specified in the radiator specifications.
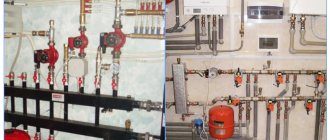
If you are going to change not only batteries, but also pipes, you will have to take care of additional materials. This mainly includes steel, metal-plastic or polypropylene. Most experts recommend using steel pipes. Along with this, you will also need equipment for welding work.
The main thing is to pay enough attention to the connections. These places are the most problematic and if the work is done poorly, there may be leaks in the future.
The most popular are MP pipes; they have an excellent price/quality ratio.
Another criterion that you will need during installation work is fasteners. Select them specifically for your heating radiator. Usually two brackets are used (bottom and top). To avoid possible distortion, use a level. Although some batteries are specially mounted with a slight slope, which will create air removal. If your battery has more than 12 sections, you will have to take another additional bracket.
Some interesting tips
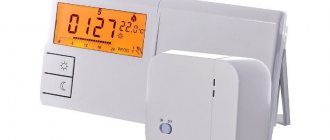
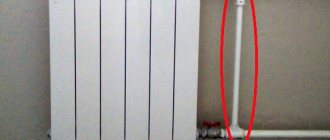
If you decide to replace old batteries, it won’t hurt to think about installing a faucet, either regular or with a thermal head. In the first case, you can manually regulate the coolant flow, in the second, this will be done automatically. But if a thermostat is installed on the radiator, it does not need to be covered with a decorative screen.
The thermal head on the shut-off valve makes it possible to change the amount of coolant so that the temperature in the room is always high enough
This will lead to data distortion when measuring temperature. It is worth noting that thermostats can only be installed in single-pipe systems. In any case, at least shut-off valves must be installed at the inlet and outlet of the radiator, if they are missing.
This will allow you to disconnect the radiator from the system to clean or replace it, regardless of the season. The thermal power reflected in the battery data sheet does not always correspond to the declared one. If you increase the number of sections by 10%, you can improve the situation.
Installation work
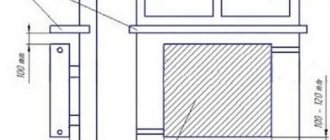
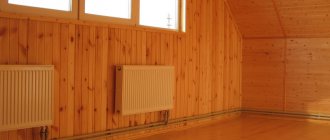
The batteries are installed under the window, which is explained by compensation for heat when street air enters through the window opening.
When installing, be sure to consider the following criteria:
- The distance from the wall is 2 centimeters.
- From the floor - 12 cm.
- From the window sill - 10 cm.
The parameters presented are not a strict rule, but only recommendations.
Now let's look at the instructions for replacing radiators.
Dismantling old heating radiators
You will need the following list of tools:
- Soldering iron;
- Gas and adjustable wrench;
- Drill;
- Grinder for cutting metal;
- Level, tape measure and pencil.
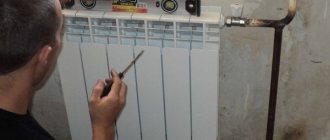
The first step is to dismantle the unsuitable heating device. For this:
- Tighten the locknuts at the top and bottom.
- We determine the places for cutting using a level. We place it in such a way that approximately a couple of centimeters of thread remain on the pipe itself.
- Then we put marks on the pipes and cut them off, after which we remove the radiator from the brackets.
- If you bought a radiator of a different size, you will have to cut the pipes and adjust everything to the desired size, and then thread them. If your house has old pipes, then use welding, otherwise if you use threads, they may break at the seam line.
If the pipe is too short, then make an insert to adjust it using ecoplast or simply solder the required length.
The last step is to prepare the remaining threads for the subsequent installation of a new battery. Use a grinder and trim the edges of the threads, then tighten the locknut and start marking.
Types of heating batteries
The main types of household radiators that are installed in apartments are: steel, cast iron, aluminum, bimetallic. When choosing elements, take into account the material from which the batteries are made. Important parameters are pH, operating pressure, degree of contamination, and maximum heating temperature. All technical specifications are included with instructions when purchasing the product. The Housing Office can also provide information.
It is worth considering in more detail the main types of radiators:
- Cast iron is a heating classic; batteries have stood the test of time, proving their durability. They still exist in many apartments and houses. Radiators are made by casting, making separate sections, and then connecting them together. Now they sell updated cast iron radiators with an interesting design. The material has high inertia, it takes a long time to heat up and takes a long time to cool down. Water circulates well throughout the system, cast iron is not subject to corrosion.
- A steel radiator is an element made of two welded metal sheets. The battery consists of several panels. Simplicity of design, easy installation and beautiful appearance are the advantages of steel appliances. Disadvantages include the metal's tendency to corrode.
- Aluminum batteries are most often used for installation in residential buildings; the material has high heat transfer. The devices are light in weight and easy to install. The power depends on the length of the radiator. Since aluminum is prone to corrosion, the water from the system must be drained in the summer.
- Bimetallic - aluminum on the outside, another metal on the inside. Material with high heat transfer. The batteries are suitable for any heating system and can have different geometric dimensions. They have a long service life - up to 25 years.
On a note!
Steel radiators come in panel and tubular types. And aluminum - casting and extrusion. In addition to the mentioned batteries, floor and baseboard convectors are also used, built into the floor and baseboard, respectively.
Installing new heating radiators (step by step)
Procedure:
- If the work is carried out in winter, you will have to negotiate with the city maintenance service so that they stop the heating riser for several hours (ideally half a day). Usually in winter they don’t bother replacing a heating radiator, but if you have an emergency that can’t be put off for a long time, then you can easily get the necessary permits to replace the battery.
- First of all, we work with cranes. We wind the seal onto the thread itself. The connection must be strong, and for this it is recommended to use tow. Initially, the pipe is coated with paint (not water-based), and then the seal is tightly wound strictly clockwise, starting from the edge of the thread. At the end everything is painted again.
- The next step is to install the faucet. We twist it in such a way that as a result the thread completely goes under it - it should not remain on the pipe. We cover the remaining tow with paint and wait for it to dry. This way you don’t have to worry about leaks, and you can’t just turn off the tap anymore.
- On both sides of the battery you will find two threads on the inside, which are designed to connect the battery to the heating system. We screw the fittings into them and install the nuts into the threads. For your convenience, it is better to use pass-through nuts, so you can connect the device in any position. It is recommended to install the footers themselves on seals (rubber or paronite).
- Let's move on to the pipes. In the places where the radiator will be connected, it is necessary to install the matching parts of the “American ones”, on the other side we put a plug and insert the Mayevsky tap.
- We install the heating radiator and connect the faucet to the American one.
- Next, screw the brackets to the wall using a level.
- The last step is to hang the battery, tighten the nuts with an adjustable wrench and the installation is complete.
At this point the installation process can be considered complete. You can also cover the radiator with a decorative screen, although this is not at all necessary, because modern models have an attractive appearance and fit into any interior.
Check before starting the system
The system's functionality is checked together with housing department employees. Water is supplied to the system under pressure so that leaks can be seen immediately. Heat should be distributed evenly throughout all equipment in the apartment.
The slightest malfunctions or leaks are eliminated immediately. The heating is turned off again and its operation is resumed after the defects are eliminated. When the system has passed the test, pressure testing is done. It is carried out by Housing Office employees. Once the pressure test has passed, the system is ready for operation.
It is possible to replace the heating battery in an apartment yourself. But this requires certain skills, as well as a set of tools. If you have doubts about your own abilities, it is better to turn to professionals, especially when you need to replace the battery in the winter during the heating season.