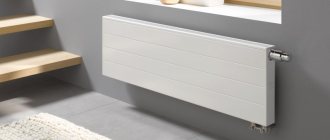
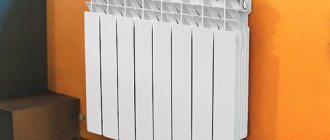
The heat supply system is an integral part of the engineering systems installed in every home. And its arrangement must be treated with special attention. This also applies to the assembly of pipelines and the hanging of heating radiators. After all, even a small problem can lead to global consequences, so it is important to know how to properly hang a heating radiator.
How to hang a heating radiator correctly
Types of battery mounting
Designs for fixing heating sections are usually divided into two types. Each of them performs its own function and is used in individual conditions.
Wall mounts for heating radiators are considered quite reliable, provided that the partition is of normal strength. The list of such fasteners includes:
- Anchor brackets. They come in long and short depending on the size and weight of the heater you need to install.
- Special elements with the ability to adjust the height of the battery. The design includes a special plate and a moving mechanism.
- Anti-noise holders. The design is standard in appearance and has rubberized parts. With their help, noise and vibration emanating from radiators and walls are absorbed.
- Corner fasteners. These are small metal structures designed to mount small-sized batteries with a low mass index.
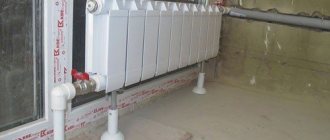
Floor brackets for heating radiators are used in individual cases. For example, if it is not possible to fix the battery on the wall due to the structural features of the room. Among these details are:
- Stands with soles. They are designed for heavy radiators and are screwed directly to the floor with long dowels.
- Additional floor mounts, which are used in case the wall mounts are not enough to hold the battery.
- Racks with and without regulator. Their design provides hooks that are fixed not only to the floor, but also to the wall.
- Details in the form of an ordinary stand with a wide sole. They are not fixed to the floor. Used for small heaters.
- Tripod holders. Convenient, stable floor bracket. This is often used if the radiator needs to be installed away from the partition.
Floor structures are also used if the room has panoramic windows or the walls are made of plasterboard. Such elements are not able to withstand radiators.
When to Use Floor Brackets
The heating system of the house is planned in such a way that the radiators are located around the perimeter of the room, blocking heat loss through window openings, balcony doors, and main walls. But it is not always possible to use walls as a load-bearing surface for fastening.
In such cases, floor fasteners are used:
The last case is the most common. Major renovations in a room are impossible without a properly functioning heating system. To plaster the walls, you have to remove the heating system. But the plaster will not dry if the water heating system does not maintain 18-20 oC for a week.
Floor brackets are used for modern cast iron batteries due to their heavy weight or due to the specific interior of the room. In this case, the fastenings are structurally combined with the supply of the heating system.
Marking the installation site
Before purchasing a mount for radiators, you need to decide on the method that will be used for fixation. After this, they begin marking, taking into account the requirements from SNiP.
- When installing a wall-mounted radiator, it is worth considering that its center should be located in the center of the window sill. The permissible error is no more than 20 mm.
- It is recommended to purchase radiators whose dimensions will correspond to 75% of the length of the window sill.
When installing a floor radiator battery, markings are made on the final or rough surface. To accommodate the battery in six sections, you will need two brackets. The greater the number of sections, the more fasteners.
After considering all the placement standards, they begin to draw auxiliary lines.
- Having chosen the middle of the window, draw a vertical line from the window sill to the floor.
- If there is a lower wiring, make a horizontal line; the upper edge of the battery will run along it.
- If there is additional lateral wiring, make another horizontal line, which will become the border of the lower part of the radiator.
Using these lines as a guide, the brackets are installed. The distance between the bottom and top must be at least 300 mm. The distance from the wall to the seat is 80 mm. As a result, a mounted battery on a holder should occupy no more than 130 mm of space from the edge of the window sill.
Any wall-mounted radiator battery can be installed on floor holders. In this case, the height from the floor to the middle of the heating equipment should be 140-190 mm.
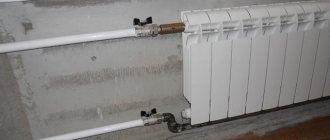
Connection to pipelines
The final step when installing heating radiators in an apartment with your own hands is connecting to the pipeline system. It can be carried out by the side or bottom, depending on how provided by the manufacturer of the heating device.
In turn, the lateral connection of the radiator to the pipes can be carried out in several options:
- One way way . It can be single-pipe (most often) or double-pipe. In addition to the pipes themselves, to connect them to the radiator you will need two ball or shut-off valves, two tees and two fittings. With a single-pipe connection method, it is mandatory to install a bypass, which allows you to disconnect the battery without stopping the system as a whole. Threaded connections must be sealed with fum tape or linen winding, on top of which plumbing paste is applied. If technical capabilities are available, the bypass can be connected to the pipes by welding.
- Diagonal connection . This option is optimal because it provides maximum heat transfer. On one side of the radiator, in its upper part, the coolant is supplied, and in the lower part, on the opposite side, there is its return outlet. It is also possible that the coolant is supplied from below and exits from above. The diagonal connection can also be one-pipe or two-pipe, and again with the one-pipe method it is necessary to install a bypass.
- Saddle connection . This method is the most convenient to implement, and outwardly the most inconspicuous in a residential area. Both the supply and return of coolant are carried out at the bottom of the radiator, but from different sides. As in previous cases, the system can be one-pipe or two-pipe. With a single-pipe saddle connection, it is preferable to install a bypass, but installation without it is possible. In the absence of a bypass, if there is a need to remove the radiator, a temporary pipe jumper is placed between the supply and return taps.
How to hang a radiator on a bracket
The mounting methods for radiators vary depending on the type of battery selected. Each option has its own step-by-step instructions.
Often, cast iron radiators are installed under the window. This makes it possible to achieve proper air circulation throughout the room.
- First of all, the points where the fastenings should be installed are determined. The bracket for the cast iron radiator should be located exactly in the place where the sections of the cast iron radiator are connected to each other.
- Fix the bracket for cast iron batteries 2-3 mm above the center of the section of the heating inlet pipe into the battery. All fasteners are installed in the same way.
- The lower holders are installed using the same technology.
- In order for the brackets to have a tight adhesion to the wall, it is necessary to first drill a hole of the required length with a diameter 1-1.5 mm less than the diameter of the thread of the fastener.
- Dowels are inserted into the prepared holes, into which threaded brackets are subsequently screwed.
- After making sure that the installed elements are reliable, hang the cast iron radiator. After it is securely seated in the grooves, you can begin soldering the heating communications.
Steel batteries are mounted on wall and floor brackets. This work is carried out in stages.
- The holes are prepared and self-tapping screws are screwed into them. The gap between the cap and the wall should be 3-5 mm.
- Next, the brackets are hung on the wall, after which the screws are screwed in until they stop.
- The radiator is hung on wall fasteners.
- The floor clamp is installed and adjusted to the battery.
After installing the battery, solder the pipes and additional radiator elements - thermostats, regulators.
In private homes, it is customary to install steel heating radiators on long metal brackets. They are intended for both lower and upper fixation. Installed on the wall using self-tapping screws.
Aluminum batteries have a special holder directly on the case. Brackets are often included. To hang a radiator on the wall, you must:
- Measure the center of the window and correlate it with the axial part of the heating device.
- Place boundaries with a simple pencil on the wall in accordance with the dimensions of the structure.
- Step back two sections from the edges of the battery, mark the distance taken and transfer it to the wall from the drawn border of the radiator.
- Drill holes in the indicated places, and then fix the brackets in them.
- After this, the batteries are hung and connected to the general heating system.
Before installing a bimetallic radiator on the wall, be sure to install brackets that will support the weight of the heating structure. It is important to follow the following rules here.
- The distance from the radiator to the wall must be at least 50 mm.
- The structure is hung with a slight slope forward; accordingly, the fastenings are installed in a similar way.
- The plugs must be located exactly at the same level as the system pipes.
Calculation of the required number of fasteners
The minimum number of radiator mounts cannot be less than two on top. A device suspended on one bracket will inevitably create tension at the connection points with the pipes of the heating system, which will lead to an emergency. The minimum required set is two fasteners on top and one on the bottom . When installed on a wall, the lower element is more necessary to maintain the vertical position of the radiator.
The total number of brackets can be determined by the standard: 1 bracket per 1 m2 of battery area. But there are recommendations from SNiP 3.05.01-85. For cast iron batteries (there were no others then) for 6-8 sections, the minimum set of fastenings is: 2 at the top and 1 at the bottom. Next, 1 bracket is added for every 5-7 sections. Floor racks are selected in the same way, first 6-8 cast iron sections are installed on 2 supports, then 1 more piece is added every 5-7 elements.
As for light batteries, the minimum set is used for the first 10 sections, then 1 mount is added every 10 radiator elements.
How to choose steel heating radiators wisely
How to install heating radiators yourself
Installing heating radiators with your own hands is not feasible for every person. At a minimum, this process requires mandatory preparation. If this situation is handled unprofessionally, the result could be devastating.
If you live in a multi-storey building, the best solution would be to call specialists due to the fact that there is a risk of flooding not only in your home. In a private house, it is possible to carry out the installation and installation of heating radiators with your own hands, but this requires considering the main stages of installing batteries.
Washing
If you want to get a modern kitchen design, washing under the window is an excellent solution that has many advantages. Most often, the window is not involved in space optimization. By placing a sink underneath it, you will free up some space for other tasks. You can also save a little on electricity by getting more natural light from the window.
Frosted glass is an excellent analogue to curtains
Having made the choice to place the work area along the window, you need to pay special attention to the curtains. As a rule, it is very difficult to maintain perfect cleanliness where people cook. Therefore, textiles should be practical and not interfere with the cooking process.
Short curtains or blinds are perfect for this.
Therefore, textiles should be practical and not interfere with the cooking process. Short curtains or blinds are perfect for this.
Modern sunny style
Colorful elements in a bright kitchen make it more interesting
The disadvantage of placing the sink under the window is the additional costs involved. The main costs are the transfer of communications. For example, the most pressing issue will be battery transfer. What can be done to successfully implement such a project?
What is needed for installation
Depending on the features of the heating design, the number and list of components required for installation will be associated with this. For example, with a single-pipe heating system, a bypass for the circuit will be needed. If problems occur, it will be possible to disable only the device in which this component is installed and will not require shutting down the entire system. This is especially important in winter, when turning off the heating will be very uncomfortable at low temperatures.
The number of components needed to install radiators with your own hands is also calculated according to the connection method and type of batteries. According to the diagram, couplings, adapters, angles and nipples are collected.
Photo of the diagram for inserting batteries into the heating system
Also, inserting a heating device will require shut-off valves. Selection of radiator type of fittings is required. There is no need to pay special attention to complex ball valves with “American” design, which require qualified knowledge. Ensuring airtightness without serious experience in this will not be easy.
To independently connect heating batteries to the pipeline, you will need fittings that will match the dimensions of the radiator and pipe threads. A sleeve will be screwed onto the bends; after twisting, it is inserted into the structure. Do not forget that after purchasing cast iron heating radiators, before installing them, you need to check the compliance of the brackets with the material of the wall on which they will be mounted.
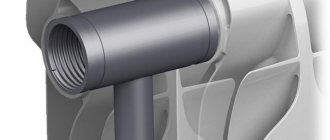
To be able to release air, the installation of a Mayevsky tap is required. Usually, it is present in the factory configuration, but if not, you need to purchase it.
Necessary elements for DIY installation
Next, before installing heating radiators in a private house or apartment, you should prepare all the parts, tools and materials necessary for installation. Find out when your heating season will end, then you can start work.
In addition to the heating battery itself, when installing heating radiators with your own hands, the installation of the following important elements is provided:
- Mayevsky crane . This is a small device mounted on the free upper outlet (collector) of the battery. Its function is to automatically remove air that may form in the system. The presence of such a device is mandatory when installing aluminum or bimetallic radiators, but if we are talking about installing heating radiators made of cast iron, then the Mayevsky tap is not installed on the radiator - instead, a device for automatically removing air is mounted at a higher point in the system.
- Automatic air vent - can perform the same function as the Mayevsky valve. Rarely used for installation on radiators. Manufactured in a nickel-plated or brass body. It is often used to remove air to the outside in other parts of the heating system, as in the case described above with the installation of cast iron batteries.
- Stub . Radiator batteries with side connections have four outlets, three of which are occupied by inlet and outlet pipelines and a device for automatic air release. A plug is placed on the fourth outlet, which is usually painted with white enamel and matches the appearance of the heating device well.
- Ball or shut-off valves . There are two of them: at the inlet and at the outlet of the radiator. The main function of such taps is that if a problem occurs in the radiator, it can be cut off from the rest of the heating system, which can continue to function. Ball valves are cheaper in price, but less functional. It is preferable to use shut-off valves when installing a heating radiator yourself, since they additionally make it possible to regulate the flow of coolant, and therefore the degree of heating in the room.
- Hooks, brackets and plastic dowels . These are fastening devices used for hanging heating radiators and attaching them to walls. Details on how to properly hang a heating radiator and what points need to be taken into account are given below.
- Linen winding or fum tape, as well as plumbing paste . These materials are needed to ensure the tightness of the connected areas.
Calculating the location
For those who want to install heating radiators on their own, do not forget that the sections of pipes that lead to the units must be placed with a (small) slope - towards the coolant flow. If the installation is laid exactly horizontally or is skewed, air will concentrate in cast iron or steel radiators. It will be necessary to blow it regularly by hand to prevent a decrease in thermal output.
The best solution would be to match the central axis of the radiator and the axis that passes through the center of the window.
Battery axis markings
Deviations may be acceptable that do not exceed two centimeters, which cannot be determined visually. But this advice is not a requirement.
Installing radiators for heating with your own hands requires compliance with several mandatory recommendations:
- The battery supply elements must be installed, calculating the location so that the slope is 0.005, it is recommended to increase it to 0.01. In this case, one meter of the pipeline must slope towards circulation - and at least by 0.5 centimeters. The angle of inclination is determined according to the length of the pipe sections that are being installed.
- There should be six to ten centimeters or more from the floor to the battery.
- From the bottom of the window sill to the top of the radiator - five to ten centimeters.
- From the plane of the wall to the radiator - three to five centimeters.
- Mandatory compliance with horizontal and vertical directions is required.
- To increase the efficiency of the battery, it is necessary to install a special shield made of special heat-reflecting material before installation. You can also simply cover the surface of the wall with a composition that has similar characteristics.
Some subtleties of hanging a radiator, advice from experts
After installing the radiator on the installed fasteners, it is necessary to check the correctness of its placement in the horizontal and vertical planes.
Checking the correct placement of the radiator in horizontal and vertical planes
It is allowed to lift the edge of the radiator on which the air vent is located. This will ensure that the air trapped in the system accumulates at the highest possible point, and its release will be carried out quickly and with maximum efficiency.
Air vent for radiator
But a change in level of more than one centimeter is unacceptable, as is a reverse tilt. In this case, the formation of an air lock is guaranteed, and the supply of coolant further along the pipeline will be limited or stopped.
Advice! Almost all companies producing heating devices require installers to install only on pre-prepared walls. That is, the surface must be smooth and clean. This will allow you to correctly mark the locations for fasteners.
The heating radiator is hung on two hooks (brackets), which are located in the upper part, and the third must be installed as a support for the lower edge of the device. The installation worker must remember that the number of brackets is determined by the weight and length of the battery.
Marking radiators with brackets
Due to the fact that radiators have a sectional design, this makes it possible to accurately determine the number of sections that will be required to heat a room under specific conditions. Information on the correct calculation and marking of this quantity is required before purchasing batteries.
Photo of radiator layout diagram
If you follow the rules for step-by-step installation of radiators, then one square meter of the heating surface area of the battery will be equipped with one bracket.
The heating radiator must be marked taking into account the following features:
- To begin with, radiators with brackets and installation points are marked, taking into account the above rules.
- Before drilling holes, one more check of all distances is required.
- Dowels are inserted into the drilled holes, and then the fasteners are screwed into them.
- Provided that the markings are correctly made, the battery should lie tightly on all supports that are mounted and rest securely on all of them.
- Subsequent work will involve connecting a homemade heating battery to the communication system.
Wiring methods
First of all, it is necessary to distinguish two general schemes of heating systems: one-pipe and two-pipe.
In a single-pipe system, radiators are connected in series, and one pipe is used for hot and cooled coolant. This scheme is more demanding in selecting the diameter of the pipes, and the number of heating devices should not exceed 4 - 5 with a total pipeline length of up to 30 m. Since the water cools when passing through the radiators and giving off heat to them, the radiators located lower down the riser should have a larger power (i.e. surface area) to compensate for the lower coolant temperature.
Wiring diagrams for one-pipe and two-pipe systems
It may seem that a single-pipe design is cheaper due to fewer materials used, but this is not the case. In it:
- Overall efficiency decreases due to the gradual cooling of the coolant;
- A larger pipe diameter is required, which also increases initial costs;
- Larger radiators are required.
Connection methods
Having looked at general heating schemes, which you are unlikely to be able to influence in an already built house, let’s move on to how to connect each radiator. After all, when installing radiators, you will need to decide for yourself which method to choose.
To understand why the connection method is important, let's look at the figure:
1 – diagonal, 2 – bottom, 3 – diagonal with bottom feed, 4 – side, 5 – side with bottom feed, 6 – bottom one-sided
An incorrectly selected connection option can lead to heat loss of up to 22%. Of course, this does not mean that he is “bad”. Losses can be compensated for by greater radiator power. But they must be taken into account before purchasing radiators, so you need to decide on the connection method at the design stage.
What general conclusions can be drawn from the figure? The most important thing is that it is recommended to place the supply at the top, then, according to the laws of natural convection, the cooled coolant itself lowers and flows out from the bottom of the battery. If possible, use the recommended connection method - diagonal.
Methods 2 and 6 with bottom connections are often used in modern houses with horizontal riser wiring in the floor for design reasons. Today, there are even models of radiators with a bottom one-sided connection, in which the coolant circulates as if it were diagonal. Thus, with an aesthetic and discreet connection, these radiators do not lose in efficiency.
Tools and materials
The following tools and materials will be required for installing heating radiators: torque wrenches with dimensions that will make it possible to follow the torque with a high level of accuracy. Due to the fact that the coolant will pass through the system under pressure, if the level of tightness is insufficient, a jet may appear from the connection point.
If over-tightened, the thread may break.
For this reason, complete study and adherence to the instructions for each unit is required. It is in them that the values of dynamometer torques will be indicated. You will also need: a sealing agent, sealing tape and tow with oil paint.
Characteristic
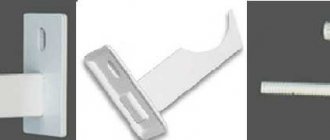
Brackets for heating radiators are fastening elements of any design, shape, and size , made of steel, cast iron or other metals or alloys.
Products are divided into:
- hanging fasteners designed to secure the radiator to the wall;
- floor stands.
There are both adjustable and non-adjustable holders of both varieties.
Important! The key to proper installation of any heating battery is the selection of fasteners that match the characteristics of the model being installed. It is optimal to use those that come with the radiator.
Radiator installation process
Before you begin installing heating radiators yourself, you must completely shut off the circuit and drain the water from the system. Complete removal of residual water is carried out using a pump. Next, a thorough check of the level of the radiator, which is hung on supports horizontally and vertically, is carried out. All plugs are removed from the unit.
Radiator installation process
Next, a bypass with a valve is connected (this is only required for a single-pipe circuit). For a two-pipe system, only a squeegee with a connected valve is used. Using threaded fittings, the battery is connected to the heating system, and tow or another type of sealant is used to seal the joints.
A bypass is needed to turn off the heating device without turning off the rest of the system. The valve regulates the circulation of the coolant. The bypass is installed on the radiator between the conductive pipe and the return pipe with taps.
It can be clarified that there is no need to remove the packaging film from devices made of aluminum, steel or bimetal until installation is complete.
Upon completion of the radiator installation process, pressure testing will be required. This can be done by a professional because he has not only experience, but also a special apparatus.
Methods for installing mirrors on drywall: easier than batteries
When it comes to hanging mirrors on plasterboard walls, there are three installation methods.
These methods vary depending on the size and weight of the mirror:
For small and lightweight mirrors, you can use double-sided tape. This is the simplest method that requires minimal time and money. This way you can attach a product weighing up to 5 kg. We apply tape around the perimeter of the product and attach it to the wall, pressing it well. The main thing is that it hangs evenly. But usually there is no need to hang mirrors of such a small size on the walls for their functional purpose. This method is often used to create some kind of decorative solution;
- for liquid nails. Using this mount, you can hang a medium-sized product on the wall. In this case, the weight of the product should be up to 20 kg;
- on dowels or anchors or special brackets. With the help of such fasteners you can even fix an old and rather weighty mirror on a plasterboard wall. The method is used when the weight of the object is more than 20 kg.
The second and third methods are most often used, since mirrors of such sizes fully correspond to their purpose.
How to hang small objects on drywall
In a situation where your product weighs up to 20 kg, you can use liquid nails. To attach a product to a plasterboard wall in this way, we carry out the following manipulations:
choose the location of the future placement of the product on the wall; remove dirt and dust from the selected area of the working surface; apply liquid nails to the back surface of the mirror; the solution should be applied in such a way as to ensure maximum adhesion surface; special attention should be paid to the edges. Liquid nails should be applied here not to the edge itself, but at a slight distance
This must be done so that when pressing the product against the plasterboard surface it does not go beyond its boundaries. In such a situation, you can leave unsightly stains near the mirror, thereby ruining the exterior finish; We press the product against the wall, adjusting its position on the surface. You can use a level for this; if during the process of pressing a small amount of solution comes out of the mirror, carefully wipe it off with a clean napkin; hold the object in this position until the solution dries completely. In order not to stand and hold the product until it dries completely, you can prop it up or use any other structure to support it.
How to hang heavy objects on drywall walls
Mirrors that are large in weight and size are attached using special fasteners - a butterfly dowel.
The peculiarity of this fastening element is that when it is screwed into the wall cavity, the dowel opens like a butterfly (hence the name of the fastening element). As a result, the dowel is firmly fixed in the hole and will not be pulled out, unlike ordinary nails. Such fasteners will not rotate in the hole made, which will ensure greater rigidity of adhesion of the product to the wall surface.
Scheme for installing heavy mirrors on drywall
We install the product according to the following scheme:
- We find a metal profile under the material. The easiest way to find it is to use a magnet;
- make a mark in the right place;
- if the mirror has large dimensions and at the same time average weight, then it is necessary to determine several places for screwing in butterfly dowels. This way you can evenly distribute the load over the surface of the wall. The best solution would be to install fasteners in adjacent profiles;
- After this, you can screw hooks into the dowels or install brackets.
In a situation where the product has quite impressive dimensions, anchor bolts should be used instead of butterfly dowels.
Anchor bolts for mounting on drywall
This fastening is more durable than a butterfly dowel. In terms of its structure, an anchor bolt is practically no different from a butterfly dowel. When screwed into the hole, it helps ensure that the mount is firmly fixed in it. Installing such fasteners in a metal profile under sheets of drywall will create such a strong fastening that can withstand the weight of even a full-length mirror. And when installing anchor bolts in two adjacent profiles, it will not allow your mirror to fall.
In addition, in a situation where heavy products are installed, in order to avoid tearing out a piece of the wall, you can install a second sheet of material. Instead of drywall, you can use a plywood sheet as a second sheet.
Mounting for heating radiators: selection, installation and types of holders
Radiator heaters are usually placed under windows. Only sometimes the project provides for a different location. To fix the heaters, wall or floor mounts for heating radiator batteries are used. At the moment there are many types of them.
Fasteners for heating radiators are very diverse.
Connection diagrams for heating devices
Work on installing radiators must begin with determining their connection diagram. In practice, 3 methods are used, they are defined by building regulations:
- Side. They are used very often, since it is the one that provides maximum thermal output.
- Diagonal. Most effective when connecting long heating appliances.
- Bottom connection. Used for heat supply systems from pipes, which are placed directly under the floor covering.
Connection diagrams for heating devices
Selection and installation of fasteners
When choosing fixing elements, you should focus on the following points:
- material from which radiators are made;
- battery sizes;
- wall material;
- window dimensions , their number and location features;
- room design project.
Important! The instructions note that the heavier the heater, the thicker the holder should be. The materials of the radiator and fasteners must match each other.
Having assessed the above aspects, you will be able to choose the right type of holders and determine the required number.
Calculation of fasteners
Distances that must be maintained when installing batteries.
When installing under windows, the following distances are maintained:
- from the floors should be at least 8-12 cm;
- about 3-5 cm to the walls;
- to the window sills at least 6-10 cm.
About how many fasteners are needed for a heating radiator.
Their number depends on the length of the heating device.
- When there are few sections - up to 10 pieces, 2 holders are placed at the top, and another one is mounted at the bottom.
- If the battery consists of 10-14 elements, 3 fasteners are installed at the top and 2 at the bottom.
- For each subsequent 4-7 sections of cast iron batteries and 10 analogues of aluminum and tubular batteries, add one support at the top and bottom with your own hands.
Every detail has its place
Marking for mounting holders
A very important question is how to mark the mounts for radiators.
- The best option is when the heater is located exactly in the middle of the window. Based on this, find the center of the opening on the wall and draw a vertical line.
- Then there are 2 options. If the wiring is bottom, draw a horizontal line marking the top edge of the battery. When installing radiators with side connections, the placement of heating pipes is important. In this case, set aside a horizontal line coming from the supply (upper) pipe.
- Measure the spaces between the holders on the battery. Set them aside relative to the drawn lines.
Size calculation
Making your own pipe heating device is not very difficult. But there is one important point here - to correctly calculate the dimensions of the device. After all, such an indicator as heat transfer will depend on them.
Required indicators
The calculation is not easy, because it requires some criteria for the premises itself. For example: glazing area, number of entrance doors, what windows are installed, whether the floor, walls and ceiling are thermally insulated.
It’s difficult to take all this into account, so there is a simpler option that takes into account only two indicators:
- area of the room.
- ceiling height.
How can this help when assembling a homemade heating device? To do this, you will have to compare it with a conventional cast iron radiator of the MS-140-500 brand. The heat output of one section is 160 W, volume is 1.45 liters. What does this give us?
You can determine exactly how many sections will be needed if you use a cast iron device. The total volume of coolant that will fit in one battery is determined from the number of sections. And knowing this number, you can approximately determine the volume of the pipe radiator.
The thing is that the thermal conductivity of steel is 54 W/m*K, and that of cast iron is 46 W/m*K. That is, a small downward error will not have any effect on the quality of heat transfer.
Calculation example
Conventionally, we will assume that an eight-section cast-iron heating device corresponds to the above-described ratio. Its volume is 8x1.45=11.6 liters.
Now we can calculate the length of a pipe with a diameter of 100 mm, which we will use to assemble a homemade battery. The standard cross-sectional area of the pipes is 708.5 mm². We divide the volume by the cross-section, we get the length (we convert liters to mm³): 116000:708.5= 1640 mm. Or 1.64 m.
A slight deviation in both directions will not greatly affect the heat transfer. Therefore, you can choose either 1.6 or 1.7 m.
Types of holders
Hooks on a steel bar.
The procedure and rules for installing batteries are independent of their type, only the type of holders changes.
Supports for radiators made of cast iron
Fastenings for cast iron heating radiators are the thickest and heaviest, because... must bear a lot of weight for years. These curved pins or flat hooks are produced separately or are attached to a steel strip in 2-3 pieces.
The products are not painted or a white (standard) coating is applied to them. You can choose a different color upon request.
This type of mounting is most common for cast iron radiators.
The photo shows a steel pin holder.
- Pin holders made of cast iron.
- Adjustable steel supports. They make it possible to change the gap between the wall and the radiator, while simultaneously aligning the battery horizontally and vertically.
- Steel pin brackets.
- Holders grouped on a metal strip.
Note! Before purchasing, consider the dimensions of the supports. They are produced for fastening sections of different depths. In any case, the holder must provide a gap to the walls of at least 30-50 mm.
In addition to pin brackets for batteries, hooks are produced from cast iron. They are equipped with dowels. The product is mounted as follows: a hole is drilled into which a plastic dowel is driven. A holder with a thread on one side is screwed into it.
Brief instructions for installing brackets.
In addition to wall fixation, there is also floor installation of cast iron using legs. Their price depends on whether their height can be adjusted or not.
The upper arcs that secure the sections to the support also differ. They are made of steel wire or have the form of a chain of interconnected movable links. In any case, the radiators are fixed to the stop with bolts and arcs.
Fasteners for bimetallic and aluminum batteries
Universal holder for bimetal and aluminum.
The mount for aluminum radiators and bimetal is similar to those for cast iron, but is made of thin metal.
- The most popular corner universal holders are for both types of devices. They are equipped at the top and bottom with recesses for the collector. Thanks to this, they can be mounted on both the left and right.
- Legs for bimetal and aluminum are not produced. But they produce racks that allow for floor installation of batteries. First, such a support is attached to the floor, then the radiator is placed and attached to it.
The use of floor stands is optimal when the walls cannot support the additional weight. For example, it is difficult to attach radiators to sandwich panels, glass, and plasterboard.
Steel instrument supports
Standard fasteners for panel radiators.
There are two types of such devices: panel and tubular analogues.
They require different types of fasteners.
- Special brackets are welded to the rear walls of panel batteries. With their help, devices are hung on brackets. This mount for steel heating radiators has a special shape designed for brackets.
Note! When installing panel devices, you should carefully monitor the vertical placement of the brackets, because 4-6 staples should fit exactly on the hooks. It is necessary that the wall is absolutely smooth and even.
- Since the weight of the radiator is small, it will be enough to fix it on the brackets from above. You can put supports from below, they will give it a horizontal direction. They cling to the brackets with hooks and only rest against the wall.
- For greater reliability, the part of the mount for steel radiators facing the wall is expanded.
Features of installation of cast iron radiators
Despite the latest devices that provide space heating, such as ultra-light and aesthetic bimetallic and aluminum products, cast iron radiators are still in demand among property owners. And although cast iron products do not have an elegant design, the batteries remain hot for a long time, gradually transferring heat to the surrounding space. There are specific design features of cast iron appliances that must be taken into account when installing them:
- Before installation, the battery must be unscrewed, then the nipples must be adjusted and the device reassembled. For disassembly, you will need a workbench and a pair of radiator keys that fit the configuration of the nipple holes. To unscrew the lower nipple, it is necessary to insert a crowbar into the eye of the key and thereby increase the applied force. To avoid distortion, both nipples (upper and lower) should be unscrewed at the same time, so it is advisable to do the work together. The following point is important: on opposite sides of the cast iron product, the threads have the opposite direction. Then the section is removed;
- in the same way, you need to screw together all the sections and then connect them in the reverse order into a single radiator, based on the heating needs of a particular room. The assembled battery, consisting of a certain number of sections, needs to be tested. If a leak is detected in the device, the nipple located in the problem area should be adjusted;
- wall-mounted models of cast iron radiators can only be mounted on brick or foam concrete walls. Wooden enclosing structures will not support their weight, so the owner of such a house needs to purchase batteries with floor supports, but there must also be fastenings on the walls that support the devices (pro
What are heating radiators?
The main indicator of the quality of radiators is their heat transfer rate. It depends entirely on the material from which the heating device is made. The most popular are:
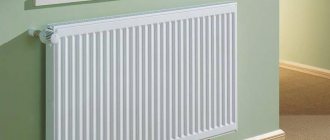
- Cast iron batteries. Advantages: huge service life due to the very thick walls of the product, high resistance to corrosion, heat transfer for some time even after the heating is turned off. Disadvantages: heavy weight and associated installation difficulties, unaesthetic appearance;
- Aluminum batteries. Advantages: the highest heat transfer coefficient, low weight, very quick installation, high permissible pressure - up to 20 bar, the ability to combine an unlimited number of sections, elegant appearance. Disadvantages: low anti-corrosion performance and rapid deterioration of aluminum in places of contact with other metals;
- Steel batteries. Advantages: relatively light weight, heat transfer begins after switching on in a very short time. Disadvantages: weak resistance to pneumatic and hydraulic shocks, low heating temperature, rapid cooling, maximum pressure - 10 bar, low service life;
- Bimetallic radiators. The most versatile variety, combining the advantages of all the above-mentioned types of batteries. The inner layer is made of steel, which protects the radiator from corrosion and increases operating pressure. The outer part - the casing - is made of aluminum, characterized by the highest heat transfer. Bimetallic radiators can easily withstand strong pressure changes and are very easy to install. A classic example of such a product is the global style plus 500 heating radiators, reviews of which are purely positive.
Classification of heating batteries
To understand what heating devices are, you need to study their classification. Types of radiators are distinguished depending on the material of manufacture:
- cast iron;
- steel;
- aluminum;
- bimetallic.
Each type has its own advantages over other models. Therefore, it is difficult to say that any of them is definitely better.
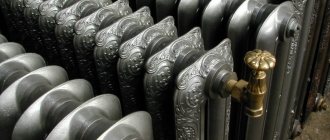
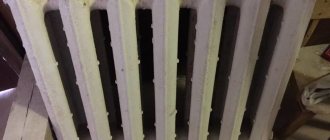
Cast iron models
Batteries made of cast iron are massive, have the ability to retain heat for a longer time, and are not susceptible to corrosion. A definite plus is resistance to large pressure surges. Cast iron radiators are the most suitable option for apartment buildings. The service life is at least 50 years, sometimes longer. Instead of regular models, you can install ones decorated with patterns.
Steel radiators
A steel battery is a steel casing, inside of which there are plates and pipes made of the same metal. Structures are divided into panel and tubular. A well-thought-out structure allows air to actively circulate, so the room quickly warms up. But the device cools down quickly after the heating supply is stopped, which can be considered a significant drawback. Due to its low weight, mounting the radiator to the wall is not particularly difficult. Compared to cast iron representatives, steel appliances consume one third less coolant, which makes them very economical.
Aluminum radiators
The complex design of the convector allows for efficient circulation of air masses. The thermostat quickly responds to commands, which allows you to change the room temperature in a short time. Depending on the production method, structures are divided into injection molding and extrusion. The first ones are of better quality, but expensive. The latter are cheaper, but cannot be repaired. They are relatively lightweight, which greatly simplifies the installation process. These batteries look attractive, but are not very easy to clean.
Bimetallic radiators
An improved version of aluminum batteries is bimetallic. The system is reinforced with steel elements, which make them resistant to higher pressures. Convectors quickly warm up and begin to give off heat. They weigh a little, making them easy to install. The surface is easy to clean from various contaminants, unlike cast iron models. These devices are more resistant to corrosion. But bimetallic heat exchangers are more demanding on the quality of incoming water.
Radiator installation
Those who are wondering how to hang a heating radiator without the help of professional plumbers need to know what steps this process involves. So, you need:
- prepare equipment and materials;
- calculate location;
- install brackets;
- hang the radiator;
- seal or solder the joints;
- check the entire system for functionality.
We purchase the necessary materials and equipment
To begin with, it should be noted that it is not recommended to install radiators in winter. And even if you decide to install heating yourself, in any case you need to call a plumber who will disconnect your apartment from the riser. To fix the radiator on the wall, you will need such components for heating radiators as: corners, bushings, nipples, brackets, brackets, couplings, adapters, tow, valves, keys. If you plan to install cast iron batteries, you also need to purchase Mayevsky taps, designed to bleed air from the heating system and prevent airing. Aluminum and bimetallic radiators are equipped with them initially.
Calculating the location
This stage is important to ensure that the heating device works at full capacity and does not collect air. To do this, sections of underwater pipes should be installed at a slight slope relative to the floor. The minimum slope is 0.5 cm. Here are the optimal battery location parameters:
- 3-5 centimeters from the wall;
- 10 centimeters from the floor;
- 5-10 centimeters from the windowsill.
If the selected type of battery does not have high heat dissipation, you can also install a heat-reflecting tap on the wall behind the battery. It is usually made of insulating material or a special heat-reflecting substance that is applied to the wall.
Installing brackets
Brackets are mounts for heating radiators in the form of durable metal hooks installed inside the wall.
It is easy to calculate the number of brackets: 1 piece per 1 m2 of battery. Of course, even if the entire battery area does not exceed 1 square meter, you will still need two brackets, since fixing the structure on one will be very unreliable. Now you need to mark their location: we use a tape measure and a level for this.
Then we drill holes in the wall, install special dowels in them, tighten the fasteners for the heating radiators and use our hands to make sure that the brackets sit tightly and do not wobble. If the choice fell on cast iron radiators, you may need a special mount for cast iron heating radiators - floor support elements in the form of legs. They will help distribute the weight evenly across all fastenings.
Installing the radiator
The last stage of radiator installation. We hang the battery and check how tightly it fits, whether the weight of the structure is distributed equally across all fastenings. Try to shake the radiator a little: if the fixation is strong enough, you can move on to the next step.
Connection and assembly of connections
There are three different radiator connection schemes:
- lateral one-sided. The most popular option. The inlet pipe is connected to the upper pipe, and the outlet pipe is connected to the lower pipe on the same side;
- diagonal connection. More suitable for long radiators in large rooms and ensures uniform heating of the entire battery. The inlet pipe in this scheme is connected to the upper pipe on one side, and the outlet pipe to the lower pipe on the other;
- bottom connection. It is used in cases where the heating system is hidden in the floor. Both inlet and outlet pipes are connected to the lower pipes from different sides. Heat transfer with a bottom connection is approximately 10% less than with a side connection.
Let's start assembling the connections. Regardless of which heating radiator fittings you purchase, you must carefully seal each connection.
Special tapes, silicone, sealant or good old tow are used as seals. If the purchased battery is protected with a special film, it is better to remove it only after thoroughly crimping each connection.
Now all that remains is to return the water supply to the heating system and carefully check all connections for leaks.
How to hang a battery
Installing batteries is considered one of the stages of creating a heating system in a house. Here you need to take into account a lot: the dimensions, the number of heating devices, as well as the design of the mounting of the heating batteries, and so on. To avoid forgetting anything, follow these simple recommendations.
- — heating devices with plugs;
- — spider fasteners;
- — adapters;
- — gaskets;
- - Mayevsky valve or air vent, and also an installation kit;
- — taps with a round hole;
- - metal-plastic or plastic pipes (if necessary).
Before purchasing heating radiators, first of all, calculate how many elbows you will need for any of the rooms. Calculate based on one knee for every two square meters. m. area. It turns out that if the room area is 12 m2, six bends will be required to supply it with heat. When you think about the metal for your batteries, remember that in most cases aluminum batteries are installed in personal homes, and in residential areas - bimetallic ones. Cast iron batteries are gradually being phased out. The battery should be hung with a gap of at least 2.5 cm from the wall surface, otherwise its heat transfer will be low. It is also not recommended to place batteries close enough to the floor surface. Step back 8-10 centimeters from the floor so as not to disturb the heat exchange. And it will be easier to clean under the heating device. If you place the battery under a windowsill, you don’t need to place it too close to it. First of all, mark the places for attaching the spider fasteners: one at the bottom and two at the top. Spider fasteners will be attached to the wall using dowels or by recessing them into the wall and then sealing them with cement mortar. Check the verticality of the fastening using a level. Unevenly hung heating appliances look bad, and heating technology is also disrupted. After installing the spider fasteners, hang the battery on them so that the bottom edges of the water collectors rest on the hook of the support. Next you need to combine the battery with the pipes that lead to the heating system. They are equipped with a thermostatic valve and valve. First of all, insert the Mayevsky tap into the top plug of the heating device from the side opposite to the connection. If you still want to paint newly installed heating devices, remember that they cannot be coated with silver paint or any other iron paint. And you need to be careful not to accidentally paint over the hole in the Mayevsky tap.
how to hang a cast iron battery in 2018
Master Class. We connect the radiator from the floor using T-shaped tubes
Also, T-shaped connecting tubes can be used to connect the battery from the floor. They are necessary if the line goes under the heating device. Let's look at this process step by step.
T-tube
Step 1. A threaded clamp connection is put on the tube.
Threaded clamp connection is put on
Step 2. After this, the tube is flared.
T-Tube Flaring
Step 3. Next, you can proceed directly to installing the tubes.
Installation of tubesTubes are installed in different directions
Step 4. The connection is made using a sliding sleeve. The radiator is connected using T-tubes, and the line goes further to the next heating device.
The heating device is connected using T-tubes
Step 5. The exit of the pipes from the floor can be decorated using overlays in accordance with the finishing floor covering. Overlays can be made for different coatings.
Decorative overlayAn example of using decorative overlays
If there are no high aesthetic requirements for the interior of the room, then you can use a budget connection option using a connecting set. This set is used for cross-linked polyethylene pipes without an aluminum layer.
Connection set
Inside this set there are guides and rings for fixing the pipe. This set is necessary to prevent threaded connections from loosening and to compensate for thermal expansion.
GuidesRing for fixing the pipe
First, the ring is put on the pipe. Then the clamp is removed from the guide, the pipe is inserted into it and secured with a ring. The latch is inserted.
The ring is put on the pipe The pipe is fixed using the ring A clamp is inserted
The pipe is cut to the required length, after which a connection is put on it and installation is carried out to the heating device.
Trimming the pipePutting on a threaded clamping connectionInstallation to a heating radiator
Decorative overlays are installed, pre-cut to size.
Mark the place of cutInstallation of decorative overlays
Using this element, the two parts are connected to each other.
This element is necessary to connect two parts. Connecting two parts.
The connection kit is attached to the ceiling. That's it, the installation can be considered complete.
The kit is attached to the ceiling. Installation work is completed.
Recommendations
When planning the purchase of brackets for radiators, it is recommended to focus on the following product characteristics:
- The composition of the alloy from which the product is made is of great importance. It must have high strength and be non-toxic, since the parts will be used indoors and heated by heating devices.
- In order for the purchased products to last as long as possible, it is worth buying brackets, the surface of which has been specially treated with agents that protect against corrosion processes and rust formation. However, painting the product will not be enough, since the product must be galvanized.
- A very important criterion for choosing brackets are the parameters of the element - length, thickness and maximum load indicators.
- The positive features of the product include the presence of a noise-reducing coating.
- The part should make it possible to adjust the distance between the device and the wall or floor.
To learn how to hang a radiator yourself using brackets, see below.
Date: September 25, 2022