SHARE ON SOCIAL NETWORKS
FacebookTwitterOkGoogle+PinterestVk
Previously, installing infrared flooring was considered a luxury, however, today this method of heating rooms has gained wide popularity. Infrared film heated floors are a modern and practical option for organizing primary or additional heating in a room. In this article we will look at the benefits of installing infrared film, its types and compatibility with floor coverings.
Thanks to infrared film heaters, an economical and efficient underfloor heating system can be built in a matter of hours
Infrared heated floor: pros and cons
Heating using IR film has many advantages over other types of similar heating. Let's consider the main advantages of this heating design:
- such a system cannot fail at the same time, since it is connected in parallel;
- possibility of installation on any type of surface - both horizontal and vertical, as well as on elements that are located at an angle;
The film does not contain components hazardous to human health, does not produce unpleasant odors or toxic fumes
- The design features of the infrared floor make it possible to achieve uniform heating of the room. This is especially important if laminate is used as a floor covering;
- another advantage of such a system is ease of installation;
- possibility of disassembly if necessary;
- this film is suitable for installation in rooms where the humidity level exceeds the permissible parameters;
- compatibility with different flooring options;
- installation of such a system is allowed not only in enclosed spaces, but also in open conditions (for example, on a veranda);
- high heat transfer coefficient, which reaches 97%;
- The efficiency of film infrared flooring is approximately 30% higher than that of other underfloor heating systems. The prices of film heated floors fully correspond to their effectiveness.
Note! When choosing IR film for organizing floor heating, you need to take into account one very important parameter - the height of the ceilings. The lower the ceiling height, the more efficient the heating of the room.
However, this design also has some disadvantages, among which are the following:
- the need to follow clear rules when connecting;
Unlike other heating systems, infrared floors act directly on the surfaces of heated objects and do not dry out the air in the room at all
- high inertia, due to which heating and cooling occur very quickly;
- poor resistance to mechanical stress in comparison with a tubular structure that uses water as a coolant.
The film system is generally not suitable for installation as the main heating system. It is recommended to use an infrared design for additional heating.
Advantages and disadvantages of “film” heating
In search of an alternative way to heat rooms, scientists paid attention to the heat exchange in the environment that occurs due to the action of infrared rays. The interpretation of the natural process formed the basis for the creation of IR film.
The film coating releases thermal energy in the infrared range. Long waves of radiation heat surrounding objects, which in turn accumulate and transfer heat to the air.
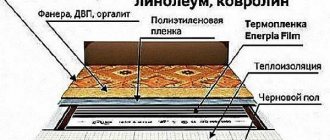
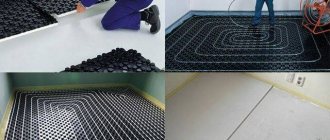
Film infrared heating systems transfer energy to the floor covering, which redirects it into the room. Installation of infrared heating film is much simpler, more convenient, and faster than installation of all currently known types of heated floors. Film floors do not require screeding, which greatly facilitates the installation process. After laying the waterproofing, you can immediately lay laminate on top of them. Infrared film floors are absolutely safe. They are used in the arrangement of not only residential premises, but also kindergartens and hospitals. When using IR systems for heating, convective air currents are not created, dust does not rise or spread. The specific operation of IR systems allows them to be used as an effective means for heating loggias, entrance lobbies, terraces, and open recreation areas. Film floors are suitable for use in wooden buildings. They can also be installed in attics, because do not load the ceiling. To control the infrared heating system, a thermostat is installed; to automate the process, sensors are placed on the floor that record the temperature and transmit a signal to the control device.
The use of infrared film for installing heated floors has become widespread due to a number of advantages:
- Versatility. Almost any floor covering can be laid on top of the heating layer. Using film you can insulate walls and ceilings.
- Easy to install. To create a heated floor system, you do not need to dismantle the old base, and you can perform the procedure yourself. No specialized equipment is required.
- Heating temperature adjustment. A thermostat with a wide range of modes is connected to the heating system. Additional control settings are possible: timer function, dividing the room into different heating intensity zones, etc.
- Mobility of a warm floor. When moving to another place of residence, the structure can be easily removed and spread on another surface.
- Compactness of the system. The thickness of the IR coating (up to 0.5 mm) has virtually no effect on the height of the floor, which is especially important for rooms with low ceilings.
- Low inertia. The film “turns on” quickly and the effect becomes noticeable within a few minutes.
- Uniform heating. The entire room is heated; there are no “hot” or “cold” zones.
- Maintaining a healthy microclimate. IR rays do not dry out the air and do not burn oxygen. indicate the therapeutic effects of infrared radiation. The air is ionized and cleansed of bacteria.
Thanks to modularity, the breakdown of one section of the film does not lead to a malfunction of the entire system.
The heating film can withstand significant dynamic loads. It can be installed in public institutions with high traffic. The service life of the IR heating system is 15-20 years
Innovative technology also has negative qualities:
- The electrostaticity of heated surfaces increases, and objects begin to attract more dust.
- After turning off the heating system, the room quickly cools down.
- When installing, it is important to consider the placement of furniture. Where bulky furniture and large appliances will be located, IR film is not installed. Failure to comply may result in system overheating.
- The operation of a heated floor leads to an increase in energy consumption.
- The coating is resistant to moisture and contact with sharp objects.
Installation of “film” heating must be done carefully and in compliance with safety standards.
Types of infrared films
From a design point of view, all IR films are similar and have a common operating principle. However, for various types of premises and operating conditions, it is customary to use certain options for film heated floors. The differences between ICs are primarily due to the fact that they are produced by different companies.
Let's consider the types of IR film based on maximum heating temperature and their compatibility with various floor coverings:
- high-temperature infrared heated floors under tiles. The maximum heating temperature of such systems reaches 50°C. They are incompatible with floor coverings that are more susceptible to heat (linoleum, laminate);
In their structure and principle of operation, all infrared films are similar to each other, the main difference is the maximum heating temperature
- low-temperature infrared heated floors for linoleum and laminate. Such systems can heat up to 27°C;
- universal IR systems that are compatible with all types of floor coverings.
The second parameter by which IR films are classified is the type of heating element. Today, there are two main types of infrared floors, depending on the heating element:
- carbon;
- bimetallic.
The power density of the infrared floor is the last indicator, which is very important when choosing heating. Let's consider three main types of IR films, depending on this parameter:
- with low power (130–160 W/m²) - used in cases where it is necessary to organize heating of a room with a small area. Compatible with “light” floor coverings;
Infrared films from different manufacturers may differ in appearance and technical parameters
- with average power (from 170 to 220 W/m²) - installed in more spacious rooms. Perfect for the following flooring options: porcelain stoneware, tiles;
- with high power (above 220 W/m²) – installed in industrial buildings. They are also used for floor heating in saunas and various workshops.
If necessary, you can always contact specialists who will help you choose the necessary system for a particular case. It is also recommended that before purchasing, read the relevant reviews on specialized forums. Film heated floors are an innovative solution for any room, allowing you to achieve maximum comfort.
Features of carbon and bimetallic IR films
Carbon films used for underfloor heating are more expensive. The heating elements in such a system are made of a special carbon material, which has a fibrous structure. In some cases, they are equipped with a protective layer of graphite. Spraying of this material helps to increase the strength characteristics of the system and also affects the length of its service life.
The basis of the material is represented by lavsan film. Carbon infrared film flooring can be mounted on horizontal and vertical surfaces.
Scheme of bimetallic infrared film for heating
Helpful information! When installing carbon film for a heated floor, the choice of connection diagram is very important. In such a situation, experts recommend using a parallel connection option.
Bimetallic IR film differs from carbon film in that it has heating elements consisting of two metal layers (aluminum and copper). The material is based on double polyurethane film, which has good elasticity.
The installation of a bimetallic system is complicated by the fact that a ground electrode cannot be connected to the system. Also, the bimetallic structure is incompatible with ceramic flooring. It belongs to the low-temperature variety, so its recommended heating level does not exceed 27°C.
Selection of system components
In addition to carbon heating strips sealed in Mylar film, the film floor system requires a thermostat equipped with a temperature sensor.
Calculation of the required quantity
Installation of film flooring with infrared heating is carried out only in the usable area of the room.
The percentage of area covered depends on whether the IR system acts as the main or additional heat source:
- 80% of the area - as the main heating;
- 40-50% of the area - as a supplement to radiator heating.
A pre-drawn diagram of the system zones layout on a sheet will help determine the total length of all strips. By calculating the length of each fragment and adding up their number, it is not difficult to calculate the required total length of the coating.
When calculating the area to be covered, it should be taken into account that according to the standards, each wall will need to be indented by 10 - 20 centimeters
To prevent premature failure of the floor system, it is necessary to distance yourself from the central heating pipes and risers when laying them out. The laid strips should not intersect or overlap each other.
When placing fragments on the plan and calculating their length, also keep in mind that the length of each strip should be a multiple of 17-18 centimeters, since it is in these places that the cutting lines are located.
Thermostat for temperature control
The operation of the IR system is controlled by the thermostat. The temperature sensor included with it is placed between the heating elements and connected to the device through contacts. The sensor reads the temperature from the surface of the film and transmits the data to the thermostat, which, in turn, operates and puts the system into operation.
The main purpose of the device is to monitor the floor temperature using sensor readings and adjust the heating power in accordance with the specified parameters.
There are a huge variety of options for modifications of regulators that differ in functionality on the market today.
All of them are divided into two types:
- Mechanical - equipped with keys and mechanical wheels and are suitable for arranging small systems.
- Electronic – equipped with push-button control and a display, suitable for small, unzoned rooms.
Programmable models are equipped with touch screens, with which you can set 4 time modes at once, thereby saving up to 50% of energy consumption.
Temperature sensors, depending on the type of device and type of floor covering, come in two versions. For soft surfaces they are available in the form of compact plastic containers. For hard ones - in the form of larger elements equipped with gel protection against the impact of adhesive compositions on the strips and to prevent mechanical damage.
Some models of thermostats are capable of reading information about the heating of the floor surface, others are able to additionally analyze the degree of heating of the air in the room
When choosing a device, you should focus on the power of the thermostat. It is calculated based on the fact that one square meter of film consumes on average 50-70 W. To determine the required value, the indicator is multiplied by the size of the working area covered with heating elements.
Budget models operating from the network often suffer from the fact that in the event of a power outage they cannot resume operation on their own. Therefore, it is better to give preference to models that have a battery. Read more about choosing and installing a thermostat for a heated floor.
If the film system is supposed to be combined with a porcelain stoneware or tile coating, you will need to build a cement-sand screed
Technical characteristics and operational scope of film flooring
Before purchasing IR film, it is imperative to study all its main technical characteristics. This knowledge will help you select the required type of system and calculate it for a specific room. Let's consider the characteristics of such heating structures:
- IR film is produced and sold in rolls, the length of which reaches up to 100 m. The width of the roll can be different (from 50 to 100 cm), and its weight is approximately 55 kg;
Rolls of IR film come in different widths - from 50 cm to 1 m, their thickness can be from several microns to several millimeters
- the finished structure is powered from the electrical network, the voltage of which is standard 220V;
- per day, the IR floor consumes approximately 20 to 70 W/m²;
- the speed of heating the film to the maximum temperature is quite high (about 2 minutes);
- surface temperature can reach 50°C.
If you decide to use such a film as the main heat source, then you need to remember that it must cover at least 70% of the floor area. In regions with cold climates, film electric heated floors can only be used as additional heating.
No. 4. What to look for when choosing?
When purchasing film infrared heated floors, it is important to pay attention to the name of the manufacturer, the stated characteristics and appearance of the film. What should a high-quality film look like and what performance qualities should it have? When choosing, pay attention to the following parameters:
- power, which directly determines what kind of flooring the film can be used with. The power consumption of the system ranges from 130-450 W/m2. For installation under linoleum, carpet and other light floor coverings, a film with a power of up to 160 W/m2 will be sufficient; for tiles and porcelain stoneware, it is better to take a more powerful film - up to 220 W/m2, and everything that is more intended for use in industrial environments and infrared saunas;
- The thickness of the film depends on the thickness of the polymer and carbon layers; it ranges from several microns to several millimeters. The minimum permissible thickness is 0.3 mm; the generally accepted thickness is 0.338 mm. The greater the thickness, the more durable the protective shell will be and resistant to deformation. Some manufacturers insist that the film should be as thin as possible so as not to take away the height of the room, but the difference in height when installing a film of 0.3 and 3 mm will be imperceptible, and the durability of the latter will be many times higher;
- film width. The material is produced in rolls with a width of 50, 60, 80 and 100 cm. During installation, the film is mounted so that adjacent sections are as close as possible to each other, but do not overlap one another. Based on this rule and the parameters of the room, the most suitable roll width is selected to ensure the fastest possible installation and minimize waste;
- strips made of silver and copper alloys must have clear contours, not show through, and be free from damage and signs of oxidation. The higher the silver content, the more durable and less sparkling the film will be. The silver part can be 1.5-2 mm wider than the copper part;
- preference should be given to those films where the copper and silver busbars are connected by a “dry” contact, which allows minimizing the thickness of the air gap and extending the service life of the product;
- The width of the copper bus must be at least 13-15 mm, otherwise we can talk about the low quality of the film. Carbon strips will not be visible or felt through copper;
- The carbon layer must be applied evenly and not show through. The thicker its layer, the longer the film will last;
- Some manufacturers add silver to carbon paste to minimize its current resistance and improve contact with the busbar. Over time, a cold tire can peel away from the constantly heated carbon part, and the result can be sparking and reduced heating power. Large companies that are constantly improving their products are coming up with different ways to avoid sparks. The most effective development is the arrangement of a grid of silver strips at the border of the carbon coating and the copper busbar. This configuration is called an anti-spark grid;
- the spaces between the carbon strips can be transparent or cloudy - the difference is in the manufacturing features. The first option is obtained by using adhesive technology, the second by lamination. After a few months of use, adhesive strips become fragile, while laminated strips last for years, so give preference to them;
- The heating speed of high-quality infrared film is 5-10 seconds.
Film heated floors Caleo
Caleo has a wide range of infrared films for underfloor heating, making it easy to choose the right system for a specific situation. The products of this brand are represented by both simple options and ultra-modern film coatings, the operation of which is as automated as possible.
Today this company produces 4 main modifications of infrared film systems.
Caleo IR film is sold complete with an installation kit: contacts and bitumen insulation, some also include connecting wires
LINE. An inexpensive system that is perfect for installation in small spaces.
GRID. A product belonging to the middle price segment. A special feature of the GRID infrared floor is the presence of an anti-spark mesh, which is made of silver.
Note! Caleo warm floors have their own characteristics. For example, their installation should be done only using the “dry” method. They are also not suitable for installation under ceramic floor coverings.
GOLD. As in the previous case, anti-spark mesh technology is used here. And also such films can self-regulate, which allows reducing energy consumption by up to 20%.
PLATINUM. The most expensive option for infrared flooring. It is distinguished by energy-saving qualities that can reduce electrical energy consumption by 5-6 times. IR flooring PLATINUM can be installed under areas that are covered by furniture, without the danger of overheating.
All of the above models have a remote control function. Installation of Caleo heated floors is carried out without the necessary organization of screed or special adhesive coating.
Caleo infrared film can be used as a main and additional heating system in almost all types of premises
A few words about safety
Film floors are considered safe for human health. They do not have a negative effect on the body during operation. But on the other hand, it is important to install them correctly, insulating all contacts to avoid electric shock. Otherwise they are completely safe. There is no need to be afraid of electromagnetic radiation - its level is negligible to cause harm.
Infrared heated floor
There is an opinion that the presence of such floors in the house improves the microclimate. And also some note a decrease in the recurrence of allergic reactions to anything.
Infrared film floors from the Rexva brand
Rexva IR films occupy second position in the ranking of heated floors. This company produces ultra-thin film communications that can be installed on various types of surfaces (vertical, horizontal and even on the ceiling). The Rexva range of heated floors is represented not only by systems with a standard power range.
For heating residential and industrial premises, this company offers infrared films, the power of which reaches 400 W/m². As a rule, such models are used to organize heating in saunas. They are characterized by a high level of water resistance, as they have a special double-sided coating located on top of the main lamination.
Products from the Rexva brand are highly durable and resistant to high pressure. Their operational scope is quite wide - from small rooms to gyms. The price of the Rexva infrared floor fully corresponds to good quality and reliability.
New film floors from RexVa have appeared on the market with a self-regulating effect, that is, with local overheating, it changes its own heat transfer in this area
Flooring installation
Even when a laminate is laid over IR film, it is advisable to protect the film from mechanical damage by laying polyethylene film, sheets of plywood or fiberboard with a thickness of 3 mm or more on top of it. Well, if linoleum or carpet is chosen as the finishing material, this should be done. It is clear that these are additional costs, but they are justified.
Features of IR films from Heat Plus
The Heat Plus brand produces heated floors (including infrared). The peculiarity of the models manufactured by this company is that they can have different film shapes, namely:
- striped;
- solid.
Related article:
Do-it-yourself water heated floor, video and description of the process
Description of the installation process of a water heated floor. Its advantages and disadvantages are different from other types.
Features of the IR floor production technology from this company make it possible to avoid the presence of unheated zones. The production of such film systems involves uniform application of carbon material on a polyester base, which allows achieving a high level of efficiency of heating communications.
Let's look at other advantages of Heat Plus IR floors:
- ease of installation;
- wear resistance;
Infrared film Heat Plus consists of safe and environmentally friendly materials and is a coating with a thickness of 0.338-2 mm, consisting of 5-9 technological layers
- reliability.
The service life of such products can reach 15 years under normal use. If desired, organizing such a system takes no more than one day, which is very convenient.
Note! The price of IR floor Heat Plus is several times higher than the standard one. However, products from this brand pay for themselves in 1-2 years.
Installation of heating elements and additional equipment
The film should be laid in strict accordance with the instructions specified in the technical documentation supplied with the product. There are no uniform standards, since the technical requirements of all manufacturers are different.
After cutting the film, be sure to insulate the copper bars at both ends!
We can only give general recommendations:
- Lay strips of material in such a way as to reduce to a minimum the length of electrical wiring and the number of points for connecting wires to the main and additional equipment.
- Carefully insulate electrical connections. Bitumen insulation is well suited for this purpose.
- Place the temperature sensor (if there is one) closer to the center of the room. This way he will convey more objective information.
- Place the thermostat in an accessible place so that problems do not arise if during operation there is a need to reprogram or replace the device.
- Select the type and cross-section of wires taking into account the total power of the heating system.
After completing installation, run the equipment in test mode and make sure that all components are functioning normally.
Also, for clarity, watch the video instructions:
Warm floor infrared film Monocrystal
The Monocrystal company is located in Ukraine and is the only manufacturer of IR floors in the CIS. Thanks to South Korean technologies used in the manufacturing process of IR films, products from this brand have taken a confident position in the construction market.
The main difference between Monocrystal models is that they do not contain silver paste. To achieve the necessary electrical contact, products from the Ukrainian brand are equipped with a thicker layer of carbon paste. In this way, stabilization is achieved between the copper busbar and the heating device.
Let's look at the main technical characteristics of Monocrystal IR floors:
- film width – from 30 to 60 cm;
Special graphite film for tiles - produced by the Ukrainian company Monocrystal
- step – 20–25 cm;
- powered by an electrical network with standard voltage (220V);
- maximum power indicator – up to 200 W/m²;
- The maximum heating temperature of the material reaches 50°C.
The service life of IR film from the manufacturer Monocrystal is 10 years. The model range includes the following varieties: linear, perforated, solid. Perforation is arranged for compatibility with tile flooring. Film heated floors under tiles are widely popular among buyers.
Characteristics
To correctly calculate the amount of film for a room of a certain area, you will need knowledge of its individual characteristics:
- Infrared film is supplied in rolls up to 50 m long.
- The width of the product can be from 50 to 100 cm, thickness - only 0.22-0.4 mm.
- Electricity consumption power: 20-35 W/hour per 1 m².
- The temperature of the infrared heated floor during operation is within +33-35 degrees. For high-quality heating of the room, it is necessary to cover 70-75% of its area with IR film.
Infrared film is not able to effectively heat homes in regions with harsh climatic conditions. There, such a modification of the heated floor can only be used to additionally enhance the main heating. The uniqueness of the system lies in the specificity of the IR rays, which, as they spread, heat not the air, but objects and surfaces encountered along the way. Thus, when transferring thermal energy over long distances, there are practically no losses.
The infrared floor includes the following components:
- Thermostat
. Collects information from a sensor located on the floor surface. The task of the device is to control the heating temperature by turning the power on or off at the right moments. More advanced thermostat models not only ensure that the set temperature is maintained, but are also capable of changing settings from time to time. To do this, appropriate adjustments are made to the device program. The mode of reducing the heating temperature during periods of absence of owners is very convenient. As a result, the thermostat maintains a comfortable temperature in the house and saves energy. - Thermal sensor and cable
. Provide collection of necessary information about heating temperature. - Clamps
. They are installed on the edges of the film cut to size. In addition to them, the system is equipped with connecting cables. - Isolation
. Required attribute in the installation kit. Basically we are talking about special insulating materials based on bitumen. - IR film
. The main element of the system. It is sold by the meter, if necessary, cut in accordance with the lines available on the canvas.
Date: September 25, 2022
Infrared heated floors: consumer reviews
Today, many home craftsmen refuse to install water-heated floors and give their preference to infrared floors. This is primarily due to the fact that a water system requires a longer installation time. And also its use is possible only after the screed has completely hardened. On many construction forums, consumers recommend infrared film heated floors. Reviews about these models are mostly positive.
The infrared energy emitted by carbon elements is completely identical to that emanating from the Sun, which is why it is so comfortable to be in a room with such heating
Consumers also pay attention to the efficiency that manifests itself in the process of using such heating systems. Studying various comments, you can see that many people point to savings in energy consumption with film heated floors. Reviews talk about saving electrical energy when using such systems by up to 20%.
Helpful information! Some IR systems take no more than 3 hours to install and can be used immediately after installation.
Such heating communications are considered completely safe and are repairable. If individual segments of the IR system are damaged, it does not fail completely. In addition, they can be easily replaced and continued operation of the system, which is often indicated in reviews. Warm floors under laminate are in great demand and usually cost the most.
Negative comments are much less common and, as a rule, indicate that when replacing the system, it becomes necessary to dismantle the floor covering. Most often, infrared heated floors are installed under laminate. Negative reviews in this case tell us that this floor covering cools down very quickly and the heating system cannot be used as the main one.
Laying and connecting film IR heaters does not require special training and can be done by hand
What types of heating systems are there?
Before this question can be answered, we need to understand what types of underfloor heating systems are available. The fact is that depending on the principle by which they work, many aspects relating to the installation of this equipment will also depend. Thus, any floor heating is a system of certain communications that are laid in various ways below the level of the floor covering and emit thermal energy, due to which the base is heated, as well as the air in the room is heated.
Types of heated floors
In general, all types of systems can be divided into two main categories:
- water;
- electric.
Water heated floor
The first, as you might guess, work due to the fact that water heated by a boiler or central heating system circulates through pipes laid inside the screed under the floor covering. But such floors are usually installed only in private homes, since, despite a number of advantages, they also have certain disadvantages that limit the possibility of their use in apartment buildings. So, firstly, they cannot be installed where there is no specially equipped connection to central heating. The fact is that it is impossible to connect to a conventional system through which the same water circulates that heats conventional heating radiators. If you make the connection without authorization, the residents of neighboring apartments will experience a heat shortage. If a complaint is received by the management company, the system will be forced to dismantle. Heating can also be done using a heating boiler if we are talking about a private house.
Connection diagram for underfloor heating to central heating
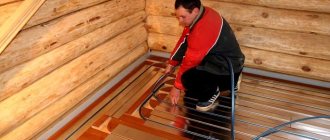
Laying water heated floors in a new building
Secondly, installing a water system in an apartment carries a certain risk. So, if the pipes through which water flows are damaged, there is a threat of flooding of the rooms located below. In this case, the owner of the water floor will carry out repairs to other residents of the house at his own expense.
Electric heated floor under tiles
It is easier to install an electric heating system in an apartment. In turn, it can be either cable or infrared. Both of them operate using electric current and can be connected to a common electrical communications system. The main disadvantage is the increased consumption of electricity, which will be spent on heating the room. However, from a safety point of view, such systems are much better than water systems when it comes to an apartment. They will prevent flooding.
Types of electric heated floors
The cable system is mounted, like a water system, in a screed, but infrared floors can be laid on top of the subfloor and simply covered with finishing material. That is why most apartment owners, when choosing a floor heating system, choose the infrared type. This is the simplest option that does not require the installation of a screed, and is also compatible with most types of floor coverings.
Characteristics and scope of use of IR film
Prices for infrared heated floors
Infrared heated floor
Installation diagram of infrared heated floor under laminate
Any floor heating system has certain features that are important to consider during installation. By the way, in some cases, heated floors can completely replace central heating, unless we are talking about harsh northern living conditions
Drawing up a connection diagram for a film heated floor
In order to avoid installation errors and other surprises, experts advise choosing a connection diagram and drawing up a project plan before installing IR film. An elementary diagram will help not only to correctly calculate the amount of material needed in a particular case, but also to select the film required in terms of power.
Let's consider the points that need to be taken into account when drawing up a connection diagram:
- cutting of infrared fabric is carried out strictly in those places that were marked by the manufacturer;
- It is strictly forbidden to cut at any angles and try to form shaped elements from the canvas;
- installation of the film is carried out in parallel strips;
- the strips must be laid in such a way that they do not overlap each other;
- It is important to remember that the gap between the film sheet and the furniture should not be less than 3 cm. The same distance must be maintained between the edge of the infrared sheet and the wall;
- copper bars of adjacent panels should not touch. The minimum distance between them is 1 cm;
- the number of connection points should be kept to a minimum;
Connection diagram for infrared film heater
- the best option for locating the connection points is on the side of the wall on which the thermostat will be installed;
- the diagram must be drawn up in such a way that the main part of the wiring is hidden behind the baseboards;
- when using short film sections (up to 100 cm), it is necessary to take care of additional insulation and purchase additional terminal clamps.
Helpful information! The individual panels are joined together using adhesive tape.
The thermostat must be selected in advance, before installing the electric heated floor. Reviews about these devices can be easily studied on specialized forums on the Internet. If the area that needs to be heated is quite large, then you need to purchase additional temperature sensors.
Floor insulation
Choose thermal insulation material covered with foil. Infrared waves will be reflected from it into the room, and not spread down to the neighbors.
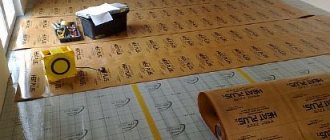
Roll out a roll of thermal film over the surface with the copper strip down. Cut it without fear, but only along the special lines specified by the manufacturer.
The lines are located on the film, so there will be no problems with choosing a cutting location. Do not allow stripes to overlap each other.
Secure the thermal film with construction tape. Install clamps or rivets under the connecting wires. Be sure to use bitumen tape and then insulating tape (insulating tape) to cover the bare copper wires that remain in the cut areas (only on one side, opposite to the place where the thermostat will be located). Now connect the strips of thermal film to each other with wires. How to do it?
Connect the right copper wire of the first strip to the right copper wire of the next strip of film. And so connect all the strips of warm floor. If the width of the film roll is 0.5 meters, then the length of one wire to connect the strips will be about 0.7 meters.
IMPORTANT!!! High-quality insulate with bitumen and then with insulating tape all the connection points of the wires. This will help avoid further troubles associated with electricity.
Preparing the base for laying infrared film
After choosing a laying scheme and purchasing material, you can begin pre-installation preparatory work. A very important point is preparing the base for laying the infrared floor. If the old concrete screed is not even, then it must be dismantled. However, if everything is in order with the screed, it is enough to simply clean it of debris and remove dust.
To prevent heating towards neighbors living on the floor below, it is necessary to lay heat-reflecting material for infrared heated floors
In most cases, the base has many small cracks and chips before laying the film. Experts advise eliminating these defects using cement mortar or any other suitable composition. In some situations, owners discover that the screed has begun to peel off from the subfloor. This situation requires the removal of the old screed and the organization of a new one.
The joints that form from connecting the walls to the floor must be carefully leveled and sealed if they have cracks. If this is not done, then the film floor will lose heat through them.
After preparing the base, it is necessary to lay thermal insulation material on the screed. As a rule, a reflector made of foamed polyethylene is used for these purposes. The joints of the individual insulator sheets are glued with mounting tape, and this is where the process of preparation for installation of the infrared heated floor ends.
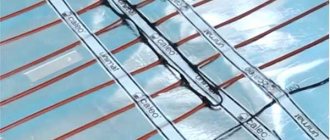
Design and principles of operation
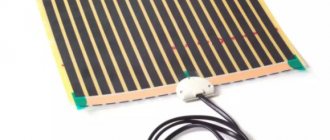
Warm infrared film flooring is a heat-resistant polyethylene film containing strips of carbon paste, which are connected by copper busbars, also soldered into the film. It is through these tires that electric current is supplied to the carbon material (most often carbon fiber).
IR film device for heated floors
Due to the fact that the current passes through the carbon, it releases maximum heat. The stripes are combined in pairs in one block. You can cut them along the dividing strip between the blocks, which makes installation much easier.
This design is also advantageous in that if one or more strips are damaged, the rest of the strip will function. Since the gap between the strips is small, even if several parts break, the floor will retain heat evenly.
Infrared film cutting line
This heating system is environmentally friendly.
In many countries of the world, scientists have long provided justification and evidence of the beneficial effects of infrared rays on all living organisms and their absolute harmlessness to human health.
The table below shows the technical indicators and characteristics of IR heated floors.
| Characteristic | Peculiarities |
| power consumption 1 m², W/m.h | 45-67 |
| thermal film width, cm | 50 |
| maximum permissible length of thermal film strip, m | 8 |
| melting temperature of thermal film, °C | 130 |
| nutrition | 220 V/50 Hz |
| IR heating wavelength, µm | 5-20 |
The amount of electricity consumed by an infrared heated floor depends on the size of the area and operating mode. Various companies producing such heating systems offer their own modifications of IR floors. They all have approximately identical characteristics and indicators, so which one you prefer depends only on you.
The thickness of the thermal film is 0.4 mm. Thanks to this, it can be mounted under parquet, tiles, laminate, linoleum. In addition, you can install the film on the walls and ceiling to heat the entire room as much as possible.
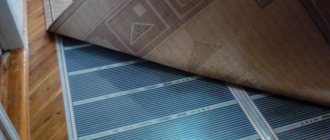
Features of laying film heated floors under laminate
After completing the preparation process, you can proceed directly to installing the IR film. The installation algorithm for a heated film floor under a laminate is as follows:
- First of all, it is necessary to cut the material. The length of the strip should not be more than 8 m;
Before laying the infrared film under the laminate, it must be cut correctly
- At the second stage, the strips are laid. In order to reduce the number of joints, experts recommend laying sheets of infrared material along a long wall. The distance from the edge of the film to the wall should be at least 10 cm, and the distance between adjacent panels should be at least 5 cm. Installation of film heated floors is best done using the parallel method;
- Next you need to connect the wires and insulate unused contacts. The wires are connected using special clamps - terminals. And for insulation, a special bitumen tape is used, which has a high sealing coefficient;
- then the infrared floor wires are connected under the laminate. To do this, you need to connect the wire to the terminal and insulate it;
- At this stage, the temperature sensor(s) are installed. Experts advise placing these elements under the second canvas (closer to the midpoint). The sensor is installed in this way: it must be glued to the underside of the canvas on the black strip;
- Next, the infrared heated floors are connected to the thermoregulatory device. To do this, you need to connect the wires from the film and the temperature sensor to it. The connection itself is made through an RCD;
When installing IR film, you should use only special types of laminate that are designed specifically for such systems
- Next, you need to check how the installed communication functions. To do this, a trial run is carried out;
- The last stage of installing an infrared floor involves laying the appropriate floor covering on top of it, which in this case is represented by a laminate.
Helpful information! The wire belonging to the sensor can be placed in corrugated protection. This will simplify the repair procedure if necessary.
It is recommended to keep it in the room for 2-3 days before laying the laminate flooring. This is necessary so that it acquires the appropriate temperature, which will further prevent its expansion. To become familiar with the features of using IR film in this case, it is recommended to read reviews on specialized websites. Film heated floors under laminate are the most common today.
Installation
To install an IR film floor, you need to perform a series of sequential steps:
- First of all, it is necessary to develop a project and make all the necessary calculations.
- Get all the necessary materials and tools.
- Install the IR floor.
- Start the system and check operation.
- Carry out a clean finish.
Area calculation
The main distinguishing property of infrared film flooring is that it is not installed under furniture. Therefore, when calculating the amount of material that will be required and choosing the location for placing the film, you need to subtract the area where the film will not be laid.
Calculation of the total area of the room S=a*b Calculation of the heating area Sob=S - (X, Y, Z) where, S - total area of the room, m²; a, b - length and width of the room, m; Sob—heating area, m²; X, Y, Z - fixed or low-cost interior items (furniture, household appliances, etc.).
When calculating the heated area, keep in mind that the IR film is laid at a distance of 100 mm or more to any vertical surface.
Once the size of the required area has been identified, the next step is to calculate the power.
| Film power | 150 W/m² | 220 W/m² |
| Main source of heating | At least 95% of the area | At least 70% of the area |
| Additional heating source | At least 60% of the area | At least 40% of the area |
| Flooring type | laminate, linoleum, carpet | parquet, carpet |
Energy consumption calculation
Energy consumption of IR film floor E=S*k*T where, E - energy consumption, W/hour;
S—total area of the room, m²; k is the conversion factor (depending on the set temperature; if the system is turned on at 50%, the factor will be equal to 0.56); T is the thermal power of the floor, W. The amount of money spent on infrared floor heating is calculated based on the electricity tariff in your area.
Installing a thermostat can reduce the cost of infrared heated floors by approximately 35%.
Power calculation
If the area of the room that is planned to be heated with a film floor is very large, several sets of IR film will be needed to install such a system. In such a situation, you need to sum up their power.
Using several sets of IR film Ptot = P1+P2+…+Pi Using part of the set Ptot = 1.10*L
where, Ptotal is the total power of the film floor, W; P1…Pi is the power of a separate set of film, W; L is the length of the infrared film used during installation, m; 1.10 is the conversion factor for the power of the film floor.
Calculation of the number of thermostats
The main purpose of a thermostat for infrared heated floors is to regulate the degree of heating.
If you connect several sets of film flooring at once, then several thermostats are needed at once, since the power consumed by the heated floor is summed up.
It is recommended to install the thermostat at a height of 15-20 cm, above the level of the final coating.
It is better to place the thermostat on a wall that is perpendicular to the direction of the stripes.
There are two connection methods:
- Zoning and connecting each zone to a separate thermostat.
- Connect a solid state relay or magnetic starter. You cannot make such a connection yourself; this requires the knowledge and skills of an electrician.
You can read about cable underfloor heating here.
Installation of infrared heated floors under tiles
Laying an infrared floor under ceramic tiles can be done in two ways: “dry” and “wet”. In the first case, the heating elements of the film do not come into contact with the cement screed. In turn, the “wet” method of installing IR film is done by pouring cement mortar over the system.
Two schemes for connecting film heated floors under tiles
Let's consider the algorithm of the method:
- Installation of the film sheet, which is carried out according to the same rules as in the case of organizing infrared heating under the laminate.
- Next, a protective layer is installed, which is often used as a polyethylene film.
- At this stage, it is necessary to install a base under the screed on top of the film. Plasterboard sheets (GKL) are excellent for such purposes. When fixing the sheets, special care must be taken, as there is a risk of damage to the heating elements of the infrared floor.
- Then a thin layer of screed is poured over the substrate.
- The last step is to lay the tiles. For this, standard tile adhesive is used.
In turn, laying infrared heated floors using the “wet” method is more profitable from a financial point of view. It includes the following steps:
- First of all, it is necessary to install the heating elements of the IR floor;
Laying the infrared film sheet under the tiles is carried out according to the same rules as under other coatings
- Next, a protective polyethylene film is laid. This stage is the most important in the entire procedure of the “wet” method of installing IR. Experts recommend laying protective polyethylene film in 2-3 layers;
- At the third stage, reinforcement is installed. As a rule, a metal masonry mark is used for these purposes;
- then the screed is poured;
- Finally, ceramic tiles must be laid.
Note! The thickness of the screed should not be more than 10 mm, otherwise the efficiency of such heating will be significantly reduced.
Thus, the installation of film heated floors under tiles can be done by hand. The only thing that is necessary for this is strict adherence to the sequence of work.
Two methods of laying infrared film under ceramic tiles: “dry” and “wet” methods
What is an electric heated film floor?
The floor is called film because it is not the cable that heats the surface, but a special film. Its thickness is only about half a millimeter. It consists of copper wires and carbon semiconductors.
The film does not emit an electromagnetic field, as it heats due to infrared waves, which have a beneficial effect on your health. It heats only those materials that stand in their path, and almost does not heat the air. For this specific heating property it is called infrared film heated floor.
The temperature sensor can be placed both on the film and under it (along the groove). Which method is preferable for specific films, check with the seller or manufacturer.
Features of installing film heated floors under linoleum
Installing an infrared floor under linoleum has its own characteristics. Let's look at this process step by step:
- First, the thermal insulation material is laid.
- Next, you need to cut the IR fabric into pieces of the required length.
- At the third stage, film heated floors are installed. It is important to remember that they must be laid with the copper elements facing down.
- Then, using pliers, clamp terminals are mounted on the copper wire elements of the film.
- At this stage, the strips are fixed with double-sided tape. This is necessary in order to avoid their free movement.
- Next, you need to complete the procedure for connecting the heated film floor to the electrical network.
- After connecting the IR floor, you need to check its functionality.
- Then a protective polyethylene film is placed on the heating elements, which is fixed with tape.
- The penultimate stage takes into account the installation of the base under the linoleum. Fiberboard sheets can be used as a base.
- At the last stage, the linoleum is laid.
The packaging with a roll of linoleum must have a pictogram indicating the possibility of using it in combination with heated floors
Thus, a film heated floor is installed under linoleum. If you are not confident in your own skills, then it is recommended to contact the masters who will do all the work efficiently and in a matter of hours.
Power and energy consumption
Installing a film floor is not as complicated as it seems at first glance. The main thing is to understand the instructions, take your time and follow all the recommendations, then everything will definitely work out
To begin with, it is important to determine what capacity the material itself needs to be purchased. Depending on the indicators, the floor will heat up differently
Selecting the power of film heated floors
Let's look at power indicators using Caleo floors as an example. So, the line of these films is represented by 4 variations.
- Line is the simplest option. The film is 50 cm wide and has a power of 130 W/m2. Ideal for additional floor heating.
- Grid is a more powerful film, but at the same time reliable and durable. There are two types depending on power - 150 and 220 W/m2.
- Gold - this option can be adjusted in power depending on the temperature level in the room. There are also two types - 170 and 230 W/m2.
- Platinum is a self-regulating high-tech floor that is not afraid of even being blocked by interior elements, and is not afraid of overheating. The most reliable and economical option with a power of 230 W/m2.
Warm floor CALEO PLATINUM
You need to choose a film based on power depending on its operating conditions. To heat the floor only in the toilet (additional), you can take the simplest and lowest-power option, but if you plan to install a full-fledged heating system for a large room, then you should take a more powerful film.
It is also important to pre-calculate energy consumption. The maximum consumption can be found by looking at the material markings
For example: if the film power is 220 W/m2, then in 60 minutes a square meter will spend approximately 0.22 kWh. Most energy is spent on heating the system. By switching your floors on and off regularly, you can save quite a lot of money, provided they are well insulated.
You can calculate the required film power as follows.
Step 1. If the system will be used as an additional system for underfloor heating (central heating will also be installed), then you should remember that it is enough to cover only 50% of the entire floor surface to achieve the desired effect.
Not the entire floor can be covered with film
Step 2. Next you need to find out the usable floor area. This includes only those areas where nothing stands - the open floor. For example, the usable area was 8.6 m2. To obtain the values, it is enough to remember the mathematics, take measurements from the free space and carry out simple calculations.
Determination of usable floor area
Step 3
Then you need to calculate the amount of film, but it is also important to take into account its parameters (width, length, etc.)
It is recommended to cover the entire usable area. So, for example, the choice fell on a film with a power of 150 W/m2, which has a canvas width of 50 cm. Thus, you can find out that the master will need to have 4 pieces of film 4 m long - that will be 8 m2. The total power will be 1.2 kW, load 5.5 A.
Calculate the required amount of film