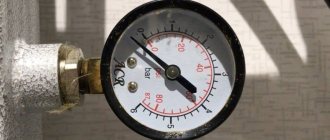
The operation of water heating networks is characterized by two main parameters - temperature and coolant flow. But there is a third value that often attracts the attention of residents of apartment buildings and private buildings - the pressure in the heating system. The main question is what it should be like for the normal functioning of all heating devices - radiators, heated floors, and so on. Since there is no clear answer, we decided to explain the essence of the problem within the framework of this publication.
Increase in pressure in the heating circuit
Now you know how to increase the pressure in the heating system, after first getting rid of the causes of the drop.
Next we will deal with its increase. If it constantly jumps, it means that the equipment is not operating in the correct mode. There may be other problems that will be discussed in this review. Sometimes the pressure indicator jumps just like that - this happens when some heating boilers operate with faulty sensors. But you still shouldn’t count on their incorrect operation, since inaction can lead to damage to the heating equipment. Most often, boilers suffer due to hydraulic overloads - heat exchangers and other internal components cannot withstand and burst.
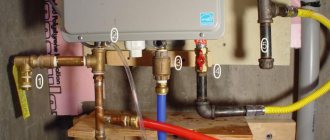
A safety team will help prevent damage to the heating system due to high hydrodynamic loads. It is a mandatory element of every closed circuit. The group consists of the following parts:
The maximum pressure for most boilers is 3 atmospheres. Therefore, it is necessary to create conditions for their safe operation. The safety valve is responsible for this. Having opened, it will release part of the coolant and immediately close.
- Pressure gauge (or thermomanometer) – used to obtain control information.
- Air vent – removes air from the circuit.
- Safety valve – protects the circuit from hydraulic overloads.
The most important link here is the safety valve. It will automatically release pressure if it goes beyond dangerous limits. Typically, users do not pay any attention to pressure gauges. After all, you won’t monitor the indicators every hour for fear of an emergency. This is why a safety valve is a must – it is a simple and effective safety feature.
Eliminating the causes of growth
The presence of air pockets can cause a gradual increase in pressure in the heating circuit. They must be removed promptly. The simplest option is to use a manual air bleeder, which is installed next to the safety group. Mayevsky taps located on radiators are also used for this. Sometimes, to completely remove air, the coolant is changed and the system is refilled.
Too high a temperature is another reason for increased pressure. Typically, the temperature of the coolant in heating systems varies between +70-80 degrees, sometimes a little more, sometimes a little less. If for some reason it rises to higher levels, this will provoke expansion of the coolant. It will begin to put pressure on the pipes and radiators, causing the needle on the pressure gauge to creep up. To prevent an accident, it is necessary to allow the coolant to cool. After this, we understand the initial reasons for the rise in temperature.
A clogged heating circuit can also cause increased pressure in the system. The heating does not clog very often, but this cannot be ruled out. The cause of blockages is most often contaminated coolant - this is typical for systems with metal pipes that are subject to corrosion.
One of the reasons for the breakdown may be scale in the pipes. Usually, sections of pipes after blockages are colder - this is how we calculate the contaminated section.
Other reasons for increased pressure in the heating system:
- Users have messed with valves and valves - this is causing cold radiators.
- Constant replenishment of the circuit with water - this is necessary for the initial filling of the system or when the pressure drops; the rest of the time the water supply must be shut off.
- A breakdown of the circulation pump or its incorrect setting - excessive pressure is created along with an increase in pressure.
- Clogging of one or another circuit - blockages in individual “directions” can provoke a rise in pressure in the entire heating system.
All this knowledge is more than enough to maintain the correct coolant pressure in the heating system.
Control methods
The pressure in the system is monitored using pressure gauges. They should be installed at the following points:
- At the entrance to the boiler and at the exit from it (modern heaters have built-in pressure gauges).
- At the lowest and highest points of the system (for houses with several floors).
- In branching areas: after tees, in manifolds, after two- and three-way valves.
Pressure gauges allow you to monitor pressure visually. And to reset it at a critical value, safety valves are used. Such a device must be installed on the supply pipeline immediately after the boiler - the working medium is discharged through it when it boils in the heat exchanger.
Typically this safety valve is classified as a so-called safety group, which also includes a pressure gauge and an automatic air vent. In addition, diaphragm expansion tanks are equipped with relief valves.
In addition to relief valves, bypass valves are used. Such a valve is installed on the bypass, through which the coolant can bypass the circuit. If a blockage or air lock forms somewhere in the circuit, and because of this, backpressure (increased pressure) occurs in the previous section, the bypass valve is activated. The pump begins to pump the coolant through the small counter “boiler - bypass - pump - boiler”.
Without such a fuse, the pump would be overloaded due to the formation of backwater and would soon fail.
To ensure proper coolant pressure in the system, it is necessary to maintain the correct pressure in the air chamber of the expansion tank. Typically it is 1.5 atm. If the value is lower, the membrane may rupture; if it is higher, the coolant pressure will also increase.
Why does blood pressure drop?
A decrease in pressure in a heating structure is observed very often. The most common causes of deviations are considered to be: the release of excess air, air escaping from the expansion tank, coolant leakage.
There is air in the system
Air has entered the heating circuit or there are air pockets in the batteries. Reasons for the appearance of air gaps:
- non-compliance with technical standards when filling the structure;
- excess air is not forcibly removed from the water supplied to the heating circuit;
- enrichment of the coolant with air due to leaky connections;
- malfunction of the air bleed valve.
If there are air cushions in the coolant, noise appears. This phenomenon causes damage to the components of the heating mechanism. In addition, the presence of air in the heating circuit units entails more serious consequences:
- vibration of the pipeline contributes to weakening of welds and displacement of threaded connections;
- the heating circuit is not ventilated, which leads to stagnation in isolated areas;
- The efficiency of the heating system decreases;
- there is a risk of “unfreezing”;
- There is a risk of damage to the pump impeller if air gets into it.
To eliminate the possibility of air entering the heating circuit, it is necessary to correctly put the circuit into operation, checking all elements for functionality.
Initially, testing is carried out with increased pressure. When performing pressure testing, the pressure in the system should not drop for 20 minutes.
For the first time, the circuit is filled with cold water, with the taps open to drain the water and the valves open to vent. The network pump is turned on at the very end. After removing the air, the amount of coolant required for operation is added to the circuit.
During operation, air may appear in the pipes; to get rid of it you need to:
- find an area with an air gap (in this place the pipe or battery is much colder);
- Having previously turned on the structure’s replenishment, open the valve or tap further downstream of the water and get rid of the air.
Air comes out of the expansion tank
The causes of problems with the expansion tank are as follows:
- installation error;
- incorrectly selected volume;
- nipple damage;
- membrane rupture.
Photo 3. Diagram of the expansion tank. The device may release air, causing the pressure in the heating system to drop.
All manipulations with the tank are carried out after disconnecting from the circuit. For repairs, it is necessary to completely remove water from the tank. Next, you should pump it up and bleed the air a little. Then, using a pump with a pressure gauge, bring the pressure level in the expansion tank to the required level, check for leaks and install it back on the circuit.
If the heating equipment is incorrectly configured, the following will be observed:
- increased pressure in the heating circuit and expansion tank;
- reducing the pressure to a critical level at which the boiler does not start;
- emergency releases of coolant with a constant need for replenishment.
Important! There are samples of expansion tanks on sale that do not have devices for adjusting pressure. It is better to avoid purchasing such models.
Flow
A leak in the heating circuit leads to a decrease in pressure and the need for constant replenishment. Liquid leakage from the heating circuit most often occurs from connecting joints and places affected by rust. It is not uncommon for liquid to escape through a torn expansion tank membrane.
You can determine the leak by pressing the nipple, which should allow only air to pass through. If a coolant loss location is detected, the problem must be corrected as soon as possible in order to avoid serious accidents.
Photo 4. Leak in the heating system pipes. This problem may cause your blood pressure to drop.
What to do if the indicator rises above normal
Liquid, unlike gas (including air), is practically not compressible. When heated, the volume of the coolant increases. This must be taken into account when filling a refrigerated system.
There should be a free volume left in the communication, which will be filled with expanded liquid. If this is not done, after starting the heating, the pressure may increase above the safe level - the excess will pour out of the expansion tank of the gravity system or the emergency valve will operate in closed types of communication.
In the event of a malfunction, for example, jamming or oxidation of the emergency valve in the boiler or safety group, the pressure may increase to critical values that can destroy the radiators or boiler.
How to choose a room thermostat and save up to 30% per month on heating
Table. Causes of increased pressure and methods of elimination.
| Possible reason | Manifestation | Remedy |
| Faulty make-up tap connected to the water supply - “excess” liquid enters the system | When the system is turned off, the noise of water flowing through a closed tap can be heard; reset must be done at regular intervals | Drain water, replace or repair faucet |
| Insufficient volume of the expansion tank - the liquid does not fit into the device and increased pressure is created | Detected upon first start. The volume of the expansion tank should be at least 10% of the volume of the entire system | Replace with a tank of sufficient volume |
| Damaged expansion tank membrane | When tapping the case, the sound is the same everywhere, i.e. no air cavity. When you press on the nipple, the coolant flows out of the tank, but the air is not released | Replace the membrane or tank assembly |
| Air locks in a closed heating system | When you open the drain valves on radiators or risers, you hear the sound of air escaping |
|
| Installing an expansion tank directly behind the circulation pump | Sudden pressure surges, audible sound of water hammer | Install a hydraulic accumulator before the pump |
| Overlapping of shut-off valves (accidentally, due to forgetfulness, by children) | Perceived difference in temperature of different radiators, cooling of disconnected devices | Check the positions of the shut-off valve handles and thermostats |
| Malfunctions in the boiler automation | Continued heating after the coolant reaches the set temperature | Call a service technician |
Advice! We advise inexperienced users to limit themselves to checking the position of shut-off valves and radiator thermostats, as well as attempting to drain the coolant through the Mayevsky taps. In other cases, it is advisable to call a technician and remember what he did so that next time you can fix the simplest faults yourself.
Interfering with the operation of the boiler is strictly prohibited.
How to control the pressure in the system?
To control, pressure gauges are installed at various points of the heating system, and (as mentioned above) they record excess pressure. As a rule, these are deformation devices with a Bredan tube. If you need to take into account the fact that the pressure meter must work not only for visual control, but also in the automation system, electric contact or other types of sensors are used.
The insertion points are determined by regulatory documents, but even if you have installed a small boiler for heating a private house, which is not controlled by GosTechnadzor, it is still advisable to use these rules, since they highlight the most important points of the heating system for pressure control.
Pressure gauges must be installed through three-way valves, which ensure their purging, reset to zero and replacement without stopping the entire heating.
Control points are:
- Before and after the heating boiler;
- Before the entrance and after the circulation pumps;
- Output of heating networks from a heat generating unit (boiler house);
- Input of heating into the building;
- If a heating regulator is used, then pressure gauges are embedded before and after it;
- If there are mud traps or filters, it is advisable to install pressure gauges before and after them. Thus, it is easy to control their contamination, taking into account the fact that a working element creates almost no difference.
System with installed pressure gauges
A symptom of malfunctions or improper operation of the heating system is pressure surges. What do they mean?
Reasons for deviation from the norm
The heating system must operate uninterruptedly during the heating season, which is almost six months. At this time, each owner wants heat to be supplied in the required quantity, that is, the pressure in the heating boiler must be constantly within normal limits.
Practice shows that not everything is always as smooth as you want it to be. Under the influence of certain factors, malfunctions in the operation of the heating system or equipment occur. What affects the efficiency of an autonomous heating structure?
Why is pressure needed?
Pressure in a heating system is the process of the coolant acting on the walls of the boiler, pipes, and radiators. Before water fills the pipeline, it is equal to atmospheric pressure (1 bar). This indicator changes as soon as the liquid begins to be poured into the pipeline and warms up. The coolant expands, the pressure increases to normal levels.
Reliable and efficient operation of a heating structure depends on pressure values. It provides it with extremely high performance and ensures that energy reaches the pipeline of all apartments in a multi-story building. This parameter determines the speed of water flow and, accordingly, the intensity of the heat exchange process between the structural components of the heating system. Therefore, the higher its performance, the greater the efficiency of the heating system.
Conclusions and useful video on the topic
Video #1. How to balance heating radiators in a home heating system. Let us remind you that without valves on each heating radiator it will not be possible to balance the system.
Video #2. Recommendations from a heating engineer for restoring operating pressure in closed-type heating circuits. The video also explains the procedure for pumping an expansion tank that has lost its “factory” gas:
A properly balanced heating system will perform its functions for several years. But one day the characteristics of the coolant will change or critical elements of the thermal circuit will fail. Therefore, it is necessary to constantly monitor coolant indicators using pressure gauges in order to promptly respond to pressure changes.
Please write comments if you have any questions about the topic of the article. We are waiting for your stories about your own experience in normalizing pressure in the heating circuit. We and site visitors are ready to discuss controversial issues in the block located under the text of the article.
Reasons for increasing power
An uncontrolled increase in pressure is an emergency.
May occur due to:
- the automatic control of the fuel supply process is faulty;
- the boiler operates in manual high-burning mode and is not switched to medium or low-burning;
- malfunction of the storage tank;
- malfunction of the fill valve.
The main reason is overheating of the coolant. What can be done?
- The operation of the boiler and automation should be checked. In manual mode, reduce the fuel supply.
- If the pressure gauge readings are critically high, drain some of the water until the readings drop into the work area. Next, check the readings.
- If no boiler malfunctions are identified, check the condition of the storage tank. It accepts a volume of water that increases when heated. If the damping rubber cuff of the tank is damaged, or there is no air in the air chamber, it will fill completely with water. When heated, the coolant will have nowhere to be displaced, and the increase in water pressure will be significant.
Checking the tank is easy. You need to press the nipple in the valve to fill the tank with air. If there is no air hissing, then the reason is a loss of air pressure. If water appears, the membrane is damaged.
A dangerous increase in power can lead to the following consequences:
- damage to heating elements, up to rupture;
- overheating of water, when a crack appears in the boiler structure, instantaneous vaporization will occur, releasing energy equal in power to an explosion;
- irreversible deformation of boiler and heating elements and rendering them unusable.
The most dangerous thing is a boiler explosion. At high pressure, water can heat up to a temperature of 140 C without boiling. When the slightest crack appears in the jacket of the boiler heat exchanger or even in the heating system next to the boiler, the pressure drops sharply.
Superheated water, with a sharp decrease in pressure, instantly boils with the formation of steam throughout the entire volume. The pressure instantly increases from steam formation, and this can lead to an explosion.
At high pressure and water temperature above 100 C, you cannot suddenly reduce power near the boiler. Do not fill the firebox with water: strong temperature changes may cause cracks.
It is necessary to take measures to lower the temperature and smoothly lower the pressure by draining the coolant in small portions at a point far from the boiler.
If the water temperature is below 95 C, adjusted for the thermometer error, then the pressure is reduced by releasing part of the water from the system. In this case, steam formation will not occur.
Startup sequence
Within a few days, the water floor system is brought to operating temperature conditions. First, the supply temperature is set at 20 - 25 degrees and then every day it is increased by 5 - 10 degrees. It is increased by 5 degrees if antifreeze is used, and if water is used, then by 10 degrees.
In addition, the rate of temperature increase depends on the size of the heated area. If the screed has a small array, then it reaches the desired mode earlier. But at the same time, experts advise not to rush, since if it warms up quickly and unevenly, it will become covered with cracks, and if a non-freezing liquid is used, it may overheat and the entire system will fail.
How to create and add pressure to a heating system
To create or add pressure in a heating system, several methods are used.
Crimping
Pressure testing is the process of initially filling the heating system with coolant, temporarily creating a pressure that exceeds the operating pressure.
Attention! For new systems, during commissioning, the pressure should be 2-3 times higher than normal, and during routine checks, an increase of 20-40% is sufficient. This operation can be performed in two ways:
This operation can be performed in two ways:
- Connecting the heating circuit to the water supply pipeline and gradually filling the system to the required values, controlled by a pressure gauge. This method will not work if the pressure in the water supply is not high enough.
- Use of manual or electric pumps. When there is already coolant in the circuit, but there is not enough pressure, special pressure testing pumps are used. Liquid is poured into the pump reservoir, and the pressure is brought to the required level.
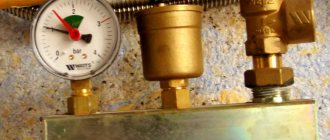
Photo 1. The process of crimping the heating system. In this case, a manual pressure test pump is used.
Checking the heating main for tightness and leaks
The main purpose of pressure testing is to identify faulty elements of the heating system in the maximum operating mode in order to avoid accidents during further operation. Therefore, the next step after this procedure is to check all elements for leaks. Tightness control is carried out by the pressure drop over a certain time after pressure testing. The operation consists of two stages:
- Cold test, during which the circuit is filled with cold water. Within half an hour, the pressure level should not drop by more than 0.06 MPa. In 120 minutes the drop should be no more than 0.02 MPa.
- Hot check, the same procedure is carried out, only with hot water.
Based on the results of the fall, a conclusion is made about the tightness of the heating system. If the test is passed, the pressure level in the pipeline is reset to operating values by removing excess coolant.
Norms and requirements of GOST and SNIP
The requirements for heating systems are set out in SNiP 2.04.05-91 as amended on January 21, 1994 N 18-3, May 15, 1997 N 18-11 and October 22, 2002 N 137.
GOST and SNiP regulate the following provisions regarding the heating system:
- climatic and meteorological conditions;
- noise and vibration levels of equipment;
- maintainability of the highway;
- design safety;
- area and volume of premises;
- economic justification;
- material resistance to corrosion;
- use of products permitted for construction;
- amount of heat per unit area.
SNiP recommends using water with or without additives as a coolant. The use of other materials is permitted if economic feasibility calculations are available.
Filling the line with toxic liquids is prohibited.
Leak test
To ensure that the heating is reliable, after installation it is checked for leaks (pressure tested).
This can be done immediately on the entire structure or its individual elements. If a partial pressure test is carried out, then after its completion the entire system must be checked for leaks. Regardless of which heating system is installed (open or closed), the sequence of work will be almost the same.
Preparation
A test pressure is considered to be 1.5 times the working pressure. But this is not enough to completely detect a coolant leak. Pipes and couplings can withstand up to 25 atmospheres, so it is better to check the heating system under this pressure.
The corresponding indicators are created using a hand pump. There should be no air in the pipes: even a small amount of it will distort the tightness of the pipeline.
The highest pressure will be in the lowest place of the system; a monometer is installed there (reading accuracy 0.01 MPa).
Stage 1 - cold test
Over the course of half an hour, the pressure in the water-filled system is increased to the initial values. Do this twice, every 10-15 minutes. The fall will continue for another half hour, but without exceeding 0.06 MPa, and after two hours - 0.02 MPa.
At the end of the inspection, the pipeline is inspected for leaks.
Stage 2 - hot check
The first stage has been successfully completed, you can begin hot leak testing. To do this, connect a heating device, most often a boiler. Maximum performance indicators are established; they should not be greater than the calculated values.
Houses are preheated for at least 72 hours. The test is passed if no water leakage is detected.
Plastic pipeline
The plastic heating system is checked at the same temperature of the coolant in the pipeline and the environment. Changing these values will increase the pressure, but in fact there is a water leak in the system. For half an hour the pressure is maintained at a value one and a half times higher than the standard value. If necessary, pump it up slightly.
After 30 minutes, the pressure is sharply reduced to a reading equal to half the working one, and held for an hour and a half. If the indicators begin to increase, it means that the pipes are expanding and the structure is sealed.
Often, when checking a system, technicians perform a pressure drop several times, either increasing or decreasing it, so that it resembles normal, everyday working conditions. This method will help identify leaky connections.
Air test
Multi-storey buildings undergo airtightness testing in the fall. Instead of liquid in such cases, air can be used. The test results are slightly inaccurate due to the fact that the air is first heated during compression, then cooled, which contributes to a drop in pressure. Compressors will help increase this parameter.
The sequence for checking the heating system is as follows:
- The structure is filled with air (test values - 1.5 atmospheres).
- If a hiss is heard, it means there are defects, the pressure is reduced to atmospheric pressure and the defects are eliminated (for this, a foaming substance is used, it is applied to the joints).
- The pipeline is again filled with air (pressure - 1 atmosphere), held for 5 minutes.
Hydraulic leveling of water heated floors
We have a water heating system, which includes water heated floors, based on a pumping and mixing unit and a conventional manifold with or without flow meters. It is a reliable, safe, comfortable and well-managed underfloor heating system. In order for it to become such in reality, and not just on advertising brochures, it needs to be configured.
For a water floor in a private house, it is better to use collectors with flow meters; in this case, it will be much easier to manage the system. If you are reading this article, but you have a similar heated floor in an apartment or house with central heating, then pay attention to the maximum operating pressure of the collector you have chosen; usually for collectors with flow meters it is 6 bar. This may not be enough for a central system.
Determining factors: expansion tank capacity, system type, etc.
The pressure in the heating system depends on several factors:
- Equipment power. Static is set by the height of a multi-story building or the rise of the expansion tank. The dynamic component is determined to a greater extent by the power of the circulation pump and, to a lesser extent, by the power of the heating boiler.
When ensuring the required pressure in the system, the appearance of obstacles to the movement of coolant in pipes and radiators is taken into account. During long-term use, scale, oxides and sediment accumulate in them. This leads to a decrease in diameter, which means an increase in resistance to fluid movement. This is especially noticeable with increased water hardness (mineralization). To eliminate the problem, periodically thoroughly flush the entire heating structure. In regions where water is hard, hot water purification filters are installed.
Normalization of working pressure in apartment buildings
Multi-storey buildings are connected to central heating, where the coolant is supplied from a thermal power plant, or to house boiler rooms. In modern heating systems, indicators are maintained in accordance with GOST and SNiP 41-01-2003. Normal pressure ensures a room temperature of 20–22 °C with a humidity of 30–45%.
Depending on the number of storeys of the building, the following standards are established:
- in houses up to 5 floors high 2-4 atm;
- in buildings up to 10 floors 4-7 atm;
- in buildings above 10 floors 8-12 atm.
It is important to ensure uniform heating of apartments located on different floors. The condition is considered normal when the difference between the operating pressures on the first and last floor of a multi-story building is no more than 8-10%
The condition is considered normal when the difference between the operating pressures on the first and last floor of a multi-story building is no more than 8-10%.
During periods when heating is not needed, the system maintains minimum levels. It is determined by the formula 0.1(Hx3+5+3), where N is the number of floors.
In addition to the number of floors of the building, the value depends on the temperature of the incoming coolant. Minimum values have been established: at 130 °C - 1.7-1.9 atm, at 140 °C - 2.6-2.8 atm. and at 150 °C - 3.8 atm.
Attention! Periodic performance checks play an important role in heating efficiency. They are controlled during the heating season and in the off-season
During operation, control is carried out using pressure gauges installed at the inlet and outlet of the heating circuit. At the inlet, the amount of incoming coolant must comply with established standards.
Check the pressure difference at the inlet and outlet. Normally, the difference is 0.1-0.2 atm. The absence of a drop indicates that there is no movement of water to the upper floors. An increase in the difference indicates the presence of coolant leaks.
In the warm season, the heating system is checked using pressure tests. Typically testing is provided by cold water pumped through. Depressurization of the system is detected when the indicators drop within 25-30 minutes by more than 0.07 MPa. The norm is a drop of 0.02 MPa within 1.5-2 hours.
Photo 1. The process of crimping the heating system. An electric pump is used, which is connected to the radiator.
What is the optimal pressure in a closed heating system?
The heating of “high-rise buildings”, which is provided according to a closed circuit, is discussed above. When arranging a closed system in private homes, there are nuances. Typically, circulation pumps are used that maintain the desired parameters. The main condition for their installation is that the pressure created should not exceed the values for which the heating boiler is designed (indicated in the equipment instructions).
At the same time, it must ensure the movement of coolant throughout the system, while the difference in water temperature at the outlet of the boiler and at the return point should not exceed 25-30 ° C.
For private, one-story buildings, the pressure in a closed heating system is considered to be within the range of 1.5-3 atm. The length of the pipeline during gravity flow is limited to 30 m, and when using a pump, the restriction is removed.
Optimal pressure values for private houses
In a system without liquid coolant, the pressure is normal for the atmosphere - 0.1 MPa or 1 Bar.
The overall indicator is formed based on the following components:
- Hydrostatic pressure - created by the coolant and when the boiler is not working, is formed by the pressure of the water column. In an open system, a special reservoir is mounted at the top - an expansion tank. Based on its filling level, the height of the heating circuit will be measured.
- Dynamic pressure - created in closed networks by a pump for circulation and convection (heating and cooling directly affect the volume of water). Such indicators often differ in places where pipes of different diameters are connected, the location of shut-off valves and many other points.
General values affect the rate of circulation of the energy carrier in the pipes, direct heat exchange in different parts of the heating circuit, and also with increasing pressure, the efficiency of the heating network increases, because the resistance in the system decreases.
Stable operating pressure and optimal, according to the accompanying technical documentation, indicators for the equipment make it possible to reduce heat loss and guarantee that remote areas of the house receive energy with almost the same temperature indicators as during heating in the boiler.
Theoretically, any value is possible for it, as long as it can withstand heating equipment with boilers and radiators. There is a completely reasonable and justified interest in the issue of working pressure.
These are the maximum indicators that can be viewed in the technical documentation of the equipment. According to established standards, for a private home the optimal pressure is up to 3 Bar, although individual units have a lower limit.
Why is hard water dangerous?
The quality of water poured into the circuit directly affects the condition of the surface of the pipes and structural elements of the heating boiler. When using hard water with a high content of minerals and salts, a large amount of scale and sediment will form during the heating process. They, in turn, will clog the entire heating system, which will ultimately lead to an increase in pressure in the pipes and radiators.
Ideally, it is advisable to fill the circuit with clean water without salts or impurities. Otherwise, the heating boiler, and sometimes the entire system, must be cleaned regularly. In the case of expensive gas equipment, you should not undertake such work yourself - it should be entrusted to professionals. They will be able to carefully turn off the heat exchanger and wash it with special reagents.
Flushing the entire system contaminated with hard water is also the prerogative of professionals.
Draining water from circuits
The design of a water floor, if installed correctly, will not have a tap or a lower point. For this reason, a compressor is used. Before draining the heated floor, this device is connected to the supply manifold. When it is factory assembled, then it has devices that prevent the reverse movement of the coolant.
At the liquid fill valve located on the supply manifold, remove the air vent and screw the adapter into this place and connect the compressor output. A hose is connected to the drain hole on the return manifold and discharged into a container or sewer.
The shut-off valves on one loop remain open. After turning on the compressor, the liquid begins to drain under pressure. The device is not turned off until an airborne suspension appears. Only then is it turned off, the valves of the first circuit are closed, the shut-off valves of the next loop are opened and the compressor is turned on again. As a result, water is drained from the entire system.
Since the length of the contours can be significant, a considerable amount of liquid remains on their walls. It is removed again, repeating the above procedure after a few hours.
After installation is completed and before operation, you need to fill the system with coolant and start the heated floor for the first time. The working medium is replaced depending on its type. The water is changed every year, and the antifreeze liquid is changed once every 3 to 5 years.