Do-it-yourself heating system installation
Before heating a private home, you need to stock up on the following tools for soldering polypropylene pipes:
- A shaver that allows you to remove reinforcement from the soldering area and chamfer the pipe;
- Pipe cutter;
- Soldering iron for polypropylene pipes with a set of nozzles of the required diameter.
The pipe connection technology is as follows:
- First you need to put the shaver on the pipe and turn it several times to remove the aluminum layer. If this is not done, the metal will gradually become damaged upon contact with the liquid, thereby having a negative impact on the entire heating system.
- The soldering iron nozzle is heated to the required temperature, then a pipe is inserted into the socket, and a fitting is put on the opposite side of the nozzle.
- When the parts melt a little, they need to be combined with some force and held in this position for a few seconds. After the plastic has hardened, you can begin soldering the next section.
A safety group is installed near the boiler outlet pipe. The installation location is determined by the fact that it is in this section of the system that the pressure rises when the system malfunctions. The expansion tank can be mounted anywhere, but there is one caveat: when installing the tank in front of the pump, the distance between them should be more than two filling diameters, and if the tank is attached behind the pump, then the distance increases to ten filling diameters. Failure to comply with this rule leads to premature failure of the membrane - and it is unlikely that it will be possible to determine the problem immediately, so you will also have to think about how to check the heating in a private house.
Sometimes the question arises whether a gravity system can be converted into heating with forced circulation. The answer to this question is affirmative - if necessary, the pump can be installed in any circuit, which allows you to completely remake the heating in a private house.
- The diameters and wiring configuration are selected so that the system can operate with natural circulation;
- Parallel to the wiring, two connections are installed in front of the boiler, to which the circulation pump is connected;
- The taps are separated from each other by a check ball valve.
When the pump is running, the valve closes and completely closes the passage in the bypass, thereby ensuring forced circulation of the coolant. When the pump is turned off, the heating automatically switches to natural circulation - the valve opens and the coolant continues to move. Of course, the check valve can be replaced with a gate or ball valve - but in this case, you will have to switch the operating mode of the system manually.
Conclusion
This article gives a superficial idea of how to install heating in a private house with your own hands. Each design element can be examined in more detail, so if there is such a need, you can look for the relevant article for a deeper understanding of a specific issue. In general, it can be noted that the heating system has a fairly simple design, and with due attention it is quite possible to assemble it yourself.
Radiator piping - diagrams, equipment used
How are heating radiators connected? - what is the wiring of these devices...
- The radiator must be turned off by supply and return taps. The heating fails when it is 30 degrees below zero outside; it is unacceptable to drain the heating system to repair one radiator...
- The connection diagram must be such that the liquid circulates across the entire radiator area.
How to place a radiator
When installing batteries, you need to leave gaps. You need to leave at least 3 cm between the wall and the radiator so as not to create resistance to air flow. From the floor - at least 15 cm, to the window sill - at least 10 cm.
It is not advisable to place the radiator in niches or cover it with screens. In this case, useful heat transfer will be lost due to deterioration of air circulation. Moreover, you can lose 50% of the radiator’s power if you place it in a casing.
Connection schemes
Connection diagrams are well known. The best is diagonal, with it it is possible to realize up to 100% of the power that the device is capable of developing.
Return flow (lateral) is only permissible with a device length of no more than 1.0 meters, in which case the efficiency decreases by no more than 10%. Other schemes are not desirable - there is a large loss of efficiency with a lower connection, for example...
What to install
Each radiator is equipped with plugs for transition from the diameter of the sections to the diameter of the pipeline. In most cases, radiators are connected to a 1/2-inch thread, which corresponds to 16 mm metal-plastic and 20 mm (external) polypropylene pipes. But they can also connect to 3/4 inches.
An appropriate set of plugs for the radiator is purchased; they are installed at all ends on rubber seals using a soft key for tightening so as not to spoil the enamel.
Mayevsky's air crane
Each radiator is equipped with a Mayevsky air valve, which is installed in the upper free plug. The radiator on the mounts is installed either horizontally or with a slight elevation towards the Mayevsky crane.
Mandatory shutdown - simplest piping
The simplest way to connect radiators is to install shut-off ball valves. It is not permissible to regulate the flow with them (do not open them completely), due to the fact that they will quickly fail.
Why do bypass
A bypass between supply and return is necessary only with a single-pipe heating circuit, when radiators are connected in series. For example, in apartment buildings, radiators must be connected to the riser with a bypass, so that turning off one radiator has little effect on the entire system and does not stop the circulation of coolant through the system.
How to seal threaded connections
When connecting radiators, it is strictly not recommended to seal metal threaded connections with fum tape. It leaks whenever the connection is turned. Everything must be screwed in with a 100% guarantee of reliability.
This is ensured by flax fiber or plumbing thread. The thread is wrapped in a not too thin layer, the winding is lubricated with plumbing grease (vegetable oil is allowed), and tightened using keys with moderate tension.
Typical radiator trim in an adjustable system
Connection with ball valves is made where only two operating modes of the radiator are required - “on-off”.
- But some radiators require flow adjustments to balance the entire system. For example, in a dead-end circuit on the first radiator, the flow rate is reduced if the number of devices in the dead-end is 5 pieces. and more. Therefore, on such radiators, a balancing valve is installed on the return line instead of a conventional ball valve.
- In some rooms, radiators may need to be switched off periodically or reduced in output to save energy. Such devices, the power of which is adjustable, are equipped with an adjusting screw tap at the supply, with which you can smoothly change the coolant flow.
Radiator piping also includes corners, tees... to direct pipes, for example, to a wall... The presence of such fittings and their location is determined in each specific case.
The presence of balancing valves and flow taps on individual radiators is determined when drawing up a heating circuit....
Automated radiator control
The radiator can be controlled automatically and maintain the set temperature in the room. A thermal head will help with this, it controls the valve so that the set air temperature is maintained.
The heat transfer of radiators can be programmed in time if you use an appropriate computerized thermal head. This is useful when setting the shutdown of individual rooms at a time, for example, at night and the first half of the day, when everyone is at work... True, in our country, unlike Western countries, such devices no longer pay for themselves...
Thermal heads on all radiators can only be used with an automated boiler, which will turn off if all or most of the radiators in the system are closed. The possibility of partial use of such devices with a conventional boiler is considered for each project...
A simple process, but knowledge is required
To understand the correctness of the process, let’s break it down into its components.
The entire instructions look like this:
- Available connection diagrams for heating radiators - select;
- We control the compatibility of different fittings and battery types;
- Connecting radiators with pipes - joining them together.
For information! Non-specialized rules for the spatial placement of the radiator will be considered separately, since neglecting them can significantly reduce the efficiency of the battery.
Non-specialized concepts
Violation of simple rules for placing batteries can negate all subsequent stages of piping, reducing the efficiency of one link to 25%.
So:
- The distance from the window sill should not be less than 10 cm;
- The distance from the floor to the bottom edge of the radiator should not be less than 12 cm;
- The radiator is not placed close to the wall; the minimum gap between them should be 20 mm;
For your information! The installation kit, along with plugs, includes holders for sectional batteries, and for panels, fastenings are included in the kit with the radiator. They are initially designed for the required interval.
But our person’s desire to save money and do everything his own way forces us to do this. Another trick that will remind you of the need for a gap is to glue insulation with a foil reflector to the wall under the radiator, and a gap is needed between it and the radiator.
- You need to be careful with battery niches. The desire to hide the heater can lead to loss of efficiency and heat loss. For lovers of aesthetics, the cost may be 10% loss of heat transfer in semi-open niches and 20% in closed niches.
Battery tying
Before heating the house yourself, you also need to think about the amount of fittings that will be used in the system. In the event that you only plan to turn off the radiators, then two ball valves installed on the connections on each side of the heating devices will be sufficient. Such cranes are quite reliable and durable, so there will be no problems with them.
It's another matter if the system needs to be configured. To regulate the coolant flow, you will need radiator valves. Structurally, they are ordinary valves in which a metal valve is installed. To automatically adjust the permeability of the connections, it is better to take valves with thermal heads that regulate the heat transfer of the batteries when the air temperature in the room changes.
Shut-off and control valves
Let's look at the strapping elements in more detail. As a rule, a typical convector has four holes - one at each corner. One of the upper holes includes a supply core, which is removed from the riser using a coupling.
Before entering the device, a ball valve, valve or temperature control valve is placed on the supply side. On the opposite side, a Mayevsky valve is installed in the upper hole to remove excess air from the system.
The return pipe most often comes out from below on the same or opposite side (see the chapter on piping diagrams); it is equipped with a ball valve. The remaining hole is closed with a plug.
It is better to connect the device using American ones, which are equipped with union nuts. This will make it easy to disconnect it from the main line if repair or replacement is necessary.
The easiest way to do the strapping is with plastic parts, since they do not require electric arc welding. Polypropylene allows you to create complex branched circuits without much difficulty. Metal-plastic pipes made of cross-linked polyethylene are also easy to install, but their price is much higher.
Heating wiring
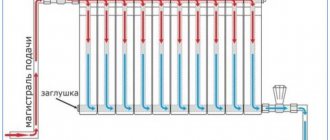
The simplest and most reliable heating wiring diagram is “Leningradka”, or single-pipe system wiring. Such a system is structurally a looped circuit running along the entire perimeter of the building. Radiators are connected to the pipeline in parallel. The main disadvantage of the Leningradka is the uneven heating of the radiators connected in the circuit.
A much more effective option for how to properly install heating, especially in multi-storey buildings, is a two-pipe heating system. There are two varieties of such a system, one of which is called a dead-end system. This scheme must be balanced, i.e. limit the flow of radiators located close to the boiler - otherwise heating of heating devices located far away will be insufficient.
In a passing circuit, there are several parallel circuits of the same length. There is no need to balance the associated wiring, since in it the heat transfer of all batteries is initially almost at the same level. If no obstacles prevent you from creating a circular passing circuit, then it needs to be done, but otherwise a dead-end two-pipe wiring is quite suitable. In any case, in order to know exactly how to properly install heating in a house, you need to think through all the known nuances in advance.
Place of radiators in the heating system
The use of radiators in heating residential premises plays an important role today. Due to design factors, most residential buildings, especially apartments in multi-storey buildings, cannot be equipped with in-floor heating, which requires a significant thickness of interfloor slabs. Therefore, the main job of heating interior living spaces is performed by wall-mounted radiators, often called radiators.
Radiators transfer thermal energy from the coolant to the surrounding space. The intensity of heat transfer depends on the temperature of the coolant, the thermal conductivity of the radiator material and the heat transfer area. The design of modern radiator models has a number of technical improvements that make it possible to connect them in heating circuits of almost any wiring diagram.
On a note:
Old-style cast iron batteries only had pipes for supplying and exiting coolant, while modern models are additionally equipped with built-in air vents to eliminate air pockets.
The new design of the batteries has radically simplified the operation of the heating system and increased its efficiency - if there are air pockets in the heating devices, it is enough to open the drain valve and bleed the air.
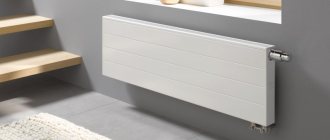
Bimetallic water heating radiator with fins that increase the heat transfer area
Thanks to modern models of heating batteries, it has become possible to choose the optimal connection diagram and install heating devices as rationally and efficiently as possible. But the operational efficiency and durability of the water heating circuit depends on the quality of the piping - a condition necessary when using polypropylene pipes, despite the numerous advantages of this material.
Important!
The connection of polypropylene pipes to a metal riser is made using special adapters, one end of which, the metal end, has a threaded connection, and the second end, the polymer end, has a polypropylene pipe connected by hot welding. When embedding a heating radiator into a circuit made of polypropylene pipes, it is necessary to use connecting fittings, adapters and couplings made of similar material.
Polypropylene pipes have a high coefficient of thermal expansion, therefore, when installing the heating circuit, gaps should be left between the ends of the pipeline sections and the wall so that during linear elongation from the influence of hot coolant, the pipe span does not rest against the wall at its ends and is not deformed. It should be taken into account that the longer the pipeline span, the greater the length it will lengthen.
Heating boilers
The choice of heat source is a key factor on which the further selection of heating elements and the operating efficiency of the assembled system will depend. The cheapest fuel today is gas, therefore, if a gas main is connected to the site, a gas-fired boiler will be the best solution.
Condensing gas boilers with electric ignition, which have a couple of features, have proven to be the most economical:
- When the coolant is heated to too high a temperature, gas is simply not consumed, which reduces its costs by about 25%;
- The heat given off to water vapor is also used for heating, which saves another 10-12% of energy resources.
If we arrange heating equipment operating on other types of fuel in order of decreasing efficiency, we will get a list of the following type:
- Wood boilers;
- Pellet boilers;
- Coal boilers;
- Diesel boilers;
- Electric heating devices.
When choosing a heat source before heating a private home, you need to pay attention to a number of nuances:
- For gas boilers, you can use not only main gas, but also bottled gas. True, the cost of heating in this case increases several times.
- Before purchasing a heating device that runs on a certain type of fuel, it is worth at least approximately studying the dynamics of rising prices for different types of fuel, and when studying, you need to tie fuel prices to geography.
- Coal boilers use firewood for heating. This must be taken into account - firstly, kindling and warming up the system will take longer, and secondly, purchasing firewood will require additional costs.
- Gas, diesel and electric boilers operate uninterruptedly if fuel is available. Pellet boilers with an automatic feeding system can operate for a week. Solid fuel boilers must be heated and cleaned at least (and often more often) once a day. A long-burning boiler can operate on one burner for several hours longer, and the most expensive and modern devices operate without problems throughout the day.
- The waste can be used as fuel for diesel boilers - this will reduce heating costs several times. The disadvantage of such savings is the shortage of used oil, which is very difficult to purchase in sufficient quantities and on an ongoing basis.
Electricity in such devices is required only for the operation of the compressor. Such schemes turn out to be quite profitable - the cost of heating can ultimately compete on equal terms with the savings when using solid fuel boilers and gas.
Of course, you have to pay for the savings somewhere - the cost of heat pumps is very high, and the installation of such equipment costs a tidy sum. It is enough to give a simple example: to install a geothermal pump, you need to drill a well several tens of meters deep, or dig a pit, the area of which will be three times larger than the area of the heated building.
There is a solution to this problem - you can use a type of heat pump in which the coolant is air outside the house. Thermal energy is pumped out of it, which is subsequently used to heat the building. In essence, this scheme represents the operation of a conventional air conditioner set to heating mode.
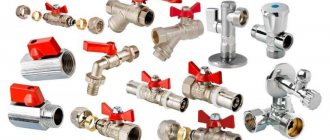
What kind of fittings are needed
To understand how to connect a heating radiator to a polypropylene pipe, you need to seek advice from professional plumbers. As a rule, this is done using shut-off valves. The simplest scheme in this case is the use of two ball-type valves. They are superior to cork and screw counterparts in strength, tightness and ease of maintenance. The purpose of these valves is to completely shut off the radiator in the event of repair or replacement. More advanced users use one or two chokes. Read also: “Single-pipe heating system - advantages of the system and installation methods.”
- Makes it possible to reduce the battery heating temperature if necessary. This will require manual adjustment.
- Two throttles are used to balance a two-pipe system when it is necessary to limit the flow through radiators adjacent to the boiler or pump. As a rule, the balancing choke is placed on the return line, and the temperature regulating choke is installed on the supply.
But the most convenient way to connect a heating radiator to a polypropylene pipe is a thermostatic valve and thermal head. The principle of operation of these elements is based on the thermal expansion of individual media. When the thermostat heats up, the linear dimensions of the bellows in the housing increase, due to which its valve closes: this leads to a decrease in the coolant supply.
When the temperature drops, everything happens exactly the opposite. This makes it possible to maintain a stable temperature in the room, regardless of changes in external parameters (weather conditions and coolant temperature). As a rule, a two-pipe heating system for a two-story house provides for the thermostat to be equipped with a balancing throttle, which is placed on the second supply line.
Along with shut-off and control valves, the lower radiator connection has air vents - this is the name of the valves with which air is released (for more details: “Installation of valves for polypropylene pipes - from product selection to installation”).
The most commonly used air vents are:
- Mayevsky crane. It is characterized by compactness and low cost.
- Standard valve or tap. They are equipped with an upper pass-through radiator plug. They are characterized by high throughput: bleeding of air in this way occurs noticeably faster.
- Automatic air vent. Allows you to clear the circuit from air bubbles during system operation.
Selection of pipe diameter
Another important issue that needs to be resolved in advance is how to install heating and with what pipes. The diameters of the pipes must be selected depending on what kind of heat transfer is planned in a certain section of the heating circuit. For example, on the wiring, this value corresponds to the power of the boiler, the connections to the radiators must transfer enough coolant to heat the radiators themselves, and the throughput of the risers must ensure normal heat transfer of all heating devices connected to them.
In principle, if it is possible to increase the circulation rate of the coolant (by increasing the pump power), the diameter of the pipes can be reduced
But at this point it is important not to overdo it - acceleration of the coolant leads to an increase in noise in the system. The standard speed value is about 0.4-0.6 m/s.
When using a gravity heating system, the diameter of the distribution pipes must be increased by at least one step. It's all about the very low pressure characteristic of systems with natural coolant circulation. Too wide pipes will reduce the hydraulic resistance of the circuit, sometimes even to the point of complete loss of system functionality. Knowledge of such points is already a large part of the answers to questions about how to make efficient heating in a private home.
Conclusion
For the most efficient heating operation, it is important to choose the right method and type of connection of devices to the coolant supply and outlet pipes. For self-installation, you will need instructions, which we presented in the video in this article.
Is it possible to connect bimetallic central heating radiators with metal-plastic.
8th floor of a 15-story building in a new building, supply from above. direct connection is planned.
I wouldn’t have asked this question if it weren’t for this (at the same time, maybe you can answer on the topic there?): ">
Thank you in advance for your answers on the topic.
Krick wrote: is it possible to connect bimetallic central heating radiators with metal-plastic.
A single-pipe, as I understand it, cannot be connected with metal: copper, stainless steel, even black metal.
Krick wrote: is it possible to connect bimetallic central heating radiators with metal-plastic. 8th floor of a 15-story building in a new building, supply from above.
. you can, but you don't need to! Listen to DOCA
DOKA wrote: One-pipe, as I understand it, it’s impossible
Why can’t we just ask him what pipe is currently in the house (riser and its diameter) that can increase the diameter of the metal-plastic?
Uncle wrote: why not right away?
Because the operating parameters of such a system may go beyond the acceptable limits for MP. It's strange that you have to explain this.
Heating risers and connections to the radiator are the responsibility of the service organization. The responsibility of the resident is from the inlet taps and therefore only replace them with the same one of the same diameter. 8th floor of a 15-story building in a new building, supply from above Operating pressure - somewhere around 8-10 bar - pressure testing can be pressed to 15 bar after maintenance work at the end of summer or early autumn and where can M.Plast go? pipe - designed for 10 bar Vandalism of new residents is not in vain.
We come only when people need us.
- And when you are not needed?
- Then we are gone. We don't exist. We don't exist for you
the riser is 1″, the foreman said that we will install it with three-quarter metal-plastic.
understood thanks. did not know. I looked at the specification - really 10 bar maximum :=/
Three-quarter MP, is this not 20mm? If so, spit in his face, and then measure with frost the narrowest place in the 20mm MP system - the fitting, and then compare its clearance with the clearance of a 3/4″ steel pipe. Plus, MP has all the corners with a small radius and a narrowed section, while steel has all the corners on the contrary, with a larger radius and widening. Even 25mm MP can't compare to 1/2″.
ASM wrote: Three-quarter MP, is this not 20mm?
ASM wrote: If yes, spit in his face
But in this case, what to do (wrong answer)? » >
thanks for the answer.
Just in case, I will openly state that it is possible or not to connect an MP 25mm battery in your situation, I don’t know. I just ran into the fact that the dimensions of the MP are equated to the dimensions of steel pipes several times, and I personally verified the fallacy of this superstition with a ruler. Regarding “don’t care”, my neighbors below had their 3/4″ risers replaced with 25mm MP. Therefore, I don’t care, every time I hear such “identity”, I really want it. As for the connection to the battery, if the riser is not replaced with an “alternative” MP, then it’s really up to you to choose. The main thing is not to harm other users of the riser.
How to connect a heating radiator to a polypropylene pipe
Connecting a radiator to polypropylene pipes is a process consisting of several stages:
- Drawing up a drawing, marking.
- Fastening batteries to walls using brackets.
- Installation of pipes, connection of individual parts.
- Pipeline testing.
There are several ways to connect the battery to the pipes:
- Bottom connection. The tubes are connected on both sides of the radiator at the bottom. Suitable for horizontal installation of a single-circuit pipeline.
- Lateral connection. On one side of the battery there are two holes for the liquid supply and waste outlet.
- Diagonal connection. A classic option for connecting radiators to pipes. The coolant supply and outlet openings are located on both sides in the lower and upper parts.
Simple process, but knowledge required
To understand the correctness of the process, let’s break it down into its components.
The entire instructions look like this:
- Available connection diagrams for heating radiators - select;
- Compatibility of various types of batteries and fittings - check;
- Connecting radiators with pipes - joining them together.
For information! Separately, the general rules for the spatial placement of the radiator will be considered, since neglecting them can significantly reduce the efficiency of the battery.
General concepts
Violation of simple rules for placing batteries can negate all subsequent stages of piping, reducing the efficiency of one link to 25%.
- The distance from the window sill should not be less than 10 cm;
- The distance from the floor to the bottom edge of the radiator should not be less than 12 cm;
- The radiator is not placed close to the wall; the minimum gap between them should be 20 mm;
For your information! The installation kit, along with plugs, includes holders for sectional batteries, and for panels, fastenings are included with the radiator. They were initially designed for the required gap.
But our person’s desire to save money and do everything his own way forces us to do this. Another trick that will remind you of the need for a gap is to glue insulation with a foil reflector to the wall under the radiator, and a gap is needed between it and the radiator.
- You need to be careful with battery niches. The desire to hide the heater can lead to loss of efficiency and heat loss. For lovers of aesthetics, the price may be 10% of heat transfer loss in semi-open niches and 20% in closed niches.
How to piping a boiler correctly
The next component of the heating system is the boiler piping. The first step is to look for a circulation pump with good performance. If it can produce a pressure of 2 meters, then such a device is quite suitable even for heating in multi-storey buildings.
The power of the circulation pump is calculated using a formula of the form:
- Q = 0.86R/Dt, where
- Q – pump performance (measured in cubic meters per hour);
- R – power of the heating boiler or circuit into which the circulation pump will be built;
- Dt is the temperature difference in the supply and return circuits (usually about 20 degrees).
When choosing a safety valve, you need to start from the maximum pressure that can arise in the system (as a rule, this value is 2.5 kgf/cm2). The volume of the expansion tank should be 1/10 of the volume of coolant in the circuit. It is advisable to take a tank with a small reserve. In standard heating systems, 1 kW of boiler power requires about 15 liters of coolant.
As a rule, the tank begins to operate at a pressure of 1.5 kgf/cm2 - i.e. when the operating pressure in a balanced heating system is exceeded. To increase the pressure, you need to use a tap connecting the heating and cold water supply, or simply pump the expansion tank with air.
Radiator connection
The sectional radiator has four radiator plugs, each of which can theoretically be connected to a liner. In practice, to circulate the coolant through the battery, two connections are enough - supply and return. Heating devices are connected according to one of three schemes.
| Connection | Description | Peculiarities |
| Unilateral | To connect to the connections, upper and lower plugs are used on one side | The connection is convenient in terms of compact placement of the connections. However, only the first 5-8 sections are warmed up effectively. The last sections are noticeably colder and quickly silt, requiring periodic washing |
| Diagonal | The upper radiator plug is used on one side and the lower one on the other. | All sections are heated evenly. Heat transfer is maximum. Only the bottom of the outer sections on the side of the blind bottom plug is silted |
| Lower | Both bottom plugs are used | Heat transfer is 10-12% lower than with a diagonal connection. No flushing required; sections do not silt at all |
Connection diagrams.
Strapping methods
To install a battery harness in a private house or city apartment, you will need:
- shut-off valves, which are most often used as simple ball valves;
- plugs for blocking the remaining channels;
- Mayevsky valves, which allow you to bleed air from the system during seasonal startup of equipment;
Device for removing air from the heating system
sealing material.
Additionally, you can install on any heating radiator:
- a pressure gauge that determines the pressure in the system (most often used when installing equipment in autonomous country houses);
- thermostat operating in manual or automatic mode. Using this equipment, you can set a certain temperature for any individual radiator.
Device for setting a specific battery operating mode
If tying is carried out with polypropylene, then additional welding equipment will be required.
Device for welding polypropylene pipes
So, depending on the factors presented above, the heating radiator piping can be performed according to the following schemes:
- for lateral connection;
- for diagonal connection;
- for bottom connection.
Side connection strapping
With a side connection method and a single-pipe system, installation of the piping is performed as follows:
- Ball valves are installed on the inlet and outlet pipes, making it possible to shut off the coolant supply to perform repair or maintenance work;
- taps are connected to tees;
- A section of pipe is inserted into the remaining branches of the tees, acting as a bypass.
A bypass is necessary for autonomously shutting off a separate radiator, for example, for repairs, without shutting down the entire heating system.
When connecting to a two-pipe system laterally, the work is performed in a similar manner. However, installing a bypass is not required in this situation.
Strapping diagrams when choosing a side battery connection method
Diagonal connection strapping
The connection of the radiator to the pipes with a diagonal connection is as follows:
- the incoming pipe is connected to a section of pipe no more than 10 cm - 15 cm long;
- Next, a ball valve and a tee are installed to connect the bypass;
- the outlet pipe is connected to the elbow and only after that is connected to the coolant removal pipeline;
- A tap is installed before connecting to the central line.
When connected to a two-pipe system, the work is performed in the same way, with the exception of the bypass.
Battery wiring diagram when choosing a diagonal connection method
Bottom connection strapping
Tying the bottom connection method is easier than all others:
- Shut-off valves are connected to the inlet and outlet of the radiator;
- pipe bends are introduced into the central mains. If necessary, special adapters - angles or tees - are installed at the bend points.
Radiator wiring diagram with bottom connection method
There is a separate nuance when piping the lower connection when connecting to a single-pipe system. In most cases, the connection is made as shown in the figure, that is, without a bypass, which allows autonomous shutdown of the heating device. But if you want to use the device, you can install it. To do this, an additional section of pipe is installed between the inlet and outlet pipes.
Piping the lower connection using a bypass
The following video provides a detailed description of the types of battery piping in a heating system.
Thus, with the correct choice of connection method and correct installation, the heating system will serve for a long time, evenly heating all rooms.
Installation of a heating radiator using metal-plastic pipes
In this article we are going to find out what shut-off and throttling valves can be equipped with a modern heating device. In addition, we will find out which pipes can be used for heating and get acquainted with the intricacies of their installation.
Wiring diagram for a city apartment.
Wiring
The most popular ones when designing autonomous heating circuits are single-pipe and two-pipe wiring.
Somewhat simplified, they can be described as follows:
- in the first case, the heating spill creates a ring throughout the heated room . Radiators break this ring or, more correctly, cut parallel to the filling.
- in the second version, two bottlings are located around the perimeter of the room - supply and return . Each heating device is a jumper between them.
The drawing makes the difference clearer.
An important point: two-pipe heating requires mandatory throttling of each battery. Without balancing with valves or throttles, the entire volume of water will be pumped through the radiators closest to the boiler; distant ones will warm much less, and in severe frosts they may even be defrosted.
Radiator connection
The sectional radiator has four radiator plugs, each of which can theoretically be connected to a liner. In practice, to circulate the coolant through the battery, two connections are enough - supply and return. Heating devices are connected according to one of three schemes.
| Connection | Description | Peculiarities |
| Unilateral | To connect to the connections, upper and lower plugs are used on one side | The connection is convenient in terms of compact placement of the connections. However, only the first 5-8 sections are warmed up effectively. The last sections are noticeably colder and quickly silt, requiring periodic washing |
| Diagonal | The upper radiator plug is used on one side and the lower one on the other. | All sections are heated evenly. Heat transfer is maximum. Only the bottom of the outer sections on the side of the blind bottom plug is silted |
| Lower | Both bottom plugs are used | Heat transfer is 10-12% lower than with a diagonal connection. No flushing required; sections do not silt at all |
Armature
Let's find out what shut-off and throttling valves will be needed in each of the described cases.
For single-pipe wiring
A typical solution for the most popular, simple and trouble-free single-pipe Leningrad system is the bottom connection of heating devices; diagonal is used a little less often.
The minimum price for the following set of fittings for each radiator:
- ball valve - 2 pieces (supply and return);
- Mayevsky tap - 1 piece.
Hint: the Mayevsky tap is installed in the upper passage plug.
Ball valves provide the ability to turn off the radiator; The air vent allows air to be released above the level of the connections. However, such piping requires a noticeable amount of time during startup and does not allow flexible adjustment of the heat transfer of the radiator.
Here is an advanced set of equipment that solves both problems:
- ball valve for return line;
- throttle or thermal head (thermostatic valve) for supply line;
- automatic air vent.
This is exactly the set of fittings used here.
The throttle allows you to regulate the heat transfer of the battery with your own hands. A slightly more expensive thermal head independently regulates the permeability of the liner, reducing or increasing heat transfer depending on the air temperature in the room.
With a diagonal connection, the radiator can be equipped with a flush tap. The best flushers are made from ordinary ball valves with male-female threads screwed into the radiator plugs.
For two-pipe wiring
The instructions for selecting fittings for a two-pipe circuit differ only in that the presence of at least one choke in the kit is mandatory.
Heating balancing, remember? But you can do without vents if one of the bottlings passes above the heating devices: the only Mayevsky valve or automatic air vent is installed at the top point of the circuit.
Please note: often the automatic vent is part of the safety group of the heating boiler and is located in its body.
The most practical set of fittings includes:
- throttle on the return pipeline;
- thermal head on feed;
Throttle and thermal head on liners.
- with a diagonal and one-sided connection - a flushing valve in the bottom plug.
Pipes
What pipes can be used for piping, and what features should be taken into account?
Steel
It is used to tie bimetallic heating devices in central heating systems. The method of connecting pipes is welding; The batteries are mounted on sockets with threaded fittings.
Important: in central heating systems, there must be a jumper parallel to the riser in front of the valves and chokes on the connections. Otherwise, your throttling valve will regulate the flow of the entire riser.
The photo clearly shows the jumper in front of the valves.
Separately, it is worth mentioning galvanized steel. It is considered an unsuitable material for heating, and absolutely undeservedly. Among other things, galvanizing was used to tie cast-iron heating radiators in Stalin buildings built in the middle of the last century; These pipes are now in no different condition from new ones.
The only drawback of galvanizing is that all connections have to be threaded: the zinc that burns out on the welds makes the pipe vulnerable to corrosion.
Metal-plastic
Tying heating radiators with metal-plastic pipes is possible, but with several restrictions.
- It is only applicable for self-contained systems with their limited pressure.
- It is advisable to use press fittings.
- If compression fittings are used, then the use of a calibrator is mandatory. Otherwise, when the pipe is combined with the fitting, the rubber O-rings on the fitting are lifted, which leads to leakage after several heating and cooling cycles.
Polypropylene
Tying heating radiators with polypropylene can also be lightly recommended only for autonomous circuits.
And there are a couple of restrictions:
- Reinforced pipes with a working pressure of PN25 are preferred.
- Long straight sections of the pour are equipped with compensators - ring or U-shaped bends, which dampen the elongation of the pour when heated.
Schemes for piping heating radiators with polypropylene must include expansion joints in straight sections.
Conclusion
As you can see, there are quite a lot of subtleties in designing heating systems for a private home. You can get acquainted with some of them by watching the video in this article. Good luck!
How to wire a heating system: diagrams and 3 subtleties of connecting batteries
For efficient operation of the heating system, radiators are connected. This procedure is accompanied by the installation of shut-off and control valves, which guarantees the reliability of the heating equipment.
Before installation work, the type of radiators and connection options are selected in advance.
Heating consists of several components: piping, boiler, radiators and heating devices. Connecting batteries is not difficult. A place for the radiators is selected, pipes are brought to them and connected.
Wiring: heating radiator wiring
Different types of strapping are used. The choice depends on a variety of conditions. The quality of the piping affects the performance and productivity of the system.
Shut-off control valves can be used using a shut-off valve, with manual or automatic control devices.
The faucet does not provide temperature control. Manual adjustment allows you to set the temperature value without special equipment.
Automatic regulation involves installing a special valve that regulates the temperature of the coolant.
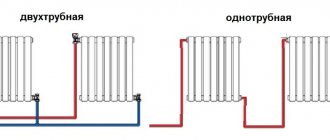
Autonomous heating systems use single-pipe and two-pipe wiring.
- The single-circuit type is characterized by the distribution of coolant around the entire perimeter of the room in one circuit. Radiators are mounted in the system, taking into account the movement of the coolant. The main line is divided in half, in which the line leaving the boiler is called supply, and the second part of the pipeline is called return.
- In the second system, two lines of coolant movement are installed: supply and return. Each of the circuits is connected to a radiator. In a two-pipe system, the temperature supplied to the radiators is equal.
Connecting a radiator with your own hands: installing cast iron, aluminum and other batteries
To properly connect the heating radiator, two connections are required for the return and supply pipes.
The connection diagram for heating radiators comes in the following varieties:
- A one-way connection is characterized by the fact that the liner is connected using pipes. At the same time, the nearest sections warm up well, and the rest are cooler. Radiator flushing is often required.
- When connecting diagonally, the upper radiator pipe and the lower one are used on different sides. This connection has good heat dissipation. Sections in the lower part are silted.
- The bottom connection is made in the lower area of the radiator. Heat transfer is less than with the diagonal method. There is no need to flush the heating system.
Regardless of the connection, shut-off valves for heating radiators are used.
In addition to the taps, a thermostat is installed that regulates the coolant supply power.
To remove excess air, a Mayevsky valve is used. This air vent increases heat transfer.
When designing the heating of a private house, it is better to use the bottom and side wiring diagrams. This will simplify installation and reduce material costs.
Radiators are connected according to the following diagram:
- During installation, the packaging film is not removed until the work is completed, so as not to cause harm to the product.
- The pipeline is shut off and the old structure is dismantled.
- The installation location is determined. In this case, the required distances from the window sill and from the floor are taken into account. Marks are made on the wall surface for mounting brackets. Then the brackets are attached to the wall.
- A shut-off device, thermostats, a coupling valve and air vents are installed on the heating product. The tightness of the structure is ensured. In this case, the threaded connections are wrapped with special flax and coated with silicone sealant.
- The devices are mounted to the brackets and leveled horizontally using a level.
- The piping systems are then connected using adapters and quick connectors.
- The structure is pressure tested and a test supply of coolant is carried out. All connection elements are checked and there are no coolant leaks.
Selecting the type of strapping
The heating system radiator piping scheme is selected based on the following factors:
- the type of system that supplies heat to the room;
- method of connecting the radiator to the central lines.
Determining the system type
Before proceeding with the selection of heating equipment piping, it is necessary to determine the type of room heating system. The following types are currently used:
- single-pipe systems;
- two-pipe systems.
Single-pipe heating is a system in which all heating equipment is connected by one pipe. The coolant sequentially enters each radiator and returns to the boiler through one closed circuit.
Heating system with one closed circuit
The advantages of a single-pipe heating system are:
- balanced system, which allows for uniform heating of all connected radiators;
- increased warm-up speed;
- aesthetic appearance and minimal amount of occupied space;
- ease of installation;
- savings on materials.
The disadvantages include:
- the interconnectedness of all elements of the system, which makes it impossible to carry out repair work on one of them without shutting down the other;
- difficulty in regulating coolant temperature;
- the need to install a pump with a high power rating.
Two-pipe heating includes two main pipelines. One delivers coolant to the radiators, and the second returns it to the heating equipment.
Heating network with two main pipelines
The advantages of such a system are:
- the same temperature of all radiators, since the coolant for a separate battery comes directly from the heating device;
- the possibility of constructing a system with lower internal pressure, which allows the installation of equipment of lower power.
The most significant disadvantage is the cost of the system. It is generally accepted that the cost of purchasing materials increases by 2 times. In fact, this statement is incorrect, since a single-pipe system requires fewer pipes, but with a larger diameter, and for a two-pipe system it is vice versa.
A single-pipe heating system is installed in almost all old apartment buildings. It is also advisable to install it in country houses with an area of up to 150 m². In new houses and country cottages, a two-pipe system is installed.
Connection options
Methods for connecting radiators also depend on the location of the pipes in a private or apartment building. Highlight:
lateral connection, in which the inlet and outlet pipes are located on one side of the radiator. This type is characterized by minimal costs for arranging the connection (serial connection), aesthetics and minimal losses of thermal energy. Typically used in most apartment buildings;
Lateral radiator connection
diagonal connection. Unlike the previous case, the input and output are located on opposite sides of the radiators. The main advantage is the possibility of uniform heating of radiators with a large number of sections (from 12 pieces);
Diagonal battery connection
bottom connection - inlet and outlet pipes are supplied from below. The advantages of this method are aesthetics and the ability to install lines on the floor or wall. The disadvantages include significant losses of thermal energy, ranging from 1% to 15%.
Bottom connection of the heating device
Piping a heating radiator with metal-plastic pipes
It is allowed to tie cast iron heating radiators with plastic hoses.
To begin with, we will remind you of the main features of household heating systems. In city apartments, the batteries are connected to centralized open coolant supply systems, while in most country houses, autonomous closed systems are used.
Centralized supply is characterized by lower coolant quality, higher pressure and temperature, and increased emergency activity. Therefore, for such systems it is necessary to correctly select the material of the hoses and radiators.
Steel or copper lines, cross-linked polyethylene parts, as well as cast iron, copper or bimetallic heating convectors would be appropriate here.
https://www.youtube.com/watch?v=AXLZiBPEYhcu0026t=1271s
Lines made of cross-linked polyethylene are well suited for transporting coolant.
Important! There is a lot of data on the successful use of polypropylene hoses and aluminum radiators in city apartments, but you make this choice at your own peril and risk.
The layout of intra-house supply lines varies:
- Single-pipe, two-pipe and manifold;
- Top and bottom;
- Horizontal and vertical.
There is also a supply with forced and gravity movement of the coolant, however, in our time, gravity options are found only in villages. Centralized supply occurs under pressure, and modern autonomous circuits are equipped with circulation pumps.
The correct choice of shut-off and control valves increases the ease of operation of batteries.
Important! From the point of view of the types of instrument piping, the method of wiring according to the number of lines is important: one-pipe and two-pipe connections have differences in connection.
Strapping schemes
The photo clearly shows the strapping elements.
The most important factor that affects the efficiency of devices is the scheme of their connection to the risers.
Let's take a closer look at the existing schemes:
- Lateral connection . With this type of piping, the coolant enters the device from the side, fills the sections and flows back out from the same side. It is used quite often, especially in apartment buildings with vertical wiring;
- Bottom connection . In this case, the supply is connected from below, the coolant fills the device and also flows out from below, but closer to the other side of the battery. This scheme has become popular recently with the advent of underground or baseboard wiring;
- Diagonal connection . The coolant enters the device at the top point on the side, fills it and exits from the bottom on the opposite side. It is considered the most effective method, thanks to which uniform heating of the device and maximum heat transfer are achieved;
- Single pipe connection . The device has only one entry point, being essentially just a dead-end extension. Least effective method.
When installing the system yourself, study the differences in the methods of connecting equipment.
Important! For lateral and diagonal connections, the coolant must enter at the top point.
If you run it from the bottom up, the efficiency loss can be up to 20%.
Tying heating radiators with polypropylene using a bypass.
When using a single-pipe supply system, it is advisable to include a bypass in the piping. It will allow you to turn off the product for repair or replacement without stopping the entire intra-house circuit.
Shut-off and control valves
Piping heating radiators with metal-plastic pipes using a shut-off valve.
Let's look at the strapping elements in more detail. As a rule, a typical convector has four holes - one at each corner. One of the upper holes includes a supply core, which is removed from the riser using a coupling.
Before entering the device, a ball valve, valve or temperature control valve is placed on the supply side. On the opposite side, a Mayevsky valve is installed in the upper hole to remove excess air from the system.
Battery piping in a one-pipe system.
The return pipe most often comes out from below on the same or opposite side (see the chapter on piping diagrams); it is equipped with a ball valve. The remaining hole is closed with a plug.
It is better to connect the device using American ones, which are equipped with union nuts. This will make it easy to disconnect it from the main line if repair or replacement is necessary.
The supply side is equipped with a valve with a thermal head.
The easiest way to do the strapping is with plastic parts, since they do not require electric arc welding. Polypropylene allows you to create complex branched circuits without much difficulty. Metal-plastic pipes made of cross-linked polyethylene are also easy to install, but their price is much higher.
Conclusion
For the most efficient heating operation, it is important to choose the right method and type of connection of devices to the coolant supply and outlet pipes. For self-installation, you will need instructions, which we presented in the video in this article.
Radiator piping - diagrams and docking
By and large, tying up a heater is about connecting a new player to the game. The radiator is connected to the pipes, equipped with new plugs and control valves - that's it, it's already in the game.
But the stated simplicity will only work when everything is done correctly, the coolants pass the radiator in the right direction, the radiators themselves are equipped with fittings with a full understanding of compatibility issues, and the connections are sealed with skill.
Competent design input.
To understand the correctness of the process, let’s break it down into its components.
The entire instructions look like this:
Knowledge of the scheme - half the problem is solved!
For information! Separately, the general rules for the spatial placement of the radiator will be considered, since neglecting them can significantly reduce the efficiency of the battery.
General concepts
Violation of simple rules for placing batteries can negate all subsequent stages of piping, reducing the efficiency of one link to 25%.
- The distance from the window sill should not be less than 10 cm;
- The distance from the floor to the bottom edge of the radiator should not be less than 12 cm;
- The radiator is not placed close to the wall; the minimum gap between them should be 20 mm;
For your information! The installation kit, along with plugs, includes holders for sectional batteries, and for panels, fastenings are included with the radiator. They were initially designed for the required gap.
But our person’s desire to save money and do everything his own way forces us to do this. Another trick that will remind you of the need for a gap is to glue insulation with a foil reflector to the wall under the radiator, and a gap is needed between it and the radiator.
Not far, not close, not high, not low.
- You need to be careful with battery niches. The desire to hide the heater can lead to loss of efficiency and heat loss. For lovers of aesthetics, the price may be 10% of heat transfer loss in semi-open niches and 20% in closed niches.
Let's look at the diagrams
It is important to fit the radiator correctly into the circuit. In cottages and small apartment buildings there may be two heating schemes. In apartment buildings, as a rule, there is one option.
- Single-pipe scheme;
- Two-pipe scheme.
With a single-pipe scheme, water from the boiler passes the entire cycle from the boiler, through the batteries, into the boiler through one pipe.
It is difficult to say what the original idea of the design engineers of this scheme was, but it is this scheme that has many disadvantages:
- Water or coolant under pressure is supplied to the upper point and drains downwards by self-draining. The air temperature in the upper rooms or floors will be higher than in the lower ones;
- In fact, there is a complete lack of regulation of the process . With simple equipment, you can set the calculated value for the coolant, but there will be no reason for this for the lower floors;
- Emergency work, both local and of the entire riser, causes a lot of problems. It is necessary to turn off the riser or the house.
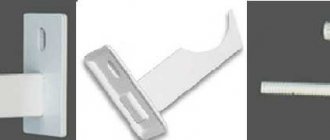
Connections to radiators of the TECEflex piping system
Your order cart is currently empty!
buy TECEflex radiator connections at the indicated prices in Moscow and the Moscow region in case of self-pickup from our warehouse. Delivery is carried out by motor transport companies to any region of Russia.
The TECEflex axial press-fit piping system offers a wide range of fittings that are used for the most common options for convenient, reliable and rational connection of heating radiators. By using radiator connections you can significantly save on time, and, most importantly, on convenience when installing the heating system of your home.
Connecting heating radiators using a variety of connection kits “from the wall”, “from the baseboard”, “from the floor” will make it as easy as possible for you to quickly and reliably install a radiator heating system. In addition, to avoid mechanical damage to components, you can buy various protective elements: casings, boxes, etc.
Double tee TECE (cross type tee)
The use of a cross-type fitting allows you to divert the supply pipeline and recirculation pipeline from two parallel main lines. The height of the fitting with protective box is 35 mm.
Connecting a radiator using a cross-type fitting
Thanks to the use of a cross-type fitting, not only installation time is saved, but also the risk of damage to intersecting pipes by trolleys, stepping on, etc. is reduced.
Connecting radiators from the floor
TECEflex universal pipes can be used to connect a radiator to pipes coming directly from the concrete screed. To prevent the occurrence of clicks, it is necessary to compensate for the linear elongation of the pipe.
To do this, it is necessary to provide pipes with an insulating tube with a thickness of at least 6 mm. In addition, it is recommended to wear protective cuffs on visible parts of the pipe. This prevents damage to the pipes, for example during vacuuming.
TECE flex PE-MDXc or PE-Xc pipes for heating systems must be guided out of the floor using a guide angle.
Types of radiators for piping
To install a heating system, you must select the type of radiator. Different types of heating equipment differ in mounting to the wall, materials of manufacture, and pipe connections. Today manufacturers offer the following options:
Construction of sectional radiators.
- Panel steel batteries made in the form of relatively thin solid panels. The connection of such radiators can be side or bottom.
- Sectional lightweight, made of aluminum. Bimetallic ones are also often used. Such batteries can be connected in one or several sections, the connection to the general system is lateral, polypropylene pipes are ideal.
For apartments with central heating, bimetallic radiators are used (cast iron ones are used less and less, this is explained by their large weight, bulkiness, and fragility). This is due to the fact that the water supplied to the heating system often contains alkali and sand, which can damage other types of radiators.
For a private home, aluminum and steel panel radiators are excellent, but all connection conditions must be met (for a copper pipeline, steel and aluminum radiators are used, for a regular one, only aluminum ones are possible).
Fittings for polypropylene pipes
The following fittings are used to connect a heating radiator to a polypropylene pipe:
- Coupling tee with diameter transition. Used when inserting into horizontal filling. As a rule, forced circulation circuits are equipped with spills with a diameter of 25-32 mm. If you need to connect a separate radiator, then it is better to take a 20 mm fitting.
- Adapters from welded socket to 1/2 inch thread. Used to connect valves, throttles, thermostatic valves.
- American. This is the name for a quick-release fitting that has union nuts and rubber gaskets. Installation of such a device takes 30-40 seconds.
Shut-off valves
Today, ball valves are most often used as shut-off valves on radiators. This is due to their high reliability and simplicity of design. In addition to conventional ball valves, three-way valves are also used, capable of not only shutting off, but also redirecting water past the radiator into the bypass. The Teflon surface of the ball is chemically neutral and does not require additional seals. The flow is blocked with one movement of the handle. The potential dangers of this method of adjusting the flow rate are discussed above. Even in emergency situations, it is better not to pull the handle of the ball valve too sharply - the consequences can be worse than the accident itself.
The need for piping heating pipes
Parts for adjusting the operation of heating devices
The piping of heating radiators ensures the correct operation of all elements of the heating main and the timeliness of their adjustment. The works also solve the following problems:
- choosing a method of control over the system - manual or automatic;
- normalization of the functions of heating communications - the flow of coolant in a separate area is limited;
- reducing utility bills;
- the safety of the finished system, which is not clogged with deposits and debris;
- ensuring normal temperature and protection from pressure fluctuations;
- removing air jams from communications;
- adjusting the heating speed of heating devices;
- the ability to connect different circuits and configure them;
- quality of distribution of thermal resources among batteries.
Strapping elements must be selected with the condition of their maximum heating.
Useful connection tips
There are some recommendations on how to connect a battery to a plastic pipe efficiently. Before attaching the fitting, the pipe must be freed from the outer chamfer. This will free the pipe from burrs that could cause the connection to become loose.
When installing brackets for mounting the radiator, you should equip every three sections with separate fasteners. To ensure that the threaded connections of the system are as tight as possible, it is practiced to use flax with paint or a polymer sealing thread. Without paint, flax will quickly fade, and FUM tape usually begins to leak in the case of minimal thread reverse.