The reason why disassembling and assembling aluminum sections becomes a necessity does not always arise spontaneously.
The most unpleasant reason forces the owner to involve a qualified specialist in urgent repairs of his heating equipment.
The appearance of a crack, an obvious leak or fogging of a weakened rib directly on the section itself leads to the idea of its inevitable replacement. Another reason is to increase or decrease the number of radiator sections to change the heat transfer coefficient.
Tool to help
A basic set of tools that you can’t do without:
- radiator, nipple key;
- open-end wrenches;
- mount;
- grinder for trimming operations;
- a set of paronite gaskets and plugs ;
- adjustable, plumbing, key;
- construction hair dryer;
- gas key No. 2.
The role of the main tool in the upcoming work is assigned to the nipple wrench.
The wrench is a thick-walled pipe with notches along its length and a flat tip with a spatula . a round metal rod, flattened at one end . The tool is calibrated by a series of notches, the spacing between which corresponds to the width of one section.
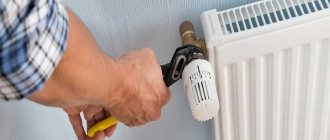
An adjustable or open-end wrench is required to carefully loosen galvanized couplings and enamel-coated end caps. A pry bar, grinder and hair dryer may be needed if problems arise with dismantling stuck joints.
Do-it-yourself disassembly and assembly of an aluminum radiator
The area where the radiator restoration will be carried out is covered with thick fabric . If this is a table surface, then the main work will not take place in weight. The prepared area will protect the soft aluminum from receiving unnecessary deformations and scratches.
Important ! Before removing the union couplings, a rag is spread under the radiator to protect the floor from dirty liquid that may leak out during dismantling. You need to have a rag on hand to absorb any remaining moisture remaining inside the sections.
Disconnection from the heating network
Before starting disassembly, the radiator is disconnected from the heating network using shut-off valves . If there are no shut-off valves at the radiator, then a housing and communal services worker is invited to turn off the heating riser for repair work.
During the heating season, after shutting off the radiator, they take a break. Since the water in it is still hot, wait for a while until the liquid cools down , and then disconnect the radiator from the heating pipes.
The coolant remaining in the battery is poured into a previously prepared bucket and the sections begin to be separated. Immediately after dismantling, the inner surface of the battery is washed with running water.
How to disassemble and reassemble the battery
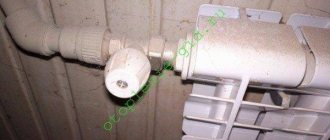
Aluminum sections connected by nipple nuts . The inner part of such a connector has protrusions by which the nipple wrench grabs the nut and unscrews it. A nut is similar to a coupling, only it has an external thread . One nipple nut has both right-hand and left-hand threads. They are made in pairs for the top and bottom connections. When the nipple is untwisted, the sections move apart, and when twisted, they are pulled together.
All plugs and adapters are pre . The connector must be accessible from all sides by the nipple wrench.
Photo 1. Fastening sections of an aluminum radiator to each other: the nipple nuts unscrew when disconnected.
To disassemble the battery, place the tool blade through the open end of the radiator into the grooves of the unscrewed upper nipple nut and, with some pressure, make a test roll counterclockwise to move the connection. If the key turns the nut normally, then insert it into the grooves of the lower nipple nut and, as in the first case, try to turn it a couple of turns.
Important ! When unscrewing connectors, follow the sequence of actions to avoid distortion.
After disconnection, the exposed thread is carefully examined for cracks and chips , and for the integrity of the thread . If necessary, the joints are cleaned with fine emery cloth.
When assembling the radiator sections, paronite O-rings are placed and placed between the sections. I lightly press the sections together and screw them together alternately. Turning the nuts to prevent distortion is limited to two turns of the wrench .
If something went wrong
During operation, the joints between sections and steel nuts stick to each other . This comes from the quality of the coolant supplied to the heating system. Sometimes even significant physical efforts are useless.
Although sticking must be dealt with, aluminum warps easily because it is a soft metal.
By heating the joints with a construction hairdryer, you can overcome stuck rust . If this doesn’t help either, because the corrosive build-up is too corrosive, then the edger gets to work.
Advice. If the nipple nut does not turn off under great pressure, then there is no need to increase the applied force with excessive leverage . In the worst case scenario, not only will the nut itself break, but both sections that sit tightly on the nut will crack.
section is cut off with a grinder , from the reverse side and at a distance from the edge of the joint by no less than half the length of the coupling. This protects the working section from destruction and does not cut the connecting nut. During cutting, the rust bounces off, making it easier to unscrew the surviving section.
During assembly, it is advisable to replace old gaskets with new ones and clean the joints , paying attention to defects and irregularities. A tight connection protects against premature leaks .
Pros and cons of aluminum heaters
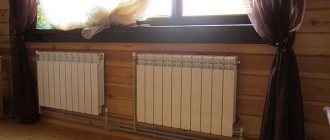
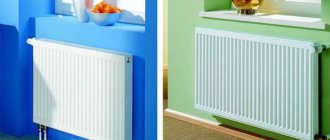
Aluminum radiators have become frequent “guests” of private houses and apartments in houses with centralized heating.
This was made possible thanks to the qualities that have won the hearts of consumers around the world:
- Aluminum is one of the best conductors of heat , releasing it into the surrounding space in two ways: radiation and thermal convection. This feature is especially in demand in heating systems with unstable media pressure.
- Assembly of aluminum radiator sections is possible without the use of additional forces. Since their light weight allows you to do everything yourself. They are easy to both transport and install.
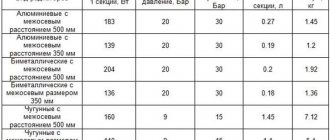
- These batteries are capable of withstanding pressure from 16 to 25 atmospheres , which makes them desirable in places that were occupied by cast iron “accordions”. There are 2 types of aluminum radiators. One of them is suitable for autonomous heating systems, where the load rarely exceeds 10 atmospheres. The second is for batteries connected to central heating, where differences of up to 15 atmospheres occur.
- Aluminum radiators are much lower in price than their steel or bimetallic counterparts. This is one of the most important factors that attracts consumers.
- They are easily adjustable , which allows you to create the necessary microclimate in the room and save money on heating.
- They have an attractive design that easily fits into any interior.
These qualities have made aluminum batteries in demand all over the world, despite the fact that they have minor disadvantages:
- Aluminum is not resistant to corrosion, but modern radiators are treated with special means that prevent its occurrence. But even after treatment, it is better to keep such heaters filled with coolant, which is difficult to do in a centralized heating system, where water is discharged after each end of the season. This is why aluminum batteries are more in demand in autonomous systems where there are no such discharges.
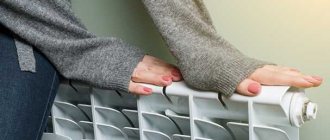
- Batteries of this type are prone to airing , so at the beginning of the heating season, excess air must be vented from them.
- The threaded connection in aluminum models is weak and if there is a strong water hammer, a leak may appear at the joint. This defect can be eliminated only by knowing how to assemble an aluminum heating radiator using additional gaskets.
This type of radiator is available in two types: solid and sectional. The second is most common in private houses and apartments.
Dismantling cast iron radiators
To dismantle cast iron heating radiators, the following set of tools is required:
- Pipe wrench number 3 (needed to unscrew the locknut and fitting);
- Pipe cutter or grinder;
- Hacksaw for metal;
- Chisel;
- Hammer and sledgehammer;
- Brush.
It is best to dismantle cast iron radiators (and any other heating devices) in the summer, when the heating system is turned off. Before disassembling the cast iron heating radiator into sections, it is necessary to drain all the coolant from the heating circuit.
The first step is to unscrew the locknuts that are located on the connections to the radiators. Next, the flaps are turned away, and the radiator can be removed. If it is not possible to unscrew the locknuts, then the connections are simply cut off, after which the radiator can be easily removed from the supports.
How are the radiator sections twisted together?
All of them are sectional and therefore can be assembled and disassembled. Although some manufacturers specifically change the nipples so that their radiator cannot be disassembled with a regular wrench. So, I uttered an incomprehensible word - nipple. Now I'll show you what it is:
This is an ordinary piece of iron with a left-hand thread on one side and a right-hand thread on the other. The white ring in the middle is the intersectional gasket. In this case it is made of silicone, but it can be made of paronite. The diameter of the nipple for aluminum and bimetallic radiators is one inch, but for Soviet cast-iron radiators the nipple has a diameter of 1¼ inches. This means that different keys are required for these heating devices. Now let's talk about keys.
How to disassemble a cast iron heating radiator into sections
Before disassembling a cast iron heating radiator, you need to prepare a set of tools:
- Wrench for disassembling cast iron batteries (5/4 inches for old devices and inch for new ones);
- Adjustable wrench of the second or third number;
- Chalk;
- Inch pipe 50-100 cm long.
You also need to find a convenient platform on which to disassemble the radiator. A good option would be a durable wooden board placed on a flat area. The battery is placed horizontally on this shield, and disassembly can begin.
The technology for disassembling the radiator is as follows:
- First of all, you need to understand in which direction the blind plugs are unscrewed, after which they need to be unscrewed. Before disassembling the heating battery, it is necessary to mark on the key the length to the unscrewed nipple. To do this, the key is placed on the battery and its edge is brought to the point where the bushing is located. A mark is made on the key using chalk in a circle until the key is inserted into the battery.
- Next, you need to figure out in which direction the key for cast iron batteries should rotate - they can have both left- and right-hand threads. Accordingly, when rotating in different directions, the battery sections will diverge or converge. The direction of rotation is determined using a fitting, which is screwed in on the same side where the key will subsequently be inserted.
- With a right-hand thread, the fitting is screwed in clockwise, so the direction of rotation of the key when unwinding will be the opposite. With a left-hand thread the situation is exactly the opposite.
- The actual promotion of the radiator begins with the first section. The first step is to strip the threads on both nipples one by one (as a rule, just half a turn of the key is enough). Next, the battery is gradually untwisted on each side so that the distance between the sections is about 0.5 cm.
- When unwinding, it is very important to maintain the specified gap between the sections - if you untwist the battery on one side more strongly, then there is a considerable probability that the thread will jam. During the unwinding process, it is worth putting a pipe on the key to reduce the required effort.
Any modern radiator can be disassembled using this technology. Often, such heating devices have plugs with the thread direction marked.
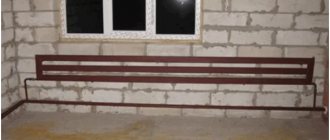
Radiator key
We heat the edge (end) of the reinforcement 40 - 50 mm long to an almost white color (not to the melting point of the metal) and flatten it on an improvised anvil. We periodically repeat this more than once, while simultaneously giving it a certain shape and size. It is convenient to have with you a nipple of the required diameter, by which you can immediately measure the workpiece being processed. After all the dimensions have been obtained during the processing process, we proceed to hardening the working area. We again heat the end to be processed to a length of approximately 150 mm and sharply lower it into a metal bucket filled with water. We continue hardening, moving in a circular motion, until completely cooled.
Dismantling an old radiator
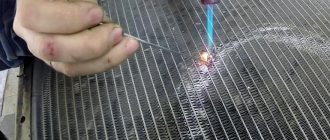
In the case of old batteries, some problems may arise - for example, the threads in such devices may become stuck, so before disassembling they will need to be heated with a blowtorch or autogen. When the joints are heated, you need to quickly tear off the nipples on both sides of the battery. Using the same method, any elements stuck to the battery are removed.
After prolonged use of the battery, the nipple may completely rust. In this case, it will be impossible to hook it with a key, so to disassemble the battery you will need a hacksaw or grinder. The remains of the nipples are unscrewed from their places, and the threads are cleaned with a brush.
If none of the described methods helps, the last resort option is to smash the battery with a sledgehammer. Before breaking a cast iron battery, it must be placed on a horizontal surface and hit along the center line with a sledgehammer until part of the section falls off. After this, the battery must be turned over and the operation repeated to break the entire section.
All that remains is to place the radiator vertically, apply several blows to the surviving sections and untwist them. Of course, in this case there is no need to talk about the integrity of the entire radiator - in most cases, half of the sections are lost.
Disassembling an aluminum and bimetallic radiator
Before disassembling the heating battery, prepare the necessary tools.
The main tool is a nipple wrench (can be rented at a specialized store for little money). It is a rod about 700 mm long. On one side, a key head with a size of 24x40 mm is welded to it, and on the other, a through hole is made. You can insert a metal rod into it. It will make it easier to turn the nut.
This is the main tool used when assembling/disassembling heating radiators
There are several notches on the surface of the key. The distance between them corresponds to the width of the radiator section. By inserting the key inside the battery and counting the number of notches, you can easily find the nipple for the desired section.
Before disassembling the heating battery, you need to be aware of the direction of rotation of the key. Place the radiator on a flat horizontal surface with the front side up. On the right there will be a right-hand thread, and on the left side there will be a left-hand thread. In order not to get confused, you can do it simpler: take the nut and tighten it alternately on the right and left, and then decide which way to turn the key. This is important because the threads can easily be stripped and then you need to buy two new sections. Imported manufacturers make the following designations for threads on the plugs and fittings on the front side of the section: D-right, S-left.
The thread on the nipple nut can be right-handed or left-handed, so before disassembling the radiator, we determine which direction to turn
Let's say you need to unscrew one section on the right. To do this, insert the key with a “spatula” into the upper hole to the desired location, secure it in the groove of the nipple nut and forcefully turn the key counterclockwise and “rip it off” from its place. This is where you may need a rod inserted into the ring on the key: a decent amount of force is required.
We make two full turns and move the key to the lower part of the radiator. We repeat the operation, rotating the key in the same direction. Unscrew the nipple 2 turns here too. We take out the key again and repeat the procedure for the upper part. So, one by one, unscrew the section completely. This is done to ensure that there are no distortions.
Heating radiator designs
If a heating element breaks down, especially in the cold season, it must be repaired or replaced immediately. Whether it is possible to disassemble the radiator depends on the type of its design. Quite often, non-removable types of radiators are installed in apartments, which cannot be restored. In this case, it is better to immediately purchase a new battery. But there are also collapsible models that can be dismantled to replace a damaged element and installed back.
Products are divided into two main types:
- Sectional batteries assembled from several identical sections reliably connected to each other. Each of them has a channel through which water circulates, and heat-emitting ribs warm the room. Sectional batteries are the most popular because the cost of such radiators is lower. If a breakdown occurs, it is enough to replace only the damaged section, and if necessary, you can always add or remove ribs.
Sectional heating radiators
- Monolithic products are one solid structure that does not have separate sections. In appearance, these radiators may resemble sectional counterparts, but the differences between them are obvious. Monolithic devices do not have connecting joints, due to which they are able to withstand greater pressure. Because of this, the trouble-free operation of these structures is almost twice as long as that of sectional ones. But in case of leakage, the monolithic device will have to be changed completely. In sectional products, it will be enough to replace the damaged element.
Bimetallic monolithic radiator
How to assemble an aluminum radiator
We assemble in reverse order. We place the sections on a flat surface (a suitable sized table or simply place it on the floor). If the radiator is not new, unscrew the end cap and Mayevsky tap.
Before installation, you should carefully examine the threads and grooves; they must be of high quality, without chips or changes. On the mounted section for testing, we “drive” the thread by screwing in and unscrewing the nipple. Here you need to pay attention to the fact that there may be a gasket under the layer of factory paint in front of the thread. Lightly rub the end with fine sandpaper; if it is found there, then it must be carefully cut off with a knife with a sharp blade.
This is what an aluminum radiator looks like in cross section
Before adding sections of the heating radiator, be sure to clean the ends to a smooth surface. We even remove factory paint. It is not needed at the ends of radiators, but will only contribute to the early appearance of leaks. Sooner or later, coolant will begin to seep under the paint. In the case of non-freezing liquids, this will happen very quickly; if water is used in the system, then not very much, but it will definitely happen. And then coolant will begin to leak between the sections, although the gaskets are still in perfect condition. The whole point is that the paint on the ends has peeled off or been corroded, and microcracks have appeared. So we make sure to clean the ends to bare metal, but use fine sandpaper so that the surface of the metal is smooth and without scratches. This guarantees the operation of the system without leaks in the radiators.
For better tightness, the ends then need to be degreased (using gasoline). Gaskets are also degreased, but they need to be washed with ordinary soapy water. For a system that will be filled with water, degreasing is an optional procedure, but for systems that will run on antifreeze it is necessary. Antifreezes have high fluidity and seep into the smallest pores. After everything is dry, we begin to assemble the aluminum radiators.
Then tighten both nipple nuts half a turn. Heat-resistant paronite (silicone) gaskets are placed on top of the nipple to seal the joints. Now we take the section that needs to be screwed and place it tightly against the nuts, checking the tightness of their fit. Next, insert the key into the upper hole and tighten it 1-2 turns. At the same time, we do not use the lever yet. We twist our hands. Then we perform the same operation in the lower hole. We repeat several times, alternately tightening both nuts several turns.
We unscrew the sections gradually, one or two turns of the nut, either from below or from above.
Tighten as much as you can. Only after tightening by hand can the lever be used. This must be done in two stages on each nipple. It is better not to use excessive force when final tightening the nipples, since you can easily break the threads: aluminum is a soft metal, don’t forget.
If the section is completely assembled, screw a plug onto the unused holes on one side, and a Mayevsky valve on the other (to bleed air from the system). Now you know how to assemble sections of a heating radiator and, if necessary, you can add several sections.
Battery assembly
In principle, with the necessary tools at hand, even a beginner can assemble or disassemble an aluminum radiator with his own hands.
To install an aluminum radiator heater with your own hands, you need to:
- Place the battery on a flat surface. This is necessary in order to inspect the device before installing it and check all joints for possible cracks or chips.
- Before connecting the heater elements, the threads at the joints are cleaned not only of debris, but also of factory paint. This is done using fine-grained sandpaper. This is important, since in the future the paint layer may crack, which will lead to leakage. For the sake of presentation, manufacturers paint not only sections of radiators, but also their joints.
When cleaning the battery from paint, you need to make sure that the sandpaper does not leave scratches on it, which could also cause a leak in the future.
Once all sections of the radiator have been assembled, it can be connected to the heating system and checked for possible leaks. Since aluminum batteries are quite lightweight, you can easily connect them yourself, even without the appropriate skills.
Dismantling cast iron radiators
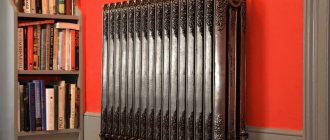
The most common are cast iron radiators MC140. During their operation, which in some cases is 30 years or more, they have shown themselves only at their best:
- accumulates heat;
- resistant to poor quality coolant;
- ease of maintenance;
- reliable and have a long service life (from 10 years and above)
How to disassemble this grandfather? And it’s very simple, because structurally all radiators are assembled according to the same principle: using nipple nuts and gaskets for tightness. True, in those ancient times, tow with paint was screwed onto the nut and there was a rubber gasket.
Useful video
How to assemble an aluminum heating radiator - video:
The need to disassemble heating radiators may arise in every home. If one of the sections leaks, it needs to be replaced or removed. It is necessary to add additional fins when the existing ones do not warm the room to the required temperature. And if during the heating season the apartment becomes hot, you need to remove the extra sections. Such problems can be solved with the help of professionals, but if your financial condition leaves much to be desired, you will have to learn how to disassemble a heating radiator with your own hands. This will allow you to save money and gain useful experience.
How to disassemble a heating radiator with your own hands
Assembling a cast iron radiator
This is done in the reverse order, the only difference being the change in the direction of rotation of the key. Do not forget about replacing gaskets; it is best to buy paronite gaskets in the store, they are stronger, more durable and can withstand aggressive coolants (antifreeze).
If you don’t find such gaskets, you can use plumbing flax. It is wound onto the right-hand thread clockwise, and onto the left-hand thread in the opposite direction - counterclockwise. Also, for reliability, you can apply a sealant (for example Unilock) to the threads of the nipple nut. If you plan to use antifreeze in the system, then you cannot apply paint to the winding - it will corrode very quickly and you will have to repack everything. And this is draining the system, flushing it, disassembling it, then assembling all the sections... a lot of work. So, under a system with antifreeze, use a chemical-resistant sealant and paronite gaskets.
Radiator assembly key.
To disassemble and reassemble the radiator you will need a tool. This “miracle of technology” looks like this:
This is not the only version of this type of instrument. You can find many design solutions in stores. For example, these:
Regardless of what the key looks like, its task is to unscrew and tighten nipples. Personally, I have always assembled radiators using the first version of the key. It is advisable that the tool be made of hardened steel. Otherwise, one key will only be enough for you to make a few joints, and then it will become unusable and you will have to buy a new one.