Fuel supply and barrel manufacturing
We have already figured out a little about how the Babington burner is made.
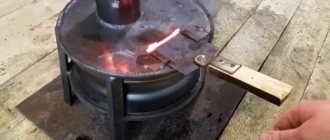
The product design, despite its simplicity, has several pitfalls. For example, you need to use a suitable pump. The best option in this case is a gear one. It is optimal for working with viscous liquids. But if there is no pump, then you can use a simple scheme for organizing the supply of fuel by gravity. But such a solution only takes place if the amount of oil in the sump, and therefore the pressure, is maintained at a high level. The barrel is a regular metal pipe 6 inches in diameter and 3 feet long. Just one nozzle is enough. If there is a pipe with thick walls, then it is best to use it, since this option is better suited for the combustion process. Pipes of this type retain heat much longer. At the final station, do not forget to install a depulsator. The Babington burner will operate without flame pulsation.
General information
The burner at the Babington mine appeared a very long time ago and it is quite easy to guess who its creator was. Currently, the scope of application of such mini-heating equipment is limited to heating small rooms. The interesting thing is that the burner can be assembled from scrap materials and does not require any investment. In addition, there is no need to organize a chimney, since no smoke is produced during the combustion process. However, it is still necessary to take care of good ventilation in the room. By the way, the patent for the Babington burner was withdrawn relatively recently, so in recent years the drawings of the unit have become available to everyone. But before moving on to the assembly process, I would like to understand in detail how the device works. First, a little history.
Do-it-yourself burner: operating principle
If you look at photos, pictures and drawings, it becomes obvious that the secondary oil forms a thin film on a curved surface. Through a groove, gas or air is supplied into the container under low pressure. After heating, the oil is atomized by this air flow, ensuring high-quality ignition.
It was this method of ignition that became the basis for inventions that have become widespread in homemade devices and drip burners using waste oil, produced in factories. Used oil is essentially free fuel, a used suspension. Therefore, it is considered more advantageous compared to other heat sources:
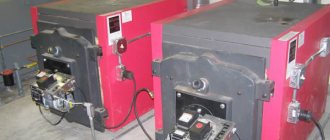
You can make a waste oil burner yourself
- solid fuel and briquettes for a homemade pellet burner;
- gasoline and diesel fuel;
- electricity;
- natural gas;
- kerosene;
- fuel oil.
The first devices using kerosene, diesel fuel and oil smoked heavily and emitted an unpleasant odor. Later they offered a do-it-yourself gasoline burner and devices using other combustible raw materials, but an active search was underway for budget fuel. Oil turned out to be a suitable source of heat, but the soot and smell negated all the benefits. Therefore, all the efforts of the inventors went into eliminating these disadvantages of the burner for waste oil boilers. This should have been facilitated by complete combustion, heating and filtration of contaminated fuel.
How to build your own apparatus based on the Babington burner principle: drawings
The principle of operation of a homemade burner, made based on the idea of Robert Babington, is clear from the drawings, where the components of the unit are visible:
Drawing of a waste oil burner according to Babington
- waste oil tank;
- waste tray;
- fuel supply pipe;
- a small fuel pump for supplying portions of oil;
- hemisphere for spraying with a small hole;
- heating chamber with heating element (may be missing).
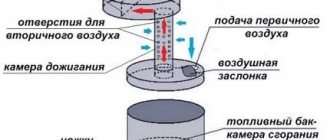
The used oil evaporates and flows down the hemisphere. These oily vapors are mixed with the air mass, resulting in a fuel mixture. The remaining oil that has not had time to be utilized flows into the pan, and from there through the tube back into the fuel tank.
This unit, based on Babington's patent, designed to burn liquid fuel, is quite simple. Therefore, it can be reproduced from scrap parts in a home workshop. Success depends on the exact compliance of the parts with their intended purpose and on the coordinated operation of all components. Therefore, before making a burner with your own hands, you should carefully calculate all the parameters.
The design of the burner is quite simple, so it can be made from available materials
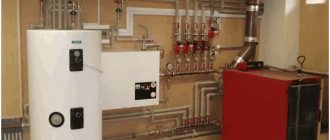
Potbelly stove plus water circuit
Any home could benefit from having an emergency heat source. Its role can be played by an ordinary, but slightly modernized, potbelly stove. You can improve the stove in two ways - put a water jacket on the burner pipe or wrap its body with a coil of copper tubes.
The coil turns are placed at a distance of about 5 cm from the perforated body of the potbelly stove and connected to the general heating system. A reflective screen is installed around the coil. For its manufacture, sheet aluminum, galvanized steel, and tin are used.
The water jacket is a tank on the upper chamber of the potbelly stove. There should be 2 fittings in its body - one for water supply and the other for drainage. In general, the design resembles a samovar. The volume of the water jacket depends on the length of the heating system and the method of circulation of the coolant.
In practice, the issue of constructing a water circuit is solved by installing a container directly on the potbelly stove. Hot water enters the heating system through the outlet. After going around the circle, it radiates heat into the room and returns back to the container.
If a pump is built into the system, the volume of the tank is small, but with natural circulation it has impressive dimensions. To control water parameters, a pressure gauge and thermometer are installed on the tank.
Kinds
The Babington burner or automatic oil burner is in great demand, and it can also be made at home. The oil in this unit is supplied under low pressure and therefore flows freely. The shape of the installation resembles a sphere or bowl, the fuel forms a thin film, after which the fuel vapors together with the air turn into a torch, which is ignited and gives off heat.
The drip-type device does not have a complex structure; its fuel is very accessible. The supply occurs from a remote reservoir, which ensures the stability and safety of the device. This evaporation burner is in demand not only in industrial settings
It is important to note that most of these devices are excellent for operating solid fuel boilers and stoves
A liquid fuel burner can be called a mobile and efficient device. It is easy to operate, runs on cheap oil, but you need to select high-quality fuel to start the device.
The pyrolysis burner works with solid fuel, which is placed on a grate. After the fuel is ignited, the door closes and the smoke exhauster starts working. Thanks to such a damper, the temperature inside the chamber rises to 800 degrees Celsius, but due to the lack of air, organic fuel begins to smolder and char, releasing gases. The latter enter the grate, mix with nitrogen and oxygen, then the mixture acquires the ability to burn. The radiated heat is sent to the organic fuel, thereby supporting the smoldering process.
To create such structures, available materials are used; the duration of the burner cycle is just over a day
It is important to note that this type of installation is considered fireproof, and also supports the use of pallets, firewood and coal. Boilers with such a burner have a low amount of combustion products, so they are considered environmentally friendly
The next type of burner is a supercharged injection burner, which is used in conjunction with melting furnaces for the forge.
Advantages and disadvantages
The main advantage due to which the homemade burner at the Babington mine has gained wide popularity is its omnivorous nature, as mentioned above. In fact, you can pour any heated oil of a reasonable degree of contamination onto a spherical surface, and a properly made burner will still operate stably. It is not afraid of gasoline or antifreeze impurities, unless their ratio with oil is one to one, then problems will inevitably arise. And then, this is not at all a reason to get rid of such a mixture; for the burner to function normally using waste oil, it will need to be well diluted with the “correct” treatment, and then put into use.
Another advantage is the simplicity of the design, which is why craftsmen quickly mastered this product. Indeed, making the “heart” of the device from a ball or hemisphere placed in a body is quite simple. It is somewhat more difficult to organize the fuel supply and air injection, and even to configure the entire system so that the DIY Babington burner operates stably and safely. But there is wide scope for the implementation of various technical solutions.
Of the serious shortcomings of the unit, only one is striking. This is the constant presence of dirt in the room where the liquid fuel burner operates. Unfortunately, it is impossible to completely eliminate accidental spills or seepage of contaminated machine oil through leaks, even if all connections are sealed and an automatic Babington burner is installed. To one degree or another, the room will be dirty, you will have to come to terms with it.
Due to its popularity and simplicity, the burner for the waste boiler is made by craftsmen in different variations, but we will undertake to describe the simplest design, which will be available for repetition at home. First you need to select the necessary materials, here is their list:
- Steel tee with internal threads with a diameter of 50 mm - for the body.
- Squeegee with external thread with a diameter of 50 mm - for the nozzle. Its length is optional, but not less than 100 mm for the nozzle.
- Metal elbow DN10 with external threads - for connecting the fuel line.
- Copper tube DU10 of the required length, but not less than 1 m - to the fuel line.
- A metal ball or hemisphere that fits freely into the tee is for the working part.
- A steel tube of at least DN10 is used to connect the air duct.
To make a burner for testing with your own hands, you need to perform one precise operation - make a hole in the center of the sphere. The hole diameter is from 0.1 to 0.4 mm, ideally 0.25 mm. It can be done in 2 ways: drill with a tool of the appropriate diameter or install a ready-made jet at 0.25 mm.
It is not easy to accurately make such a small hole; thin drills easily break. Instructions on how to do this correctly are shown below:
Another way to make a calibrated hole in the spherical part of an autonomous burner is to insert a nozzle of the required diameter there. To do this, a hole is drilled, the diameter of which is slightly less than the outer diameter of the nozzle, and processed with a reamer. The jet is pressed inside and polished, as described in the video:
When this operation is completed, we assemble the burner based on the drawing:
A hole must be made on the side of the nozzle wide enough to ignite the unit. A large fuel heating spiral is not needed, 2-3 turns are enough. The finished product can be mounted on a mounting plate and built into any boiler, including a homemade one. At the end of the work, you need to connect the air and fuel lines, and then organize the supply of oil and air. The simplest method of fuel supply is by gravity; for this purpose, the waste container is suspended from the wall above the burner device and a tube is laid from it.
If you use a pump to pump oil, you can subsequently use control sensors and a control unit, then you will have an automatic burner that will be safer to operate. Detailed instructions for selecting materials and assembling the device are shown in the video:
If everything is done correctly and the diameter of the air hole is 0.25 mm, then the fuel consumption of the burner should not exceed 1 liter per hour. There should be no black soot during combustion; you need to achieve even burning of the torch. The adjustment is carried out by moving the sphere back and forth or changing the air pressure. Any compressor can cope with its injection, even from a refrigerator, since the operating pressure does not exceed 4 Bar.
Security measures
- A burner using oils and other GSPs can be dangerous if installed and operated incorrectly. To avoid a fire, a number of measures must be observed:
- floors and walls made of flammable materials are sheathed with metal or asbestos sheets;
- fuel reserves are stored at a safe distance;
- oil leaks must be removed in a timely manner;
- electrical elements of the installation must be carefully insulated to avoid sparking in the oil spray area;
- The burner must be placed out of reach of air currents and drafts.
A burner with an open nozzle must not be left running unattended!
The Babington burner, unlike a blowtorch converted for working in mining, is a reliable and durable unit that does not require complex maintenance. It is enough to periodically clean the fuel system, tank and sump, blow out the air duct in idle mode, and also monitor the serviceability of the compressor and oil pump. A working burner is a reliable and economical unit with a long service life.
What is a Babington burner?
A homemade oil burner can be used for a variety of purposes, for example, to work with a universal boiler or as part of a simple liquid fuel stove. The main task is to assemble a nozzle that will produce a powerful flame. Here are the requirements:
- Low power consumption;
- Ease of manufacture;
- High efficiency;
- Impeccable operation of the homemade product even on contaminated fuel.
We have already said that in order to effectively burn used oil, you need to heat it or spray it. The easiest way is to heat it using a heating element to a high temperature, but this is fraught with high energy costs. A liquid burner should become a source of cheap heat, but in the case of electric heating (evaporation) this is impossible - utility tariffs in our country are very high.
Since we cannot provide heating of the used oil with its subsequent evaporation, therefore, we need to try to spray it. This is exactly what the Babington burner, which has an extremely simple design, allows you to do. If we take a simplified drawing, we will see that the fuel flows here along a spherical surface in which a thin hole is made - air coming out of the compressor is supplied through it. The air jet blows away particles of used oil from the surface of the sphere, resulting in the formation of a fuel-air mixture.
The above diagram provides, albeit a somewhat simplified, but still quite intelligible explanation of the principle of operation of the burner.
The resulting mixture is ignited, and the burner flame is used for one purpose or another. For example, nothing prevents you from installing the burner in a universal boiler that can work with any type of fuel. It is also possible to make boilers yourself; there is nothing complicated about it. An interesting fact is that there is virtually no evaporation here - the process takes place at almost a low temperature, due to the pressure of air from a very thin hole.
For more efficient combustion in a liquid fuel burner, a waste oil heating system is used using a low-power heating element. Here is an approximate diagram for making such a burner.
The Babington burner is a fairly simple device, but its manufacture will still require some skills that are unlikely to be obtained anywhere except through experience.
The Babington burner has many advantages. First of all, it does not require preliminary purification of used oil, and there are very, very many impurities in it - it is not for nothing that it has such a black color. Secondly, it is extremely easy to manufacture. If you love and know how to work with tools, you can easily cope with its assembly and have a simple and effective source of heat at your disposal.
The evaporative burner during exhaust requires another heat source. This leads to the need to use a large amount of electricity or to a more complicated design - you need to somehow heat the fuel so that it begins to break down into flammable fractions. Babington's scheme is much simpler - it is difficult to do without a compressor, but it can do without evaporation. It involves the simplest spraying of fuel, after which it ignites without much difficulty.
Preparing the injector
First, we need to prepare a spherical nozzle through which the used oil will flow. It is necessary to make a hole in it with a diameter of 0.2-0.3 mm. The larger the hole diameter, the greater the burner power. And here a small difficulty awaits us, related to the fact that the air channel must be very smooth - the air must hit forward, into the nozzle tube, and not into its walls. It would be ideal to drill the hole not by hand, but on a machine, using a drill of a suitable diameter.
If you are lucky enough to find a ready-made jet with a suitable diameter, then this will be an ideal option - it needs to be mounted in the center of the hemisphere.
If you can't find a hemisphere, use a rounded piece of sheet metal with a jet welded on the inside, as shown in the picture.
The result of our work will be the most important part of our waste oil burner - this is the spray nozzle. Heated fuel will flow through it, atomized by the incoming air. From here, the fuel-air mixture will enter the burner pipe, and a flame will rage at the outlet. By installing the burner in a universal boiler, we get an inexpensive heat source.
Furnace for waste (waste oil)
More than once, both beginners and experienced blacksmiths have come to the conclusion that over time, the fuel to maintain a fire in a forge or burner, be it gas, fuel oil, coal or coke, will invariably become more expensive.
Therefore, the issue of reducing the cost of resources is becoming increasingly urgent. In this article we offer you a more detailed consideration of this type of fuel for forging equipment as waste oil.
In principle, such a resource is quite common and often does not cost as much as other types of fuel.
It’s not so easy to stop craftsmen talking about complexity. And over time, the first installations began to appear, so to speak, experimental prototypes to cover household needs, running on waste oil.
The inventors took as a basis the long-proven equipment of burners, heaters, stoves and potbelly stoves. The modifications were carried out, as is customary here, with improvised means - spare parts from tractors, cars and scrap metal, which has nowhere to be used and would be a pity to throw away.
After a long journey of trial and error in blacksmithing, the craftsmen managed to adopt the new product from those who switched to a more economical type of fuel. Having understood the essence of the process of formation of a combustible mixture, gas forges were redesigned.
During the work, one significant drawback emerged - the recycling is difficult to ignite.
To solve the problem, we took different paths: we added a forge with a compartment for preheating the oil with coal or firewood; installed oil purification filters; mixed waste with gasoline or diesel fuel.
As for forging on an industrial scale, no work is currently underway to switch to this type of fuel. The reason for this is factors such as:
- expensive modernization of industrial plants,
- possible interruptions in operation due to clogging of oil supply nozzles,
- as well as a high percentage of sulfur in this type of fuel, which entails additional consumption and changes in the structure of the upper layers of the metal.
Drip burner
A good solution would be a do-it-yourself drip burner using waste oil. The structure consists of the following elements:
- 5-10 liter containers with fuel located above the combustion site;
- a thin hose with a tap for supplying fuel to the burner;
- the burner consists of a metal pipe with a diameter of 5 mm and a length of 50 cm, a metal container with a recess for fuel combustion and a thick-walled pipe with a diameter of 10 cm with many drilled holes for air supply.
The burner design itself is located inside a potbelly stove or brick oven. The waste material flows by gravity onto a heated surface, where it ignites. It is necessary to provide a container to collect combustion residues.
Equipment conversion
Making a waste oil burner from scratch is much easier than doing any modifications that require investment. For example, user reviews indicate that converting a diesel burner for testing costs fantastic amounts. The design turns out to be complex, requiring fuel heating. It’s easier to order a ready-made nozzle from China or buy a Russian-made product, or even better, make the burner yourself.
A blowtorch burner is also not the best option. Just remember how a blowtorch works. Gasoline is poured into it, which is supplied to the nozzle under air displacement pressure. The nozzle itself is preheated, since the fuel must burn in an evaporated state. Since gasoline is a highly purified fuel, it easily passes through the nozzle without clogging it with impurities.
Using a burner during mining is associated with a constant risk of fire, so having a fire extinguisher in the boiler room is strictly necessary!
In the case of used oil, everything is much more complicated - it contains the smallest particles of metal, gasoline combustion products, gasoline itself, various fractions of decomposed oil and many other contaminants. The nozzle in the blowtorch will become dirty very, very quickly. There are some ways to modernize the injector, but they are not justified. Therefore, next we will look at how to make a Babington burner with your own hands and save yourself from difficulties and high costs.
Additional Tips
When using a homemade burner, there are usually increased requirements for compliance with fire safety rules
Important to remember:
- Do not leave a working nozzle unattended.
- It is prohibited to install the equipment in a residential area.
- To heat the heating main boiler, a special room is usually made without flammable coating on the walls, ceiling and floor.
- To increase operating efficiency, heavily contaminated waste is enriched with clean oil.
- Reliable ventilation is built in the boiler room to remove gases and smoke after fuel combustion.
- Carry out regular maintenance and equipment reliability checks.
If used correctly, a homemade burner will last for many years. The savings from using this type of heating are obvious, because the used oil has already been paid for, and if not for the homemade firebox, it would have to be disposed of.
Previous Post
Dropper from a pipe
The design of a dropper stove made from a pipe with a bottom fuel supply.
A dropper stove operating on waste oil consumes oil more economically than a potbelly stove. This is due to the fact that fuel enters the furnace gradually. The operating principle of the dripper stove is quite simple. Due to the evaporation in the ignition bowl, warm air circulates through the pipe and heats the room. It is necessary to make a dropper stove step by step, observing the correct dimensions:
- For the pipe dripper body, a pipe with a diameter of 21 centimeters is required. The thickness of the pipe wall must be at least one centimeter. Height – 78 centimeters. The bottom is made of steel sheet. The thickness of the steel should be from 5 millimeters. It is necessary to cut the bottom, taking into account the thickness of the pipe, and weld it to the structure. At the bottom you need to place a bowl for ignition. The legs of the stove can be made of any material. For example, wide bolts will do.
- A hole must be made in the pipe. The distance from it to the bottom of the structure should be at least 7 centimeters. Through this hole it will be possible to observe the operation of the stove, as well as additionally light the bowl. The hole must be closed with a door. To do this, you need to make a small door from a sheet of steel or the remains of a pipe. In order for it to close hermetically, an asbestos cord should be attached around the perimeter.
- A pipe is welded on the opposite side of the hole. Its diameter is 10 centimeters. The thickness of the pipe must be at least 4 millimeters. This pipe will serve to remove smoke.
- The cover of the structure is also made of sheet metal. To do this, you need to cut a circle with a diameter of 22.8 centimeters. Walls 4 centimeters wide are welded along the edge. Two holes should be made. One on top of the lid with a diameter of 9 centimeters. The other should be placed on the side and be no more than 2 centimeters. You will need to make a door for the second hole, and you will also need to use an asbestos cord for tightness. The small hole will serve as a viewing window.
- The next step is to create a pipe for the air supply. To do this, you need a steel pipe 76 centimeters long and 9 centimeters in diameter. It will be necessary to make several holes in the pipe with a diameter of half a centimeter, retreating 0.5 centimeters from the edge of the pipe. There should be 9 holes placed around the circumference. After another half a centimeter there are 8 holes with a diameter of 4 millimeters. After the same interval, 9 holes of 3 millimeters each should be made. Using a grinder, 9 thin slits of 3 centimeters are cut. At the other end of the pipe, a hole with a diameter of 1 centimeter is made through which the fuel supply tube will be inserted.
- The fuel supply pipe should be small, only 1 centimeter in diameter. The length and bend should be made in such a way that fuel from the tank can gradually flow into the stove.
- The air and fuel supply pipes must be welded to the furnace lid.
- The chimney should be made taking into account the capabilities of the room. The height of the chimney pipe must be at least 4 meters. The chimney must be straight, without curved sections.
Pipe dropper - assembly diagram
The dripper stove consumes only 1-1.5 liters of waste oil per hour. This is enough to heat a room with a volume of up to 150 m3.
Arrangement of doors
The stove is almost ready. The finishing touches remain. I cut an opening in the door of the lower chamber through which air can freely flow to the pan and the stove burner.
Gap
The opening in the upper door was equipped with thrust plates for additional sealing.
Riveted the thrust plates
I assembled a simple lock for the top door. During the heating process, the stove body “leads”. To ensure that the combustion chamber remains airtight, the top door must close as securely as possible. That's why I made the castle.
Simple castle
I screwed several pieces of metal corner to the wall.
I installed the stove on the screwed corner. This is both convenient (if necessary, it will be much easier to carry out an inspection) and functional (heat loss into the ground is reduced).
Installed the stove
Let's start making our own
- welding machine;
- Bulgarian;
- lathe.
In appearance, the burner looks like a small empty gas cylinder, with oppositely directed steel pipe sections welded on the top and bottom sides of it. The inside of the burner measures only 1 inch (2.54 cm) and its walls are quite large.
A piece of pipe at the bottom is required to supply oil and air to the part where combustion occurs. The short pipe at the top is used as the burner mouth from which the flame will erupt.
Expert tip: To set the air flow into the oven, a regular high-power household vacuum cleaner can be used.
Waste oil burner
Nowadays, waste oil burners are a type of equipment that is needed in almost all heating systems of technical or industrial premises.
Waste oil burners are installed in boilers and furnaces, water heaters, and heat generators.
Disposal of used motor oil (waste oil) is a fairly serious problem all over the world.
At the same time, the energy potential of mining is high; By burning it, you can get a lot of heat, incomparably cheaper than from any other energy source.
The question of how to make a burner for testing with your own hands is of interest not only to those professionally involved in the automotive industry - a stock of mining will help save a significant amount on heating utility rooms in a private household.
The waste is completely unsuitable for heating residential premises due to the original additives contained in the motor oil and the impurities that got into it during operation.
However, waste is a very specific fuel, and any other liquid fuel burner will not work with it.
Waste oil burners are designed for burning waste oils in hot water boilers, process plants and warm air generators.
It is combined and successfully uses waste oils, diesel fuel and vegetable oils as fuel, which is very convenient from the point of view of operation and allows you to reduce the cost of maintaining several types of burners.
Thanks to a wide range of capacities (from 24 kW to 595 kW), they fully satisfy any consumer needs.
In terms of performance, the burners operate on waste oil and are adjustable within different limits.
The fuel for the burners can be diesel, it is also possible to use vegetable oils and various types of processed oils with a viscosity of up to 90 units.
Among other things, the burners are very convenient to use, as they do not require adjustment when switching from one type of fuel to another.
Final stage
Homemade waste oil burners delight consumers with a powerful flame. But in order to ensure their uninterrupted operation, it is necessary to carefully consider the design of external components. In our burner, the waste oil flows down a spherical sprayer, but is not completely directed to the nozzle - most of it goes to the drain tank. From here it flows into the main tank, where there is a low-power heating element. If you do not want to transfer fuel manually, use any suitable oil pump.
The pump itself is placed between two tanks - it sucks waste oil from the drain tank and directs it to the main tank. As a result, we get a fuel cycle. Users will only have to periodically add it, since some of it gradually burns out at the outlet of the nozzle.
In order for the assembled unit to last as long as possible, all connections must be lubricated with high-temperature sealant.
As for the heating element, it must be equipped with a thermostat. It is needed for primary fuel preparation. Used oil is quite viscous, and for the injector to work it must be thinner. Therefore it needs to be warmed up. But not to a temperature of +250-300 degrees, as is done in evaporative burners, but only to +70 degrees. In this state, it will be liquid enough to fall off in the form of tiny droplets from the surface of the spherical atomizer.
Operating principle of the Babington burner
A few words about the history of the invention. The considered method of burning heavy fractions of liquid fuel appeared relatively recently - in the middle of the last century. More precisely, inventor Robert S. Babington (RS Babington) patented his diesel burner in 1969. However, the patent has long expired and now its device is available to everyone interested.
Babington’s invention is fundamentally different in operating principle from traditional oil burners, where a mixture of air and fuel is injected by a nozzle under pressure:
- Exhaust or diesel is supplied from the tank by a low-capacity pump.
- Fuel drips onto the working surface - spherical or inclined. The fuel flows down along it, forming a thin film.
- In the center of this surface there is a hole of small diameter (no more than 0.3 mm), through which the compressor pumps compressed air.
- A Babington waste oil burner operates on the following principle: a stream of compressed air exiting through a small orifice under pressure tears off part of the oil film from the surface.
- As a result, we obtain a jet of air-fuel mixture, which, after ignition, forms a stable flame. It is sent to the firebox of a furnace or boiler, heating the walls of the chamber or the water jacket. The figure below shows the operation diagram of the burner device:
Since some of the fuel flows past the hole, a flow back into the tank is organized. Here you can clearly see that the unburnt remains of used oil flow from the hemisphere into a special container, and from there back into the main tank. From it, the fuel is supplied for combustion under low pressure, and is preheated to liquefy it. As you can see, the design does not provide any filter elements.
Preheating waste oil or diesel fuel before burning it with a Babington burner is very important and here's why:
- The heated waste liquefies and forms a thinner film on the working surface, which is well atomized by the air flow. This promotes more efficient combustion.
- The smaller the droplets of liquid fuel suspended in the stream, the easier it is to ignite a boiler or Babington stove in manual/automatic mode.
Comparison with modern models
As for today's stoves, they are not at all similar to the old prototypes, with the exception of the potbelly stove, which retains the original principle of operation. In the sixties of the last century, the combustion of fuel to the state of carbon dioxide and water vapor was not considered something harmful, which cannot be said about the present time. Now any greenhouse gases are a dangerous enemy of the environment, so people are trying to abandon systems that pollute the environment. It is still impossible to ensure complete afterburning of the waste, but achieving maximum efficiency is quite possible.
Modern oil furnaces are different from the original ones
Also, in the distant past, there were no motor oils on the market with synthetic additives and clever additives, which can reduce the fuel consumption of internal combustion engines several times, but if burned incorrectly, they release carcinogens, toxic substances and mutagens. And people then were more resistant to various environmental influences, and the population was about 2.5 times smaller than now.
And in the end, Soviet engine oil was a natural petroleum product made on the basis of saturated carbons, which could not reach a high combustion temperature. This means that the appearance of harmful and dangerous nitrogen oxides in those heaters was practically eliminated. Modern installations emit such substances in significant quantities, which forces us to look for cleaner and alternative solutions.