A quick and simple method of increasing the temperature in a room are various types of large heating units, which include waste oil heat guns.
Such devices, which make it possible to heat even large spaces in a short time, are especially often used for heating workshops, garages, auto centers, and other office and industrial premises where a large amount of waste accumulates.
In this material we will consider in detail the principle of operation of heat guns and their varieties. We will also list several popular equipment manufacturers and tell you how to make a heat gun with your own hands.
How to use a homemade unit correctly?
The unit described above should not be placed near mixtures or objects that can easily ignite, or in a draft.
It is also important that the stove chimney is completely sealed, and there is at least 50 centimeters of free space around in each direction. It is imperative to ensure that no water gets into the fuel used, otherwise it will splash out of the holes in the pipe
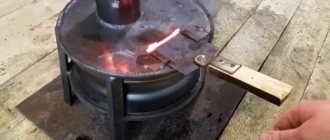
The “working” will heat up very quickly. Fill the container to two-thirds of the height, then, adding 25 grams of gasoline or solvent, ignite the resulting mixture through the fuel filling hole. For ignition, it is preferable to use a burning wick screwed to a piece of wire.
Features of heating structures during testing
The devices described in this article are often referred to as miracle stoves, because they use used oils (motor, transmission), which cost very little. Thanks to this, the operation of this type of furnace is cheap. The other miracle stoves that interest us will not operate on gasoline, diesel fuel, kerosene and other highly flammable mixtures.
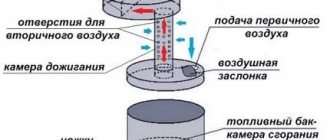
“Exhaust” devices heat rooms by directly heating the air in them. From a constructive point of view, such a unit consists of two combustion compartments. In compartment No1, the used oil is burned, resulting in the formation of flammable vapors. After this, the vapors are fed into compartment No. 2, where they are mixed with air and, having a sufficiently high temperature, quickly burn, which is why large volumes of thermal energy are released.
In most cases, both compartments will be connected to each other using a pipe
It is important that holes with a diameter of about 10 millimeters are drilled in the latter - through them air will flow into compartment No. 2 for mixing with flammable vapors
Below are the main advantages of “working off” units.
- They are quite safe, since in this case it is the oil vapor that burns, and not the used oil itself.
- It is quite possible to make such a stove with your own hands, using cheap and affordable materials.
- Finally, such devices are easy to install and use, which is good news.
But there are also some disadvantages that anyone who plans to make a miracle stove on their own should know about.
- Only a warm room should be used to store used oil. At sub-zero temperatures it will simply freeze and lose all its properties.
- In addition, this oil must be specially filtered. It is prohibited to use simple contaminated waste from car services. It is almost impossible to clean contaminated oil at home.
Trial run
To use the gun you need to perform some procedures.
- We light the lighter by bringing it to the fuel ignition hole.
- Open the valve so that gas begins to flow.
- When the gas lights up, put the lighter back.
- Turn on the fan.
If we briefly consider the manufacturing technology of this kind of heat gun, it looks like this:
- We attach a metal extension disk to the burner;
- we extend the pipe necessary for gas supply to the device;
- we install iron plates necessary to improve heat transfer;
- install the clamp on one side of the extension, after which you need to secure the heat exchanger itself;
- We assemble the entire heating device;
- we make holes in the heat exchanger so that hot air can escape through them;
- We weld a metal ring to the second end of the pipe;
- We install a switch on the heat exchanger that will turn the fan on/off;
- fan assembly itself.
In order to connect the edges of the sheet together, you can resort to the connecting lock method. If for one reason or another you cannot do this, then use regular fastening bolts.
Well, so we looked at the features, operating principle and manufacturing technology of such a device as a gas heat gun. This device is very popular due to its efficiency and the ability to heat large areas in record time. You can do it yourself, just have a list of necessary tools, materials, and a little patience.
What is required for production
Diagram of a Babington burner. (Click to enlarge) Assembling the burner is not at all difficult, but there are certain components that must all function correctly in order to ensure trouble-free operation.
The burner consists of the following parts:
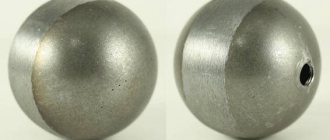
- Babington nozzles, which can be used as a door handle. Usually located in the burner.
- A 20 lb (9 liter) propane tank that will act as a source of compressed air.
- The liquid fuel pump is usually a gear oil pump. Connects via copper pipe.
- A cut-off 100 lb (45.36 liter) propane tank can be used as a burner guide. Mounted at the required height. You can also get by with a blowtorch.
- A settling tank to collect impurities that have not been burned. A cut off unnecessary cylinder will do.
- A splash catcher, because without it there will be splashes everywhere. A piece of beam is used for this.
Basic principles for designing a heat gun
To construct a heat gun yourself, you need to find a large-diameter pipe. Then make two holes slightly at the two ends on opposite sides: one of large caliber, the other of small caliber. The final products of combustion will come out through the large one, and fuel will flow through the small one. Then it is necessary to install a combustion chamber with an automatic catalyst, which will bring the gas mixture into a burning state
It is very important to maintain a high degree of tightness throughout the entire structure to avoid leakage. Then you need to attach a fan to the end of the pipe, where the small-caliber hole is located, and the structure is ready
How to make an electric heat gun - this question is not difficult, the main thing is to properly follow the safety rules when using it
This position is especially important for a tank with a gas mixture; it must be at least a meter away from other objects in the room. If possible, it is advisable to temporarily remove highly flammable materials while using a homemade heating device
Because warm air can catalyze many chemical reactions.
An electric heat gun made with your own hands does not require specialized skills or professional knowledge, and what is especially important is that there are practically no material costs for construction. However, during construction it is very important to comply with the points indicated in the drawing
(See also: Do-it-yourself greenhouse heating)
A homemade electric heat gun allows you to provide adequate heat to large areas. Since from a practical point of view, double heating occurs. The first source of heat is simple warm air, the second source is a gas mixture, after combustion of which a fairly significant amount of heat is released.
This design is mainly used for heating rooms in which, due to circumstances, it is impossible to ensure proper tightness, for example, repairs in the winter. An electric-gas gun is mainly used for heating large premises or for quickly heating small living spaces.
To make a diesel heat gun you will need a number of components, namely:
- the combustion chamber;
- diesel fuel tank;
- large-caliber metal pipe;
- catalyst;
- fan.
First you need to make a hole at both ends of the metal pipe: one large and one small. Then it will be necessary to install the catalyst into the combustion chamber in the metal pipe itself. In no case should you begin construction without having a plan for the future design, since in this case either it will not be possible to assemble the unit, or its final operation will simply be energy inefficient. (See also: Do-it-yourself gas generator stove)
The smallest diesel heat gun is used mainly for heating a small room and its main advantage is efficiency. The main feature of its design is the use of a small metal pipe and the absence of a fuel tank. That is, such a unit functions solely by converting cold air into warm air. The main thing to remember is that the fan must always have a separate power source in order to avoid a short circuit in the electrical network.
To build a diesel heat gun, it is necessary to determine the footage of the future room, and also take into account the degree of air insulation of the room where the future heating unit is planned to be used. From a practical point of view, the degree of air insulation can be determined by only one parameter: air ventilation is noticeable or not. Depending on this, you need to plan the future design. If the room is sufficiently insulated, then the gas mixture can be dispensed with and, therefore, energy costs will be significantly lower.
Many people often ask the question, how to make a diesel heat gun yourself? The answer is very simple, the first thing you need to do is make your own plan, and then carefully implement it point by point. The most common practical mistake many people make is precisely failure to comply with all points of the plan or lack of due attention.
Self-assembly of a diesel heat generator
A homemade diesel heat gun consists of three independent structures - a body or casing of the device, a fuel tank with a pump and a fine filter, and a combustion chamber. As a rule, the fuel tank in such devices is located at the bottom of the device.
The combustion chamber is a thick-walled pipe, half the diameter of the body, with a hole for the nozzle on one side and a chimney outlet in its upper part. Another independent device that is used in a diesel heat generator is a fan with an impeller. It is this device that will create a directed air flow that will flow around the heated combustion chamber and exit out in the form of a hot air stream.
To assemble a diesel heat gun with your own hands, you must strictly follow the sequence of actions:
- A blower fan of the required capacity is mounted on one edge of the housing.
- The combustion chamber with the nozzle fixed at its end is installed and centered in the casing. The combustion chamber can be a galvanized pipe of the required diameter, sealed on both sides and with technological holes made for the nozzle and smoke exhaust. We should not forget about installing a piezo ignition in the combustion chamber. It is best to use the factory version, which can be purchased at specialized spare parts stores.
- The fuel tank (it is best to take a ready-made one of the required size and capacity) should be placed 15 cm below the body. In the resulting space you need to secure the high pressure fuel pump (HPF) and the fine fuel filter.
- At the next stage of assembly, you need to connect the injector to the pump and filter with a red copper annealed tube through which fuel will be supplied. In addition, you should connect the fan via a dimmer to a household electrical outlet. This device may not be used, but it will allow you to regulate the temperature of the heated air using the speed of rotation of the fan blades, without increasing fuel consumption.
- Next, you should weld a smoke exhaust pipe to the combustion chamber, through which the combustion products of diesel fuel will be removed.
- A mandatory step in assembling such a device is inspection of the finished model by a specialist. As a professional, you can invite a mechanic you know from the nearest car service center.
Types of furnaces for mining
It has already been said above that the simplest potbelly stove is not very convenient or effective. Therefore, various modification options have appeared, which we will consider below.
Exhaust stove from an old gas cylinder
Here you will also need 4 mm sheet metal (about 50 sq. cm), but another basic element is more important - a waste gas cylinder with a capacity of 50 liters, better than the old Soviet model, propane. Oxygen is heavier and more massive, making it difficult to work with. In addition, you need:
- steel pipe with a diameter of 100 m, a length of 2000 mm;
- valve with ½ inch thread;
- steel corner with shelf 50 mm, meter or a little more;
- clamps;
- loops;
- a piece of fuel supply hose;
- car brake disc. We select the diameter so that it fits freely into the cylinder;
- another cylinder (freon) to create a fuel tank.
Sequence of work:
- we drain the remaining gas from the cylinder, drill a hole in the bottom and rinse the cylinder with water;
- We cut out two openings in the side wall - a large lower one and a smaller upper one. The fuel chamber will be located in the lower one, and the afterburning chamber in the upper one. By the way, if the dimensions of the lower opening allow, in addition to mining, it will be possible to use firewood as fuel;
- We make the bottom of the afterburning chamber from a steel sheet;
- We make a burner from a pipe - a place where volatile gases mix with air and ignite. Holes are drilled in the burner (according to the principle described above), the inside of the pipe is GRINDED, this is necessary for greater efficiency of the product;
- the finished burner is welded into the bottom of the afterburner chamber;
- We make a waste tray from a brake disc and a piece of steel sheet. We weld the lid in its upper part;
- It is better to use a coupling to connect the burner and the pan cover - this makes servicing the stove easier;
- We provide a fuel supply. To do this, a hole is made in the wall of the cylinder into which a pipe with a threaded edge is welded;
- A valve is placed at the outer end of the pipe and a hose is connected to it. The hose, in turn, is connected to the fuel cylinder;
- the chimney pipe is welded into the upper part of the cylinder, then “taken away” in a smooth upward transition until leaving the room.
In fact, this completes the work with the furnace itself, but it is better to additionally build a heat exchanger - this will increase efficiency.
One of the heat exchanger options - plates welded onto the body - is shown in the photo below.
The finished oven with the doors open (the hinges were needed specifically for them; the pieces of the cylinder cut out in step 2 are attached to the hinges).
Pressurized furnace in operation
This design is also assembled on the basis of a 50-liter cylinder.
The air supply here comes from a fan (for example, from the stove of a VAZ 2108 car), which allows you to increase the draft in the afterburner and at the same time actually make the entire surface of the cylinder a heat exchanger.
The operation process and ignition are shown in the video.
Exhaust furnace with water circuit
Manufacturing a furnace with a water circuit can be almost the same as in the simplest version. The main difference is the organization of heat extraction into the water coolant. In the photo below, this possibility is realized by winding a pipe around the furnace body. In this case, cold water is naturally supplied from below, and heated water comes out from above.
A more “advanced” option is a stove with a “water jacket”. In fact, the body is enclosed in a second, hollow one, inside of which water circulates. The heated liquid is supplied to heating radiators.
True, the phrase “does not smoke” from the manufacturer is a bit of an exaggeration - this is only possible with regular cleaning of the chimney and the use of sufficiently high-quality, filtered fuel.
In the drawing, the device looks something like this.
Drip furnace
This type of stove is safer than those designs into which fuel is poured at once. In addition, in the case of gradual feeding, the burning duration can be freely adjusted.
A mandatory element of the system is a separate fuel tank, the waste from which is supplied in small portions - almost drops - using a special device.
The photo below shows a design where there is a separate tank with an oil line located above the fuel chamber. The base of the furnace is a gas cylinder; a valve is used to regulate the flow rate of the waste. The design of the furnace is discussed in more detail above.
Another type of product is with a retractable fuel compartment and a double afterburner.
It is realized in metal.
Please note: due to supercharging and the absence of fuel loss during filling, the exhaust consumption is reduced by 20...30%
Do-it-yourself gun being tested
The design of a heat gun is quite simple, so if you have certain operating skills, you can try to assemble such a unit yourself.
Homemade heater device
To make the device yourself, you can use a simplified diagram of a heat gun. At the bottom of the structure there is a fuel tank, above which there is a fan and a working chamber. The latter is supplied with fuel, while the fan pumps hot air into the room.
A self-made thermal device for testing will cost much less than one purchased in a store, but its technical characteristics are somewhat lower
In addition, the device contains a pump, a filter and a connecting tube through which fuel passes, a nozzle for the release of combustion products, a pipe for heated air and a number of other elements.
Required parts and materials
Before starting work, you should stock up on materials or ready-made components of the device.
When making a thermal heater using waste oil, you can use a sawn-off part of an old gas cylinder as a body.
The body of the heat gun, for which it is necessary to use thick-walled metal. For example, a suitable sized section of pipe or other suitable product can be used as this part. You can also make the body from a thick stainless steel sheet (3-4 mm) by welding the seam.
The combustion chamber. This part is suitable for a metal cylinder, the diameter of which is half that of the body.
Fuel tank. This element is a bowl made of a material with low thermal conductivity. An ordinary metal tank, carefully covered with a heat insulator, will also work.
The fan, which is necessary for the installation of a thermal device during mining, can be purchased at the store or use an existing device provided it is in good condition
Fan. To ensure a simple and reliable design, it is preferable to use a reliable and economical 220 volt impeller fan, which is easy to use and durable.
There are several articles on our website in which we examined in detail how to build a heat gun with your own hands. We recommend reading them too:
- Heat gun on different types of fuel.
- Waste oil heat gun.
- Diesel heat gun.
- Thermal gas gun.
Installation of the device during testing
First of all, you should take a pipe, cylinder or other outer shell of the device.
At the bottom there is a heater and a fuel tank, which must be separated from the top of the device at a distance of 15 cm. To make this part of the device look neater, it can be hidden in a metal box. A combustion chamber is installed in the center of the free space, for which a galvanized pipe can be used. The compartment is sealed on both sides, after which holes are made in it for the nozzle and smoke exhaust. The combustion chamber is firmly fixed to the walls of the housing. It is advisable to equip the working compartment with a piezo ignition, and also connect a fan to it. Next, you need to install a fuel pump with a nozzle, adding a filter between these parts. It is also important to organize an outlet pipe from the tank, through which the waste will flow to the fuel filter and injector. It is also necessary to resolve the issue of the fan's power source. If there is an electrical outlet within reach, this item can be plugged into an outlet. If it is not available, you will have to use a battery.
Finally, you need to cover the holes located at the top with nets.
Tips for using heat guns
Experts recommend paying attention to the following points when producing heating devices:
When operating the device, you should follow safety rules: remember that at a distance of 1 meter from the device, the temperature of the heated air stream can reach 300 °C. To warm up a room of 600 square meters, only 10 liters of fuel are enough. It is necessary to clean the evaporation bowl, removing slag from the waste, once after 20-50 hours of operation of the device. Water should not be allowed to enter the fuel cell along with used oil or other types of fuel. If a large amount of this liquid gets into the tank, the burner may go out.
You should also not forget about fire safety rules: it is better not to leave homemade heating devices unattended, and also to have a fire extinguisher or other device for extinguishing a fire within reach.
Conclusions and useful video on the topic
In the video below you can see detailed instructions on how to independently create a heat gun that works during mining.
A self-made or store-bought waste heat gun will allow you to significantly save money on the energy source when using an essentially waste product - used motor oil.
When operating the unit, you should remember that it can become a source of fire, so it is advisable to follow all fire safety rules and not leave the device unattended.
Can’t decide on the choice of heat gun or still have questions about building the device yourself? Please leave your comments, share your experience, and ask questions in the block below.
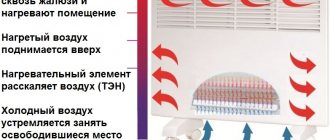
Operating principle of the device
Household fan heaters are compact devices that can easily be installed in almost any suitable place. To operate the device, you need electricity: both for the fan and for the heating element.
Such devices are often used in apartments, garages, and even for heating workshops, greenhouses and other premises. It all depends on the power of the device.
Any fan heater model has three components:
- fan;
- a heating element;
- frame.
The fan drives a stream of air through the body, the spiral heats this air, and the warm air flows throughout the room.
If you add automatic control elements to the device, you can set an acceptable air temperature. The device will turn on and off without human intervention, which will save energy.
To make a homemade fan heater, a regular household fan, the dimensions of which correspond to the body of the device, is suitable. Sometimes the housing is made based on the size of the fan
When operating the fan heater, you must adhere to safety rules. Do not place any objects or materials directly on the fan heater body or too close to the protective grille.
If the device is equipped with an overheat protection system, it will simply turn off. But if this module was not installed during assembly, the device may overheat, break down, or even catch fire.
A self-made fan heater can be of almost any suitable size and power. As a housing, you can use a piece of asbestos-cement pipe, a metal pipe, a rolled sheet of metal, or even a housing from an old system unit.
Usually, a fan is first selected and a heating coil is made, and then the type of device housing is determined depending on its filling.
The most important point when creating this heating device is safety: fire and electrical.
The heating coil in homemade devices is most often of the open type; it is simply twisted from suitable wire. Direct contact with a heated coil can lead to fires, burns, etc.
To make a fan heater with your own hands, you will need the most common tools, as well as basic knowledge of installing household electrical equipment
Therefore, the spiral must be properly secured inside the case, and the outside of the device must be covered with a reliable grille. The installation of the device's power supply also requires attention.
All contacts must be insulated; the base below is usually made of materials that do not conduct current: rubber, plywood, etc.
Device
In order to understand how an electric heat gun works, first of all, you need to know the diagram of its device.
This type of thermal units consists of the following structural elements:
- Frame. Typically, this element has the following types of forms:
- cylindrical (the most common shape);
rectangular (more suitable for household purposes).
The outer casing can be made of the following materials:
- durable metals;
- fire-resistant plastic;
- ceramics.
- a spiral made of refractory metals;
a system of hermetically sealed pipes that are filled with quartz sand (another name is heating element).
It is also worth noting that depending on the model of the electric heat gun, the number of heating elements may vary.
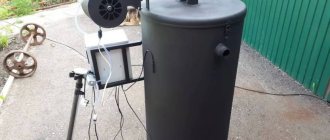
Operating principle of heating boilers during testing
In most cases, the exhaust boiler is a pyrolysis type unit. In other words, it is not the fuel that is heated in it, but the gas-air mixture that is released when the used oil is heated.
Based on the method of feeding waste, there are two types of boilers:
- gravity supply is carried out through the use of the principles of communicating vessels;
- There is also drip feed and forced injection by an oil pump.
Heating equipment operating during exhaust does not emit unpleasant odors because all fuel is completely burned. During the combustion process, carbon dioxide is released. Since used oil is considered waste, the cost of purchasing heating equipment quickly adds up.
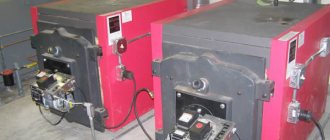
Pros and cons of oil boilers
An oil heating boiler has the following advantages:
- The heating device is inexpensive compared to other types of heaters for heating systems. If you wish, you can make the boiler yourself, then it will cost even less.
- Fuel resources are available in most regions. Mining can be purchased at warehouses. Some people have the opportunity to receive used oil completely free of charge.
- The efficiency of heating equipment is quite high.
- A waste oil boiler is a multifunctional unit.
- The heating device is easy to install and operate.
The disadvantage of the units is that for the heating equipment to operate efficiently, you need to buy only high-quality purified waste that does not contain various impurities. The disadvantage is the frequent maintenance of the unit. The combustion chamber will have to be cleaned every two weeks. Clean the filter once a month. The room where the boiler will be installed must have a ventilation system. Spent fuel must be stored under certain conditions. This will require a lot of containers.
Characteristics of gun-type heaters
Since choosing a heat gun in the context of the variety of models of heating devices offered by manufacturers is not easy, it is necessary to have at least a general idea of the parameters and functionality of these heating units, so let’s consider a list of their main technical characteristics.
Depending on the type of heater, the following energy sources are used to heat the heat exchanger:
- electricity;
- diesel fuel;
- solarium;
- TS-1 kerosene;
- used oil;
- gas (natural and/or liquefied);
- combination of several types of fuel.
Power - we are talking about the amount of heat generated by the unit, depending on the energy consumed and ranging from 2 to 600 kW. The value of this characteristic determines the area of the room that can be heated by a specific type of heat gun.
Fan performance is the volume of air driven through the heat exchanger (from 120 to 5000 m3/hour), depending on the number of revolutions of the electric motor per minute and the design of the propeller. The power of the fan electric motor can be in the range of 3-200 W.
The speed of air flow at the outlet of the heat exchanger must correspond to the performance of the gun, since a low speed will lead to overheating of the unit, and an excessively high speed will not give the flow time to heat up when passing through the heat exchanger. This parameter for heat guns of medium power (up to 30 kW) ranges from 2.5 to 4 m/s and is an important factor when choosing the location of the heater.
Air flow temperature
Voltage consumption is a characteristic of low-power electrical devices, as well as gas and diesel fuel units (the air blower, ignition, and automation of these units consume a current of 220 V). High-power gun-type electric heaters are connected to a 380 V network.
Number of power modes - most manufactured heat guns are equipped with a two- or three-step power adjustment system.
Equipped with automation - modern units are equipped with control devices for operating modes, fan speed, and an automatic temperature maintenance system.
Fire safety level – equipped with an automatic operation system, auto-cooling of the combustion chamber, flame control, emergency cooling of the heat exchanger.
Mobility – stationary (movable, but bulky) and portable (compact, low and medium power).
Noise level – low noise (30-40 dB) and noisy (40-70 dB).
Weight - household units - 5-15 kg, industrial units - up to 150 kg.
Knowledge of the listed characteristics will help you navigate when searching for a device that is optimally suited to specific operating conditions.
Do-it-yourself gun being tested
The design of a heat gun is quite simple, so if you have certain operating skills, you can try to assemble such a unit yourself.
Homemade heater device
To make the device yourself, you can use a simplified diagram of a heat gun. At the bottom of the structure there is a fuel tank, above which there is a fan and a working chamber. The latter is supplied with fuel, while the fan pumps hot air into the room.
A self-made thermal device for testing will cost much less than one purchased in a store, but its technical characteristics are somewhat lower
In addition, the device contains a pump, a filter and a connecting tube through which fuel passes, a nozzle for the release of combustion products, a pipe for heated air and a number of other elements.
Required parts and materials
Before starting work, you should stock up on materials or ready-made components of the device.
When making a thermal heater using waste oil, you can use a sawn-off part of an old gas cylinder as a body.
The body of the heat gun, for which it is necessary to use thick-walled metal. For example, a suitable sized section of pipe or other suitable product can be used as this part. You can also make the body from a thick stainless steel sheet (3-4 mm) by welding the seam.
The combustion chamber. This part is suitable for a metal cylinder, the diameter of which is half that of the body.
Fuel tank. This element is a bowl made of a material with low thermal conductivity. An ordinary metal tank, carefully covered with a heat insulator, will also work.
The fan, which is necessary for the installation of a thermal device during mining, can be purchased at the store or use an existing device provided it is in good condition
Fan. To ensure a simple and reliable design, it is preferable to use a reliable and economical 220 volt impeller fan, which is easy to use and durable.
Installation of the device during testing
First of all, you should take a pipe, cylinder or other outer shell of the device.
At the bottom there is a heater and a fuel tank, which must be separated from the top of the device at a distance of 15 cm. To make this part of the device look neater, it can be hidden in a metal box. A combustion chamber is installed in the center of the free space, for which a galvanized pipe can be used. The compartment is sealed on both sides, after which holes are made in it for the nozzle and smoke exhaust. The combustion chamber is firmly fixed to the walls of the housing. It is advisable to equip the working compartment with a piezo ignition, and also connect a fan to it. Next, you need to install a fuel pump with a nozzle, adding a filter between these parts
It is also important to organize an outlet pipe from the tank, through which the waste will flow to the fuel filter and injector. It is also necessary to resolve the issue of the fan's power source. If there is an electrical outlet within reach, this item can be plugged into an outlet. If it is not available, you will have to use a battery.
If it is not available, you will have to use a battery.
Finally, you need to cover the holes located at the top with nets.
Tips for using heat guns
Experts recommend paying attention to the following points when producing heating devices:
- When operating the device, you should follow safety rules: remember that at a distance of 1 meter from the device, the temperature of the heated air stream can reach 300o C.
- To warm up a room of 600 square meters, only 10 liters of fuel are enough.
- It is necessary to clean the evaporation bowl, removing slag from the waste, once after 20-50 hours of operation of the device.
- Water should not be allowed to enter the fuel cell along with used oil or other types of fuel. If a large amount of this liquid gets into the tank, the burner may go out.
You should also not forget about fire safety rules: it is better not to leave homemade heating devices unattended, and also to have a fire extinguisher or other device for extinguishing a fire within reach.
Required power indicator
The main indicator of a device is its power, since the effective functioning of the device depends on it.
To determine the required heat transfer of the device, it is important to simultaneously take into account a number of indicators:
- The volume of heated space, to calculate which it is enough to multiply its parameters (height, width, length).
- The difference between the temperatures inside and outside the room.
- Heat loss coefficient, the value of which depends on the thermal insulation of the room. The average value of this indicator is 1-2, while an uninsulated building has a coefficient of 3-4, and a well-insulated house has a coefficient of 0.6.
The minimum value of the required power, indicated in kilocalories per hour, can be obtained by multiplying the above values.
To convert a certain number to kilowatts, simply multiply the number by a factor of 0.001163. This value must be kept in mind when choosing a ready-made device in a store.
How to weld a simple stove
Then the heat is released in greater quantities into the room, rather than being “thrown out” to the street. Another upgrade is to make an iron drawer. Oil is poured into it. With this design, the stove is easier to maintain. The drawing contains all the necessary dimensions. Before assembling a homemade oil stove, it is necessary to select the correct diameter of the firebox and body.
Here everything depends on the volume of the room that needs to be heated. If it is a garage of 3 by 6 meters, take a profile of 80x80x4 mm. The fuel box is made of metal 60x60x4. It is more difficult to work with round rolled metal.
The step-by-step instructions look like this:
- Cut the metal according to the drawings to make a casing, drawer, afterburner. If the latter has a bend, the tube is cut at an angle of 45 degrees.
- For a profile of a smaller standard size, one wall is cut out with a grinder. Plugs are welded to the sides. The result is an open container to which you need to attach a handle.
- The structure is welded. It is necessary to drill an air hole at the top of the fuel chamber. The pipe is perforated. At this point the work is completed.
It should be taken into account that you need to calculate the number and diameter of holes in the afterburner. If you use a profile of 80 by 80 mm, then the cross-sectional area will be equal to 6400 square millimeters. This value is divided in two
Pay attention to the markings of the drill used. If it is 8 mm, then the hole area will be 50 sq. mm. Now 3200 needs to be divided by 50
This results in a total of 64 holes required to operate effectively. However, as a result of customization, their number can be increased
Now 3200 must be divided by 50. The result is that 64 holes will be required to work effectively. However, as a result of customization, their number can be increased.
It is important that the chimney is of sufficient length. The elevation of the chimney outlet must be at least 5 meters. Then the operation of the stove during testing will ensure the highest possible efficiency even without supercharging
Otherwise, the pipe will have to be extended to this mark. But you can further increase productivity if you organize an inclined chimney running along the wall. The heated metal will release heat into the room. Only in this case is it important to follow fire safety rules. There should be no wooden shelves above the pipe, and no wallpaper on the walls. Even better is to cover the wall with a metal sheet.
Then the operation of the stove during testing will ensure the highest possible efficiency even without supercharging. Otherwise, the pipe will have to be extended to this mark. But you can further increase productivity if you organize an inclined chimney running along the wall. The heated metal will release heat into the room
Only in this case is it important to follow fire safety rules. There should be no wooden shelves above the pipe, and there should be no wallpaper on the walls
Even better is to cover the wall with a metal sheet.
Making a drip heater
Professionals who have assembled more than one “dripper” use old propane cylinders with a diameter of 200 mm. Oxygen ones are also suitable, since their cross section is 220 mm. the latter benefit due to thick walls. They serve for a long time, do not burn out, and accumulate heat. Pipe C-10 is also suitable if it has a wall thickness of 5 mm. An excellent option for a durable housing is pipes made of heat-resistant stainless steel alloys, alloyed chromium, molybdenum or nickel (for example, 15X1MF or 12X18H12T) with a wall no more than 3 mm. However, it is not advisable to specifically purchase this raw material due to its high cost.
Technologically, the manufacturing process is as follows:
- A flame bowl is made using a piece of pipe or ready-made steel containers. This one is pulled out through a rubber hatch, so it is not made too big.
- The openings necessary for connecting the chimney pipe and the cleaning service hatch are cut out in the body. The latter is framed and closed with a door. Bolts can be used for fastening.
- An afterburner is being made. All holes are not made at once. Usually the bottom 2-3 rows are drilled, and the rest are drilled during the setup process. If you do everything at once and there are too many of them, you will have to make a new one.
- Weld the cover with the air duct and flange. The latter is necessary for installing the fan. The fuel supply device is connected. Photo and video instructions will help here.
Now assemble all the components and connect the electrical wiring. The structure will be more stable if you make a metal frame. A heavy metal profile is suitable for this.
We make a heat generator from a cylinder
First of all, prepare the gas cylinders for welding - remove the spherical parts (don't forget to fill them with water first!) and cut one vessel to size so that together they form a body of the required height (1 m).
Prepare the remaining materials, taking into account the following recommendations:
- It is better to make the combustion chamber and flame bowl from stainless steel with a thickness of 1.5-3 mm (for example, grade 12X18H12T);
- if you couldn’t find stainless steel, use black steel grade St3 - St20 from 4 mm thick;
- Also select a stainless steel waste oil supply tube;
- wall thickness of flame tubes – at least 3.5 mm;
- to seal the top cover, select a 40 x 4 mm steel strip (rim) and an asbestos cord;
- prepare 3 mm sheet metal for the manufacture of an inspection hatch;
- For the heat exchanger, use pipes with a wall thickness of at least 4 mm.
The manufacturing process of a two-pass boiler during testing looks like this:
- Cut the Ø32 mm flame tubes to size and weld the heat exchanger using one cylinder as the outer casing and a Ø150 mm tube as the walls of the combustion chamber.
- Attach the water heating system supply pipes to the heat exchanger.
- In the second cylinder, cut holes for the inspection hatch and chimney pipe. Weld a Ø114 mm fitting and make a neck with a cover from sheet steel.
- Weld both tanks into one body. Make a shell of iron strip on top - it will serve as a seal for the lid. Fill the gap between the edges with asbestos cord.
- Make an afterburner in accordance with the drawing. Make holes in the hemispherical cover (formerly the end of the cylinder) for the viewing window and installation of the afterburner (in the center).
- Equip the lid with handles and a shutter on the window. The afterburner pipe can be tightly welded to it or screwed with bolts sealed with asbestos cord.
At the bottom end, the perforated pipe is closed with a plug, where 4 holes are made - one in the middle, the remaining three - radially. An oil pipeline tube is inserted into the central hole and scalded. The last step is to make a flame bowl of the boiler where the waste oil will burn.
Upon completion of assembly, weld an elbow with a flange to the afterburner pipe and install the “snail”. To prevent the outer metal wall of the water jacket from wasting heat in vain and heating the boiler room, insulate the body from non-flammable basalt wool. The simplest way is to wrap the insulation with twine and then wrap it in thin sheet painted metal.
The manufacturing process of an oil-fuel boiler is demonstrated more clearly in the following video: