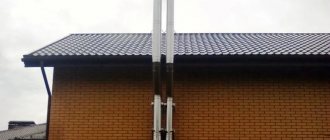
One of the most important requirements for ensuring the safe operation of solid fuel heating equipment is the correct organization of the removal of combustion products. In such a way that they come out promptly and completely, without penetrating into the room, and give way to the influx of fresh air necessary for the continuous combustion of the fuel fill. Violation of these rules leads, at best, to inefficient operation of the furnace or boiler. But what’s much worse is the possibility of carbon monoxide poisoning or a fire hazard.
Chimney: calculation of height and cross-section
In this article we will not consider possible options for the construction of chimney pipes - there is a lot of information about this in other publications on our portal. The conversation will focus on the main parameters of the pipe - its cross-section, which ensures the timely removal of combustion products at an optimal speed, and the height, which ensures the creation of the necessary natural draft.
So, the topic of today’s conversation is the chimney: calculation of height and cross-section, justifications and convenient online calculators.
What is it for
There are several reasonable excuses for calculating the height of the chimney above the ridge:
- with the correct height, heating efficiency increases. The heating device will produce maximum heat transfer and fuel costs will be the lowest;
- in order to maintain the health of those living in the house. Incorrect calculations lead to smoke and carbon monoxide entering the building. It is necessary to provide the necessary draft for the operation of the chimney;
- in order to prevent fire. A short pipe prevents the gases from cooling, which can lead to a fire.
A correctly calculated chimney saves fuel and protects the health of people living in the house.
Volume of incoming air
As a rule, residential buildings are equipped with natural air circulation. The flow of outside air can be through a window or a special valve. The outflow occurs through the ventilation duct. It can be located inside the wall or designed as an extension. A ventilation duct cannot be installed in an external wall, since in this case condensation may form on the surface, which will lead to damage to the structure. Also, due to cooling, the speed of air movement may decrease.
The values for ventilation pipes in residential buildings are determined by the established requirements, which are regulated by SNiP
The frequency of exchange, which reflects the quality of operation of the ventilation system, is also important. So, the volume of air flowing into the room should have the following values:
- in a residential building - 3 m³ per hour per square meter of area. Moreover, this indicator does not depend on how many people are in the room. Sanitary standards establish that for temporarily staying people in a building, 20 m³ per hour of supply air is sufficient, and permanent residents require 60 m³;
- in a utility building (for example, in a garage) - at least 180 m³ of air per hour.
To calculate the diameter of the ventilation pipe, use a system in which there is only natural air flow, without installed forced devices. The simplest method of calculation is the ratio of the area of the room to the cross-section of the ventilation duct opening.
Mathematical calculations
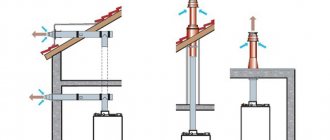
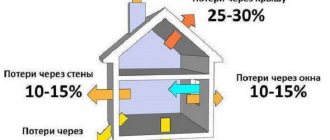
To understand this, let's look at a diagram for calculating the height of the chimney.
The diagram clearly shows how to determine the height of the chimney depending on its location relative to the roof ridge
In it we have displayed all the most important aspects of accounting for chimney installation. The diagram shows the calculation of the chimney height in three options:
- If the distance between the pipe and the ridge is ≤ 1.5 m, then the chimney must be raised 0.5 m above the highest point of the house.
- If the distance from the chimney pipe to the ridge of the house is ≤ 1.5-3 m, in this case the height of the chimney above the roof will be equal to the height of the house. Or you can install the chimney flush with the ridge of the house.
- This option is most common. If the distance from the chimney to the ridge of the house is more than 3 m, the chimney may be located below the ridge of the house by 10° relative to the horizon.
In the third case, the question arises: what height should the chimney be with this arrangement? In this option, you need a tool such as a laser tape measure. Let's take the following data as an example. As an example, the height from the ridge to the base of the house is 6 m. The horizontal distance from the chimney pipe is also 6 m. Question: what should be the height of the chimney above the roof for it to work properly? In this case, the calculation of the chimney above the roof is carried out using the knowledge of mathematics acquired at school.
Let's draw an imaginary line at 10° relative to the horizon. The letter Y is the distance from the ridge along the horizon to the chimney. In our case, this is 6 m. We denote the height of the house as Z. For us, this distance is also 6 m. The letter X will indicate the vertical distance from the end of the chimney pipe to the ridge of the roof. The answer to the question of how to calculate a chimney is this: you need to calculate the tangent of the angle (TG) of the imaginary line and then use the formula. A right angle is 90°. Our imaginary line is 10°. We carry out simple calculations: 90 – 10 = 80°. Tangent 80° = 5.67. We calculate X. Using the formula X = Y/TG80. That is, in order to calculate the height of the chimney, we need to divide the distance from the ridge to the chimney by a tangent of 80°. In our case, it is: 6m/5.67 = 1.058 m. Distance 1.058 ≈ 1 m 6 cm. So, X = 1.06 m. Now, to calculate the length of the chimney pipe, we need to subtract from the total height of the house (6 m) the resulting value of X. Let's call the length of the chimney the Latin letter T. Hence T = Z – X = 6 – 1.06 = 4.94 m. Roughly, the length of the chimney from the base of the house turned out to be 5 m.
In addition to the mathematical method of calculating the required length of the chimney, there is a graphical method.
Channel requirements
The location of the chimney relative to the ridge is not the only issue during construction. It is important to take into account the recommendations and pay attention to the following:
- The material is selected depending on the fuel the boiler runs on. For a gas, stove or solid fuel unit, a stainless steel pipeline would be a good option.
- The number of heating devices should not exceed two per chimney. Otherwise, there is a high risk of incorrect diameter calculation. When using two heating devices, one type of fuel must be used, and the diameter of the pipes can be no larger than the chord of the chimney itself.
- It is preferable to construct a cylindrical or round pipe. This design allows you to create ideal draft, preventing smoke from returning to the room.
By following these simple rules, you can achieve efficient operation of your heating system.
Graphics Computing
This method involves drawing a building diagram with all the correct dimensions and proportions. A line is drawn from the ridge of the house at an angle of 10° relative to the horizon to the location of the proposed chimney until the lines intersect. The resulting distance is measured and converted to a real scale. You can adjust the diagram by moving the axis of the chimney horizontally. With these simple movements you can find the required location of the pipe.
There must be at least 50 cm between the roof covering and the edge of the pipe outside the building. If the stove heating fuel is solid, then add another 0.15 m to construct a protective structure, the material of which is metal tiles or corrugated sheets.
This is how the height of the chimney for a solid fuel boiler in a house is calculated.
Looking for the right place for the pipe
When designing a house, care must be taken to position the chimney on the windward side of the house. To do this, you need to analyze the direction of the prevailing winds. If the features of the landscape or internal layout do not allow this, then the chimney should be located on the leeward side, but as close as possible to the ridge.
Aerodynamic calculation
An aerodynamic length calculation is required for the boiler room chimney. There is a certain formula for this:
Determining the minimum chimney height using the aerodynamic calculation formula
It is used to determine the parameters that influence the calculation of the height of the boiler room chimney using this method:
- Parameter A denotes the coefficient of territorial weather conditions. For the North of our country it is equal to 160 units. The coefficients of other territories are in the descriptive documentation;
- The Mi parameter indicates the weight of the element passing through the chimney over a certain period of time. This information is in the passports for heating devices;
- The parameter F indicates the speed with which the elements resulting from combustion settle;
- The parameters Spdki, Cfi mean the concentrate of various elements in the gas. All this data is in the characteristics of heating devices;
- Parameter V denotes the volume of exiting gas;
- The temperature difference is indicated by the parameter T.
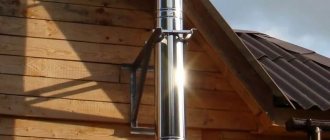
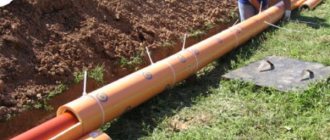
Passage of a round chimney pipe through a wooden ceiling using polyurethane foam of various designs
To pass the chimney through wooden structures, you can use a ready-made ceiling-passage assembly (see photo). It is selected based on the outer diameter of the pipe. Before installation, this ceiling passage unit must be prepared: all surfaces that will come into contact with the wood of the ceiling sheathing, and all internal surfaces of the passage box, are lined with thermal insulation.
Factory-made ceiling passage unit. Before use, it must be covered on all sides except the front with heat-insulating material.
Usually basalt wool serves as thermal insulation, but it must be special: it can withstand high temperatures. When purchasing a material, make sure that it is designed for use at temperatures of 800-1000 o C. These materials have a higher cost, but it is unreasonable to skimp on safety. Cheaper options contain binders that sinter at high temperatures, causing the thermal insulation to lose all its properties, and this can lead to a fire. In addition, it is advisable to use foil heat insulator - this will make the structure even safer.
Having insulated the passage unit, prepare a place for its installation. Mark on the ceiling where the chimney will be located. Draw a hole of a suitable size: slightly smaller than the size of the front panel of the pass-through unit in such a way that it is convenient to attach it to the ceiling trim with self-tapping screws. Having cut a hole, cover its edges with the same heat insulator as the pass-through unit, or any other with similar properties. To increase the level of fire safety, metal strips can be strengthened on top of the heat insulator. Insert the prepared passage unit into the finished hole. It can be put on the pipe and installed with it. Having installed this structure in place, secure the panel of the passage unit with self-tapping screws (the holes can be pre-drilled).
Preparation and installation of ceiling penetrations
After checking the vertical installation of the chimney pipe, proceed to complete this stage. The voids remaining in the passage unit are filled with thermal insulation. You can use pieces of the same basalt wool or fill the voids with expanded clay. In theory, you can use sand, but you shouldn’t. It is inferior in terms of thermal insulation properties to both expanded clay and basalt wool, in addition, sooner or later it will end up at the bottom, since there are cracks, and through them grains of sand will fall onto the stove.
Further actions depend on where you led the chimney: to the second floor or to the attic. But the main difference is in aesthetics and the availability of finishing. If you led the chimney pipe into the attic, the passage through the ceiling can be considered complete. If you brought the chimney to the second floor or into the attic, you put a protective metal screen on the pipe, which is now attached to the floor with the same self-tapping screws. After this, you proceed to the next stage - output through the next ceiling (this is if you are on the second floor) or through the roof, if in the attic or attic.
This is what the finished ceiling penetration looks like
The chimney passage through the ceiling may also look like this. This is a ready-to-use option that consists of two boxes. The inner box is made of metal, the outer one is made of heat-resistant material (in this case, mineralite).
Minerite roof passage assembly. It is completely ready to use
There is an air gap between them, ensuring fire safety. According to the manufacturers, the remaining free space between the sandwich pipe and the cutting box does not require filling with a heat insulator. You can leave everything as is, or you can, for greater reliability, still add heat-resistant thermal insulation. In such a case, such as a chimney passing through a wooden ceiling, it is better to be on the safe side than to put out a fire later.
This is how a mineralite assembly for passing through the roof is installed. Just put it on the pipe and inserted it into the prepared method
The passage through the ceiling can be like this (see photo). In this case, sealing the edges of the hole in the ceiling is mandatory (remember, there is thermal insulation around the edge first, metal on top).
The factory aisle assembly may look different. Depending on the shape, the installation method varies slightly
A little about traction
With the help of draft, what arises during the combustion process comes out of the chimney. Due to the movement of air currents, negative substances escape into the atmosphere. What factors does craving depend on? First of all, the height of the chimney pipe plays a big role. It also depends on the air temperature outside the room and in the chimney itself. During the period when fuel is burned, the temperature can reach 250°. In contact with the metal pipe, the hot gas cools down, it falls, resulting in good traction. Moisture condensation in the chimney destroys the structure and impairs draft. This usually occurs in winter at low temperatures. In order to remove condensation, smoke exhausters are installed to create artificial draft.
Important! When there is high humidity and precipitation gets into the chimney system, draft is disrupted. To prevent such phenomena, special protection umbrellas are installed on chimneys.
Craving is usually determined using the “old-fashioned method.” The stove door opens and with the damper open, a lit match is brought to it. A match flame will show whether there is draft in the stove. If he is pulled inward, the pull is strong. If it blows into the room, then a phenomenon called reverse draft occurs. In such cases, the stove will smoke and should not be lit.
This occurs when the chimney is clogged or faulty. Therefore, from time to time, the chimney system is cleaned and repaired.
Height and cross-section - is there a connection?
The length of the channel and its diameter are directly related. It is their correct ratio that allows you to create sufficient draft to remove gas waste. A smaller chimney helps lower the air temperature, which means the draft force is reduced. On the other hand, a pipe that is too wide also contributes to the rapid cooling of the air flow.
The result of incorrect determination of parameters can be reduced draft, condensation on the surface and the impossibility of normal heating of the room, simultaneously with the removal of harmful substances. Consequently, much more fuel will be consumed in the heating process, and costs will increase significantly.
A couple of tips
When the house has alternative heating, it also requires a chimney. But it is unprofitable to produce different smoke exhaust systems. It is easier to combine them into one, which will connect all the channels made taking into account such parameters as equipment power, amount of smoke and type of fuel. Such structures have a number of advantageous qualities:
- they save living space;
- all systems work stably;
- time, money and labor are saved.
But only specialists can calculate such structures.
What nuances should be taken into account when planning a chimney?
To develop an ideal project, it is impossible to do with calculations and constructions alone. The chimney intersects with the internal elements of the room, which means that it will certainly affect the layout. Even if you really want to install it as close to the ridge as possible, in achieving this goal you may encounter a number of difficulties. And, as a rule, the chimney ends up having to be placed at a great distance.
The height of the chimney above the roof will depend on the following nuances:
- interior of the room;
- type of chimney;
- number of floors;
- ease of installation of the smoker;
- access possibilities for preventive maintenance;
- the type of material used during the construction of walls and rafter systems;
- number of connected elements to one chimney.
Stoves in two- and three-story houses are installed one on top of the other, and their chimneys are positioned so that they can exit along one shaft.
Based on their design, chimneys come in the following varieties:
- Wall. They are considered the most economical option, they are easy to install and easy to maintain. Such chimneys are installed in brick and stone structures, in those places where it is possible to lay a channel in a load-bearing wall.
- Indigenous. Such chimneys are erected separately from the stove. This design is more expensive, but in some cases it is possible to install only it. They are erected in the absence of technical capabilities for arranging a wall channel. Main chimneys are built, as a rule, if it is necessary to install chimneys in stacks, from timber or logs.
- Mounted. Such a chimney is installed directly on the reinforced concrete ceiling of the stove when arranging small buildings that require proper distribution of free space.
Most designers give preference to the use of risers, that is, smoke channels that are erected during the construction of walls - they make it possible to significantly save on building materials. However, if the box does not have a main wall, it is not possible to install risers. However, if you decide to install smoke ducts, it is better if they are located extremely close to the ridge girder.
The construction of a wall chimney is carried out using a buoy template, which is lined with brick on all sides. It is a special box made of wood, the diameter of which is equal to the diameter of the chimney. Having reached the top of the template, it is moved higher, after which it is covered again. Actions continue until the construction of the load-bearing wall is completed.
Often, brick pipes are placed on the inside of main walls. Thus, more efficient heating of the house is achieved and heating costs can be reduced. Sometimes risers are installed in external walls, but this approach is more expensive and will require more effort during subsequent operation. If the chimney is laid in an external wall, the thickness of the pipe wall will be greater.
In any case, when making a pipe in an external wall, you will definitely need to determine the height of the chimney above the roof using one of the methods presented above. According to the standard, the height of the outer part of the chimney installed inside the main wall should be 50 cm.
The distance from the untreated ridge girder and rafters should be 50 cm, and from the treated (protected) one - 38 cm. Metal pipes should be at least 70 centimeters away from elements that may be subject to fire. It is imperative to adhere to building codes when calculating the distance from the chimney to the rafter system.
There are no such strict standards for the development of root and casing pipes. When deciding on their placement, they rely more on architectural preferences, ease of installation and the specifics of subsequent maintenance. How much the pipe protrudes above the roof in this case should depend only on the preferences of the owner, and fire safety standards should not be neglected.
The section of the chimney that extends beyond the roofing material will need to be plastered with a cement-sand mortar, the layer of which should be 2-3 cm. In the place where the chimney passes through the attic, it should be whitewashed to be able to quickly find a possible leak in the future gases and make repairs.
Summarizing the above
We understand how to calculate the height of the pipe above the ridge. All that remains is to comply with some requirements when calculating and constructing the system in order for it to work stably and reliably:
- the height of the chimney above the roof must meet the necessary rules;
- the chimney system should be cleaned and inspected for repairs;
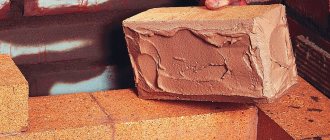
- when laying a brick chimney, it is necessary to ensure its maximum density;
- It is advisable to install an umbrella over the chimney to prevent dust and moisture from entering it;
- it is necessary to regularly monitor traction for its good quality;
- when manufacturing a chimney exhaust system, make sure that it stands vertically to the ground and control the angle of inclination, which is considered acceptable;
- the system must be constructed of materials that are not flammable.
Perhaps these are all the criteria by which the chimney pipe is calculated. You can, of course, do it yourself. But it’s better for specialists to do this for you. Everyone must do their job. Peace and warmth to your home!
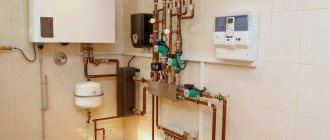
Basic rules for installing a chimney
Few people know that the external chimney greatly affects the amount of resources consumed and the comfortable temperature in the room. However, the chimney pipe not only rids the house of flue gases and smoke, but also has a serious impact on the efficiency of the heating system, fire safety, air comfort and raw material consumption. But to do this you need to set it to the correct height above the roof.
Before calculating the parameters of the chimney and installing it, you should carefully consider these aspects:
- What fuel will be used. This affects the optimal material from which the chimney will be made, since the gases generated during heating have different temperatures.
- Chimney parameters. Namely, the design features, the level of elevation above the roof and the internal cross-section. The functional features of the heating system depend on this. Inconsistency of the listed indicators often leads to improper operation of furnaces and boilers.
- Availability and characteristics of ventilation. Most heating devices that generate fuel gases require good ventilation. However, it is not always cost-effective and efficient to build it separately, so ventilation is often combined with a heating system.
You can select materials and make calculations on your own. However, to save time and be more reliable, you can calculate everything on a special calculator or contact specialists.
Some recommendations before installation:
Only after taking these aspects into account can you proceed to calculating the height.
General provisions
Requirements for placing the chimney pipe relative to the horizon and roof ridge
The location of the highest point of the chimney is of great importance for fire safety and the efficiency of the heating system. Natural draft is formed according to the laws of physics: warm air tends upward, and the vacated space is occupied by a new portion, since the vacuum is instantly filled. The more heated air, the more intense the draft, which is related to the height of the chimney and its cross-section. The goal of all calculations and recommendations is to achieve such an upward flow rate that heat loss is minimal, but at the same time, combustion products do not have time to enter the room. Too much draft is not desirable because heat will not be transferred to the air masses, and more fuel will have to be burned to maintain a comfortable temperature in the house.
Another aspect must be taken into account: an excessively high chimney will negatively affect the system for removing fuel combustion products, although it would be logical to assume that the higher the chimney, the greater the draft. This is true, but the flow, rising higher and higher, gradually cools, and the cold air tends downward. At a certain moment, an air plug of cold gas forms, which presses down on the rising warm flow and prevents it from rising higher - the thrust comes to naught. In addition, the situation is aggravated by the fact that condensation forms when the gas cools. It further reduces cravings.
It is advisable to place the chimney pipe from the ridge at a distance of no less than 50 cm and no more than 150 cm. The height of the chimney above the ridge is no less than 50 cm. This placement is successful for practical reasons:
- at this level, snow accumulates in smaller quantities, therefore reducing the risk of leaks at junctions;
- materials are saved during construction.
You can take the pipe outside by removing it 1.5-3 m from the ridge, then the height of the chimney should be: maximum - level with it, minimum - with a deviation of no more than 10 degrees from the horizon, if you draw an imaginary straight line through the highest points of the chimney and a skate. The last criterion is valid for the highest point of the pipe if it is located at a distance of more than 3 m from the ridge. The height of the chimney pipe above the roof must be at least 50 cm. The chimney duct should not be installed at the level of the attic windows to avoid carbon monoxide being drawn into the room.
The chimney pipe must match the exhaust vent of the stove
Determining the location of the chimney pipe relative to the ridge and its height is a necessary stage in drawing up a heating system design. But in addition to this aspect, it is necessary to take into account a lot of other conditions and initial data: type of fuel, boiler power, properties of materials, the presence of additional channels that remove combustion products from the fireplace, stove, climatic indicators, preferential wind direction. Having familiarized yourself with the SNiP requirements for the height of the chimney, you need to make additional calculations. For example, calculate the cross-section of a chimney pipe. Calculations for complex projects with a large number of objects should be performed by professionals. Operating an incorrectly designed chimney can be life-threatening.
How to make it yourself
The purlin is made of steel or wood. When building private houses, the second option is mainly used, since steel ones are quite heavy.
We recommend that the timber be impregnated with a fire-retardant agent before installation to ensure the durability of the structural element.
- Installation is carried out after completing the main stages of roofing. The basic principle of laying the ridge trim elements is to lay the outer fragments on the side of the gables, through which the mounting cord is pulled. The lace is leveled and temporarily fixed to the opposite gables. It will serve as a guide for the remaining fragments.
- It is recommended that two people work together. After installing and fastening the first structural element, move on to the next. The fragments are laid with a spacing of about 20 cm, which allows for better waterproofing of the structure. In the same way, all elements are laid and secured along the slope.
Attention! Particular attention should be paid to fastening the outer elements, since they are exposed to maximum wind loads.
- However, adjustment alone, even if the shelf width is more than 20 cm, is not enough to ensure sufficient waterproofing. In any case, there will be gaps through which drops of rain or snow blown by the wind can get under the roof. You can put a layer of glass wool in the groove, but try not to compact it too much, as this may interfere with ventilation.
- There is another way: instead of glass wool, use self-adhesive foam tape (filler), which is laid along the edge of the shelf from the bottom. But this material is quite expensive, and the result obtained is similar to the option using glass wool.
- A ventilation compartment must be provided. Otherwise, condensation cannot be avoided, even if the roof has been reliably protected from moisture.
Note: If, due to the peculiarities of the roofing structure, it is not possible to equip it or at least provide the required gap, then to combat attic dampness, windows are installed in the end parts.
How to attach a ridge to a roof: from corrugated sheets, on slate
The method of fastening depends entirely on the material of the protective strip. Figured elements are often made from the same material.
A mandatory procedure is waterproofing wooden roof elements. Before installing the finishing elements, the purlin is covered with roofing felt tape.
Corrugated roofing. Let's look in more detail at how to install a ridge on a roof made of corrugated sheets.
konek-5 konek-6
- Strips of sealant or special ventilation tapes that match the pattern of the sheets are attached to the edge of the profiled sheet.
- Fastening is carried out in increments of 20–30 cm based on the parameters of the corrugated sheet pattern. Elements laid overlapping are fixed to already installed bars, screwed with self-tapping screws through the upper corrugation.
Attention! Note that the screws must be equipped with rubber or neoprene seals.
To get the most durable and high-quality connection, it is recommended not to screw in all the hardware at once. It is advisable to make fragments of two to four pieces of hardware each. The rest are tightened only after checking the lace and level. Agree that every extra hole in the roof poses a potential threat to its reliability.
Ventilation device
To create ventilation, you must perform the following operations.
- After installing the rafter system, a waterproofing film is fixed across them. The connecting seams are taped with mounting tape. In this case, an overlap of 150 mm is required;
- Lathing is installed along the rafters. The movement of air flows occurs precisely due to a certain gap formed by the sheathing. If the waterproofing does not allow moisture to seep into the thermal insulation layer and the wood of the supporting structure, then the gap provided by the sheathing makes it possible for any moisture that gets in to dry out quickly enough.
- An additional ventilation hole is created in the ridge part. Excess steam and condensate are removed through it.
- It is necessary to provide gaps along the bottom of the eaves through which outside air will flow under the roof.
How to install a roof ridge made of metal tiles can be seen in the video.
https://youtube.com/watch?v=LDszZ7EqCyY%3F
2019stylekrov.ru
Environmental considerations for industrial buildings
In a word, the throughput of the chimney pipe must ensure the unhindered passage of smoke and its release into the atmosphere. Moreover, the environmental aspect is also important here, namely, whether the products of fuel combustion are properly dispersed in the atmosphere.
Thus, during the construction of commercial and factory enterprises, certain sanitary standards are taken into account. And they depend on the weather conditions of the area, the typical speed of air flow, the topography of the landscape and many other factors.
So, what value did you get and is it exactly equal to 5 meters?
Chimney location and wind direction: how to prevent turbulence
According to all building codes and regulations, the chimney must rise above the roof at a certain distance. This is necessary so that the air on the protruding parts of the roof does not cause reverse draft due to turbulence.
Backdraft can be seen firsthand in the form of smoke that pours from the fireplace directly into the room. But the extra height of the chimney is also not needed, otherwise the draft will become too strong and you won’t get any heat from such a fireplace: the wood will burn to ashes like a match, without having time to give off heat.
This is why it is so important to calculate the height of the chimney as accurately as possible, especially taking into account the direction of the winds in the area:
If the pipe is located too close to dense trees or a high wall, it must be extended with asbestos-cement or steel pipe.
In this video you will also find valuable tips on installing a chimney and solving problems with its height:
Preparatory work
Before proceeding with installation, it is necessary to clarify several basic factors. When selecting a channel, you need to take into account the height of the building, the diameter of the future channel, and others. Give special attention to the installation site and location of the heating equipment. Installation of a sandwich chimney, like any other, can be done in two main ways:
- Internal.
- External.
For example, when installed internally, the installation of a sandwich chimney is carried out directly in the heated room, and in this case additional sealing is not required. But, there is a nuance, if the attic space is not heated, in this case, it would be useful to additionally insulate the pipe during installation and carry out a seal to prevent exhaust gases from entering the rooms with the ensuing consequences. In addition, at the initial stage, think about what to do with those materials, walls, next to which, in contact, the chimney will pass. Surfaces must be treated with special fire retardants.
Do-it-yourself sandwich chimney installation
As for external systems, the assembly of the external sandwich chimney must be carried out taking into account the mandatory insulation. These types are much safer, since they immediately remove the pipe to the outside during installation, reducing the likelihood of exhaust gases entering the premises.
Which type and shape should I choose? Here it is worth giving preference not only to aesthetic indicators, but also to functional ones. Keep in mind that it is easy to fix or fasten a square chimney, it is quite easy to use and does not require special skills during installation. But the main disadvantage of such a system is the accumulation of condensation and other unnecessary dirt and dust inside. Round elements in this part are much preferable, given their shape; they retain much less not only a variety of debris that can get in from gusts of wind, but also form less condensation, naturally taking into account proper insulation. The only thing is that such systems are difficult to install and you will need skill. In addition, do not forget to prepare the necessary tools for installation in advance. So, the tools needed to install a chimney:
- Drill, grinder.
- Jigsaw, screwdriver.
- Hammer.
- Screwdrivers.
- Protective ammunition.
- Spatula and chisel.