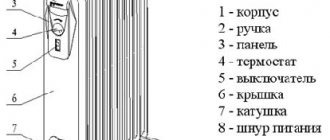
With the onset of cold weather, there is a need to heat the premises. It is not always possible to provide central or autonomous heating to premises such as a garage, barn, paddock, or greenhouse. The reasons may be different: lack of funds due to the high cost of connecting such systems or lack of technical capabilities.
If you make a gas heater with your own hands, it will effectively heat utility rooms. Now on the market you can choose and buy many different models of gas heaters at different prices and with different characteristics. However, the price includes a steep seller's markup.
We will tell you how to assemble an almost free homemade product from available materials. Here you will find a detailed description of homemade devices and instructions on how to make them. To help do-it-yourselfers, we offer assembly guides and valuable advice.
Homemade gas heaters for the garage
Homemade heater
The main advantage of such a device is that its manufacture does not require expensive branded parts. In this case, it is possible to make do with improvised components available to any garage owner.
Preparation of materials
To make a gas heater you will need to prepare:
- branded burner with valve;
- sheet of tin of suitable size;
- tin scissors;
- electric drill with a set of drills;
- riveter and rivets for it.
Assembly of the structure
The structure is assembled as follows:
- On the sheet metal blank the outline of the future heater body with four rectangular ears is drawn.
- According to the markings, a workpiece is cut out with sections that do not have burrs.
- The burner is attached to the curved pipe-shaped body with ears using bolts.
- The ears at the other end are used to secure the protective mesh.
As a result of the assembly, a heater with tin walls and working ends is obtained.
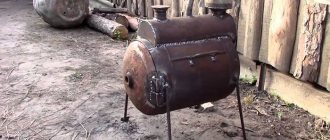
Wood stove
The good old solid fuel stove is a classic that will never lose its relevance. We offer detailed instructions for making such a homemade stove for the garage.
The first thing you need is a pipe. It will become the basis for the future oven.
In the fragment used, cut a hole for the grate - without it, heating the lower layers of firewood will be problematic.
Place the ash box exactly on the cut hole.
Turn the workpiece over and make holes for the chimney.
To increase heat transfer during kindling, it is recommended to use horizontal partitions in the chimney.
The heat exchanger can be made from thin pipes.
The stove will stand on legs - they can be easily made from any available material. In the photo, for example, a bumper amplifier is used.
We assemble the structure and install the chimney correctly.
We add refractory bricks inside - this will make the potbelly stove work much more productive!
To speed up the process, we offer you ready-made drawings - using them you can quickly and, most importantly, correctly assemble a wood-burning stove for your garage and be satisfied.
Convector – efficiency and quality
Fast and efficient garage heating with household convectors is the choice of most car owners. The convector has many more advantages than disadvantages:
- the colder the air entering the convector from below, the higher the heat output of the heater;
- it is possible to install both electric and gas convectors;
- the heater body does not heat up, the temperature does not exceed 65 degrees;
- full guarantee of fire safety;
- uniform heating of the entire garage;
- automation allows you to maintain the desired temperature and saves energy consumption;
- The heater is easy to install in any convenient place in the garage.
The only disadvantage of such a convector is that it will have to be cleaned often, since there is always a lot of dust in the garage.
Important. When installing a gas convector, it is imperative to equip the room with high-quality ventilation
Classification by heating element type:
- needle type heating element - cannot be used in rooms with high humidity, since the heating element is practically not protected from water, dust and dirt;
- tubular heating element is waterproof and has protection against overheating. A budget solution for a small garage, but it takes a long time to heat up;
- monolithic heating element type - there are no welds in the body of this heating element, so the heating element is reliably protected from water and shock. It quickly warms up the garage and can be set to automatically adjust the desired temperature.
How to roughly calculate energy costs when choosing a convector for a garage? For an insulated garage of 10 square meters you need a 1 kW convector, this is quite enough.
Options for thermostats in convectors:
- mechanical regulator - it is impossible to accurately set the temperature control; it is not recommended to choose such convectors for the garage;
- electronic regulator - has a timer and temperature sensor, economical and safe;
- programmable adjustment - from two to four temperature programs, it is possible to set individual parameters. The best choice, but the price is higher than the electronic regulator.
If you combine an IR heater above the hood and a programmable convector, then the garage will always have a comfortable temperature for both the owner and the car.
OCD
Model using IR silicate glass
Since IR silicate glass is used, products of different brands experience sharp changes in thermal conductivity and transparency. For this reason, make and test one emitter. Based on the test results, it may be necessary to vary the diameter of the material.
The following arithmetic principles should be taken into account for quartz installations.
Material parameters
0.5 mm: power – 350 W, current – 1.6 A.
0.6 mm – 420 W and 1.9 A.
0.7 mm: 500 W and 2.27 A.
0.8 mm: 530 W and 2.4 A.
0.9 mm: 570 W and 2.6 A.
Thin wires have a solid radiating surface. When using thick versions, exceed the IR power that glass can transmit.
Testing
The finished product is placed vertically on a non-flammable surface. Supported with a heat-resistant object. A current of 3 A is supplied to the product. A digital tester is used to monitor the current.
We need to check the behavior of the glass. If it quickly heats up and cracks within half an hour, it is not suitable.
After 1.5 hours, the radiation power is checked. Place your palms parallel to the radiating planes. The distance from them is 15-17 cm. You need to hold it for at least 3A min. Then you will feel a soft warmth for 5-10 minutes. If your palms immediately get burned, you need to reduce the diameter of the wire. If after 20 minutes there is not even slight heat, thicker material is needed.
Principles of snake bending
It is necessary to base this scheme on the type of battery
The covers are cut according to glass parameters. Contaminants are removed from them. Ears are attached to one covering. Their parameters: 2.5 x 5 cm. The basis of such a film is copper foil. It is glued with superglue. The ear extends onto the lining by 5 mm. Protrudes 2 cm.
The formation of the snake must be done on a special template. For ponytails, a minimum of 5 cm is allocated. The bitten ends of the nails are used. They are ground to roundness.
The wire is wound onto the template. It must be annealed to fix the shape.
A voltage of 5-6 V is applied to the snake. When the material has a shine with a cherry tint, the thread should cool completely. This operation is repeated 3-4 times.
A plywood strip is placed on the snake. The snake is pressed with your fingers. Slowly unwind the tails that were wound on the nails (nail diameter - 2mm). Each ponytail needs to be straightened and molded. The nail retains 25% of the twist. The remainder is cut flush with the extreme side of the template. And the remaining 5 mm of the tail should be cleaned using a sharp knife.
The snake is carefully removed from the mandrel and attached to the substrate. The leads are in contact with the lamellas. You need to remove the snake with two knives. The blades are inserted from the outside under the bends of the branches on nails (1 mm)
Then the winding heating thread is carefully lifted and lifted. The snake is placed on the backing and slightly bent. The leads are in the center of the lamellas
The leads appear in the center of the lamellas.
Nichrome is soldered to copper. The solder medium is conductive paste. Liquid solder is dripped onto a clean contact (1 drop). Through a piece of polyethylene, this area is pressed down with a weight. When the paste becomes hard, the weight and polyethylene are removed.
Next comes work on the emitter. A 1.5 mm layer of silicone sealant is pressed onto the center of the snake. Then the operation is repeated, but the layer is already 3-4 mm. The sealant fills the contour of the substrate. The distance from the edges is 5 mm.
The glass is carefully applied. Pressed down. It should fit tightly
Next is waiting for the silicone to dry. It's about a week
It should fit tightly. Next is waiting for the silicone to dry. This is about a week.
Then the excess sealant is removed with a razor. Sealant leaks from the lamellas are also eliminated.
Types of diesel heaters
Heaters running on diesel fuel are divided into the following types:
- Stationary;
- Air;
- Infrared;
- Direct acting devices;
- Indirect acting units.
The differences between the last two are that direct heating heaters are not equipped with filters and air vents for combustion products. It must be remembered that when such a unit operates, the latter enter directly into the room in which it is located. Therefore, they are used in non-residential premises or for urgent repairs during cold weather.
Heaters of this type are characterized by a combustion control system. Note that it works in automatic mode. The large fuel tank allows for refueling every 10–15 hours.
Indirectly heated diesel heaters do not emit combustion products into the environment, which was achieved through the use of filters that purify the air. These devices are perfect for residential premises.
Infrared diesel heater
This type of unit can be used to heat buildings with high ceilings, because they are usually installed on the ceiling or wall. Infrared radiation will help to heat even gazebos located outdoors.
Such heaters act similarly to solar radiation. When fuel is burned, heat rays are generated, aimed at heating objects, people or walls, which, in turn, already heat the air in the room with their heat. This helps save fuel consumption, which is undoubtedly an advantage. These devices are recommended for use in rooms that are characterized by poor thermal insulation or there are restrictions on the use of electricity or there is a shortage of it.
Air Diesel Heater
The operation of an air heater resembles the principle of operation of a fan. This unit is equipped with a durable housing that protects against overheating and mechanical damage. Heat guns, which are a type of air heater, heat a room through the movement of a warm air flow and are often used in non-residential premises.
The main feature of this type of heater is that it heats the room as long as it works. This means that if you turn it off, the temperature in the building will drop sharply.
Why do you need a heat exchanger?
There are many types of gas tent stoves. And their common disadvantage is that some of them do not remove combustion products to the outside. This is quite dangerous; there is a risk of poisoning from combustion products. Also, moisture formed during the combustion process gets into the tent space - moist heat is not an optimal environment for long-term stay of people.
A heat exchanger for a winter tent is an excellent solution that provides safer heating using gas burners. The principle of their operation is simple:
- The burner located under the heat exchanger heats the structure;
- Air is drawn through the exchanger tubes, heating up and entering the winter tent;
- Combustion products are discharged through the chimney to the outside of the tent.
The power source is a battery; low-noise computer coolers or other types of fans are used as a fan.
In its design, the device resembles a small fire-tube heat exchanger used in solid fuel heating boilers. The heat from the burner passes through it, and air is driven through the tubes. At the output we get dry heat, which is quite comfortable and warms people.
Autonomous gas burners
Autonomous gas burner
Third place in the ranking is the best method, but since it involves the use of an autonomous heater, and we need methods of dealing with the cold, so to speak, “with our bare hands,” it ended up in third place.
The choice of autonomous heaters for cars today is quite wide. Among the many models, we can highlight a liquid heater, for example, such as Webasto. Such heaters will not only warm the car interior, but will also help start the car engine, as they are pre-heaters for the fluid. Only they are expensive and this heater needs to be installed correctly on the car.
Now about completely autonomous heaters, among which gas heaters come first. They use infrared radiation burners as the main element. Such a heater will not only warm the interior, but also make it possible to boil tea or heat food. But in addition to the heater, you will also have to carry a liquefied gas cylinder with you. So for a passenger car, a five-liter cylinder will do just fine.
The video shows how an autonomous gas burner works:
One kilowatt is the rated power of such a burner and this is quite enough to keep warm. As for consumption, it is unlikely that more than 80 grams of gas will be consumed per hour. This means that you will be able to provide yourself with warmth for a day or even more. The gas burner itself is very convenient, light and compact. Carrying it will not cause any inconvenience, but in addition to the cylinder, as additional equipment you must not forget to take with you a lighter, a hose and a reducer.
You should light a gas burner away from flammable materials and observe fire safety measures in every possible way. In addition, you will need to periodically ventilate the interior so as not to suffocate in smoke. Experts advise placing the gas heater in a special box in order to completely eliminate contact of the burner with the car. Prometheus gas burners have proven themselves to be quite good.
How to make an infrared heater yourself?
All infrared radiators used for heating rooms are characterized by high efficiency and efficiency. This is achieved through a unique operating principle. Waves in the infrared spectrum do not interact with the air in any way, but at the same time the temperature of all surfaces in the room increases. As a result, they already heat the air. That is, the maximum amount of radiant energy is converted into heat. That is why such heaters are often made at home.
Infrared emitter based on graphite dust
Now we will look at how to make a do-it-yourself room heater that operates in the infrared spectrum.
Prepare the following items for work:
- Graphite ground to dust.
- Epoxy adhesive.
- Wire with plug.
- Two pieces of glass or clear plastic of the same size.
- Thermostat.
- Copper terminals.
- A wooden frame that matches the size of the pieces of plastic.
- A brush.
Manufacture the device according to this scheme:
Prepare your work surface. Take two pieces of glass or plastic of the same size, preferably 1 by 1 m. Clean the material from dirt, paint residues, marks from greasy hands - you can use alcohol. As soon as the surface is dry, you can begin the main work. The heating element will be graphite dust. It conducts electric current with high resistance. The dust begins to heat up when connected to the power supply. As soon as it reaches a sufficient temperature, it will immediately begin to emit infrared waves and heat the room. But first the conductor must be attached to the working surface. Simply mix carbon powder with glue until a homogeneous mass is formed. Using a brush, make tracks on the surface of the glass from the mixture prepared in the previous step. Do it in a zig zag pattern.
It is important that the zigzag loops do not reach the edge of the glass by 5 cm, and that the graphite strips start and end on one side. In this case, there is no need to make indentations from the edge of the glass. This is where the terminals will be attached. Attach the glasses to each other with the sides on which graphite is applied, and fasten them with glue
To ensure a high level of reliability, place the workpiece in a wooden frame. Attach copper terminals and a wire on different sides to the places where the graphite conductor comes out to connect the device to the electrical network. Let the heater dry for 24 hours. Connect a thermostat in the chain to make operation easier.
This is where the terminals will be attached. Place the glasses against each other with the sides on which graphite is applied, and fasten them with glue. To ensure a high level of reliability, place the workpiece in a wooden frame. Attach copper terminals and a wire on different sides to the places where the graphite conductor comes out to connect the device to the electrical network. Let the heater dry for 24 hours. Connect a thermostat in the chain to make operation easier.
Film infrared heater
If you are wondering how to make a heater to fully heat a medium-sized room, then use ready-made film materials that can emit infrared waves. They are present in large quantities on the market.
For assembly you will need the following structural elements:
- Two sheets of infrared film measuring 500 by 1250 mm.
- Foamed, foil-coated, self-adhesive polystyrene.
- Two-core wire with plug.
- Decorative corner.
- Polymer glue.
- Natural fabric for decoration.
Perform assembly according to the following instructions:
Prepare the wall surface for arranging a homemade heater by attaching thermal insulation
It is important that its thickness does not exceed 5 cm. Remove the protective film from the self-adhesive layer, attach the polystyrene with the foil up to the surface. Press the material firmly against the wall. Connect sheets of infrared film together in series
Using a spatula, apply glue to the back of the material. Attach all this to the already mounted polystyrene. Attach a thermostat and a cord with a plug to the film. Decorate the device with fabric. Simply attach it using decorative corners on top of the film.
Press the material firmly against the wall. Connect the sheets of infrared film together in series. Using a spatula, apply glue to the back of the material. Attach all this to the already mounted polystyrene. Attach a thermostat and a cord with a plug to the film. Decorate the device with fabric. Simply attach it using decorative corners on top of the film.
DIY IR heater
Such a heating device is considered the most efficient, since when using it, heat is not wasted, but is used only to heat the environment.
- A little purified river sand;
- Graphite chips. It can be obtained by crushing a stone, or extracted from used batteries;
- A tin of shoe polish or coffee;
- Electrical wire;
- Plug.
- Prepare a coffee box
. It must be cleaned of residues and washed thoroughly, then dried; - Mix graphite and sand
. These two bulk components must be mixed together in a 1:1 ratio. Pour the resulting mixture into the box until it fills it halfway; - Attach the wire
. Attach the prepared wire to the tin can using pliers, roll it inside into a ring and fill it with the remaining mixture completely with a small slide on top; - The final stage
. You need to tightly put the lid on the box, due to this, the necessary pressure will be created inside, and then attach the plug to the wire.
Heater Manufacturing Guide
The first stage is glass preparation. Clean the glass surface from any kind of contamination. Light a paraffin candle and thoroughly smoke one side of each glass rectangle.
The first stage is glass preparation
It is recommended to cool the glass before using smoke. This will create a large temperature difference between the glass elements and the candle flame, which will contribute to more intense soot deposition. Take into account the fact that the thicker the soot layer, the lower the resistance of the finished heater will be, which will increase the heating efficiency. Excess soot must be removed.
The second stage is working with foil. Cut 2 strips from aluminum foil. Each of them should have a width equal to the size of the soot coating. These strips will act as electrodes. Apply glue to the soot and attach improvised foil electrodes so that they protrude somewhat beyond the boundaries of the glass. Place the second glass on top and carefully seal the structure using a product intended for this purpose.
Aluminum foil
Stage two – working with foil
The third stage is testing the heater. Test the resulting product to determine power and resistance indicators. If the power is about 220V, everything is fine with the device and you can safely connect it to the network.
The fourth stage is completion of the work. Connect the electrodes to the power cable. Plug in the device. It will begin to gradually heat up and quickly warm up to 40 degrees.
The heating area of the considered device is relatively small. Therefore, either make several similar devices, or use larger glass. The first option is more effective and generally preferable.
Subtleties of choice
Now it’s time to find out how to choose an outdoor electric heater for your dacha with your own hands. This process will not take much time, even if you do not have specific knowledge. If you choose the right device, then you can raise the temperature to 25 degrees. If necessary, you can also choose a model that has an interesting design.
If you take into account all the points when choosing, then you can get a reliable device:
- Device power. During manufacturing, the manufacturer must indicate how much area the device can heat. Before purchasing it, you must correctly calculate the dimensions of your terrace. If you are planning to choose a heater for your dacha, then its power should be 2 kW.
- Automation. Many models may have a special motion sensor. This will make your life much easier. You just need to enter the room and the device will automatically start heating.
- Availability of power regulator. Thanks to this addition, you can independently set the correct heating mode.
- Material of manufacture. The housing must be made of plastic or stainless steel. This will allow you to get a truly reliable device.
- Design. This criterion is considered quite important. Today there can be a wide range of different models, which can have a variety of designs and, accordingly, installation methods. Only you decide which device to choose. Typically, many summer residents choose the floor installation option.
- Cord length. Before purchasing a heater, you should choose a unit that has a long cord. It is best not to use an extension cord while connecting this device.
- Availability of special rollers. Typically, heaters are heavy and therefore it is better to use special rollers to move them.
- Fall protection. If the heater falls or deviates from its axis, then the device will automatically turn off the power.
- Remote control. Now many manufacturers have begun to produce devices that can be controlled by remote control. Thanks to this, you can greatly simplify the management process.
- When choosing, you need to take your choice of company seriously. Recently, the leading position has been occupied by Enders.
Which one should I do?
Do-it-yourself gas generator: instructions for making
Low-power gas burners for everyday life and small private production are classified according to performance indicators as follows. way:
- High-temperature – for precision soldering and welding, jewelry and glassblowing. Efficiency is not important, you need to achieve the maximum flame temperature for a given fuel.
- Technological – for metalworking and forging work. The flame temperature is highly desirable not lower than 1200 degrees, and subject to this condition the burner is brought to maximum efficiency.
- Heating and roofing systems achieve the best efficiency. The flame temperature is usually up to 1100 degrees or lower.
Regarding the method of burning fuel, a gas burner can be made according to one of the following. schemes:
- Free-atmospheric.
- Atmospheric ejection.
- Supercharged.
Atmospheric
In free-atmospheric burners, gas burns in free space; air flow is ensured by free convection. Such burners are uneconomical; the flame is red, smoky, dancing and beating. They are of interest, firstly, because with an excess supply of gas or insufficient air, any other burner can be switched to free-atmospheric mode. It is here that the burners are ignited - at a minimum fuel supply and even less air flow. Secondly, the free flow of secondary air can be very useful in the so-called. one-and-a-half-circuit burners for heating, because greatly simplifies their design without sacrificing safety, see below.
Ejection
In ejection burners, at least 40% of the air required for fuel combustion is sucked in by the gas flow from the injector. Ejection burners are structurally simple and make it possible to obtain a flame with a temperature of up to 1500 degrees with an efficiency of over 95%, therefore they are used most widely, but cannot be made modulated, see below. According to the use of air, ejection burners are divided into:
- Single-circuit - all the necessary air is sucked in at once. With a properly profiled gas channel at a power of more than 10 kW they show an efficiency of over 99%. Can't be repeated with your own hands.
- Double circuit - approx. 50% of the air is sucked in by the injector, the rest into the combustion chamber and/or afterburner. They allow you to get either a flame of 1300-1500 degrees, or a CPL of over 95% and a flame of up to 1200 degrees. Used in any of the ways listed above. Structurally they are quite complex, but repeatable on their own.
- One-and-a-half-circuit, often also called double-circuit - the primary air is sucked in by the flow from the injector, and the secondary air freely enters a limited volume (for example, the furnace firebox), in which the fuel burns out. Only single-mode (see below), but structurally simple, therefore they are widely used for temporarily starting heating stoves and gas boilers.
Supercharged
In pressurized burners, all air, both primary and secondary, is forced into the fuel combustion zone. The simplest supercharged microburner for benchtop soldering, jewelry and glass work can be made independently (see below), but the manufacture of a supercharged heating burner requires a solid production base. But it is the supercharged burners that allow you to realize all the possibilities of controlling the combustion mode; according to the terms of use they are divided into:
- Single-mode;
- Dual mode;
- Modulated.
Combustion control
In single-mode burners, the fuel combustion mode is either determined once and for all by design (for example, in industrial burners for annealing furnaces), or is set manually, for which the burner must either be extinguished or the technological cycle with its use must be interrupted. Dual-mode burners usually operate at full or half power. The transition from mode to mode is carried out during work or use. Heating (winter - spring/autumn) or roofing burners are made with two modes.
In modulating burners, the supply of fuel and air is smoothly and continuously regulated by automation, working according to a set of critical initial parameters. For example, for a heating burner - according to the ratio of temperatures in the room, outside and coolant in the return. There can be one output parameter (minimum gas flow, highest flame temperature) or there can also be several of them, for example, when the flame temperature is at the upper limit, fuel consumption is minimized, and when it drops, the temperature for a given technical process is optimized.
Are you here
A gas convector for heating a garage is the most economical heating method compared to electrical appliances. For one reason or another, it is not always possible to heat a garage with electrical appliances (insufficient electricity, interruptions, high cost). Yes, initially the cost of a gas convector is higher than the cost of electric heaters, but its payback (due to the difference in the cost of gas in relation to electricity) is only one month. The clean operation of the device consists in the intake of air and the removal of combustion products from the street through a coaxial pipe; only the heat exchanger is in direct contact with the room. The only main disadvantage of a gas convector in comparison with electrical appliances is the complexity of its installation and the installation of a coaxial pipe.
Advantages of gas convectors
Durability, cast iron heat exchanger, service life more than 20 years. A wide range of models, divided by power, from 2 to 10 kW, is easy and convenient to select for any area. The device is easy to use, does not take up much space, and is silent. In order to calculate your benefit, simply compare the cost of gas and electricity.
Electric garage heating
The easiest way to heat a garage with electricity is to use a suitable heater, either purchased or homemade. If you don’t have the money to buy factory equipment, you can make it yourself. The simplest heating device is a goat heater, the most affordable, but also the most ineffective. It is done easily and simply - take some kind of non-flammable dielectric, and wrap a nichrome wire around it. Next, connect the electrical cable to the product and plug it into the outlet.
Among all the options for heating a garage, this option is considered the most dangerous - electricity is generally not a joke. Bare nichrome wire is used here, there is no insulation of any kind. Users may be burned or receive electric shock, and there is a risk of fire. It is prohibited to leave such heating unattended. And in general, you should not use such makeshift and extremely dangerous heaters.
Electric heating of the garage can be organized using factory heating devices:
Before you start choosing the type of heating, you should take care of at least minimal thermal insulation of the garage. Otherwise, the heat will simply go outside.
- Heat guns - they are extremely safe and provide quick heat injection into the garage. It only takes a few minutes to warm up the entire volume, after which the room will become warm. Minus – increased noise level;
- Infrared heaters are a modern solution that pleases with high efficiency. Infrared heating of the garage does not dry out the air and is not harmful to health. Simple IR heaters are used here, which heat not the air itself, but the surrounding objects, as a result of which they begin to emit heat;
- Electric convectors are a great way to heat a garage in winter and not have to worry about installing or manufacturing complex equipment;
- Electric boilers - in this case, classic water heating using an electric boiler is organized in the garage. A boiler for a garage is selected according to its area and heat losses, focusing on the formula 1 kW of heat per 10 sq. m. area.
Heating of the garage can also be organized using a homemade boiler - for this you will need an electric heating element of suitable power, which must be built into a metal pipe of one diameter or another. Next, bends are welded to the pipe, to which a water heating system with batteries is connected. By the way, these same batteries (heating registers) can be made independently using pipes with a diameter of 100 mm.
Long burning stoves
A furnace running on waste oil is not only one of the cheapest options in terms of operation, but also the most fire hazardous.
In addition to the potbelly stove, you can use the Bubafonya stove, made by yourself, to heat your garage. It is made from barrels with a volume of 150-200 liters or from pipes of a suitable diameter. The internal volume of the stove is almost completely filled with firewood, resulting in long-lasting combustion - it can last up to 20-24 hours or even more.
The disadvantage of the Bubafonya stove for heating a garage is that at the time of ignition the smoke will go directly into the room. Therefore, the front door will have to be opened so that there is something to breathe. After igniting the stove and installing the chimney, the door closes and the unit begins to operate normally. In addition to the DIY option, nothing prevents you from purchasing a ready-made factory device.
Gas convector and scope of use
A gas convector for home is a device that uses main or liquefied gas as an energy carrier. It is installed on the floor of the room or mounted on the wall. Outwardly, it is similar to a heating radiator, but unlike it, it has holes in the lower and upper parts for convection.
Heating systems using gas convectors are used for heating:
- livestock farms;
- greenhouses;
- portable gas convectors are used for heating retail outlets;
- country houses;
- poultry farms;
- Garage heating with a gas convector is also found.
Typically, these units are used in places where, for one reason or another, it is not possible to install water heating. This is especially true for basements, ground floors and underground garages.
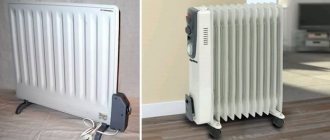
Idea N3: Oil heater
Since technical oil has good heat transfer functions, it is widely used in heaters. You can assemble this oil heater yourself at home. To do this, you will need an old heating radiator (cast iron or bimetallic battery, register or other tubular structure), a tubular heating element, the oil itself as a coolant, sealed plugs for placing the heating element.
Rice. 11: Example of using a register control unit
To maximize the safety of the oil device, it can be supplemented with a heating sensor, the open contacts of which are connected to the power circuit.
The manufacturing process of an oil cooler is as follows:
- Take the old radiator, it is important that it is replaced due to the modernization of the system, and not due to a violation of the integrity of the case. It is advisable to verify this yourself by adding liquid or at least through an external inspection.
Rice. 12: Take an old radiator - Prepare two holes in the heater - for the heating element and for filling the oil. The first hole must be equipped with a thread and located in the lower part so that the heated masses rise upward. It is more convenient to place the second hole in the upper part; when putting the heater into operation, it will also have to be sealed. In addition, holes can be made for draining the oil and for the emergency pressure relief valve. Rice. 13. Prepare two holes
- Screw the heating element into the hole on the radiator. When choosing a specific heating element model, it is important to make sure that the thread diameter matches the hole diameter, and that the kit includes oil-resistant rubber gaskets. Rice. 14: screw the heating element into the bottom hole
Another important point is that the diameter of the heating element must be such that it never touches the walls of the radiator. For sealing, linings, special compounds and tow are used.
- If you left necks for oil drainage and for installing sensors, install the appropriate equipment in them. Seal all holes that will not be used in the future, leaving only the neck for filling the oil.
- Fill the heater with technical oil approximately 85% of the total volume. A margin of 15% is necessary for the free space that the liquid will occupy after heating and thermal expansion. Never fill oil too close. Close the oil filler neck. Rice. 15: Close the oil filler neck
- Ground the heater to a ground loop.
It should be noted that to increase the service life of such a device, the heating element should be selected in accordance with the housing material. Otherwise, due to the large difference in the output voltage of the particles of these metals, destruction of the elements will occur. Also note that the heater will have a decent weight, so it is advisable to ensure it is securely fixed in space or make a structure for ease of movement.
Rice. 16: Wheeled design
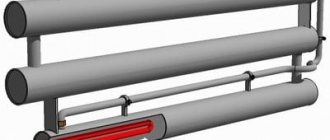
Heating with liquid fuel
Do-it-yourself budget heating of a garage can be done using liquid heating units, including homemade ones. In our reviews, we have already described exhaust furnaces that provide cheap, and in some cases, free heat. For example, if you are changing engine oil, then over the spring and summer you can collect several barrels of finished fuel. A properly assembled oil stove will generate a large amount of heat and will delight you with even combustion without soot and soot.
Pyrolysis-type furnaces consisting of several parts, as shown in the figure, give good results. A fire is lit in the oil container, as a result of which oil vapors and pyrolysis products begin to form. They are burned in a vertical pipe with holes, producing a large amount of heat. By regulating the access of oxygen, you can adjust the intensity of combustion.
When using any stove, it is better to allocate a separate corner for it. You also need to think about a reliable foundation and lining the adjacent walls with non-combustible materials.
Using a stove with a plasma bowl to heat your garage, you can achieve maximum heat transfer and minimum fuel consumption. The oil here breaks down into its constituent parts in a hot bowl, after which it burns to form a bluish-white flame, similar to plasma. Of course, there is no trace of plasma here, since it is formed at much higher temperatures. These furnaces are characterized as the most productive.
Factory models
Let's look at the most popular types of heat exchangers for winter tents. The equipment is new, so we won’t see much variety here. But what is on sale is more than enough.
Heat exchanger Sukhovey
We have before us a good device, made of durable stainless steel and aluminum pipe. It features a capacity of up to 184 cc. m/hour and can operate at high and low speeds. The carefully thought-out design ensures high efficiency, and the low-noise fan relieves users of unnecessary noise. The device easily unfolds into working condition and works with tiles from the manufacturer Hephaestus. The cost of the model is approximately 7,000 rubles.
It is also possible to use other burners that are compatible in size with this heat exchanger.
Heat exchanger for fishing Sibtermo ST-1.6
The presented model is distinguished by the presence of two fans at once, which increases the throughput. This is an excellent heat exchanger for a tent for winter fishing, allowing you to warm up a large volume of air as quickly as possible. The weight of the unit is only 1.88 kg, it can be used in conjunction with any gas and infrared burners. Even in the most severe winter, your tent will be warm and comfortable. The chimney in this model is connected from above.
The cost of the heat exchanger for the Sibtermo ST-1.6 winter tent is about 5,600 rubles.
Heat exchanger "Desna BM"
Extremely compact, with one fan, ideal for a winter tent. Works in both automatic and turbo mode. Can be used in conjunction with any burners and stoves (including infrared). The case is made of stainless steel and protected by durable enamel that can withstand heating to high temperatures. The manufacturer claims high efficiency, incomparable to the efficiency of any other analogues. The cost of the unit is about 7,000 rubles.
We recommend: Film infrared ceiling heaters
Gas stove for tent
A camp stove with one or two burners, powered by gas, is often used as a heater. Depending on the model, weight can vary from 400 g to 2 kg. This option has the following advantages:
- the ability to conveniently cook or reheat food;
- the surface is easily washed from dirt;
- often the design allows for folding into a compact suitcase;
- economical fuel consumption;
- presence of a protection system.
As in special heaters, a gas cartridge is used here. It is not included in the package, but must be purchased separately. It is better to give preference to models with a safety valve that shuts off the gas supply in case of overheating or other unusual situations. Resumption of combustion occurs after pressing the red button located on the gearbox.
It is important to remember that heating a tent in winter while fishing without burning out requires constant ventilation of the space. At least a minimum gap should be left so that combustion products escape into the atmosphere, excluding accidental poisoning.
Gas heater for tent
The travel heater option is perhaps the safest. First of all, it was originally designed to create heat in a closed room, so there is no risk of ignition of other objects, carbon monoxide poisoning, etc.
Such heating devices weigh no more than 1.5 kg and are very economical. So, on average, about 200 g of gas is burned in 4 hours of operation. At the same time, the device will not allow you to freeze even in severe frost.
Most models are equipped with piezo ignition, which eliminates the need to use matches or a lighter - the tool for creating a spark will always be at hand. Some users note that in severe frost the heater loses power and the gas entering the tent heater stops evaporating. In this case, you need to warm up the fuel supply pipe with several matches or a tablet of dry alcohol.
It is recommended to choose a model with a gas preheating system. Its essence lies in the presence of a tube that passes through the flame and frames the cylinder. As a result, the gas is heated before it exits, and therefore burns stably even at a temperature of -30.
It is important to leave a ventilation connection with the outside space. This will allow:
- Avoid the formation of condensation inside the tent, which will prevent things from getting damp.
- Ensure timely removal of carbon dioxide, which has a detrimental effect on the general condition of the body.
Among the advantages of a gas heater are:
- space heating rate;
- good drying of clothes;
- ability to heat food and water.
The disadvantages include:
- the relatively high cost of the device and the fuel cartridges themselves;
- the need to replace the canister at night.
Burners (primus stoves)
This is a universal heater option that, depending on the model, uses gaseous or liquid fuel. Mostly specialized stores sell gas burners. When choosing a model, you should pay attention to the power - not lower than 2000 W. With this value of this parameter, a liter of water will boil after 5 minutes.
Options that can support the combustion process from both types of fuel deserve special mention. The transition between gaseous and liquid fuel occurs by replacing the nozzle.
A pure gasoline tent heater has such advantages as frost resistance, convenience, reliability, and good heat dissipation. However, despite all the positive aspects, it cannot be recommended to fishermen and here’s why:
- A canister of liquid fuel weighs much more than a gas cylinder, and if you need to cover a long distance on ice in search of fish sites, this can be a significant challenge.
- Even with the most careful use, fuel will get on your hands. In all other cases there is nothing wrong with this, but during fishing it will negatively affect the catch. After contact with tackle or bait, the smell of fuel will remain on your hands, which can be easily heard by underwater inhabitants.
- When gasoline and kerosene burn, a lot of carbon monoxide and soot are released into the air. The tent will have to be kept open, and all clothes will stink of combustion products.
There are also kerosene heater lamps. They have all the pros and cons indicated for liquid fuel heaters.
Convector – efficiency and quality
Fast and efficient garage heating with household convectors is the choice of most car owners. The convector has many more advantages than disadvantages:
- the colder the air entering the convector from below, the higher the heat output of the heater;
- it is possible to install both electric and gas convectors;
- the heater body does not heat up, the temperature does not exceed 65 degrees;
- full guarantee of fire safety;
- uniform heating of the entire garage;
- automation allows you to maintain the desired temperature and saves energy consumption;
- The heater is easy to install in any convenient place in the garage.
Useful video
Video on how to make heating in a garage with your own hands.
Do-it-yourself garage heating: cheap and fast (the most economical way).
The choice of heating method depends on many factors: the size of the garage, the type of building - permanent or temporary, whether you need to constantly maintain the temperature or whether you need to be able to quickly warm up the room, etc. Only by answering all the questions will the car enthusiast be able to make the right choice, because each heating method has its advantages.
Thus, a heat gun or a heater on wheels does not require installation, installing a potbelly stove will cost the least, and you can save on fuel by heating your garage with waste oil.
At the same time, the safest options are factory boilers for heating with solid or diesel fuel, and a constant temperature can be ensured by a system with liquid circulating through pipes, heated by a gas boiler.
The choice is yours!
Construction of a heater from a pipe
This homemade design is also called a thermal gas gun. It produces significantly more heat than previous heaters and absorbs more energy resources. Also, such structures are often equipped with chimneys, which makes them bulky and difficult to carry.
The diagram will familiarize you with the principle of operation and design features of a gas heat gun. The heat flow generated by the device is distributed using a fan
To assemble the heater yourself, you need to collect the following material:
- three meter pipes of various diameters (two 8 cm and one 18 cm);
- steel plates with which the fastening will be carried out;
- Metal sheet;
- gas burner with piezo ignition;
- axial fan.
You will also need a variety of tools: drill, welding machine, tape measure, level, grinder, metal scissors. Pipes can be replaced with cylinders or fire extinguishers of suitable diameters. A grinder will be needed to cut the bottom and top, as well as shorten the workpieces.
Working in intensive mode to heat a room of 15 square meters, a forty-liter cylinder is enough for about a week. While working, the gun dries the air, so you need to humidify it
In a pipe with a diameter of 18 cm, two holes of different diameters are drilled: 1 cm and 8 cm. They need to be drilled opposite each other.
A 30 cm section is cut from a pipe with a diameter of 8 cm, which will represent the combustion chamber. Fasteners are welded to this pipe and a hole with a diameter of 1 cm is drilled in it. Then this pipe is inserted into the first pipe.
You need to cut a plug from a sheet of metal. It will close the gap between the heater body and the combustion chamber. A combustion chamber is welded to the body, and a pipe for exhausting hot air is welded to a hole with a diameter of 8 cm. After this, the plug is welded. After making sure that the gas burner is tightly attached to the combustion chamber, you can insert the hose through the centimeter holes.
A fan is installed at the back of the device, and a smoke exhaust is installed at the top. In order for the heater to stand stably on the surface, the legs should be welded. A gas heat gun efficiently heats rooms and uses gas economically. However, when using it, you should adhere to safety precautions.
Features of operation
It is important before using gas stoves in the garage to make sure that the ventilation is working properly and that there is no gas pollution in the room. The valve on the gas cylinder or on the stove must be closed after each switching off of the equipment, even if it is equipped with its own shut-off valves.
Therefore, having opened the gas, we light the burner flame. If a cannon is used, the fan is turned on before the fire is lit. A reducer must be installed on the cylinder, which protects it from backlash and regulates the gas pressure.
Otherwise, the operation of a gas furnace is similar to other types of furnaces. The main thing is to be responsible and careful about the maintenance and care of equipment and your garage will always be warm.
Autonomous heating device
This heater is designed for 12 volt current. Thanks to this, it can be connected to a battery. It can be used in rooms where there is no heating and where renovations are being carried out, as well as in the garage or any room in the house. Its power is not enough to heat the entire room. It does not create infrared rays. It only heats the air.
To make it you need to take:
- Metal can. It could be a coffee can. Its height and diameter should be 20 and 10 cm, respectively. These values may deviate upward or downward. You should not use a jar made of plastic, cardboard or any other material. This is because they are poor conductors of heat.
- Bracket. It can be a U-shaped part of a children's metal construction set.
- Bayonet cartridge.
- Car brake light lamp. It is designed for 12 volts. Its power is 25 W.
- 2 A fuse.
- Sleeve made of insulating material.
- Cable. The cross-sectional area of one wire must exceed 1 mm².
Sequence of manufacturing an autonomous heater
A 12 volt device is made as follows:
- Drill 20-30 holes in the side wall of the can. Their diameter should be 3 mm.
- Make a hole in the bottom of the jar. It is drilled in the center of the bottom. The diameter should be equal to the diameter of the bolt that will secure the bracket.
- Fix the bracket at the bottom of the can.
- A cartridge is secured to the top of the bracket. This element must be positioned so that the lamp does not touch the walls of the container.
- A hole is drilled in the side wall of the can at the level of the top of the bracket so that the bushing for the cable fits in it.
- A sleeve is inserted into this hole and an electrical wire is pushed through it, through which a current of 12 volts will flow. The cable will be connected to the socket.
- Screw in the lamp and close the jar with a lid.
- A fuse is connected to the cable break.
The 12 volt heater is ready. Now all you have to do is connect it to the battery and wait 10 minutes. During this time, the homemade garage heater will warm up. When using a device with an operating voltage of 12 volts, you need to monitor the battery voltage. It should not fall below 10 volts. Otherwise, the current source cannot be restored.