Electric boilers are the easiest to install and connect; they do not require a chimney, supply and exhaust ventilation, or a separate room for the boiler room. Since standard heating element models already contain all the necessary elements and components (circulation pump, expansion tank, safety group, etc.), when organizing a simple heating system, communications around the electric boiler are minimal.
All these factors allow you, having basic skills and knowledge, to install and connect an electric boiler yourself, without the involvement of specialists. But please note that the condition for providing a warranty from most manufacturers is that installation is carried out by a specialized service organization. However, the ease of installation also has a positive effect on the cost of the work of the craftsmen.
What is the difference between an electric boiler
Experts consider an electric boiler to be the simplest equipment for creating heating. You don't have to do any complicated work during the installation process.
What does not need to be installed with an electric boiler:
- No chimney is created;
- Supply and exhaust ventilation is not used;
- No special room is used to organize the boiler room.
But how is this possible? Is it really possible to connect an electric boiler in a private home without all this? And what will work reliably?
Yes! Thanks to modern technologies, the latest models have control elements and components for operation: a pump for forced circulation of coolant, an expansion tank, security systems and other equipment.
Therefore, in the case of assembling a simple heating system for private use, a lot of space or developed communications are not required. Due to this, the installation process requires little knowledge to make a reliable connection yourself.
Important: Unfortunately, many manufacturers make special requirements for warranty service. The installation must be carried out by a qualified technician from a special organization under a contract.
The only advantage in this situation can be seen in the low cost of such a service. Why charge a lot of money when anyone can do it after a little familiarization with the installation process. It's really very simple.
If you have not yet chosen an electric boiler
The choice of a heater operating in conjunction with a water heating system is made based on power and operating principle (the cost of the equipment depends on the latter). Electric boilers have no problems with functionality - any model is equipped with an automation unit. If desired, various peripheral devices can be connected to it - weather sensors, room or overhead thermostats and GSM modules for control from a mobile phone or via the Internet.
Important note. Some, Protherm or “Evan” require in the operating instructions that the installation and connection of the electric boiler to the network be carried out by specially trained personnel. Self-connection will result in a waiver of warranty obligations.
After completing the work, the craftsmen make a note in the technical data sheet of the product.
Before choosing and purchasing a heating device, check how much electrical power has been allocated to your home by the management company. It may happen that it is not enough for individual electric heating. Point two: a single-phase 220-volt network is capable of powering boilers that consume up to 12 kW/h inclusive. More powerful water heaters are connected to a three-phase 380 V power supply.
Determination of thermal power
This indicator is calculated using the standard formula: calculate the heated area of a country house or cottage, then multiply the quadrature by 0.1 kW. Obtain the thermal energy demand that the electric boiler must cover.
Consider a number of nuances:
- the height of the ceilings of the rooms is up to 3 m, otherwise the calculation is carried out according to the volume of the premises: the cubic capacity is multiplied by 40 W;
- the heat generator must be selected with a minimum margin of 20%;
- if the heating unit is planned to be used to provide domestic hot water, the reserve must be at least 50%;
Dividing a quadrature by 10 is the same as multiplying by 0.1, the result is the same - in the northern regions, the square footage of the building is multiplied by 0.2 kW, in the southern regions - 0.08 kW;
- The power of the boiler, which operates only at night and charges the heat accumulator, is assumed with a double margin.
Example. A small house of 100 m² on average requires 100 x 0.1 = 10 kW of heat. The power of the electric heating installation is 10 x 1.2 (20%) = 12 kW. We need to heat water for household needs - multiply by a factor of 1.5 and get 15 kW.
To obtain more accurate results, we suggest studying the methodology for calculating the load on the heating system
Which type of heater is better
Next, you need to select a water heating device based on its operating principle. What types of household electric boilers can you buy:
- Traditional, equipped with tubular electric heaters (TEHs).
- Electrode, where the salted coolant is heated by passing current through the water.
- Induction devices heat the liquid using Foucault eddy currents that arise in the metal core of a multi-turn coil.
Electric mini-boiler room with tubular heaters (TEN), fully equipped
Valuable advice. Do not listen to the tales of salesmen praising the efficiency of certain electric boilers. They like to use the expressions “energy-saving”, “eternal”, “economical” and so on. Remember: all types of heaters are equally effective at converting electrical energy into heat with an efficiency of 98-99%.
The first place in the user rating is occupied by heating element heaters. The only weak point - the heating element itself - has long been protected with ceramics, and in addition it is easy to replace. Modern models of heat generators are wall-mounted mini-boiler rooms with a built-in expansion tank and circulation pump. There are simpler versions that include only heaters and an automation unit.
The cheapest and most reliable option is an electrode boiler with a control cabinet, shown in the photo. Its disadvantages:
- loud switching sounds from the operation of a contactor or magnetic starter;
- gradual degeneration of salts in the coolant, which reduces heating efficiency, which is why the water in the heating system will have to be added with salt 1-2 times a month;
- The electric device works stably with radiators, but is poorly compatible with heated floors, where it is necessary to maintain a low coolant temperature of 35-50 ° C.
Induction electric boilers for heating a private home are quite expensive, and there are questions about the reliability of the devices. There are known cases of phase burnout inside the coil, the power of the heat generator dropped by a third. Fixing the breakdown is very problematic.
An induction heater heats water with a metal core located in the vortex field of the coil
Rules for connecting an electric boiler
Many people thought that there were no rules. Therefore, you can familiarize yourself with the connection diagram of the electric boiler. Then connect everything yourself and use it for many years. In fact, everything is not so simple.
Connection rules based on PUE (7th edition):
- If the power of the electric boiler is more than 10 kW, permission is required from Energonadzor specialists. But there are many models on sale that do not exceed this limit. They have sufficient heat output to heat a small house;
- But in the case of installing a differentiating meter, there are no exceptions. You will have to obtain permission from Energonadzor. This is a very useful addition because it helps save energy. Therefore it is better to install it.
No other permits will be required. But it is necessary to understand the nuances of equipment installation.
Types of boilers by heater type
Today there are many modifications of units that differ in the connection diagram of the electric boiler, and are classified according to:
- configurations;
- characteristics of thermal conditions;
- design solutions;
- type of heating;
- manufacturing plants;
- cost.
All electric boilers designed for water heat supply, according to the method of heating the coolant, are divided into 3 main categories:
- Heating elements that use tubular electric heating elements.
- Electrode or ionic/electrolysis, operating using the ability of water to heat up when passing alternating current through an electrode.
- Induction, using the properties of ferromagnets to heat up under the influence of induction current.
Electric boiler installation
It is worth realizing that all electric boilers differ mainly only in operating power. For power greater than 6 kW, a three-phase 380 V power supply is used.
Although models with a power of 8-12 kW can be used from a single-phase network and 220 V, their performance will not be at maximum efficiency.
As we have already mentioned, the electric boiler can be installed anywhere. Use of the corridor, kitchen, hallway is allowed.
Although, taking into account the need to install pipes for the movement of coolant, adjust grounding, and add associated communications, it becomes clear that even in permitted locations, installation is characterized by significant difficulties. And it is prohibited to place a boiler in a bathroom.
If you use wood to mount a wall, you will have to provide a layer of non-combustible material: xylitol sheet or basalt cardboard.
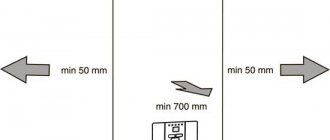
Standard requirements for the space around the electric boiler:
- It is necessary to leave 0.7 meters of free space on top;
- Provide 0.5 meters of free space on the sides of the boiler;
- There should be 0.7 meters left to the boiler unit;
- There should not be less than 3 cm between the surface of the boiler and the wall.
But in general, these are not complex restrictions and requirements in comparison with similar heating equipment.
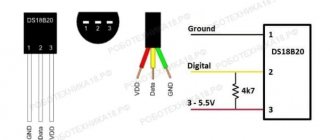
How to make grounding
Laying a grounding loop near a private house is a simple matter and very useful from the point of view of electrical safety. For installation, find 3 steel rods Ø16 mm 2 m long and a strip with a cross-section of 40 x 5 mm.
Stepping 3 m away from the wall of the building, arrange grounding according to the step-by-step instructions:
- Mark a triangle with sides of 2 m on the ground and dig a pit to a depth of 50 cm.
- Sharpen the ends of the rods with sandpaper or a grinder, install them at the vertices of the triangle and drive them into the ground to their full length.
A bunch of grounding conductors (on the left in the photo) and laying a busbar into the house (on the right) - In the pit, securely connect the protruding ends of the rods with a strip by welding.
- Make a supply bus from a strip, welding it to the circuit and securing it to the base. Grab a bolt to it, screw on the copper busbar and conduct the grounding conductor inside the house, connecting it to the metal body of the electrical panel.
Upon completion, treat the welding seams and the above-ground section of the strip with bitumen and bury the hole. For more information about the grounding device for an electric boiler and home appliances, watch the video:
DIY electric boiler installation
You may not be able to do everything yourself. But some of the work can be done without the involvement of craftsmen. It's interesting, educational and will help you save money.
Stages of work:
- The wall is cleaned of dirt and dust accumulations until a shine appears;
- We will use a hinged mounting plate, screws and dowels. Usually all this is offered along with the boiler;
- Markings are created on the wall along the mounting strip. Holes are drilled to match the diameter of the dowels;
- The dowels are inserted into the holes;
- The boiler is hung on the wall using threaded hooks. Now you need to tighten the screws.
But don’t be surprised if other fasteners are offered with the model. It's normal they may differ. The instructions must indicate the method of fastening.
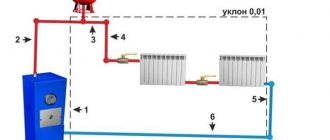
Modern control for single-pipe systems
The boiler is usually controlled by a single thermostat, which provides poor control, especially in townhouses. The thermostat will only take into account the temperature of the floor or room in which it is located.
For example, if the thermostat is located on the ground floor next to the boiler, then it will read the temperature of that floor.
The steam will reach the radiators first, quickly heating the floor. This means that the thermostat will turn off the boiler before the steam can fully heat the radiators on the floors furthest from the boiler, resulting in lower temperatures on those floors.
To eliminate this problem, it is proposed to place temperature sensors on several floors with an averaging thermostat.
This ensures more even heat distribution.
Larger single-pipe steam heating systems may require the use of a thermal timer control.
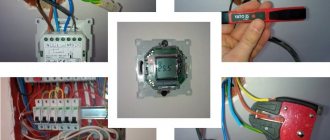
Electric boiler wiring
If a modern model of electric boiler is used, then elements for full operation are already installed in its monoblock housing. Therefore, we connect to the pipes based on the supply and return pipes. It is important to understand that the water starting system should be connected to the return line, thanks to the make-up tap.
If we use a simple option, then we will have to use the circuit and connect the electric boiler sensors ourselves. But overall it's a simple job. It should not lead to serious difficulties.
Stages of piping a simple electric boiler:
- A hydraulic manifold and a volumetric expansion tank are installed on the basis of a special fastening;
- Pipe laying is in progress. A circulation pump, a filtration system, and safety elements are added.
Important: After and very important before each element, it is worth installing a special shut-off valve to cut off the coolant in this part of the system. This will help in the process of carrying out repair work, since you will not have to drain water throughout the entire system. For reliability, some moving elements are additionally secured; a tourniquet is used for this. Threaded connections are reinforced with sealing tape.
Now we understand the differences between an electric boiler and have studied the rules for connecting it. Unfortunately, this is not enough for reliable operation; installation of grounding and connection to the electrical network should be left to specialists, since this is very important and difficult to do without specific knowledge.
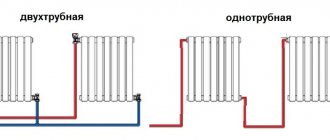
Pros and cons of a 2-pipe system
The advantages of such heating include the following points:
- The system is more reliable and less vulnerable to defrosting;
- Parallel connection principle, providing greater heat output;
- Possibility of extension, both vertically and horizontally, which is especially convenient when expanding living space (extension of residential premises);
- Possibility of manual temperature control for each room.
The disadvantages include the following:
- Higher cost;
- Installation is somewhat more complicated;
- More consumables (pipes) will be required.
Photos of the best electric boiler models
Heating a home using electric heaters
The following electrical appliances are used for air heating:
- Air convectors are devices consisting of a housing with a heating element inside. During operation, cold air enters the convector, is heated by a heating element and naturally exits through the grille located in the upper part. Depending on the location, convectors can be floor-mounted or wall-mounted.
Electric convector
- Oil heaters - heating of a room with such electrical appliances occurs by heating a sealed housing (radiator) filled with oil, located inside heating elements.
Oil electric heater
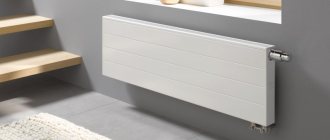
- Ceramic heating panels are devices that heat rooms due to the convection of warm air by a ceramic surface heated by tubular or flat electric heat-generating elements (heating elements, heating cable) located underneath it.
Ceramic heating panel
- Infrared emitters are heaters that heat a room by heating objects within the device’s coverage area with infrared rays and then releasing some of the heat to the air around them. A classic device of this type is a housing with a quartz transparent tube, inside of which there is a spiral made of nichrome or tungsten wire that heats up and emits infrared rays.
Infrared emitter
Required Tools
The quality and speed of work completion depend on proper preparation.
For installation you will need:
- A drill with different attachments for making holes for fasteners.
- Level for mounting equipment.
- Fastening elements capable of withstanding the load created on them by the mass of the electric boiler.
- Pipes for highways.
- Cable for laying the power line from the mains.
Additionally, you will need to purchase circuit breakers and RCDs.
Materials used
Previously, steel pipes were mainly installed. They quickly failed due to corrosion. Also, their internal diameter during operation decreased over time due to salt build-up. This reduced the efficiency of the heating system and electric boiler.
Polypropylene pipe piping
Tying with polypropylene pipes
Steel has been replaced by plastic in the form of polypropylene, which not only has a service life of 50 years, but is also several times cheaper. Piping with such pipes is easy. This means that prices for installation work are reduced.
Positive characteristics of polypropylene pipes:
- the inner diameter never changes;
- the inner surface is always smooth, which does not reduce the speed of water flow;
- speed of installation;
- withstand pressure up to 25 bar and temperature up to +95 ℃;
- high quality connections between pipes and other elements of the heating system.
There is only one drawback - linear deformation with increasing coolant temperature.
Pipe connections are made in two ways: using special fittings or soldering. The second option is more reliable in terms of not causing leaks at the joints.
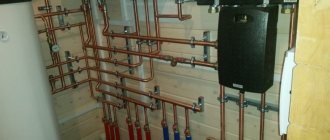
Copper piping
An excellent option, but expensive in all respects:
- the price of copper pipes is higher even than steel pipes;
- the cost of the services of a welder and installer will be more expensive, because joining requires knowledge of the technology, the availability of a welding machine and consumables, and extensive experience in carrying out this type of work.
The advantages of using copper pipes in piping include:
- their long-term operation, not inferior to polypropylene. Copper does not react corrosively with hot water;
- high heat transfer. Copper products themselves will give off heat well into the room, thereby acting as additional heating elements for the house.
Piping an electric boiler with copper pipes
Safety regulations
When carrying out installation work, it is necessary to comply with safety requirements. Violations can cause damage to the installation and a short circuit. Errors can cause ignition during the startup phase of the device.
Laying the power cable of the device requires disconnecting the voltage to prevent electric shock. Electrical equipment used to heat a room must be grounded.
When connecting, it is necessary to lay new wiring with a cross-section corresponding to the power consumption. The equipment must be mounted on a substrate made of non-combustible material.