Therefore, for such a “gluttonous” consumer of electricity as an electric boiler, on whose stable operation in winter a lot depends, it is important to make the correct electrical wiring, select reliable automatic protection and make the connection correctly.
To better understand the principle of connecting a boiler, you need to know what it usually consists of and how it works. We will talk about the most common heating element boilers, the heart of which is Tubular Electric Heaters (TEH).
An electric current passing through the heating element heats it up; this process is controlled by an electronic unit that monitors important indicators of the boiler’s operation using various sensors. The electric boiler may also include a circulation pump, control panel, etc.
Depending on the power consumption, electric boilers designed for a supply voltage of 220 V - single-phase or 380 V - three-phase are usually used in everyday life.
The difference between them is simple, 220V boilers are rarely more powerful than 8 kW , most often heating systems use devices no more than 2-5 kW, this is due to limitations on the allocated power in single-phase supply lines of houses.
Accordingly, 380V electric boilers are more powerful and can effectively heat large houses . Connection diagrams, rules for choosing cables and automatic protective equipment for 220V and 380V boilers are different, so we will consider them separately, starting with single-phase ones.
Connection and first start-up of a three-phase boiler
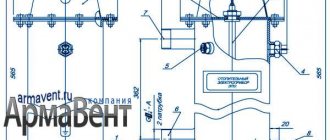
They begin to install an electric three-phase heating boiler by calculating the circuit. It is somewhat more complicated than when connecting to a 220 V network, but is present in the passport for the unit. Since you will have to obtain permission to operate the boiler on a 380 V network, it is better to entrust the connection to electrical network workers.
The most important part is connecting the wires. The procedure is indicated in the instructions and is absolutely simple. The main thing is to maintain color and properly ground the unit.
Three-phase connection diagram
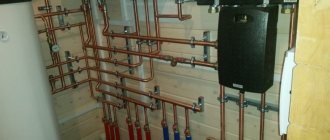
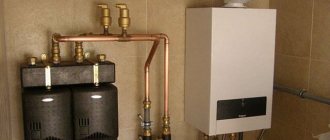
It is important to perform the tying correctly. Correct strapping is a guarantee of high-quality operation of the device
This will require a number of components and tools. The work is not difficult for a person who has an understanding of plumbing work.
Water must enter the boiler through the return line. This is done in order to be able to add water while the boiler is operating without causing cavitation processes. A shut-off valve is installed in the supply line, and a filter is installed in the discharge line.
The boiler is mounted at the lowest point of the system. This will allow you to obtain maximum heating of the heating system elements. The coolant supply pipe to the radiators is installed at the minimum height from them.
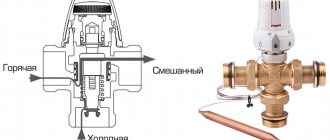
A double-circuit heater must be connected so that the coolant in the small circuit is heated to a certain temperature and supplied to the large circuit to the radiators.
After the connections are made, start-up begins. First, remove the front panel and slightly open the return valve so that water begins to flow into the tank.
Control is carried out using a pressure gauge on the device body. The required pressure is limited by the green sector on the device (1.5-2 bar). When the arrow moves to this sector, unscrew the tap on the relief valve (installed in the upper part) and completely bleed off the air. When water flows without bubbles, it is closed. In this case, the pressure in the tank will drop. You should wait until it grows and then bleed the air again.
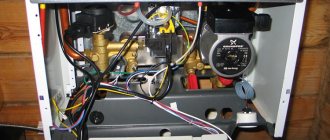
Electric boiler control unit
Next, proceed directly to the launch. To do this, turn on the gas station. The power light on the device indicator will light up and digital data on the water temperature will appear.
By pressing the arrow buttons (+ and -) you control the amount of kW used and the water pressure in the boiler. The Mode and OK buttons allow you to program the temperature and power consumption in kW.
After setting the set temperature, the pump begins to function and the heating element turns on. All that remains is to close the lid and enjoy quiet and fast operation. Stop the boiler by pressing the button with the minus sign and completely resetting the set temperature.
Electrical panel assembly
The input switch and meter are sealed by power grid workers, so they are located at the beginning of the switchboard so as to provide this opportunity.
Step by step assembly:
- fastening of automatic devices and RCDs on the rail according to the drawn up diagram;
- connecting elements to the input switch using a comb;
- connecting phase wires with wires with lugs;
- installation and connection of the zero bus;
- checking (tightening) joints with a screwdriver;
- turning on the power, checking the operation of the machines;
- determining network parameters using a multimeter.
Before starting to operate the 380V network, make sure that all elements of the internal system (sockets, sockets, switches) are installed and connected.
Absolutely not
- Connect the generator through a regular house socket using a plug-plug wire, turning off the input circuit breaker. Why? We answer:
- The power of the most popular generators for private homes usually ranges from 5-6.5 kW. A household socket, if installed correctly, can hold a load of up to 16A (~3.5 kW), and if installed incorrectly (non-GOST wire, cross-section less than 2.5 sq. cm., Chinese socket, weak contact connections, etc.) 10A or less . When the load increases, a fire hazard arises.
- According to GOST (12.2.007.0-75 clause 3.1.7), the presence of uninsulated live parts in electrical installations is not allowed, and when using a plug-to-plug connection, we have the possibility of dangerous voltage on one of the plugs.
- This circuit allows for the mechanical possibility of supplying counter voltage to the generator, which will lead to its failure. This is possible if, while the generator is running, one of the household members turns on the input circuit breaker, knowing that there is voltage from the network.
- It is prohibited to connect the generator through a distribution board using a switching circuit on automatic machines. Let's look at an example that we encountered in practice:
Incorrect generator connection diagram
Let's take a look at the build quality of this shield. Why is such a scheme dangerous? When two machines are turned on simultaneously (in this case, “Input” and “External Rose and Generator” at the bottom left), we receive counter voltage on the generator line, which leads to its failure. A family member uninitiated in the scheme or the owner of the house who is thinking about the meaning of life can turn on two machines at once. It is necessary to use three-position reversing switches I-0-II (for example, ABB OT40F3C)
- It is strictly forbidden to connect one of the generator outputs to a common neutral bus unless the neutral is re-grounded in the main panel (TT circuit) and/or on a pole and/or in the metering cabinet. Such grounding, as a rule, is absent in old SNT or in villages where the norms for laying power lines are violated. By violating this rule, we transfer dangerous half-phase voltage from the output of our generator to the “public” neutral. This can lead to electrical injuries to your neighbors and electricians working on the line. How to determine if there is re-grounding? The neutral is grounded either at the top of the pole through the reinforcement terminal, or on a steel strip that runs along the pole and goes into the ground. One example of a circuit with grounding of the neutral on a pole and organization of grounding according to the TN-CS scheme
Grounding the neutral in the ASU
This is interesting: If you connect wires of different sections, which one will burn out first? (video)
Connection instructions
Scheme of combining a gas boiler and a generator with grounding.
Connecting a gas boiler to a generator is quite simple; it is only important to ground the “zero”. But if the generator does not have a clearly defined “zero” and “phase”, there are 2 methods of grounding:
- Use a 220/220 separation transformer corresponding to the power of the gas boiler. Consider one of the terminals of its secondary winding as “zero” and ground it.
- Take the phase with a higher potential to ground as “zero” and ground it.
Without grounding, the gas boiler will not operate from the generator, since the ionization flame sensor will not function. If the generator is connected to the electrical network at home, grounding is not required, since it is already carried out in the electrical network.
It is important to understand that the generator, like the internal combustion engine of a car, during its operation emits a sufficient amount of combustion products in the form of exhaust gases. Therefore, you need to take care of the ventilation system, preferably forced
To do this, you need to install ventilation to the generator itself; an excellent solution is to completely divert all exhaust gases to the street by connecting a corrugation to the exhaust pipe.
Compliance with all safety rules: exhaust to the street through a corrugated hose, additional forced ventilation of the room, fire protection of floor and wall coverings.
Characteristics of a voltage stabilizer for a gas boiler (video)
A stabilizer for a gas boiler is an indispensable device that allows you to extend the service life of a heating device connected to the electrical network. Selecting a stabilizer is a rather labor-intensive undertaking, during which you need to take into account many nuances related to the type of electrical network and the characteristics of the device. Using the above recommendations, you can choose a truly high-quality, suitable device that will reliably protect the heater from the influence of power changes in the network, and will allow you to enjoy the operation of your gas boiler for many years.
Heating schemes for a private house with an electric boiler
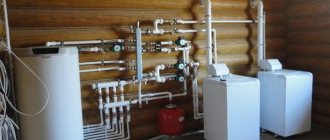
The simplest heating scheme for a private house with forced circulation by a heating element monoblock electric boiler, which already has an expansion tank, a circulation pump, a safety valve and an air vent.
Heating diagram for a private house with a simple electric boiler that does not have an expansion tank and a circulation pump.
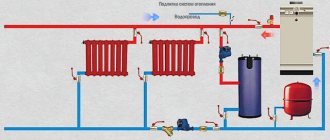
A simplified diagram of using an electric boiler as a backup heating equipment in conjunction with the main boiler and buffer tank. The electric boiler can be used during the night zone with reduced tariffs, and during the day the buffer tank will release the accumulated heat for a long time.
Connection diagram for a double-circuit electric boiler.
Heating scheme with electric boiler and heated floors. Hydrocollectors are used to distribute heated floors into several circuits.
Electrical installation in a single-phase network
As we have already said, you can connect the water heater to a single-phase network through a plug or a separately powered cable. There is no point in even stopping at the first option, because... Anyone can insert a plug into a socket.
As for the second option, first you need to calculate the current cross-section of the cable (if the required diameter of the cores is not indicated in the product data sheet), and then bring the conductor to the installation site of the boiler. Then everything is simple - we connect the phase, neutral and grounding to the corresponding terminals in the unit (they are marked on them). For your attention, a schematic diagram of connecting an electric boiler with a thermostat to the heating system:
The best known manufacturers and models: characteristics and prices
Denzel GT-950i
One of the best inverter gasoline generators for a gas boiler with a power of 0.9 kW and economical fuel consumption of 0.5 l/hour. Designed for continuous operation for 4.5 hours, it has compact dimensions, a more stable and quiet 4-stroke internal combustion engine, a body in the form of a soundproof casing, which makes its operation quite quiet.
According to reviews from the owners, the mobility of the generator allows it to be used not only to power the boiler, but also other equipment in the house, and to take the generator to the garage or fishing at any time.
Cost: 14,800 rub.
Daewoo Power Products GDA 1500I
An excellent, more powerful 1.4 kW inverter synchronous gas generator, which is enough to provide electricity to the most complex heating systems. The four-stroke engine is housed in a soundproof casing, making its operation virtually silent. However, the model has higher fuel consumption - 1.25 l/h, which is still compensated by the presence of an inverter and the ability to adjust the speed. With a sufficiently high power, it has only one outlet.
Through practice, the generator has proven itself to be optimal in performance, reliable and durable.
Cost: 17,000 rub.
Huter DY5000L
Powerful 4.5 kW dual-fuel (gas/petrol) synchronous generator. Designed to power not only the boiler, but also the full-fledged electrical network of an average country house. Designed for continuous operation for 9-9.5 hours, the generator automatically turns off when overheated, overloaded or low oil level. No obvious shortcomings were observed due to the practice of use.
Cost: 29,000 rubles.
CHAMPION IGG980
An excellent inverter gasoline generator with a power of 1.1 kW and economical fuel consumption of 0.6 l/h. It is distinguished by an extremely affordable price, small size, greater power than stated by the manufacturer, and the ability to adjust it. But, like other inexpensive models, it has characteristic disadvantages in the form of a low-quality sinusoid at the output, noisy operation, poor assembly, which causes oil and gasoline leaks.
Cost: 7,800 rub.
Position three – type of fuel for the generator
Selecting a generator by power and type of fuel
Before choosing which electric generator - gasoline, diesel or gas - you should purchase for your home, you should take into account some circumstances. If power outages are short-term, then it is more preferable to purchase and connect a gasoline generator, which, moreover, is much cheaper than a diesel one
If there are long and frequent outages in the main network, then it is better to buy a diesel generator. These units are more expensive than gasoline units, but the cost of diesel fuel and maintenance is several times lower than that of gasoline units.
And finally, if the house has natural gas or a gas tank for heating, then it is advisable to connect a gas unit as a backup power source.
Installation rules and requirements
Electric boilers are compact in size, require a minimum of wiring and have a modern design, which allows them to be installed anywhere.
All general requirements are described in the PUE (7th edition). Electric boilers with a power of up to 10 kW do not require approval from the Energonadzor services. However, if you want to install a meter that differentiates electricity consumption by zone of the day, which we recommend doing in order to save money, you will still have to coordinate the installation. For boilers with a power of more than 6 kW, three-phase power supply (380 V) is required; 8-12 kW models can operate from a single-phase (220 V) network, but it will not provide operation at full power.
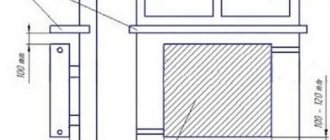
The choice of installation location for an electric boiler is more extensive than for gas or solid fuel boilers. Electric boilers can be installed in a residential area, for example, a corridor, hallway or kitchen, but keep in mind that in any case you need to run pipelines, wiring, grounding and other communications to it. The installation of an electric boiler in the bathroom and toilet is prohibited.
The requirements for the installation surface are also minimal, it can also be a wooden wall, but in this case it is necessary to insulate the installation site with a layer of non-combustible material (basalt cardboard, xylolite sheet).
Fireproof protective plate when installing an electric boiler on a wooden surface.
Manufacturers also impose requirements on the space around the electric boiler necessary to ensure maintenance and repair. The values differ depending on the model, so before planning the installation location and wiring, you should find them in the operating instructions. Usually this:
- from 0.7 m from above the boiler;
- from 0.5 m on the sides (including to the pipeline) and below;
- from 0.7 m in front of the boiler unit;
- at least 3 cm between the wall and the boiler.
Electrician's recommendations
For hidden wiring, built-in electrical panels are chosen, and exposed wires are connected in overhead distribution panels. The shield body is placed so that it can be easily reached.
Electricians advise observing the following conditions:
- horizontal sections of wires from the panel to the sockets are made at a height of 2.5 m from the floor;
- wiring in the walls is placed vertically or horizontally; it is prohibited to install it along an oblique line;
- connect the wires with adapters in installation boxes;
- the underground connection to the power pole is made with a single piece of wire without connections;
- Do not connect the switch to the neutral wire;
- When laying on wooden walls, insulating hoses with asbestos linings are used.
The distribution housing is selected according to the type of room, taking into account the characteristics of the microclimate - in aggressive environments, boxes with maximum protection from direct water jets and dust are used.
Home generator - how to connect correctly
There are two main schemes for connecting a generator to a house. Both methods are designed for self-installation without calling a technician. It’s up to you to decide which method is simpler, lighter and more suitable for the type of generator:
- Method with a changeover switch;
- Through automatic control.
Connection with changeover switch
Two types of switches are applicable here: either reversible or reversible (with 3 positions). They simply switch the home network to different power sources. 3 branches are connected to both:
- the first is from the main power grid to the generator,
- the second - from the house to the generator,
- the third is from the generator to the devices.
To correctly account for the electricity consumed at home, it is very useful to know how to connect an electric meter. You just need to adhere to the general installation scheme and take into account the different parameters of the device when choosing it.
The principle of operation of an electric generator is that it will be in operation when the main network is turned off (de-energized). If the current supply from the general electrical network is normal, then the generator cannot function. That is, one thing is active or both sources of electricity are turned off. To connect a generator in a private house, it is better to use cables with copper wire inside. As a rule, it looks like a cord with two plugs at the edges.
Contact mounting diagram:
- top contacts – the cable from the main network is attached;
- contacts in the middle - private circuit of the house;
- The bottom contacts are intended for the power plant (grounding).
It is important to connect the entire circuit and then start the generator!
How to start the generator:
- you need to warm up the generator for a couple of minutes;
- turn the switch on the panel down.
Connecting a generator with automatic start
There are stations that are equipped with automatic service. The automatic unit is connected to the generator and to the power supply. When the power goes out in the house, the generator system automatically kicks in, replacing the main power source. When the power supply is restored, the station also switches itself off.
This unit can be purchased separately at electrical supply stores.
ATS connection principle:
- the AVR system is connected to the electrical network;
- The ATS and the generator are connected by a control cable;
- a cable comes out of it, which is attached to the contacts of the generator and from it conducts electricity into the house.
Important! Any work on connecting generators must be carried out when the house or apartment is de-energized by you personally! This ensures that you will not be accidentally shocked by an electrical shock.
Types of electric boilers
Electric boilers are available on the market in a wide variety of products. The differences between them are as follows:
- Number of circuits. Like other types of heaters, an electric boiler can be single- or double-circuit. A single-circuit boiler has a slightly higher output power, since it does not provide for operation with domestic hot water.
- Type of heating element. This can be a heating element, an electrode or an induction coil (inverter).
- Coolant type. Some single-circuit heater models use antifreeze.
- Type of electrical network used (220 or 380 volts) and connection method (single-phase or three-phase).
- Heating method. The boiler is of flow-through or storage type.
To create increased power, greater electrical system performance is required. It is recommended to connect an electric heating boiler with a power of over 12 kW to a 380 V network. To do this, you need to obtain permission and draw a separate line.
Input of three phases into the building and outgoing lines
Electricity from the pole is connected to the building through the air or underground.
All conductors are connected to the electrical panel, then the electric current enters the meter and passes to the distribution unit. Here the working zero and the grounding wire are separated, they are connected to the grounding bus, which is connected to the repeated grounding branch. Formation of outgoing lines :
- additional circuits come from the input switchboard (VRS);
- an introductory switch is installed in it, all phases are connected to it;
- circuit breakers are installed for each group circuit in the home, each of them is powered from different phases;
- groups are formed according to the power of units and devices so that each phase has approximately equal value;
- three phase conductors and a neutral conductor from the grounding bus are connected to the meter contacts;
- the meter output is connected to a common circuit breaker for the entire house.
Valera
The voice of the construction guru
Ask a Question
For connection, use the triangle or star method. The first method is to connect the phases sequentially: the end of the first to the beginning of the second, the end of the second to the beginning of the third, and so on. Star - when the ends of the phases are joined at a common point and the ends of the phases of consumer windings - also in one place.