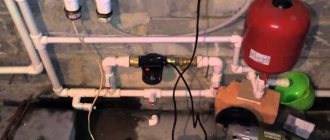
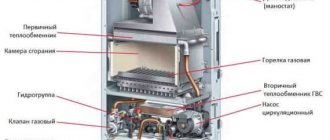
Nowadays, gas boilers play a very significant role in heating in many countries around the world. After all, from large cities to remote villages, gas has been supplied. And therefore, gas heating gradually replaced wood-burning stoves. The gas boiler is located inside the building in a specially designed utility room. After that, a heating circuit is connected to the equipment, a chimney is connected and the boiler is powered from the gas pipeline. For all types of boilers: floor-mounted, wall-mounted and others; There is such an important indicator as efficiency.
What does efficiency mean?
On the market you can find a huge number of models of gas boilers from various manufacturers, among which there are not only domestic, but also foreign ones. Typically, when purchasing this gas appliance, buyers determine their choice based on the cost and power of the equipment. And, unfortunately, these are the wrong criteria for choosing a gas boiler. Many private household owners forget about such an indicator as efficiency. This is a very important parameter by which you can choose a fairly good heating device. The boiler efficiency has the following definition: it is the ratio of the useful heat spent on heating water to the installed heat of the gas boiler. That is, not all the heat that a gas boiler produces goes to heating the working fluid. Some of the energy goes into the surrounding atmosphere and for the heating device’s own needs.
Other changes
Among other things, gas heating units equipped with modulating burners also have very good performance indicators. Modern boilers from the best European manufacturers are initially supplemented with similar two-level or fully modulated elements. Burners of this type are able to independently adapt to the actual operating parameters of the heating system installed in the house. Thus, the percentage of underburning in boilers of this design is reduced to a minimum.
In conventional heating units, home owners can, among other things, try changing the position of the burner. Installing this element closer to the water circuit allows you to increase the efficiency of the boiler by several percent. In this case, the heat balance of the unit increases significantly.
How to calculate average efficiency
Each gas boiler is equipped with a passport. It is in the passport that the efficiency value is displayed. But the main problem is that this is only an average efficiency value, which may differ from reality. This indicator is calculated by the manufacturer using the formula n=(Q/Qo)*100%, where:
- n – efficiency factor;
- Q is the thermal energy that was used for heating;
- Qo is the value of the total amount of heat that is released when gas is burned.
This formula only allows you to calculate the average efficiency value. Gas equipment with a coefficient of almost 100% can increasingly be found on the market, and the range of such products is increasing exponentially. Of course, such an indicator of useful action is, frankly speaking, unreliable. Indeed, during operation of the boiler in a private house, additional losses of thermal energy are added, which are not taken into account by the manufacturer. And it is these losses that can fundamentally reduce the efficiency of heating equipment.
The actual useful effect of the installed equipment is most correctly calculated using the following formula: Nf=100-(q+q2+q3+q4), where:
- Nf – actual efficiency of the equipment;
- q – heat energy escaping into the chimney;
- q2 – energy losses generated due to the layer of burning inside the walls of the boiler;
- q3 – losses caused by improperly prepared gas mixture;
- q4 – heat losses caused by fluctuations in the temperature of the surrounding space.
It was found that the greatest heat losses are indicated in the q indicator. It turns out that most of the generated heat literally “flies down the drain.”
Cast iron and steel structures - what are the differences?
Whatever material the boiler is made of, it is very important that it meets the basic operational characteristics. Let's look at them in more detail
First of all, you should pay attention to the material of the heat exchanger - cast iron or steel. If you want to use a ready-made solid fuel boiler circuit, it’s unlikely that you’ll be able to make a cast iron heat exchanger yourself
Such work requires both special equipment and special knowledge and skills. Therefore, you can purchase ready-made sectional structures, which are disassembled before transportation and reassembled on site.
Cast iron heat exchangers tend to become covered with dry rust - a special film that protects the walls of the unit from destruction. In addition, wet rust also forms much more slowly, which is due to the long service life of cast iron products - from 10 to 25 years. Other advantages of cast iron heat exchangers include the absence of the need for frequent and complex maintenance. Cleaning of such devices is rarely required, and carbon deposits practically do not reduce the efficiency of the boiler. If it is necessary to repair or increase the power of the unit, you only need to replace the defective sections or increase their number.
The disadvantages of cast iron products are:
- the large mass of the boiler requires a separate foundation;
- difficulties in the assembly process and high transportation costs;
- sensitivity to thermal shock - cast iron does not like temperature changes, so contact of a hot surface with cold firewood or cold water can be detrimental to it;
- high thermal inertia - it takes a long time to warm up the boiler, but its subsequent cooling occurs slowly.
As for steel products, they are less sensitive to temperature changes and are not afraid of contact with cold objects. This property allows, when assembling solid fuel heating boilers according to drawings, to equip them with sensitive automatic elements. And thanks to their low inertia, such units quickly warm up and cool down - this allows you to regulate the air temperature in the house. At the same time, you can make a drawing of a long-burning solid fuel boiler with your own hands, which will allow you to take into account all the nuances.
In appearance, steel boilers are solid welded units that are quite difficult to transport, although their sensitivity to mechanical damage is much lower than their cast iron counterparts.
The possibility of repairing steel boilers is, from the point of view of some experts, very doubtful. Repairing, as well as welding a boiler with your own hands according to a drawing at home, is quite difficult; over time, leaks may form at the seams in it. In fairness, we note that everything depends on the worker’s skills in working with a welding machine. But repairing a cast iron heat exchanger is still easier - you only need to replace the sections.
As a rule, boilers with cast iron heat exchangers are non-volatile and inexpensive, so they can be a worthy alternative to already installed heating equipment in the event of a power outage. Coolant circulation in such units occurs naturally, without the use of a pump. However, the batteries must be installed in such a way that when heated, water moves freely through the pipes under the influence of pressure in the boiler.
Floor boiler efficiency
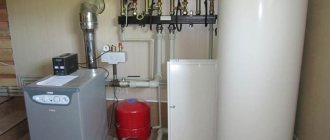
There are several types of gas boilers. One of the most common ones are floor-mounted. Equipment of this type has proven itself to have positive operational parameters and compactness. The design feature of such devices makes it possible to achieve greater power compared to wall-mounted similar models.
The line of floor-standing equipment includes models that can interact with the heat carrier without the influence of a pump. Such devices have a minimum amount of automation and additional equipment. This, in turn, affects reliability and ease of maintenance.
The efficiency value of such gas boilers fluctuates within 90% under ideal operating conditions. This is a pretty good performance indicator, but with all this, the floor-standing boiler has its drawbacks. The main one is the need for a separate equipped room in which the established requirements must be met.
Equipment setup
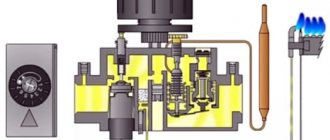
The open chamber is a fairly simple combustion device. It looks like this: above the burner there is a heat exchanger in the form of a coil of thin copper tubes. Thanks to the open design, the air required for the combustion reaction is supplied to the point of ignition of the gas from the environment.
As a rule, there is enough air from the room (provided good ventilation is organized). But there are wall-mounted models with air intake from outside, for which a special hole is mounted in the wall. Open combustion chambers require a chimney.
Most often it is installed for models of floor-standing gas boilers, and was also used to complete an old-style boiler (in this case, ignition was carried out by a pilot burner).
Combustion chamber design diagrams
Floor-standing gas boilers with an atmospheric burner can be configured independently. Pressurized systems are regulated by an automatic control unit and do not require additional configuration.
Scheme of actions for setting up single-stage equipment:
- Install the device on the boiler.
- Connect to the gas pipe.
- Check for absolute tightness.
- Remove the burner housing.
- Using a pressure gauge, measure the gas pressure at the inlet.
- Connect to electricity. Make sure that the jumpers and phases are connected correctly.
- Place a gas analyzer in the chimney pipe.
- Start the device.
- Using a pressure gauge, take pressure readings at the outlet of the burner block. Pressure readings must correspond to the parameters indicated in the data sheet.
- Adjust the air flow using the air damper.
- The gas analyzer readings must also comply with all gas equipment installation standards.
Setting up gas equipment should be carried out by specialists. The simplest open-type boilers can be configured independently if you have certain skills and knowledge of the design of the burner unit. The efficiency of the boiler, its level of efficiency, and fuel consumption depend on the quality of the burner. It is possible to superficially determine that the equipment is malfunctioning by the changed burner flame.
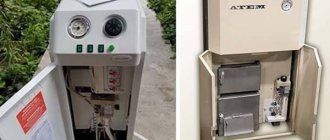
Efficiency of wall-mounted gas boilers
Wall-mounted models of gas boilers are compact and economical heating devices. Such boilers are excellent for heating houses, small cottages and suburban areas. The efficiency of such equipment usually ranges from 85% to 100%, according to the manufacturer. But, as we already know, this indicator is influenced by the actual losses of thermal energy.
Wall-mounted models, as a rule, have small dimensions and weight, which makes it possible to mount them on the wall. They are equipped with a coaxial chimney and have a built-in hydraulic pump in their design. Thanks to the pump, the coolant is forced to move inside the heating system, which greatly improves the efficiency of the boiler.
Final stages
At the final stages the following operations are carried out:
You can also modernize the gas burner yourself. This will significantly increase the amount of heat generated. The following steps are required:
After improvement, the boiler flame will be located between the tubes. As a result, they will become seriously warm.
Condensing heating devices
Boilers of this type began to be produced relatively recently. During this time, they have rightfully earned the title of the most economical devices. According to the device data sheet, their usefulness reaches 110%. And here the question involuntarily arises: where do such values come from? After all, everyone knows from school that efficiency cannot exceed 100%. This value can exceed 100% for condensing boilers due to the fact that when fuel is burned, about 95% of the energy goes into useful action. At the same time, carbon dioxide and water vapor are formed inside the boiler. As a rule, steam contains a certain amount of energy, and if it is condensed, additional energy is released that can increase efficiency by 10-15%. By summing these numbers, a value greater than 100% is obtained.
Cleaning the combustion chamber
Blue fuel is distinguished primarily by the fact that its combustion does not produce too much soot. Of course, it is necessary to clean the furnace of a gas-fired boiler less often than of solid fuel equipment of this type. But it is still necessary to wash the combustion chamber of such heating units from time to time. Experts believe that owners of gas boilers need to do such cleanings at least once every 3 years.
Conclusions and useful video on the topic
The first video will help you understand how to clean the boiler heat exchanger, which will help to significantly increase its efficiency.
The following video will give you an opportunity to understand how to clean a gas burner in order to increase the efficiency of the boiler.
Experience shows that maximum efficiency from a boiler can be achieved with its systematic maintenance with timely cleaning of burners and heat exchanger from combustion products and dirt. And also with proper placement and use of radiators. In addition, only modern high-tech equipment can be highly efficient.
Have you noticed a discrepancy or want to supplement our material with useful recommendations for increasing the efficiency of the boiler? Leave your comments, participate in the discussion and ask your questions to our experts - the feedback form is located below.
Decorative lattice - master class
To make a screen for a niche radiator design, you need to take several steps:
Making a template in the form of a design you like from waste plywood. Going through the template with a jigsaw. It needs to be processed with a milling cutter
It is important to achieve ideal transitions between the details of the ornament. To close the niche with the battery you need to prepare several templates. Depending on the width of the niche, you should choose your number of fragments. They need to be sanded and coated with special enamel.
It is important to make special holes for fastening. After the enamel has completely dried, the parts are sanded and painted with the required shade of paint. The parts are secured using fasteners.
Reasons for poor heat transfer
The efficiency of the heating system in an apartment is influenced by various factors. The efficiency of batteries depends most on the following conditions:
- material for the manufacture of pipes, radiators;
- the size of each radiator in the room;
- hot water circulation speed within the system;
- liquid heating temperature.
If the above indicators are optimal, but heat dissipation is still low, the cause may be contamination of the battery from the inside. This occurs due to the accumulation of rust, dirt, scale, plaque, and solder. In old houses, professional cleaning of pipes, radiators and risers often seriously increases their heat transfer.
Flushing cast iron radiators
In addition, covering the batteries with decorative boxes or painting too frequently, as a result of which the metal remains covered with a very thick layer of paintwork, can reduce the efficiency of the system. Risk factors include air pockets inside the pipes, as well as external contamination of the radiators.
Radiator connection diagrams
How well the radiators will heat depends on how the coolant is supplied to them. There are more and less effective options.
Radiators with bottom connection
All heating radiators have two types of connection - side and bottom. There can be no discrepancies with the bottom connection. There are only two pipes - inlet and outlet. Accordingly, coolant is supplied to the radiator on one side and removed from the other.
Bottom connection of heating radiators for single-pipe and two-pipe heating systems
Specifically, where to connect the supply and where the return is connected is written in the installation instructions, which must be available.
Heating radiators with side connection
With a lateral connection, there are many more options: here the supply and return pipelines can be connected into two pipes, respectively, there are four options.
Option #1. Diagonal connection
This connection of heating radiators is considered the most effective, it is taken as a standard and this is how manufacturers test their heating devices and the data in the thermal power passport for such a connection. All other connection types transfer heat less efficiently.
Diagonal diagram for connecting heating radiators with a two-pipe and one-pipe system
This is because when the batteries are connected diagonally, the hot coolant is supplied to the upper inlet on one side, passes through the entire radiator and exits from the opposite, lower side.
Option #2. Unilateral
As the name implies, pipelines are connected on one side - supply from above, return from below. This option is convenient when the riser runs on the side of the heating device, which often happens in apartments, because this type of connection usually predominates. When the coolant is supplied from below, this scheme is used infrequently - it is not very convenient to position the pipes.
Lateral connection for two-pipe and one-pipe systems
With this connection of radiators, the heating efficiency is only slightly lower - by 2%. But this is only if there are few sections in the radiators - no more than 10. With a longer battery, its farthest edge will not heat up well or will remain cold at all. In panel radiators, to solve the problem, flow extenders are installed - tubes that bring the coolant a little further than the middle. The same devices can be installed in aluminum or bimetallic radiators, thereby improving heat transfer.
Option #3. Bottom or saddle connection
Of all the options, saddle connections for heating radiators are the least effective. Losses are approximately 12-14%. But this option is the most inconspicuous - pipes are usually laid on the floor or under it, and this method is the most optimal from an aesthetic point of view. And so that losses do not affect the temperature in the room, you can take a radiator a little more powerful than required.
Saddle connection of heating radiators
In systems with natural circulation, this type of connection should not be made, but if there is a pump, it works well. In some cases, it’s not even worse than the side one. It’s just that at a certain speed of movement of the coolant, vortex flows arise, the entire surface heats up, and heat transfer increases. These phenomena have not yet been fully studied, therefore it is not yet possible to predict the behavior of the coolant.
Increased heat transfer.
To effectively increase the radiated heat rate, there are many ways:
- installation of a convector;
- painting pipes with black paint;
- register setting;
- additional battery sections.
The convector is a curved pipe with metal plates. You can make it yourself or buy a more modern analogue in the store.
The use of matte black paint to paint the surface of the coolant also gives a good result. Aesthetically, it doesn’t look very attractive, but when it comes to comfort, you have to choose.
Another inexpensive and fairly popular design is a register. These are several wide pipes connected to each other with welded sections. These also include heated towel rails, radiators, main lines and even an ordinary steel pipe fixed around the entire perimeter of the room.
Technique for performing work on connecting radiator sections
Extending radiators is a useful skill for a home handyman. Knowing how to join sections, it will not be difficult to provide your own microclimate in each room.
Before connecting two radiators, a power calculation is made. The formula is simple - 10 m2 requires 1 kW of thermal power. The section's performance is indicated in the data sheet. This data will be useful for calculations. Then you need to buy the required number of elements, find tools and assemble the heating device.
Tools and components for work
To assemble a heating radiator with your own hands, you will need:
- wrench or adjustable wrench;
- radiator key;
- plugs with right and left threads – 1 pc.;
- nipples;
- paronite gaskets;
- intersection gaskets made of durable, flexible material;
- battery sections;
- sandpaper of fraction No. 120.
Thread gloves are useful for protection. It is more convenient to install the batteries with two people; an assistant will not hurt.
Step-by-step battery expansion process
Do-it-yourself heating radiator assembly can be done at any time. If the heating season has already begun, the network must be shut off, the coolant must be drained from the circuit and the heating device must be dismantled.
How to connect the battery:
- Place the dismantled radiator on a horizontal plane. To avoid scratching the coating of the battery and table (floor), lay a cloth. Remove all additional elements - taps, temperature sensors. To wash the battery, take it into the bathtub, open the plugs and rinse with a stream of water.
Check the integrity of threaded connections and ends of the heating device. If there are deposits, sand the joints. Place the battery back on a flat, horizontal surface. The area is chosen to be level to ensure the tightness of the joint. The slightest curvature of the position will lead to an uneven joint. For seals, only paronite gaskets are chosen. This is a durable, flexible material that can withstand heat without loss of quality. Check the quality of nipple threads
Smooth and uniform cutting without chipping is the key to a strong joint. Move the sections together, placing spacers between them. Carefully begin to tighten the nipple. The part has a left-hand thread on one side and a right-hand thread on the other. This means that when rotating, both sections are attracted
It is more convenient to carry out work with a special radiator wrench. The tool may come complete with a battery, but is also sold separately.
This means that when rotating, both sections are attracted. It is more convenient to carry out work with a special radiator wrench. The tool may come complete with a battery, but is also sold separately.
- Grab the sections a little, check the evenness of the joints and tighten until tight. The number of turns of the nipple turns on each section must be equal.
Knowing how to increase the heating battery, it is not difficult to assemble a system with the required power indicators. After building up the sections, the radiator is checked for leaks.
For a household check you will need:
- a piece of pipe with a cross section of 15 mm;
- automobile pump with pressure gauge;
- tire nipple.
Now solder the nipple to the pipe and insert it into the radiator. This design is needed for air pressure testing. Install a plug on one of the radiator inlets. Connect a car pump with a pressure gauge to the nipple. Pump air at a pressure of 1 bar. If the tightness of the joints is broken, a whistle of escaping air will appear. You need to find a leak, tighten the nipple or change the gasket. Carry out the pressure test again. If there are no leaks, install the radiator into the network.
Pressure testing with water is carried out in the same order. Instead of air, colored water is pumped in. Let the device stand for 5 hours and inspect for leaks. If there is a leaky joint, water will leak out. Tighten the joints, check again, install the battery into the system.
An extended battery increases in weight. Before installing the radiator, it is advisable to strengthen the fasteners and screw in additional brackets. This will protect the device from collapse, because the battery will be even heavier with coolant. The device is integrated into the network at a selected location, taking into account the increase in battery length.
How to install a thermostat on a battery: step-by-step instructions
You will need:
- metal-plastic pipe with a diameter of 20 mm;
- 2 tees with 1/2″ thread;
- 6 American metal-plastic compression fittings;
- thermostat;
- ball valve
Procedure:
Unscrew the drive nut with an adjustable wrench and unscrew the old winding.
Clean the threads of the outlet so that the connection between the radiator and the pipe is clearly visible.
Perform the same operation with the lower connection. For ease of installation, remove the radiator and place it on a flat horizontal surface. Hold the radiator cap with one wrench and unscrew the tube with the second.
After this, remove the old seal from the hole, for example, with a screwdriver.
Now you need to assemble a bypass with a thermostat and a ball valve. Coat the threads of the compression fitting with silicone sealant until it fills all cavities.
Take 2 tees and 2 nipples and twist them together.
Screw the thermostat and ball valve to the nipple.
Install transition couplings from metal-plastic to metal into the tee. You should end up with a knot like this.
Screw it into the battery.
Do the same with the bottom connection.
For the bypass, cut off a section of metal-plastic pipe of the required length, after first removing the nuts from the compression fittings and measuring the distance.
Calibrate the edges, that is, remove the chamfers with a calibrator.
Place the nut and ferrule on the pipe and connect it to the ball valve and thermostat.
Do the same with the other end of the pipe. The jumper (bypass) is ready. Connect it to the radiator.
Hang the battery on the old mount and connect it to the riser. To do this, prepare 2 metal-plastic tubes. Don't forget to measure the length at the top and bottom - it often varies.
Remove the bypass from the radiator. Screw the tubes into the upper and lower nodes.
Install the bypass on the radiator, and the tubes in the riser outlets. At the top there is a thermostat for heating.
Below is a ball valve.
Tighten the nuts with an adjustable wrench. The radiator with thermostat can be put into operation.