If there is only cold water in the house, then living in it can hardly be called comfortable. Often, to solve this problem, it is proposed to install a separate system that will heat the coolant, consuming additional electricity. But if you install a heat exchanger for hot water from heating, you can significantly save energy resources. Let's consider what types of devices are used in private homes, and how they are correctly connected to the heating system.
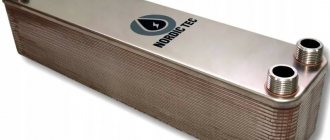
Plate heat exchanger Source a.allegroimg.com
What it is?
A heat exchanger is a device designed to exchange heat between two or more heat carriers not directly connected to each other.
Most often used to heat water directly from the heating system. This allows you to significantly save on heating and electricity, as it allows you to avoid spending additional energy on heating water, as is the case with an electric or gas water heater.
Theoretically, you can consider using water directly from the heating system, since its quality is not much different from water sold in supermarkets. However, in practice, it cannot be used for domestic purposes.
This is due to the following reasons:
Replacing water in heating pipes is a costly process and requires money.- The injection of new water has a negative effect on boilers and contributes to rapid wear of the system.
- Heating systems often use chemical additives to soften the water.
- The pipes in these systems themselves have a lot of deposits inside them; the standards for their use are designed for process water, and not for human consumption.
For the above reasons, it is not possible to use water directly from heating pipes for household and food purposes, and to heat water from a heating system, it is necessary to use a heat exchanger.
Principle of operation
Heat exchangers for preparing DHW water operate on a non-contact principle. Their design may be different, but the principle of operation is the same - they work on the principle of heat transfer. There is a heated coolant (in this case from the heating system), which is supplied to the pipes/channels of the heat exchanger. The hot coolant gives off some of the heat to the tubes through which it flows. Other parallel channels carry water that needs to be heated. In contact with the walls heated by the coolant, it heats up. This is exactly how a heat exchanger for hot water from heating works.
Schematic diagram of using a heat exchanger for preparing hot water from heating
For heating to be effective, the heat exchanger must be made of a material with high thermal conductivity. Usually these are metals - copper, stainless steel. Copper is an expensive metal, but has excellent thermal conductivity. Stainless steel conducts heat less well, but due to its strength, the walls can be very thin, which makes such heat exchangers also effective.
What are the advantages of using the device?
The main advantages for which it is worth installing this device are:
- High efficiency . The heat exchanger is capable of supplying water at the optimal temperature to several places in the house at once.
- Economical. The device allows you to heat water directly from heating; there is no need to install a heater and waste additional electricity and gas.
- Small size . The device is quite compact and does not take up much space.
- Easy to install and use . The device is easy to install, does not require frequent maintenance, and is easy to clean.
How does the device work?
The way the device works is that it allows two independent systems to exchange heat with each other.
Depending on the specific type of device, the pipes are connected to each other by plates, or arranged in a special way , for example, a pipe with a heat carrier is located inside a pipe with a receiver.
The water heats up quickly without coming into direct contact with the heat source.
The device is connected to heating and water pipes. Water passes through the system and is heated by a heat source, and then arrives at the tap in a heated state.
Kinds
Based on their design, devices of this class are divided into two main categories:
- tubular,
- lamellar.
For domestic needs, plate-type devices are used due to greater ease of use and efficiency, as well as easy transportation and installation. Among tubular devices in everyday life, as a rule, the shell-shaped version is used.
Lamellar
Plate type heat exchangers are a structure of plates installed parallel to each other and connected in a single housing . The heat carrier and heat receiver flow in separate pipes connected to communications on the front and rear panels of the device.
Plate heat exchangers are in turn divided into three groups:
Collapsible. In this version, rubber seals are used to ensure the tightness of the structure.
The advantages of collapsible heat exchangers are ease of installation and use.The downside is the regular need to replace rubber gaskets and sensitivity to aggressive substances.
- Soldered. The design of such devices is more durable and is made of steel. Unlike collapsible ones, they rarely require maintenance and are tolerant to any environment. The disadvantage is the large weight of the structure and the impossibility of disassembling it, resulting in more difficult transportation.
- Welded. Made from heavy metals, used only in industry.
Tubular
This type of device is used mainly in industry, and also as structural elements of air conditioners and refrigerators.
They are used less frequently for heating water, since to ensure the same efficiency as from the plastic type, such a device must be quite large in size.
The advantage of this type is its high resistance to any conditions and environments . A common design is when another narrower one is located inside one wide pipe. The heat carrier flows through the inner pipe, and the receiver flows through the outer pipe.
In turn, tubular exchangers are divided into several types:
Case-like. A large number of tubes connected in a lattice.
It is possible to connect several devices of this type to achieve greater efficiency.This type is most often used in everyday life among tubular exchangers.
- Twisted. The pipes are twisted together around a single core. It is a compact and quite effective option. A variation of this design are spiral heat exchangers, in which both channels wrap around a single partition.
- Irrigation exchangers are designed in a spiral shape. Water flows down the gutter. Mainly used in ventilation systems.
Malfunctions of heat exchangers and their disassembly, repair and maintenance
Despite the simplicity of heat exchangers for domestic hot water supply, they still have malfunctions and require periodic inspection and maintenance. Let's look at how to identify problems and fix them.
Boiler malfunctions
All heat exchanger malfunctions can be divided into two groups:
- violation of tightness;
- deterioration of heat transfer through surfaces.
Violation of tightness
If the tightness of the housing of a shell-and-tube heat exchanger, or the outer contour of the plate gaskets, is broken, then a break can be noticed visually. Water will flow out. An additional symptom of the presence of a gust is a drop in pressure in the heating or hot water supply system.
- If, however, visually (which happens very rarely) it is impossible to find the location of the leak, then compressed air is supplied to the system (the system is pressurized) and by washing the leak is found by the formation of bubbles on the surface.
- Particular attention should be paid to connections (flanged and threaded) and welded joints.
Work on testing hot water supply networks with high pressure
- Moreover, both circuits need to be checked. If this is a shell-and-tube heat exchanger for hot water supply, then when supplying compressed air to the pipelines of the heating system, pay special attention to the casing, and when pressing hot water, to the rolls. We check the joints in both cases.
- When looking for a burst in plate heat exchangers, no matter which circuit the pressure is applied to, we wash all surfaces.
- It is much more difficult to find a break in the heat exchange surfaces - it is not visible, and the mixing of network and hot water is imperceptible. Such a malfunction can be detected either visually when disassembling the unit, or by mixing a dye - fluorescein (uranium) - into the network water.
Fluorescein (uranine) packaging
- If there are leaks through the heat exchange surfaces, the hot water will turn green. It will be even more noticeable when illuminated by ultraviolet light. After disassembling, traces of dye on the surfaces in contact with the water of the DHW circuit can be used to find the location of the leak.
Water flowing from the tap if the heat exchanger seal is broken will be green
If you can’t find fluorescein (by the way, this is an absolutely harmless substance), then you can try using food coloring.
Advice. An indicator that there is a break on the internal heat exchange surfaces is also the observation of air coming out of the hot water taps while the heating circuit is being pressurized.
Gusts are eliminated by replacing tubes or plates or damaged gaskets. Welding or soldering is also used. In some cases, simply tightening the connection is enough. Sometimes in a shell-and-tube heat exchanger the damaged bundle tube is simply plugged.
Heat transfer deterioration
Scale on the tubes of a shell-and-tube heat exchanger
Pipe with scale, close up
Scale on plate heat exchanger
This defect is caused by the appearance of scale, oxides and other deposits on the heat exchange surfaces. Signs include a long warm-up time for the heat exchanger.
That is, we supplied heated network water to the appropriate circuit, and we wait too long for the hot water to flow (it will still flow, but only when not only the material of the pipes or plates, but also the layer of deposits on them has warmed up). With such a malfunction, temperature control systems also do not work well.
To eliminate this problem, deposits are removed. There are three possible ways to do this job:
- Flushing with water, into which compressed air is pumped for greater efficiency.
- Chemical washing with acids, alkalis or other means.
- Mechanical cleaning - for this it is necessary to disassemble the heat exchanger.
Flushing the heat exchanger
Modern chemical cleaning solution
Mechanical cleaning of the internal surfaces of the boiler
Disassembling heat exchangers
As we have already said, in order to repair and maintain heat exchangers, in some cases you will have to disassemble them. Let's look at how this is done.
Shell and tube heat exchangers
In most cases, heat exchangers for hot water supply of this design have welded tube sheets. That is, disassembly using keys comes down only to removing the inlet pipes and rolls.
- Next, you can clean the inner surface of the bundle tubes, or replace damaged ones. When removing flared tubes, they have to be drilled out.
- It is almost impossible to remove the entire bundle with boards to clean the outer surfaces of the tubes; they can only be cleaned by cutting windows in the casing.
- Although very rarely (the author of the article has encountered such a heat exchanger), old shell-and-tube boilers allow you to separate the casing and tube sheets and remove the entire bundle. Then they are mounted through flanges and gaskets - but this is a very rare case.
Plate heat exchangers
This type is easier; to disassemble, we simply unscrew the nuts that compress the package of plates and gaskets. Then you can clean each plate in any way and reassemble the heat exchanger.
True, especially if the gaskets are made of paronite, they will have to be replaced with new ones, since upon repeated compression they are unlikely to provide the required tightness.
Maintenance
Like any other equipment, heat exchangers require maintenance.
Maintenance of hot water boilers is no different from maintenance of other heating network devices. As a rule, following regulatory legal acts (regulatory legal acts), technical regulations and other regulatory documents, the maintenance schedule includes the following operations.
- Inspections once a week or several months. If necessary, tighten the nuts and bolts.
- Hydraulic tests once a year. During hydraulic tests, increased pressure is also supplied to the system and heat exchangers (usually 25% more than the working pressure). If it does not fall within 10 minutes and no leaks appear, then the heat exchanger is considered sealed and has passed the test.
- The heat exchangers are also washed annually with water and compressed air.
- After testing and washing, paint and insulation are usually updated as necessary.
- Chemical flushing is usually carried out every three to five years, provided that deterioration in heat transfer and the presence of deposits are detected. It is not done every year because pipes or plates become thinner when treated with acid or alkali. However, new modern means are more gentle on materials, and if necessary, chemical washing can be done more often.
- Since bacteria can develop in hot water supply pipes, DHW systems are also disinfected annually (the heating circuit does not need this operation). Most often, a bleach solution is used, which is then washed with plenty of water, but other disinfectants can also be used.
A modern disinfectant - an alternative to bleach
How to calculate a model for a specific building?
When selecting a specific device model, the following parameters must be taken into account:
- number of residents in the room;
- the volume of water required by one resident per day, the standard consumption rate is 120 liters per person per day;
- degree of heating of the coolant - in centralized heating systems the standard is heating equal to 60 degrees;
- whether the device will work around the clock, or whether it is planned to be turned off periodically;
- water temperature in pipes in winter;
- number of appliances consuming hot water;
- permissible percentage of water loss.
The performance of the device must be calculated for the winter season, when the most active use of hot water is implied. For accurate calculations and selection of equipment, you can contact supplier companies.
Water jacket
Another heat exchanger is simply implemented - a water jacket (water circuit) on the pipe. A larger diameter pipe with two pipes for water supply/discharge is welded onto the chimney section. The principle of operation is still the same: hot water rises up, colder water flows down from the remote tank.
This method is more attractive for several reasons:
- heating occurs due to heat that previously simply flew away;
- making such a heat exchanger with your own hands is not difficult, although there are factory-made options;
- can be installed on any metal chimney and for this you do not need to disassemble the stove and make holes in it;
- a heat exchanger on the pipe prevents the penetration of gases from the chimney into the room.
All these advantages make such a device quite attractive. But this solution also has disadvantages:
- complete sealing of seams is required;
- when adding cold water, condensation may form;
- You cannot pour water into a heated system - it may tear the walls of the chimney due to the temperature difference.
The water circuit for the stove is made in a similar way, but in this case, a container with water is built around the body. Almost always, such a heat exchanger is made for round stoves. Firstly, you can select a larger pipe and weld the bottom and top, which is unlikely to be possible with rectangular stoves, and secondly, water moves in a circle easily and the system is efficient, which is difficult to achieve with a square casing.
Technical selection criteria
When choosing a heat exchanger, it is necessary, first of all, to pay attention to such parameters as the design and power of the device, as well as its cost. When using a device with a water tank, the choice of a tank of suitable volume plays an important role.
Design
To heat water from the heating system, devices of various designs are used, differing from each other in heating speed and efficiency:
With a coil .
In this design, the function of the heating element is performed by a coil filled with water. The complex shape of the element significantly accelerates heating. The coil can be installed at the bottom of the tank, or vertically for more uniform heating.- With two coils . Two coils provide even greater efficiency and heating speed.
- For heat pump . It differs in the way it is connected to the heating system; it can also be equipped with a coil.
- Device with electric heater . An additional heater speeds up the heating process. This option is the golden mean between a conventional heat exchanger and an electric water heater.
Volume of the tank
An important factor that must be taken into account when choosing is the size of the tank:
- For small spaces, a tank of one hundred liters is suitable . This is a compact and economical option, the easiest to transport. It is worth remembering that a small volume of water retains heat for a much shorter time, so it will have to be heated more often.
- For most private homes, a tank with a volume of 200 liters is suitable . This is enough for several plumbing fixtures, and the temperature will remain for quite a long time.
- For large houses, a tank with a volume of 500 liters is suitable . Such tanks are also used in production. For most premises, such a large volume will be an unnecessary and uneconomical solution, since such a tank will require much greater energy consumption.
Functions
- Most often, heat exchangers are used to create a second heating circuit. Without it, the fuel burns and heats the walls of the firebox. Interacting with air, heated bricks give off heat. But it flies away through the flue.
- With the help of a heat exchanger in a brick kiln, hot air transfers excess heat to the circulating fluid. Allows you to increase efficiency by obtaining a double output coefficient per fuel unit.
- Heat exchangers are used in stoves for baths, garages, and houses. In each listed option, the heat exchanger has its own function - heating water for a shower, heating the coolant for heating, and the like. Various designs increase the range of applications.
Types of heat exchangers are divided by design, location and material of manufacture. For each specific case, you can select a combination of these types.
By combining the design and material, and placing it correctly, you can significantly increase the efficiency of a brick kiln. It’s worth considering how to make a heat exchanger for a furnace without extra costs. By analyzing the types of existing structures, you can select the most optimal heat exchanger for a particular layout.
- Coil. It is created from a pipe, coiled in the form of a spiral, several meters long. Such a water heat exchanger for a furnace is installed in a container with a liquid coolant. The ends of the pipe are expanded into the walls, allowing the coolant to circulate inside, simultaneously heating the water in the tank. With the correctly calculated length of the coil, the material it is made of, and the number of rings, you can speed up the heating of the water. Also, the part of the coil that remains in the air increases the rate of heating of the room.
- Heat exchanger with container. The tank and heat exchanger pipe for the furnace are installed directly next to the combustion chamber. It is necessary to strictly observe the degree of inclination of the supplied pipes in order to achieve natural circulation. In some cases, it is necessary to install an electric pump for these purposes. This solution has its advantages - the water is heated directly by passing through a pipe that goes around the firebox. This solution increases the heating rate. Typically used for heating circuits.
- Pipe board. It consists of two completely sealed containers and a large number of small pipes. The main pipe-containers are located in different parts, near the combustion space and are connected by pipes. Heat exchange occurs at the joints. This design is used for heating large spaces, up to high-rise buildings. The operation of such a heat exchanger is complicated because precautions must be taken. The chemical composition of the water is important here; due to the formation of scale, wall breakthroughs are possible.
- Water jacket. This heat exchanger is the most difficult to create with your own hands. Its design consists of two sealed tanks located one inside the other. Efficient and easy to use - a heat exchanger for a stove made from a pipe. It allows heat exchange to occur quickly, but is difficult to manufacture and requires professional skills.
Household models and their prices
Currently, there are a large number of heat exchange devices on the market, differing from each other in type of design, heating rate, tank volume and cost.
Lamellar
Here are some popular models:
R-012-10-19 PROMTECHSERVICE .
The plates of this model are made of steel. Between the plates there are thermal pads that effectively transfer heat from the carrier to the receiver.The strength of the structure is ensured by the corrugated surface. Approximate cost of the device: 14,000 rubles.
- KAORI Z. Soldered version model. The flows are directed diagonally. The plates have a large heat transfer area. Durable and reliable model. Cost from 32,000 rubles.
- Innovita DHW . Budget solution, installed on a gas boiler or heating network. The model is intended for use with Innovita boilers. Cost from 8000 rubles.
Shell and tube
Below are popular models of shell-type heat exchangers:
- TNG-1.6-M8/20G-2-2-I . A popular model, often used in industry and at home. It has tube sheets and a vertical heat compensator. Price – from 9000 rubles.
- Shell and tube heater TTAI . The design consists of two tubes with thin walls of different diameters, one nested inside the other. Thin walls promote more efficient heat transfer. The device is compact and easy to maintain. Price – from 7500 rubles.
- Bowman 190 kW . Premium device. Titanium tubes with anti-corrosion coating are suitable for interaction with chlorinated and sea water. Can work for both heating and cooling. Price from 120,000 rubles.
Manufacturers
Adapters for water supply pipes
Products from leading manufacturers differ according to several criteria:
- price;
- reliability and quality;
- possibility of device repair;
- availability of spare parts;
- guarantee (including guarantee of reliability and quality).
All of the manufacturers listed below have proven themselves to be the best among consumers.
Kroll
Country: Germany.
The cost of devices ranges from 200,000 to 700,000 rubles.
In total there are 7 series of manufactured products: S, SKE, H, SL, NKA, NK, A.
The Kroll company has a high level of popularity among consumers due to the fact that it produces exceptionally high-quality products.
Ridan
Country Russia.
The cost of devices ranges from 40,000 to 800,000 rubles.
Only one series of heat exchange devices is produced: HH.
Due to the fact that the company produces only one type of heat exchange devices, it cannot be called a universal manufacturer.
SWEP
Country: Sweden.
The cost of products ranges from 45,000 to 600,000 rubles;
There are 6 series of heat exchangers in total: GX, GC, GL, GD, GF, GW.
SWEP has a great influence on the market due to the optimal price-quality ratio of its products.
Dragon energy
Country Ukraine.
The cost of products ranges from 60,000 to 400,000 rubles (the cheapest products among leading companies).
Heat exchangers are produced in 7 series: Dr 30, Dr 50, Dr 100, Dr 150, Dr 200, Dr 500, Dr 1000.
The company's products are in great demand due to the active production of various types of devices.
Step-by-step instructions on how to make it yourself
You can construct a device for exchanging heat from the heating network to water with your own hands.
Tools and materials
To construct a plate heat exchanger with your own hands, you will need:
- welding machine;
- Bulgarian;
- stainless steel sheets - two corrugated, one flat. Thickness 4 mm;
- electrodes.
Manufacturing process
The entire manufacturing process of the device is divided into several stages:
- It is necessary to cut corrugated steel plates. You will need 31 plates measuring 300 by 300 mm.
- A strip 18 meters long and 10 mm wide is cut from a flat sheet. The tape must be cut into pieces 300 mm long each.
- Squares of corrugated material are welded to each other with a ten-millimeter strip from different sides, adjacent sections must be perpendicular. You will get 15 sections facing one way and 15 the other in the form of a cube.
- A flat stainless steel manifold must be welded to the parts where water will flow.
- A hole is drilled in each collector, and the connecting part of the pipe is welded to it.
- The structure is mounted with the open side facing the gas system.
Connection diagrams
The heat exchanger can be connected to heating and water supply systems using three different schemes: parallel, two-stage mixed and two-stage sequential.
Parallel
The most simple to implement and economical scheme . A prerequisite is the installation of a temperature regulator. The disadvantages are not the most economical consumption of carrier heat, as well as the need for an enlarged pipeline.
Two-stage mixed
Also requires a temperature controller. Significantly more economical than a parallel circuit in terms of heat consumption. However, the design itself is more expensive, since it requires two heat exchangers at once. Equipment must be selected very precisely in accordance with specific conditions.
Two-stage sequential
With this connection, the incoming flow is divided into two, one passes through the regulator, and the second through the heater. The heat carrier is consumed more efficiently compared to the mixed one. The load on the network is also distributed more efficiently.
The disadvantage of the scheme is the impossibility of full automation . Despite all the advantages, in practice the scheme is rarely used due to the strong influence of the heating and plumbing systems on each other and the possibility of overheating of the heating network.
Material of manufacture
- Copper. Due to its ductility, copper is most optimal for the manufacture of a heat exchanger. A copper tube is easy to bend and give any shape. It has a high thermal conductivity coefficient - more than 380. But copper is also not a heat-resistant material and is expensive.
- Stainless steel. Also quite flexible and responsive material. Although it has a lower thermal conductivity coefficient. But it is resistant to temperature changes. Any configuration can be welded from it. IMPORTANT: Galvanized steel cannot be used; when heated, it releases toxic zinc compounds into the air.
- Metal-plastic. Easily accessible practical material. Easily found, but it has a low thermal conductivity! Almost two orders of magnitude lower than that of copper. But this material is durable and resistant to temperature changes.
How to use?
There are two main options for using a heat exchanger to heat water:
- The first option is to heat running water. The disadvantages of this method are limited water consumption, difficulty maintaining heat, and lack of water reserves. Pros: the system is compact.
- Heating in the container. The heat exchanger is immersed in the tank and filled with water. The design allows you to maintain the temperature for a long time, while there is always a supply of water. The disadvantage of this method is that the large dimensions of the tank require a lot of space.
Everything you need to know about hot water is presented in this section of the site.
Rules for installing a heat exchanger on a sauna stove
The following rules must be followed:
- The heat exchanger must consume no more than 10% of the total energy produced by the furnace, then the latter will operate with good efficiency.
- The pipes must be laid so that the water flows by gravity, that is, at a 250-degree slope on the direct supply and 30-degree on the return one.
- It is important to reserve power for cooling after fuel burns.
- It is necessary to provide a sufficient volume of water for each individual model, because if there is too little of it, it will boil quickly, which can lead to the formation of deposits on the walls and a fire hazard, and if there is too much, you will have to wait a long time before taking a shower.
How to connect a heat exchanger if the tank is in a steam room:
- The entrance to the hot water tank should be at least 5 cm higher than the upper register fitting. This is necessary for better circulation.
- The upper register is from 1.4-1.5 m from the floor, despite the fact that the podium under the stove is 15 cm. The bottom of the tank in the steam room should be at least 1.5 m, and preferably higher.
- If the tank is 0.5 m high, then we have a total installation of 2.0 m. That means there is still half a meter to the ceiling. And here the question arises: how to fill the liquid. If there is a running water supply, then water will flow without problems.
Second connection option: we place the tank lower, and place the fitting for the supply circuit on the side. But there is a nuance: if the water level is below the upper fitting, there will be no circulation. It will stand in the heat exchanger and periodically reach a boil, but in the tank it will remain cool.
If you need to place the tank in the wash room, you should follow the same principles as when placing it in the steam room.
