Home » Equipment » Warm floor
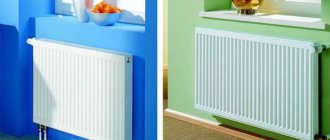
Warm floors are necessary to maintain comfortable conditions in the house. However, not everyone can create such conditions, especially if it is necessary to lay warm floors under PVC, linoleum and other floor coverings.
Today we will find out what types of heated floors can be combined with such flooring as PVC tiles.
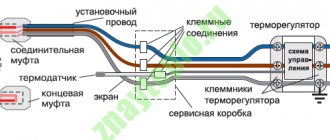
Connecting wires
Electrical diagram for connecting a heated floor
Connection of several strips of heating film is carried out in parallel connection using a distribution box. In the case of using a film with a grounding layer, the grounding wire is connected bypassing the thermostat (connection to the grounding layer is made using a separate terminal). It is recommended to use an 8-fold junction box with a depth of at least 25 mm. After connecting the wires, a control test of the system is carried out.
Carefully lift the protective layer and insert one connector plate so that there is reliable contact with the conductive busbar.
After connecting the connectors to the two copper bars, first crimp the clips with your fingers and then with pliers.
Strip the end of the wire and clamp it securely into the barrel connector with pliers.
Use 50x40mm butyl rubber insulation tape to insulate the copper bars. Copper busbars with connected wires are insulated in two sections (top and bottom).
Busbar sections free from connections are insulated with one piece of insulation.
It is necessary to carefully “wash” the contact area with your fingers, while 25 mm of the wires must be covered with insulation.
The wires are laid around the perimeter of the room in a 50-mm gap left or in a groove cut into the thermal insulation, starting with the strip of film furthest from the mounting box. Secure the wires with special tape. It is not allowed to lay electrical wires on top of or under the heating film. Route the wires from the heating film to the thermostat or junction box.
Is it possible to install a film floor under the tiles?
To answer this question, it is necessary to take into account the operating recommendations provided by the manufacturer. In particular, it says: “The product can be installed under tiles, wood, laminate, linoleum, etc.”
A thin electric film heated floor under tiles is installed quickly, does not “steal” free space and does not affect the quality of installation.
Since the heating system is resistant to moisture and precipitation, the film can be laid outdoors, followed by cladding with porcelain stoneware. This will forever solve the problem of icy paths, garage heating, etc.
Laying an infrared warm film floor under tiles with your own hands requires a certain level of professionalism and the availability of building materials. Although the technology is fully and thoroughly described by the manufacturer, if you have any doubts about your capabilities, it is better to seek help from a specialist.
Necessary materials
Standard equipment for a film heated floor system
- Thermal film in a roll;
- Contact terminals;
- Set of wires;
- Bitumen insulation on a self-adhesive basis.
- Thermal reflective insulation;
- Heat-resistant polyethylene film;
- Thermostat and mounting box for it. It is selected based on the selected power of the heated floor and the type of installation (built-in or surface-mounted);
- Additional temperature sensor if necessary (one will be included with the thermostat);
- Double sided tape;
- Additional wire for mounting a thermostat. It may also be needed if you install several sets of heated floors in one room (you will need to add up their power to calculate the cross-section). The wire cross-section is selected depending on the power of the system and the material of the purchased wire (see table).
| Wire cross-section, mm2 | Maximum permissible power consumption with copper wire, kW | Maximum permissible power consumption with aluminum wire, kW |
| 1,5 | 3,5 | 2 |
| 2,5 | 5,5 | 3,5 |
| 4 | 7 | 5,5 |
| 6 | 9 | 7 |
Rules for safe operation
In order for a heating system made of infrared film to operate safely and provide comfortable conditions in the house, it should be installed in compliance with the following technology:
- installation is carried out only on a dry and flat surface;
- between the coating elements it is necessary to maintain a distance of at least 50 mm;
- mandatory grounding device;
- install a thermostat and film floor of the same power;
- The heating elements should be connected directly from the heating element and powered directly from the electric meter.
Heating a house or apartment using underfloor heating film is quite efficient and economical, and can create comfortable living conditions. You can install the system yourself; the main thing is to strictly follow the installation rules and manufacturer’s recommendations.
How to install and connect film heated floors with your own hands
2017-12-22 Evgeniy Fomenko
The technology for installing film heated floors is perhaps one of the simplest among all types of heated floors. And, without having any special skills, it is quite possible to do it yourself, without resorting to the help of specialists. It is often used as the only source of heating, but if you live in latitudes with harsh winters, it may not be enough.
Infrared flooring can be used under almost any floor covering. Regardless of the surface under which we are going to lay it, the materials used do not change much. But there are slight differences. For example, if we are laying under linoleum or carpet, then in order to avoid damaging the film, we will have to use solid cushioning materials.
While under the tiles you will have to make a cement screed on a reinforcing base. These floors can be laid without preliminary preparation of the surface; it is enough to simply insulate the floor thoroughly so that the heat rises to the top and does not go into the floor. Let's take a closer look at how to properly install an electric heated floor under various materials.
So, for a parquet board or under a laminate, the cake looks like this:
- Primary sex.
- Thermal reflective material.
- A layer of thermal film.
- Polyethylene film.
- Plywood or fiberboard. These plates are used to protect the heating element from mechanical damage.
- Linoleum.
Well, and, perhaps, the most labor-intensive option is to lay it under the tiles. But despite the complexity of installation, this option is the most effective heating method. Because the tile heats up quickly and can maintain the temperature longer.
Infrared film heated floor
In order to understand exactly how high-quality strip flooring differs from other varieties on the market.
Let's take a closer look at its main distinguishing characteristics:
They are absolutely safe for humans; the element that conducts heat in them is carbon. Thanks to this system, you will be able to create comfort and maintain warmth in your home, your loved ones will get sick less and you will forever forget about frozen feet.
This type of heating is more beneficial for our body; infrared radiation is widely applicable in many fields, for example, in medicine. How much does it cost? This is perhaps one of the most expensive heating options, but it is completely worth the cost.
Installation of heated floors made of film
In order to understand how this system works, you will need to understand its structure in detail. It is made of a dense thin film (polyester), divided into segments and filled with carbon paste (carbon), applied by spraying. In the more expensive version, it fills the entire space completely and has a paste-like consistency.
When it is exposed to electricity, it emits infrared radiation. Current is supplied through copper-silver wires, which are connected to the power source. The degree of heating is controlled using a thermostat connected to the floor. And he, in turn, reads the readings from the temperature sensor, which is located on the outside of the film.
To save energy resources, it is more profitable to connect an automatic thermostat; it independently determines the most profitable operating time. This is currently relevant because electricity prices have increased greatly.
The package includes the following components:
- Thermal insulation material that directs heat outward rather than warming up the neighbors’ ceiling.
- Padding material.
- Installation diagram
Let's look at the installation diagram for a film heated floor, namely, how to lay it yourself, without resorting to specialists for help, let's figure out which side to lay it on.
For a quality connection you need to do the following:
The entire installation, if you follow the instructions, will take about 3 hours if the floor is laid under linoleum or laminate. If you have not dealt with electricians before, it is better to use the help of a qualified specialist. Because not all errors can be corrected, and the material is quite expensive.
Kinds
Most often people buy infrared film flooring.
Infrared film floor
It is one of two types. Another is a rod heated floor. Many people have experienced both types. Of course, they left their feedback in various videos.
Bimetallic is a composition consisting of two layers of polyurethane and a heating element placed between them, which is made of two metals:
- Aluminum;
- Copper.
Carbon film flooring consists of a certain number of heating strips that manufacturers hide in Mylar film. The strips themselves are carbon. They lie across the film. All their ends are connected by a perpendicular silver-copper ribbon.
Both types of film reliably protect internal elements from moisture and also make electrical breakdown impossible.
The rod type is a mat containing flexible rods, as well as a set of tires. The latter combine heating elements and supply current to them. Any core floor has heating elements made of composite material. Its base is graphite. As it heats up, it can expand, which reduces the number of points of contact and increases resistance.
The infrared rod floor can cope with heavy loads.
Rod infrared floor
It is often mounted under tiles. Also works well in high humidity. Therefore, reviews about it are often positive.
Types and types of fastening of quartz vinyl panels
There are several ways to connect tiles:
- Using adhesive locks. Each tile has 4 adhesive strips: 2 external and 2 internal. Thanks to them, the panels are connected to each other. The gap between them is invisible, even by touch it is very difficult to determine. This type of panel must be laid on a flat surface. In the reviews, many write that it is not necessary to remove the old coating, the main thing is that the base is level.
- Glue installation. In this case, the quartz vinyl tiles do not have any locks and are attached to the base of the floor using special glue. This material is attached only to a perfectly leveled surface, preferably on a cement screed treated with a primer solution.
- Glue method. The entire back side of the quartz vinyl panel is coated with a compound that provides adhesion to any type of surface. According to reviews, most people use this method of attaching tile material.
- Groove method. It is similar to the connection of tiles, where there is a tenon on one side and a groove on the other. To install this coating, you also need a flat subfloor surface.
- Connection with a lock. The basis for it is plastic, with spikes located along the edge in such a way as to be fixed in special locks that are located on the adjacent panel. To install tiles with a locking joint, a flat surface is required, since this material is not flexible and ductile enough.
Features of laying tiles
When the material is purchased, it is laid in the room where the installation will be carried out so that the tiles “soften”.
The tiles are:
- with glue included;
- self-adhesive;
- with locking fastenings.
Tiles are laid along a long wall. Also keep in mind that solid elements are glued first, after which the cut ones are added.
The process of installing tiles on heated floors
The “underfloor heating” heating system for absolutely all floor covering options is composed of the following elements:
- material for thermal insulation from the bottom of the structure to direct heat and cut off cold surfaces;
- special pipes for the coolant;
- reinforcing mesh and pipe fastening elements;
- concrete screed;
- vinyl tiles for flooring.
Calculations of the location of the heating pipe circuits are made in advance. Their number is limited by the power of the heating boiler to warm a specific volume of liquid. One circuit is no more than twenty-five linear meters of heating pipe.
It is proposed to do the work in the following order:
- A thermal insulation layer is placed over the surface of the rough coating, and a damper tape is used to compensate for the thermal expansion of concrete.
- For fastening pipes - guides. In the usual version, it is enough to lay a reinforcing mesh and fasten the pipes with clamps every twenty to twenty 5 cm. The fastening should secure the pipe, leaving room for thermal expansion.
- Pipe installation near the walls is carried out at a distance of 70 mm.
- The order in which the pipes are laid involves leading the ends to the distribution manifold.
- After pipe laying work, a leak test is carried out and the temperature of the liquid is brought to 20 - 25 degrees, and a screed is made.
- After the final screed has dried, preparation and installation of PVC tiles begin.
- The surface of the screed is thoroughly cleaned of dirt, defects are eliminated, and dust is removed.
- Leave the tiles in a room at a temperature of 20 degrees for a period of at least 12 hours so that they acquire size and straighten out.
- Tiles with a locking fastening system and a self-adhesive backing will not pose any difficulties during the installation process. Install from the farthest corner of the room with a ledge of each row by 1/3 or 1/2 of the slats. At the same time, the protrusions of the following tiles are inserted into the grooves of the locks without excessive effort. Self-adhesive tiles are straightened during installation to allow air to escape under the product and for strong adhesion of the coating.
- Tiles, the installation process of which is planned using glue, requires careful selection, taking into account operating temperature conditions.
Laying option
Having become familiar with the conditions and requirements for the process of installing a hydraulic “underfloor heating” system, the owners of the premises can easily select a material that is suitable for covering the floor
from the point of view of aesthetics and practical use to solve the issue of energy saving.
Of interest is the process of installing a heated floor system under PVC tiles
. The initial costs of purchasing equipment and performing installation work will be more than justified in a short time.
One of the options for laying the final vinyl tile floor covering is shown in the material below.
Vinyl tile installation
Warm floor 'target=»_blank»>')
Comparative table of heat loss and thermal expansion
| The basis | Heating up to 28°C* | Heating up to 40°C** | ||
| Thermal expansion | Heat loss | Thermal expansion | Heat loss | |
| SPC | No | 0.5°C | 0,04% | 0.5°C |
| WPC | No | 6.5°C | 0,21% | 6.5°C |
| LVT, quartz vinyl | No | 1.5°C | — | — |
| Rigid Vinyl | No | 1.5°C | 0,21% | 1.5°C |
* - Up to 28°C. Heating floor.
** - Up to 40°C. Enough to heat the room, the maximum permissible temperature for comfortable walking on the floor.
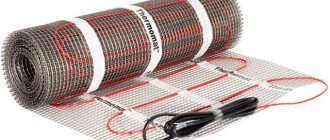
Electric cable heated floors and PVC tiles
They are a special mesh (cable mat) with a heating electric cable attached to it in a snake-like manner.
A cheaper option is also used, which involves installing only a cable fixed to the base. The system is heated by transforming electrical energy into thermal energy.
It is impossible to lay PVC tiles directly on such a structure, since the installation of the latter requires a level base. Therefore, if you choose this type of heated floor, you will need to hide it under a concrete screed.
The advantages of this system include lower cost installation (compared to a water circuit), temperature uniformity along the entire length, and the possibility of installation in rooms where the temperature drops to zero degrees (country houses, etc.).
Tile and porcelain tiles are very practical materials, but they are cold for walking barefoot. The underfloor heating system solves this problem and also provides additional heating to the room. At first glance, an infrared heated floor under tiles is best suited, since it has the thinnest heating elements. But in reality, the film creates more problems than it is worth when installed in tile adhesive. In this article we will look at how you can install infrared floor heating with your own hands.
Quick navigation through the article
Features of operation of film heated floors
Film floors require minimal energy consumption.
Warm floors are a relatively new type of space heating, successfully used in both residential and public buildings. Their main difference from the classical heating method is the placement of heating elements not on the walls of the room, but directly under the floor covering. This makes it possible to create the most comfortable temperature in the lower part of the room with a minimum of energy costs.
Among all types of floor heating systems, infrared floors are the most technologically advanced to use.
- Compared to cable systems, IR flooring has a higher coefficient of performance (COP).
- Unlike water floors, IR systems do not use a liquid coolant, so the possibility of leaks is excluded.
- IR systems emit almost no electromagnetic waves during operation and do not dry the air.
The table shows the comparative characteristics of infrared floors and water underfloor heating systems.
The effect of infrared waves is similar to the effect of sunlight
Heat transfer here occurs through infrared radiation, resulting in heating of the floor covering, as well as objects in the room.
The length of the IR wave is about 10 - 20 microns, which brings its action closer to the sun's rays: freely passing through the air, when it hits walls, ceilings, furniture, etc., it transfers its thermal energy to them.
In turn, the heated objects begin to transfer heat to the air in the room, heating it. This property in thermodynamics is called the effect of secondary convection.
However, like any heating system, infrared floors also have their disadvantages.
Interlocking quartz vinyl tiles
When laying interlocking tiles on a “warm floor”, the condition must be met - to leave compensation gaps along all walls from 5 to 10 mm. The gaps allow the tiles to move as they expand without damaging the joints.
Art
East
interlocking tiles are recommended for use with electric heating systems; it is not advisable to use water heating. Heating temperature no more than 28 ° C. In general, interlocking tiles are sensitive to temperature changes and change their size. The temperature gap must be left at least 1 cm. This applies to installation with “warm floors” and use on balconies and rooms on the south side, where heating in the sun may occur.
The manufacturer does not recommend using any kind of backing under the interlocking tiles, both during normal installation and when laying on a heated floor.
Art
East
brand has another
collection ART STONE
class 33/42, which stands out for its structure. This tile uses rigid SPC board as the load-bearing base. This slab is a stone-polymer slab (Stone Polymer Composite).
Unlike quartz-vinyl laminate with WPC (Wood Polymer Composite) board, STONE tiles from ART EAST:
78% consists of calcium carbonate and does not contain a foaming agent, wood flour or plasticizers;
thinner, but at the same time stronger, more resistant to maintaining dimensions when changing humidity and temperature;
more durable due to the same denser structure.
ART STONE SPC is a stone-polymer tile with locks, the superiority of which over floors with WPC slabs has been confirmed by laboratory tests. All these characteristics make the Stone collection tiles the most suitable material for “warm floors” than other PVC interlocking tiles.
Tests show that ART STONE coating can withstand heating to temperatures exceeding 28 ° C. But the brand representative still recommends not to take risks and use this limitation during operation. Art Stone interlocking tiles can be used with any type of floor heating systems.
Floor
Click
interlocking tiles – containing 30% quartz. Compared to other quartz-vinyl coatings, it is soft. Floor Click quartz-vinyl laminate with “warm floors” changes its dimensions and can also expand when installed in rooms with intense sunlight (south-facing, floor-to-ceiling windows, etc.). When laying, be sure to leave a gap of 1 cm. It is also advisable to make expansion joints under the thresholds at the entrances to the rooms and every 8-10 meters of continuous fabric. Use underlay under LVT with a thickness of 1.5 mm or 1 mm. It is not recommended to lay it on infrared heating; the tiles may rise at the joints.
Castle tile collection Decoria
– the material is hard and quite stable, contains up to 70% quartz sand. The manufacturer advises using a backing when laying on a concrete screed, otherwise the floors will begin to crunch. Permitted for use with heating systems, including film ones. Use with water systems where temperatures may exceed 28 degrees is not advisable.
It is possible to lay Decoria interlocking tiles both with and without expansion joints (thresholds).
Alpine
Floor
tiles with locks can be laid over heating systems. It is better to use a cable type to regulate the temperature and keep it no higher than 28°C. A gap around the perimeter of 8-10 mm is required.
Advantages of heated floors
Below we will look at perhaps the simplest heated floor - IR flooring under tiles.
Its advantages are as follows:
- The air in the room does not lose its freshness, because this type of heating does not affect it in any way.
- An infrared heated floor under tiles, emitting waves of great length, heats not only the surface of the floor itself, but also the entire body of the person who is currently walking on it.
- This method of heat transfer allows it to be re-released from previously heated objects, which increases the overall temperature in the room even more.
- The content of negative ions in the air increases at least 4 times.
- During operation, infrared film does not emit dust, noise or vibration.
- The amount of electromagnetic radiation generated is so small that it can be neglected.
- This type of heating is perceived much more pleasant by humans at initial low temperatures in the room than in the case of water heating.
So what is a film infrared heated floor laid under the tiles? By and large, infrared heating consists of a thin film 0.3-1 mm thick, equipped inside with an electrically conductive element. Below we will describe methods for installing infrared heated floors under tiles.
Principle of operation
IR floor is a thin film, between the layers of which carbon plates are placed. They serve as a heating element that generates heat. The device operates from the mains, heating is carried out using infrared rays measuring 10 - 20 microns.
The film quickly heats the floor, and the presence of a thermostat allows it to turn off when the desired heating level is reached, and turn on again when cooling. As a result, the device operates approximately 20 minutes per hour.
Film flooring has the highest efficiency when compared with other systems. With rapid heating, electricity consumption is not significant, thereby infrared flooring is considered more profitable and economical.
In addition, it does not heat the air masses in the room, but the objects in it, and they already heat the air. This allows you to create a wonderful atmosphere in the apartment, since the air does not dry out, while it is saturated with negatively charged particles.
Infrared flooring is perfect for different rooms; the ideal option is to install it under the tiles in the toilet or bathroom (we suggest you read the step-by-step instructions for installing the TP in the bathroom).
Installation of heated floors
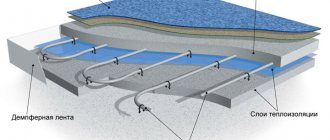
Laying the water circuit of a heated floor on an insulating material
When installing a heated floor system under PVC floor tiles, pipes laid in a screed are used. The installation process is as follows:
- The concrete base is cleared of debris, and local repairs are performed if necessary.
- The ceiling is leveled with self-leveling construction mixtures.
- The insulating material is laid on the base with the foil layer facing up.
- A damper tape is fixed around the perimeter of the room.
- The pipes are laid according to the chosen pattern - “snail” or “snake”. To fix the contours, special plastic hooks are used. Pipes can also be laid over a reinforcing mesh, to which they are attached with plastic cords.
- The system is connected to the collector, filled with water and checked for functionality.
- The pipes are filled with screed after turning off the system. It can be turned on only after the solution has completely dried.
If pouring the screed is not possible, for example, on a wooden base, the pipes are laid using the dry method. Channels for the pipes are cut out in the boardwalk, and after they are laid, a flat plywood base is installed under the quartz vinyl tiles.
Laying schemes for PVC flooring
The first version of the scheme may include:
- wooden base;
- a pipe circuit laid between wooden joists;
- layer of plywood/chipboard;
- polyvinyl chloride tiles.
Second option:
- cement-sand base;
- waterproofing layer;
- water floor contour;
- additional screed layer;
- self-leveling mixture to correct differences;
- finishing coating.
Third option:
- concrete base;
- heat/moisture insulating layers;
- electric heating cable (single-core/two-core/self-regulating);
- cement-based screed to level the surface;
- polyvinyl chloride tiles.
Fourth option:
- cement based screed;
- plywood sheets;
- moisture/heat insulating layers;
- film infrared floor;
- finishing coating (in this case tile);
Each option is unique in its own way, as it is installed based on personal preferences and skills, and is also installed in different types of houses.
Water heated floor and PVC tiles
It is a complex, closed structure consisting of pipes, a pump, a distribution manifold, shut-off valves, fittings, an air vent, and fasteners.
One of the main advantages of this model is its minimal heat loss. In addition, it is environmentally friendly and does not create electromagnetic radiation (unlike electric floors).
Most often they are installed in private houses and cottages, since the installation of a heating boiler is necessary. In apartments - hydraulic compatibility with the pre-installed heat exchange system of the room will be required.
Water models are demanding in terms of thermal conductivity of finishing materials. In this context, PVC tiles are the best choice.
Disadvantages include the risk of leakage and labor-intensive installation.
Vinyl Adhesive Tile
Vinyl tiles are a fairly soft material. When heated, the tile expands greatly. Changes in size can be affected not only by the floor heating system, but also by exposure to direct sunlight. But still, some manufacturers consider it possible to use their vinyl tiles and the “warm floor” system.
Tarkett company
gives the following instructions:
Do not install Art Vinyl tiles on a heating system that does not prevent condensation on the substrate.
Do not allow the temperature of the base surface to heat above 27 ° C.
Before laying modular tiles, the heating system is turned off 3-4 days before the start of work.
Laying is carried out at a room temperature of 15-28 ° C, optimally at 20 ° C.
The heating system is connected no earlier than 72 hours after installation is completed.
Experience shows that when heated above 27 ° C, Tarkett, Forbo vinyl tiles become soft, so we, as experts, do not recommend laying vinyl tiles on “warm floors”. We believe that this material can diverge at the joints and deform under the influence of heat.
Materials Not Recommended
When looking for a solution to the question of which floor covering is best to choose for a warm water floor, you should understand that not all materials offered on the modern market are suitable in terms of characteristics for specific operating conditions. Therefore, it is not recommended to use the following varieties:
- Parquet. Wood does not tolerate temperature changes well. So, when heated to about 28-30°C, it begins to dry out, crack and deform.
- Carpet. Due to the thickened dense structure, the material conducts heat poorly. Therefore, laying it on top of heating elements will make heating ineffective.
Laying a film floor under tiles with your own hands
At the initial stage, preparatory work is carried out. The surface is cleared of debris and leveled. The thickness of the heated floor can reach up to 1.5 cm. An approximate sequential layer of materials to be laid is as follows:
- heat-reflecting substrate – 2-3 mm;
- infrared film – 0.4-0.5 mm;
- painting mesh – up to 2 mm;
- a layer of concrete mortar (or tile adhesive).
You immediately need to decide:
- location of the thermostat;
- effective distribution of film under the tiles.
Installation of a heated floor begins with laying a heat-reflecting substrate. The best option would be to use strips whose size is 0.6 m. If you purchase wide material, it should be cut.
An infrared film is placed on top of the substrate. There are the following requirements when performing this work:
- Do not place stationary furniture on the film (this may lead to system burnout);
- the film should cover up to 70% of the area in the room;
- the presence of a distance from the walls at the level of 10-12 cm;
- the film is not installed overlapping.
It is more advisable to distribute the film along the maximum length of the room. The marked heating material is cut off. It is recommended to cut pieces of film in places where there is no graphite layer. If you still need to cut it along the graphite layer, then this place is subsequently insulated with adhesive tape or tape. The film is attached to the substrate using tape.
Next you need to start connecting the film floor
Particular attention is paid to the correct installation of the thermostat and temperature sensor. It’s worth mentioning right away that one thermostat can normally “serve” a room with an area of 12-15 m²
It is installed next to the supplied wiring.
The cable is secured to the film using copper clamps. The degree of reliability of connections is checked using the halves of the clamps, which must be in contact with each other. Bituminous tape and silicone sealant are used to insulate the clamps.
While the sealant dries, the thermostat is installed. When using an overhead device, the cable is routed outside the wall and placed in a plastic box. If the thermostat is built-in, then a hole is hollowed out in the wall for it and grooves are made for the cable.
The temperature sensor is mounted under the film. To do this, a groove is made in the base, and the sensor itself is placed in a corrugated tube. The sensor wire is laid so that it is located directly under the tile.
The thermostat is securely attached to the wall and connected to an electrical cable. Foil tape is glued obliquely to the film. To ground the floor, one of its ends is connected to a wire.
By testing the heating system, its functionality is checked. All sections should heat up within 5-8 minutes. Using a tester, the places of film cuts and joints are checked.
Next, laying the heated floor is performed in the following sequence:
- holes are made;
- dowels are inserted into them;
- the painting mesh is attached with self-tapping screws;
- a thin and uniform primary concrete screed is created;
- the screed dries completely;
- a final check of the functioning of the heated floor is carried out;
- a fixing screed is applied;
- After it dries, tiles are laid.
Screwing in the screws when attaching the painting mesh should be done very carefully. They can damage the surface of the film or contacts, which will cause a break in the electrical circuit. After final fixation of the mesh, it is necessary to test the heated floor.
When laying film flooring, it is prohibited:
- carry out work at high humidity and air temperature below 0ºС;
- use nails as fasteners;
- connect the film without grounding;
- bend it at an angle of 90º over an area up to 5 cm long;
- install the film in close proximity to other heating devices.
To avoid mechanical damage to the film, it is recommended to carry out installation work in soft shoes. You can use infrared heated floors after about a month, when the concrete base under the tiles has completely dried.
Video on installing a film floor:
Installation stages
Preparation
Do not place heating elements under low furniture. There should be good ventilation above the floor and a gap of at least 3 cm should remain.
To direct thermal energy upward and reduce electricity consumption, heat-reflecting insulation must be laid under the heating element. You can use materials coated with metallized Mylar or polypropylene film, but it is prohibited to use insulation based on aluminum foil, as it corrodes over time.
General network connection diagram
- Select in advance the installation location of the thermostat on the wall and install the wiring there.
- Determine the areas on which the film heated floor will lie.
- Prepare a clean and level base.
- Place heat reflective material on the floor. It is best to lay it over the entire area of the room, and not just under the film, so as not to create unnecessary unevenness. Secure it with tape to the base and glue the joints.
Installation of thermal film
- Roll out a roll of thermal film on the floor. Along specially marked lines or between black silicon strips, you can cut the roll to the desired size. The copper contacts should be side down.
- Attach a clamp to the copper strip. One side of it should be inside the thermal film, and the other side should be outside on top of the copper strip. To fix it, clamp it with pliers.
- Seal the cut lines with bitumen insulation. If the cut was not made along special lines, you need to isolate the entire side completely.
- Secure the thermal film with tape so that it does not accidentally move.
It is better to cut the film into pieces of the maximum permissible length in order to reduce the number of contacts. To reduce wire consumption, the contacts of the film should extend towards the thermostat.
Installing the terminal clamp
Connection
- Install the thermostat on the wall. It is best to mount it in an accessible place near an outlet or switch.
- Lay the wires from the heating elements to the thermostat according to the connection diagram. The wires should run along one wall, preferably under the baseboard, in a groove or plastic box.
- To prevent the wires from creating unevenness, cut a groove for them in the heat-reflecting insulation.
- To connect the wire to the clamps on the heating mats, you need to cut off the insulation at its tip. Insert it into the terminal clamp and clamp it using pliers. Make sure the wire is well secured and not pulled out.
- At the point where the wires are connected, a square of bitumen insulation is glued to the terminals with a margin at the top and bottom.
- Connect the other ends of the wires to the thermostat. The connection diagram depends on the specific model and is indicated in the instructions.
- Install a remote temperature sensor and connect it to the thermostat. Its head is installed from below to the black silicon strip of the heating elements using bitumen insulation. At the location where it is installed, a cut is made in the reflective insulation to avoid the appearance of a bump.
- If you do not have experience in electrical installation work, then connecting the thermostat to the network should be entrusted to a professional technician. If a film heated floor consumes more than 2 kW in total, it is recommended to connect it through a separate machine.
- After connection, you need to check each heating strip for functionality at a temperature of no more than 30 degrees.
- If everything works perfectly, waterproofing made of polyethylene film is laid on top for additional protection.
Connecting wires to the film
Mounting the temperature sensor
So that if the sensor breaks down, it can be easily replaced, you need to lay it along the floor and walls in a groove inside the corrugation.
Laying tiles
Next, there are two ways to lay tiles on film.
Methods for laying tiles on film
- The first is that a plaster (painting) mesh is fixed over the polyethylene waterproofing to increase adhesion. A screed or self-leveling mixture with a thickness of 8-10 mm is poured onto it.
- The second is that the floor is sheathed with gypsum fiber sheets (gypsum fiber sheets) on top of the waterproofing. They are attached to the base with self-tapping screws between the strips of heating elements. This must be done very carefully so as not to damage them; retreat at least 6-10 mm. If the area is small, then you can first attach the film to the wrong side of the gypsum fiber board, and then lay it on the floor.
Advantages of using quartz vinyl flooring and heated flooring
- Thermal conductivity. Quartz vinyl tiles retain heat.
- Fast heating. Thanks to the small thickness of PVC tiles (up to 7 mm), heat spreads quickly and evenly.
- Environmental Safety. There are no harmful and toxic additives in the structure of quartzvinyl: there is no emission when heated.
- Antistatic. Static voltage does not accumulate on the surface, PVC tiles do not conduct current, and are absolutely safe in combination with a film heating system.
- Stability. Quartz vinyl tolerates temperature changes without consequences.
- Versatility. Quartz vinyl tiles of adhesive or lock type are compatible with all types of heating, except infrared film type.
Pros and cons of underfloor heating with quartz vinyl tiles
Quartz vinyl tiles have good moisture resistance
Quartz vinyl tiles are a modern finishing material that has the following advantages:
- Multi-layering. Each layer is made from environmentally friendly, safe raw materials. When heating a heated floor, the finishing coating does not release harmful substances into the environment.
- Moisture resistance. This flooring is universal and can be used in rooms with high humidity. This is convenient, since electric heated floors are often installed in the bathroom.
- Wear resistance. If we compare the coating with laminate, in terms of wear resistance it corresponds to class 32.
- Practicality. The coating is easy to care for, it does not absorb dirt and can be cleaned with simple detergents.
- Fire resistance. This material does not burn and does not support a flame, so it can be used in rooms with high fire safety requirements.
- High thermal conductivity. A system with such a coating will heat the room evenly.
- Soundproofing properties. The multilayer structure dampens shock waves and noise up to 19 dB.
- Maintainability. A separate element can be easily removed and replaced with a new one. You don't need to call a professional to do this. During the operation of an electric heated floor, it may be necessary to replace a section of the cable. The finishing coating is disassembled during the repair and assembled after its completion.
The adhesive method of laying vinyl tiles makes it difficult to dismantle it
Like any other material, quartz vinyl has disadvantages:
With the adhesive installation method, it will be difficult to dismantle the tiles. The surface of quartz vinyl laid on a concrete base is cool and uncomfortable to the touch
Therefore, a warm floor in such conditions will be more than appropriate. Gaps form between the tiles - this is the main difference from rolled materials. It is important to carefully level the base before laying tiles. Otherwise, all its defects will be noticeable.
Ceramic tile
When choosing a traditional floor covering, such as ceramic tiles (porcelain stoneware or mosaic), you will have to face some difficulties, which, in principle, can be overcome.
Firstly, to lay the tiles you need a cement-sand screed, which provides a fixed base.
Secondly, the screed increases the load on the beam floors. For the stability of the structure, the number of beams should be increased and the pitch distance (section between the beams) reduced.
Thirdly, you need to calculate the height of the beams in the house so that in the bathroom they are installed lower than in other rooms by about 10 cm. After installing the waterproofing and subfloor, you will see that the difference is equal. But still, the height of the floor in the finished bathroom should be 2 cm lower than the floor covering in other rooms.
The advantages of such flooring are resistance to impacts and scratches, durability of the material and ease of maintenance.
In addition, the finishing material has a low coefficient of moisture absorption, which is most important in the bathroom
Methods for laying film heated floors
As a rule, when laying heated floors with power supply, three methods of their location are used:
- Lay the flooring directly under the covering, as is the case with a film floor.
- Location in the thickness of the screed, on which, after it has dried, the finishing coating is laid.
- Installation of an electric heated floor over a tile screed.
If the floor screed is in perfect condition, you can install a heated floor under laminate or linoleum directly on it, which will significantly save time on additional work. When laying an electric cable floor in the kitchen, bathroom or loggia, the heating elements are hidden in the thickness of the screed, having previously laid a thermal insulating layer.
In the case of laying heated floors in two-story houses, where the floor insulation on the first floor has been completed, additional screed and thermal insulation are not necessary. Ceramic tiles laid on top and a thick layer of glue will serve as protection for the heated floor. True, you should first check the instructions for it.
Basics of Safe Use
In order for the infrared heating system to be safe, it is important to make competent calculations and installation, according to technological recommendations:
- install the floor on a flat and dry surface;
- make gaps between sheets of the product of at least 0.5 cm;
- provide grounding;
- choose a film floor and a thermostat of the same power;
- connect the heating elements directly to the machine and power it from the meter.
For your information! For more efficient operation of the floor, it is recommended to install an additional temperature sensor; it will monitor the temperature regime.
Film heating can create comfort in the home. Even non-professionals can install an infrared heated floor under ceramic tiles; the main thing is to strictly follow the installation rules for this system.
Is it possible to lay film flooring under tiles?
Infrared heated floors are intended primarily for “dry” installation under laminate, linoleum, PVC tiles, and carpet. To attract customers, many manufacturers claim that their film can be laid in screed or tile adhesive under the tiles.
There are 3 main reasons why you shouldn't do this:
Firstly, the film has low adhesion. If you immediately pour screed on it or lay tiles, it will turn out to be floating. Because of this, the concrete will have a hollow sound when tapped, and if something heavy is dropped on the floor, the screed may even crack.
Sometimes, for better adhesion of the solution to the top layer, they try to make a lot of cuts and notches. But imagine how difficult it will be to isolate it all. Moreover, you need to insulate it reliably and durablely, so that you don’t break the tiles later if you start getting an electric shock from leaks and the RCD constantly trips.
- Secondly, the composition of the film itself. All tile adhesives and screed solutions are alkaline. Over time, polyester film (PET) corrodes, regardless of the thickness or number of layers. At best, you'll end up with a short circuit and sparking from exposed electrical connections.
- Third, there are rod and cable electric floors that are ideal for under-tile installation. When installing them, you don’t need to invent or invent anything; they are specially made for “wet” installation.
But there are several installation options, which are discussed below.
System installation
Preparing the surface for installation
To lay the floor yourself, you need to make initial preparations:
- Dismantling old flooring materials.
- Cleaning from dust and roughness.
- Dry the coating thoroughly.
These simple steps are enough to get started.
Approximate price from 250 to 1000 rubles per meter
We carry out thermal insulation
The heat-reflecting material you choose must be cut into strips approximately 60 cm wide (the length depends on the room). We lay strips of material around the entire perimeter of the floor and fasten them with tape. Carefully check the quality of the insulation at the joints of the strips.
Installation diagram
Installation of film floor
The material is very thin and can easily be damaged if handled carelessly. The instructions on the package will help you learn about safety precautions when working with infrared heated floors. Also, carefully insulate the film cutting line!
A few more important recommendations:
- Do not stretch the film over the entire floor area; it is better to install it in the middle of the room, where there is a minimum of furniture;
- If you decide to install the film under large furniture, consider a ventilation system;
- The minimum permissible distance from the walls is 10 cm;
- Make sure that the coating under the film definitely does not conduct electricity;
- Laying the film along the entire length of the room allows you to save on the length of the wiring.
Connection
Before starting to work with ceramic tiles, we recommend that you fully connect and check the operation of the infrared floor in test mode. This will make it easier to notice and fix problems in a timely manner.
Infrared floors under tiles should warm up within 1-2 minutes after activating the thermostat. If everything corresponds to the norm, you can proceed to the final stage.
Installation of heated floors
We lay the last layer of flooring: ceramic tiles. It is glued in the traditional way, and you can use the infrared floor no earlier than a month from the date of installation of the tiles, since tile adhesive and screed take a very long time to dry.
Photos of step-by-step installation
Infrared film heated floors and PVC tiles
They appeared on the market not so long ago, but have already gained considerable popularity.
They are a flexible, thin system, the functioning of which is based on long-range infrared radiation. The heating element is a hexagonal carbon nanolattice, enclosed in two layers of polymer material and connected by silver-plated copper conductive busbars. Installation is quite simple, glue is applied to the leveled base, on top of which sheets of film heated floors are laid, and then another layer of adhesive is applied to the latter, on which adhesive PVC tiles are laid.
The advantages include high efficiency, excellent thermal conductivity, excellent maintainability of the entire complex, both PVC coating and heated floors. In addition, the infrared spectrum is as close as possible to the solar spectrum, therefore it acts as a kind of “native” for humans from a physiological point of view.
An undoubted advantage is that PVC tiles transmit radiation with virtually no loss, which makes the combination of such a heating system with this type of finishing floor coverings effective. It is also worth noting the simple installation, which you can do yourself.
Disadvantages include significant energy consumption (especially in large rooms), heating of furniture (without legs), and dependence on a constant power supply.
Water heating
Regarding this solution, we can say that it has many disadvantages with a small number of positive aspects. The only advantages are that after pouring the cement, a flat surface is formed, perfect for laying vinyl, and the fact that thin parts compensate for the increase in the height of the floor relative to the ceiling with their small thickness. There are many more disadvantages:
- You will have to fill the screed and this will inevitably require either the involvement of professionals or long-term independent work.
- After the screed is made, it needs a lot of time to dry. At the same time, the filling process itself also takes a lot of time.
- The temperature of water floors can be quite high, which negatively affects the condition of the decorative coating.
- Such a floor is very difficult to configure in rooms of complex shape.
- The height of the room will be significantly reduced after installation of all components of the structure.
- There is a risk of leaks.
Advantages of quartz vinyl tiles
Many people appreciate quartz vinyl tiles for their high strength and phenomenal wear resistance. Among other things, due to the fact that this finishing material contains polyvinyl chloride, quartz vinyl floor tiles acquire natural warmth. In reviews, buyers note that it is pleasant to the touch, unlike ceramic ones. The main advantages of quartz vinyl flooring:
- Environmental friendliness of the material. Harmful substances are not released even at high temperatures.
- Quartz vinyl tiles, reviews of which tell us that they do not absorb water at all, are widely used in rooms with high levels of humidity.
- Fire resistance. It does not support the combustion process, that is, it is a self-extinguishing material.
- High resistance to chemically active substances.
- A high level of wear resistance and, accordingly, durability; the service life of the tiles is 25 years.
- Resistant to temperature changes.
- Impact resistance.
- Has noise-absorbing properties.
- Easy to maintain and repair. The tiles can be washed with any detergent. If repairs are necessary, individual tiles can be easily removed and replaced with a new panel.
- Excellent aesthetic properties.
- If desired, you can make a “warm” floor under quartz vinyl tiles; there is no need to lay a substrate.
- The material does not conduct electric current and is antistatic.
Flaws
Even with all the advantages, film floors placed under tiles also have disadvantages:
- heating is recommended in rooms with a small area; when installing them in rooms of impressive size, costs will increase noticeably;
- since the floor does not lie under heavy objects and plumbing fixtures, it will not be possible to rearrange the furniture in the apartment;
- using glue or concrete screed to secure the tiles will significantly reduce their service life;
- failure can lead to a short circuit;
- it is permissible to lay the film only on a perfectly smooth base;
- mechanical damage to the film is possible - since the tile has significant weight;
- adhesion of the IR floor makes installation more difficult.
For your information! To increase adhesion, it is recommended to lay plasterboard or glass wool mesh between the heating system and the tiles.
However, this will reduce the heating capacity of the structure.