Hi all! You will probably agree that the radiator grill can significantly affect the appearance of the car. By replacing or modifying it, the car will take on a completely different look. That’s why many people strive to do some kind of restyling.
Some prefer installing a new grille, while others prefer painting or minor adjustments to an existing element. Moreover, it is not necessary to seek help from specialists. You can do this kind of work yourself.
Advantages
If you are interested in small tuning, but do not want serious innovations, just install a new grille. Your old bumper will only benefit from this.
Considering the current assortment, you can literally buy whatever you want. On Avito and other sites they sell factory-made elements, handmade decorative overlays, so to speak. You can just slap on a little molding and it's done. It’s up to you to decide, since a new grille is not that expensive. Much depends on the material of manufacture, but more on that later.
Speaking of strengths, I am a proponent of buying or DIYing a new grille for several reasons.
- Availability. The price of parts for tuning the grille is low. Moreover, on Kia, Chevrolet Orlando, Lacetti, Renault Duster, Mazda, Lancer 10, Skoda and a number of other cars, the prices are equally good. You don’t have to spend a lot of money to have your VAZ 2105, Nissan X-Trail T31, Lifan x60, Chevrolet Cruze, Priora, Granta or the same UAZ Patriot transformed and sparkle with new colors.
- Installation methods. If you don't even know anything about removing the bumper and are worried about the risks of damaging the heating system when working near the radiator, the replacement can be done by specialists. St. Petersburg, Moscow and almost every city in the country has at least 1 car service center where they are ready to do everything for you efficiently and quickly. You can buy a tuning element and entrust its installation to specialists. Or put the work entirely on the shoulders of the masters. Many workshops are ready to make or order everything you need. It costs more, but you have a minimum of worries. Or do it yourself. Not the worst option either.
- External changes. Installing even a small grille instead of the factory one gives the car a completely different sound. A regular trim or a black grille with original cells perfectly changes the appearance of the car.
- Range. We are talking about both the design and the materials used to create the radiator grilles. Chrome, plastic, aluminum, stainless steel and other materials will allow you to get what you need.
As you can see, there are a number of reasons to start removing the old grille and installing a new original element in its place. Sometimes after such mini-tuning the car immediately looks like new. It can be a slant towards sport, elegance or brutality. It's up to you to decide.
So, let's tune our car? Then you need to choose a suitable new grille for yourself. The easiest way is to buy it specifically for your car. It is enough to know the article number and choose the color that matches your car.
Moreover, the finished grille may already have an emblem or badge that you like. That is, it is not necessary to save the badge of your car. You can literally stick anything on there.
The most important point is the material from which the upper and lower grilles are made. It could be:
- aluminum;
- plastic;
- stainless steel;
- carbon
Aluminum parts are the most expensive, while plastic is considered a budget option. Stainless steel can be called something in between.
Many people choose carbon. You will have to spend more money on it, but even in the photo the car with a carbon grille looks great. In fact, it's even better.
Types of radiator grilles used in Niva cars
Replacing the heater radiator Lada Kalina
Before you start tuning, you need to finally decide what material the future part will be made of. This will determine the set of tools that will be useful to you during the work, as well as the algorithm of actions that will make up the tuning. Today, four main materials are used to make radiator grilles for Niva cars, namely:
- Aluminum. Making radiator grilles from it will cost the most.
- ABS plastic or fiberglass. This material is the cheapest of all presented on this list, and is most often used in the manufacture of radiator grilles for Niva cars.
- Stainless steel. The best option based on price-quality ratio.
- Carbon. Quite an expensive material, but if you want this detail to look stylish on your Niva and add presentability to it, you should resort to it.
https://youtube.com/watch?v=-S1nBy9zOec
As a rule, aluminum grilles are installed on expensive foreign cars and SUVs, so such material would not be the best solution for the Niva. However, stainless steel, high-quality plastic or carbon fiber are equally suitable - the choice depends on what goal the car owner is pursuing when tuning his Niva. The shape and color of the part that will be installed on the vehicle also depends on them.
Do it yourself
Even though you know the catalog number of the grille that would fit your car, I suggest we talk about tuning it yourself. Still, it is much easier to install a finished element and wipe the icon with polish than to cut, glue and saw yourself.
Let's look at the process step by step. The front of the car will be pleasantly pleasing to the eye, and the knowledge that you did everything with your own hands will lift your spirits even more.
- In order for the new mesh to fall into place, it must be released. To do this, remove the factory radiator grille. Usually it is held on by plastic clips, so there should be no problems with how to remove the element;
- Be careful that there are no wires or hoses trailing behind the grille. Cars are different, so anything is possible. Try to avoid damage to the old frame. This is where your new grille will be mounted;
- After removal, the inner part is cut out with a hacksaw. The task is to remove everything unnecessary so that the new element fits perfectly. It depends on what size the new part will be;
- Be sure to clean everything and sand it thoroughly. It is better to fill all excess holes with fiberglass or automotive putty;
- You can use an old frame or buy a new one. In the second case, everything is clear. If you rework an old part, you can paint it or wrap it in vinyl. By painting you will be able to chrome the part, that is, give it the appearance of real chrome. Or carbon. As you wish;
- The new mesh is cut based on the dimensions of the frame. It is fixed with clamps and screws for reliability. The modified radiator grille is placed in its rightful place.
Do not forget that the radiator grille has not only a decorative, but also a protective and functional task. It prevents large debris from reaching the radiator, plus it provides air supply to cool the engine. Therefore, under no circumstances make the new grate solid or too fine-mesh. There must be good air flow to the motor, otherwise there will be problems with overheating.
How does the screen affect the heating process?
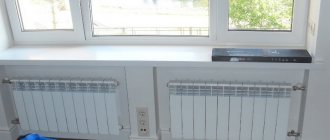
In pursuit of the external beauty of the product, one should not forget about its functionality - the screen should not interfere with effective heat exchange in the room. Do not be afraid that after installing the grille on the radiator, heat will be retained, which will provoke an increase in home heating costs. If you select the right design, such problems will not arise. Moreover, with the help of a special layout and configuration of the screen elements, you can even increase the amount of incoming heat.
The larger the holes, the more efficient the heat transfer
If you understand the operating principle of a standard heating radiator, then there will be no problems with choosing the correct design of a decorative screen.
Operating principle of a heating battery
When heated, the heating radiator transfers heat into the room as a result of the movement of heated air masses (convection process) and through direct thermal (infrared) radiation.
The principle of operation of the radiator
The effectiveness and priority of each of the two thermal energy transfer options may vary. This is influenced by the design of the radiator, the temperature of the coolant and air in the room, and the presence of obstacles in the path of heat flow.
So, at not too low temperatures, cast iron batteries give off heat according to the principle of convection, but after the coolant temperature rises to 70 degrees and above, heat is transferred using infrared radiation.
Main methods of heat transfer
Conclusion. Maximum efficient operation of a heating radiator can be achieved with efficient heat transfer using both methods.
So, in order to ensure free air circulation, the converter radiator is equipped with a grille that does not have an upper horizontal panel.
Warm air distribution
Prices for popular models of heating radiators
Heating radiators
What to consider when choosing a grate
The main rule that must be observed when choosing a grille is that its design should not interfere with the free circulation of heated air and the passage of infrared radiation . This is possible if the front panel of the grille is equipped with a sufficient number of holes, amounting to at least 50% of the total area, and the free passage of warm air is ensured above the battery.
The holes at the top should not interfere with convection
It is also recommended that the material used has excellent thermal conductivity and allows air to flow freely into the room. If the inner surface of the screen is painted black or dark brown, the heat absorption will be better.
Introduction
Tuning the radiator grill with your own hands is an expressive element of the car body, which, along with updated rims and optics, makes the car unique and noticeable to others. It is worth noting that most of the manipulations that almost every car enthusiast can do with the grille of his car do not require significant financial costs or specialized training. You can independently change such a decorative element beyond recognition; you just need to stock up on free time, a set of simple tools and consumables, which can be purchased at any auto store or pavilion that sells building materials. Whether this will result in illumination of the radiator grille or installation of a new emblem is the owner’s decision.
Choosing a grille for a car
Types and varieties of radiator grilles
When starting to make a radiator grille with your own hands, you need to know what kind of radiator grilles there are. The further work plan, the choice of the necessary tool for the job, as well as the final result depend on this. Many people don’t know how to make the radiator grill for their car more attractive.
There are several types of grilles in the automotive industry:
- aluminum radiator grilles;
- stainless steel;
- made of ABS plastic;
- carbon
The gratings come in different sizes and shapes
Each type of radiator grille has its own pros, cons, functions, design, and colors. Let's look at them.
The strength and flexibility of aluminum is known to everyone. This is the most versatile material used in industry as a whole. There are six modifications of aluminum in total. The fifth and sixth series are produced with an admixture of magnesium alloy, which adds rigidity to the structure. The sixth series of aluminum contains, in addition to magnesium, silicon, which protects against corrosion and also prevents the metal from twisting and deforming. These gratings are the most difficult to work with, as they are durable. Such alloys are used in expensive foreign cars, where strength is paramount. Do-it-yourself radiator grilles made of this alloy will bring the car closer to the tank. DIY radiator grilles made from this material are durable. Most often, such materials are used in SUVs.
The second type is stainless steel. Cheaper, but outwardly emphasizing the style of the car, the metal glows and is easy to process. A chrome radiator grille will look good on your car.
In sunny weather, the material on the radiator will simply shine and attract the attention of passers-by. In addition, stainless steel has a very high resistance to deformation, is durable and looks good on the front of the car, as it does not corrode, which means it always has a shiny surface
With stainless steel, you don't have to worry about how to make your radiator grill more attractive. Stainless steel will look best with backlighting, LEDs and xenon.
ABS plastic is what can most often be seen on domestically produced cars. This material is the cheapest, there is a lot of it in the auto parts markets. Craftsmen can train and experiment with this material without fear of consequences. ABS plastic is quite durable and also has high weather resistance. A significant positive aspect of using ABS plastic is.
ABS plastic grille
Carbon currently remains an expensive material due to its durability, weight, strength and ability to regulate heat transfer. In everyday conditions, a carbon fiber radiator grille is unlikely to work, and therefore it is better to purchase finished products. Moreover, it is not so easy to get carbon of a certain size.
Modern tuning options
The car owner has the right to independently carry out all kinds of updates to the radiator grille; the only thing he must take into account is the free circulation of air flow; the new body element should not reduce the capacity of the cooling system. It is not worth making a grille from a mesh that is too fine, with the size between the cells being less than 5x5 mm, since it will only be possible to ride on it at low speed. Moving at high speed increases resistance, causing air flow to the fan and radiator to become more difficult. Some types of tuning with their “bells and whistles” can completely or partially close the grille, blocking the flow of air, which is why the fan is forced to “breathe” through the lower part of the body. In this case, the efficiency of the cooling system will decrease several times.
Coloring
The mesh can be left in its original form, or it can be painted. This way you will give it an original look. Moreover, you can paint not only the mesh itself, but also the grille along with it. As you might guess, the mesh is painted before connecting to the grille, unless you want to make them the same color.
To do this, you need to thoroughly degrease the surface of the mesh. For better adhesion of paint and surface, apply a layer of primer. Choose primer depending on the type of material: different compositions are used for metal and plastic.
After this, you can safely start painting. To avoid cleaning paint stains from the garage floor, lay down unnecessary newspapers or an old rag. The easiest way to paint is using an aerosol can. Keep it 40–45 cm from the surface. Apply 2 thin coats. Give each one about an hour to dry. Make sure that no sagging occurs. If desired, you can coat the mesh with the grille with an additional layer of varnish.
Lay newspapers or fabric under the mesh and then apply spray paint
As you can see, there is nothing complicated in making a protective mesh for the radiator grill yourself, as well as subsequent installation. All the necessary materials and tools can be purchased at any construction supermarket or automotive parts store without any special expenses. Speaking of costs: making a mesh with your own hands is several times cheaper than buying a ready-made one. You will only need a little time and effort to give it the desired shape and install it in its place.
Getting started: removing the factory radiator element
Usually the grille is held on by self-tapping screws or bolts screwed into specialized holes in the body. Recently, fastenings have increasingly been replaced by neat plastic latches. In order not to damage the car and its other elements, you should first look at the car’s maintenance manual. However, if it is not there, you can figure it out yourself; usually dismantling it takes about 20 minutes.
To remove the grille, you need to unscrew the screws that secure it to the car.
How to install the product
Before you begin installing the mesh, you will need to remove the grille. On some cars this can only be done together with the bumper. As a rule, to dismantle you need to unscrew the retaining bolts that are hidden under the hood, and then bend the clamps at the bottom of the grille. After this, it can be carefully removed from its place. For other models, the fastening is so simple that you don’t even have to lift the hood lid: just pry the edges of the grille with a flat screwdriver and remove it from the grooves. You can find more detailed instructions in your vehicle's owner's manual.
Required Tools
To install the protection on the grille, prepare the following set of tools:
- ready-made protective mesh
- flathead screwdriver;
- a set of hex keys for dismantling the grille;
You will need these tools regardless of your preferred mounting method. But besides them, you will need the fasteners themselves. Depending on how you connect the mesh to the grating, you will need one of the following tools:
- standard holders
- cable ties about 18–20 cm long
- screws and industrial hair dryer
- welding machine.
Mounting options
You can secure the mesh in four different ways:
- using standard holders;
- using cable ties;
- using self-tapping screws;
- fusing the stacks into the lattice.
Each of these methods has its own pros and cons. For example, the best option is to install it on standard clamps. Another option is to install the mesh on self-tapping screws. True, before this you will need to heat the screws and thereby prevent further cracking.
Rare motorists resort to the fusion method. Firstly, you need to have special equipment. Secondly, if the grate is made of plastic, it can easily be melted. Well, in the end, you can’t redo a crookedly fused grille, and the entire part will need to be replaced.
For these reasons, drivers who decide to modernize the radiator grill on their own most often use plastic construction clamps. They are low cost and available at any hardware store. To make the ties invisible, purchase them in the color of the future grille and mesh.
Installation instructions
When the mesh itself is ready and the installation method has been selected, you can begin the installation process.
- Carefully remove the radiator grille. Be careful not to damage the cells.
- Wash the parts and remove any debris that has accumulated during use.
- Apply the mesh to the outside or inside of the radiator depending on the final location.
- If you are installing the mesh outside, fold in the seam allowance at the edges.
- Secure the mesh to the grill with clamps. It is best to use a symmetrical circuit. The ties arranged in a checkerboard pattern look beautiful and hold tightly.
- Cut off the long tails of the zip ties. Make sure that the fastening is not broken and the clamp does not fly off.
- Place the grille back into the car.
Connect the mesh and radiator grille strictly along the contours
LED illumination of the radiator grille
Illuminating the radiator grille is a simple and not at all expensive procedure. To create it, you will need an electrical circuit that consists of diodes. It is this that will subsequently be located around the perimeter of the entire radiator protection. When performing this, you should remember only one important rule - any backlight cannot be installed on the part of the radiator that is heated while driving. It is best to attach diode strips to the ribs of the radiator block. Instant glue and silicone will help ensure reliable fastening.
Positive points
There is a healthy grain in such improvement of the car, especially if in the summer you often move along the highway, from one city to another. The thing is that modern cars have large radiators (which can extend far down) and double grilles that are supposed to protect them. One is mounted between the headlights, but many manufacturers now build the second into the lower part of the bumper.
Grilles are supposed to protect - but they don’t! And why? This is because now they often carry purely design solutions; there is a large cell where not just a fly, but a really large stone from under the wheels of the car in front will fly.
All this can really cause damage to the surface of the radiator; it’s certainly difficult to break through, but it’s easy to get clogged with flies or fluff. And here the decision to fix the protective mesh is very justified, because all the insect fluff and other delights of our roads will settle on it. And you can easily wash it all off at the nearest sink.
Chrome radiator protection
The chrome trim on the radiator grille will help give the old design an attractive metallic-mirror shine. To do this, you need to carry out a series of difficult steps, as a result of which a binder will be applied to the surface, which should be dried at a temperature of at least 65 degrees. A spray gun will help apply a layer of CT activator. 2516. Distilled water will rinse the grate, a double gun will apply “Metachrome” with a reducing agent.
All these complex operations can be avoided by purchasing a radiator grill cover in advance from any car store, perhaps even an online store, with the help of which the difficult process of adding shine will turn into a pleasant pastime.
Screen manufacturing materials
When selecting grids for batteries, the type of material is taken into account. Not all types of such structures effectively absorb heat
You should pay attention to such a parameter as thermal conductivity. In addition, other properties are studied: radiator heating temperature; exposure to temperature changes
Considering that this design is regularly exposed to heat, it is recommended to purchase environmentally friendly products. This is due to the ability of some materials to release harmful compounds into the environment.
Metal gratings
Products in this group are presented in different types: simpler, classic, carved. Metal grilles are installed on heating radiators quite often due to the good heat transfer of the material. This allows them to conduct heat without affecting the efficiency of the battery and the entire system.
Metal structures are easy to clean. It is permissible to paint them repeatedly, changing the shade. The front panel can be mesh or perforated. Moreover, the shape of the holes changes depending on the wishes of the customer. The advantage of such products is long service life and durability. To prevent the structure from injuring residents, it is attached to the wall.
The metal is heat resistant. It is resistant to temperature changes and can heat up and cool down repeatedly. Products made from such material are classified as mid-price products. It is recommended to use structures with a metal thickness of 1 mm. This is enough to ensure good thermal conductivity of the screen. Moreover, in terms of strength, such products are not inferior to analogues made from other materials. The disadvantage is the difficulty of self-installation, since it uses a welding method.
Wooden gratings
This is an environmentally friendly material. When heated, it does not emit harmful substances. Wooden grilles for heating radiators will fit well into any interior. They are represented by a wide range of models. More often, lattice screens that are simple in design are used. Wooden products are not strong enough, so it is recommended to use the option with shelves, which in this case will serve as stiffeners.
Wood is a heat-resistant material, however, with prolonged contact with a source of high temperatures, such structures can dry out. However, this does not lead to immediate deformation of the products. To prevent the shape of such grilles from changing, they should not be installed close to the battery. The advantage is the ability to change the color of the structure when the design and color scheme of the interior changes. The main disadvantage of wood products is their high cost.
Plastic covers for radiators
PVC gratings are made from polymer material in whole or in part. In the second case, plastic can be successfully combined with metal and rattan. The advantage is the ability to decorate with any texture: wood, natural stone. Plastic grilles are cheaper than their metal and wooden counterparts.
Such designs are lightweight and easy to maintain. They do not absorb moisture, do not deform when exposed to moderate temperatures, and do not emit toxic substances. However, all these properties of the material are preserved provided there is no direct contact of the plastic with the heat source.
The main disadvantage of PVC products is low thermal conductivity. Under other conditions, this property could be an advantage, however, if there is no goal to reduce heat loss, then low thermal conductivity causes delay in warm air flows. This reduces the efficiency of batteries and leads to excessive fuel consumption.
Glass screens
They are durable because they are made of tempered glass up to 8 mm thick. This prevents damage due to mechanical stress. Such screens are attractive and fit well into interiors of various styles thanks to their minimalist design.
Glass grilles for heating radiators differ in size, color and material thickness. The fasteners are installed on the corner areas of the screen. The disadvantage of such products is the lack of holes. Heat is dissipated from 3 sides: from the battery up and to the sides. This contributes to a decrease in the efficiency of the heating system.
It is easy to care for glass structures. They are not afraid of moisture, they are smooth, due to which dirt is retained in minimal quantities on the surface of the panel. In addition, a photograph, any drawing, or pattern can be printed on the glass screen.
Multifunctional mesh netting
Making a radiator grill with your own hands is not a very labor-intensive process. Many car owners do not like the factory version; at home, an ordinary chain-link mesh consisting of small cells can help replace it. In stores, for modest amounts of money, you can find products made from various materials, such as aluminum, steel and plastic. To install and fasten such a product, you will need a few more simple devices that are in every car enthusiast’s garage:
- hacksaw for working with metal;
- needle file and file;
- "sandpaper";
- bolts, screws or plastic clamps;
- cold welding.
The mesh for tuning the radiator grille will be created on the basis of the previous version, which is why you should not immediately break and throw away the factory mount and frame. The production design will become the basis for the creation of a new decorative element of the body. A hacksaw and a file will be useful for cutting off all the jumpers. After this procedure, the part will not have primary rigidity.
If any irregularities appear on the surface during the process, they should be carefully removed with a file. The holes that appear after removing the ribs are easiest to cover by cold welding. She is able to “set” quite quickly, literally in 10 minutes everything will be ready. The last step in making a frame is the process of sanding the damaged surfaces with sandpaper; it would be better if you take paper with the smallest fraction of abrasive.
Manufacturing and installation
Now, you need to take a fine mesh and fold it in half, so that the edge fits under the edge and it folds more tightly. The edges of the galvanized mesh are incredibly sharp and tenacious, so protect your hands with gloves. After the mesh is folded as tightly as possible, we temporarily fix it with ties in the four corners. Next, we put the same layout on this grid and cut out the future grid. The most convenient way to cut such a mesh is with metal scissors.
The second step is to place the mesh on the frame. To use as a base, a mesh with larger cells will serve. According to the layout, you should cut out the desired outline from it. Then we place a piece of fine-mesh mesh on top of it, and align the edges so that they match perfectly. If you use a model when cutting out parts, be careful and attentive, then all three parts will be the same size and, when placed on top of each other, will give a smooth, perfect, three-layer edge. If everything is correct, we fix our parts in this position, tightly tightening them together with ties
It is important to place the ties in compliance with a certain pattern - either in a checkerboard pattern, or every even row, with distances of three cells. The accuracy of geometric shapes is always fascinating and after final decoration, the view will be even more transformed
Our hand-made mesh for the radiator grille turned out to be much stronger than the factory one and much denser, however, it is perfectly ventilated and does not create any obstacles to the air flow. Now you need to process the edges of the finished lattice. To do this, we take the car door seal, and carefully, slowly - so as not to tear it by accidentally catching on the sharp edge of the mesh, “put it on” it. Starting from the bottom right corner, millimeter by millimeter, it isolates the sharp edges of the grille edge, plunging them into the depth of the seal. Having completed a full circle, we will return to the starting point, now we can trim off the excess.
In fact, the grille is already ready for use, but it would be nice to give it a more presentable look. Tuning the radiator grille with your own hands is also a completely feasible task, and you need very little to do it. First of all, you should cut off all the hanging “tails” of the ties - not remove them completely, but rather cut off the excess, hanging part. Now place the grid on a clean sheet of paper, face up. Shake the can of paint well and start painting.
First, standing on the right, then, after waiting a little (an hour or an hour and a half), standing on the left of the grate. Such a coloring that “crosses” the directions of the jet will more thoroughly cover the entire surface of the craft.
If you approach the question of how to make a radiator grill with your own hands, you can get a high-quality and reliable grille within just a few hours.
What to choose: paint or film?
There are several ways to decorate the outside of the radiator grille. Many car owners prefer to paint this decorative element of the body. Before starting work, you should remember that painting any part must occur before it is attached to the frame - this rule is relevant in the case when two parts will be decorated in different colors. If the design is planned to be made in one color, then, naturally, painting the radiator grille should be carried out only after all parts have been completely assembled. The assembled product must be primed; it will be better if the primer and paint are of the same brand.
Some car owners with a creative approach cover the factory or home-made frame with colored decorative film; most often you can see colors such as carbon and chameleon. It is better to carry out such manipulations before the structure is thoroughly connected. There are usually no particular difficulties when pasting; you just need to first prepare the surface to be pasted. It will need to be cleaned of dirt and degreased, then wrapped with a film using a hairdryer and a flexible squeegee, which will have to be carefully smoothed.
Why do you need a battery screen?
A correctly chosen decorative screen will not only disguise the unpresentable appearance of the radiator, but will become a natural addition to the interior, emphasizing its style and color scheme.
Plastic screen in a modern style
There are several functions that radiator screens perform:
- Being a technical device with protruding elements - sharp edges, taps, valves, the heating radiator carries some danger. It is also worth considering that sometimes the surface temperature of the battery is quite high and touching it can cause a burn. Therefore, the screen performs a protective function . This is especially true in families with small children.
- Due to the correct choice of material for making the product, optimal selection of the location and size of the holes, it is possible to improve the convection of the battery and increase the efficiency of the heating process . For example, using a metal screen model you can increase the heating area.
- The decorative possibilities of the radiator screen are obvious - the battery does not always look appropriate in the interior. With its appearance, it can spoil the entire impression, “break” a finely calibrated and thoughtful design concept. The overlay, made in the same style as the interior, will fit organically into it and will not stand out from the general background.
- Due to their design, old-style batteries are most susceptible to rapid contamination of hard-to-reach places where dust and debris accumulate. It takes a lot of time and effort to keep such a structure perfectly clean. With the help of the screen, the issue of cleanliness is solved radically - the battery is reliably protected from contamination , and the screen itself does not require complex care and always looks neat.
The perforation pattern is selected taking into account the design style of the room
Painting decorative elements
Not everyone will decide to create a new decorative element instead of the factory radiator grille. It will be easier to change its style by painting it. The new color will help “refresh” the appearance of the car. Painting the radiator grille yourself must comply with the rules for painting plastic; only a procedure carried out in several stages will help the paint adhere firmly. Even before starting work, the entire surface that is planned to be painted should be made matte, this is especially true if there are chrome-plated areas. Failure to follow such a simple technology will inevitably lead to paint peeling.
The prepared elements should be matted with sandpaper and soapy water - this helps to completely remove the chrome layer; Scotch Brite is suitable for cleaning hard-to-reach areas. A properly prepared structure will have an aluminum tint after cleaning. It should be washed in soapy water and wiped dry with any rag. Next, the surface must be degreased using a solvent. After complete evaporation of the substance, you can proceed to the next stage.
The future tuning radiator grille needs a primer; it is better to prime the plastic with a specialized Velcro substance. You can buy it in special cans. The primer should be applied in several layers; between approaches, you should allow 2–3 minutes for the previous layer to dry. It is preferable to do all procedures in daylight or high-quality artificial lighting - this will allow for uniform application.
Only after all of the above can you begin painting, which will be applied in several layers. After each coating you will have to take a significant pause, you will need at least 15–20 minutes. The dried paint should be carefully varnished, it is especially important to pay attention to the first application, which will ensure initial adhesion. The following layers can be made more dense, but smudges must be avoided. After drying the updated body element for about a day, it can be installed in its proper place.
Where is the best place to install the mesh?
There are two ways to install a protective mesh - outside or inside the radiator grille. Both are successfully used by car owners, having their own advantages and disadvantages.
Thus, installing a mesh behind a car radiator grill has the following advantages:
- does not catch the eye, so you can save on expensive types;
- hidden mounting points;
- simpler installation process;
- installation is carried out once during the entire period of operation of the grid.
The disadvantages of this method include the need to remove the front bumper (owners of foreign cars most often encounter difficulties) and difficulties in cleaning the mesh material (to solve this problem, you most often have to turn to professionals, so you should be prepared for financial costs).
The protective mesh is designed to trap a variety of small particles
The external installation method has more positive aspects:
- ease of installation and, if necessary, dismantling;
- there is no need to disassemble the vehicle;
- there is no need to remove the mesh for cleaning, since this procedure is external;
- a more attractive view from the front of the car, especially if the mesh is color-matched.
This method has no global disadvantages. The only negative is the fairly high cost. However, it is easy to avoid such a difficulty - just spend time and effort on making your own protection for the radiator grille.
Variations of the updated radiator
Decorative mesh on the radiator grill is an original decoration element for any car. It is quite difficult to develop radiator protection yourself; it is easier to use the existing factory form.
The design, made of ABS plastic, can be easily replicated with a soldering iron, paint and skillful hands. The creation of a new grille occurs by sawing out the second rib; the parts are connected in the area with the cut-out emblem of the car brand. This simple method allows you to get a solid structure.
The decorative radiator grille can be made of fiberglass mesh. The old frame is completely dismantled, the emblem is cut out with a hacksaw. Using a factory product, a new mesh is cut along the contour. Small allowances should be made at the edges, which will allow the product to be fixed in the inside of the frame. For fastening, use any available mounting adhesive, plastic clips, putty, silicone or screws with rings.
Using silicone glue, the emblem can be attached to the radiator grille. In addition to it, the grid can be decorated with various letters, all kinds of drawings and brand labels. The main thing in this process is the tireless imagination of the owner and a number of various available means.
Dimensions, shape, material of the radiator grille
Each car manufacturer has its own size, shape and material for making the grille. Many use plastic, some use metal to create gratings, and there are also combined gratings - made of plastic and metal. The dimensions largely depend on the dimensions of the front part and the layout of all its elements. Manufacturers often coat the radiator grille or some of its parts with chrome, disguising the plastic material of the grille as metal.
For example, on the latest generation Ford Focus the radiator grille is very small and serves almost only a decorative function, since volumetric air intakes installed on the front bumper are used to cool the radiator.
Ford Focus radiator grille
But on the latest generation Toyota Land Cruiser 200 SUV, the radiator grille is very voluminous and it performs both a protective, decorative, and aerodynamic function, since it does not have air intakes on the bumper.
Volumetric radiator grille Toyota Land Cruiser 200
Many manufacturers, in pursuit of an aesthetic appearance of the front end, forget about the direct purpose of the radiator grille - protecting the radiator. They make a grid with very large cells or with a significant distance between the grid strips. Such a lattice cannot always “catch” a flying stone. Many car enthusiasts solve this problem by either replacing the grille or installing a fine mesh from the inside of the factory grille.
It should be noted that in addition to the improved appearance and protection of the radiator, tuning radiator grilles can also provide other useful functions. For example, there are grilles into which additional lights are integrated. These lights connect to the wiring that goes to the headlights.
Some craftsmen create exclusive radiator grilles using the factory grille as a basis. Typically, the outer contour of the factory grille remains, which makes it easier to install it in place in the future, but the inner part is cut out. A grille with a special pattern is mounted in place of the cut out part; it is also possible to install additional lights. Next, the finished grille is painted or chromed, and then installed in place.
The ability to dismantle the radiator grill makes it possible to replace it if damaged. But many people use this opportunity to give the car individuality, since there are now many types of grilles on sale, which look very different from the factory ones.
You can also change the appearance of the front of the car not only by replacing the grille, but also by purchasing linings for it. Moreover, grille covers can be not only decorative, but also perform a specific function. Nowadays, winter grille covers are sold for almost all cars. This cover completely covers the grille, blocking the air flow through it. In winter, this contributes to faster heating of the power plant and compliance with the temperature regime.
Radiator grille trim
How to make a radiator grille with your own hands
The radiator grille is manufactured independently in several stages.
Materials
First you need to purchase the following materials:
- thick cardboard;
- polyester resin (200 - 300 g) and hardener;
- glass mat with a density of 300 - 450 g/m². You need approximately 500 g;
- universal putty;
- masking tape;
- bars for grouting;
- sandpaper;
- degreaser;
- acrylic primer;
- solvent.
Advantages and disadvantages
I have made my choice - next weekend I will equip my machine with a branded mesh. However, minor troubles are possible - I studied the list of them myself and want to share with everyone.
Cooling of the radiator by the incoming air flow after installing the mesh will deteriorate somewhat, and the thermal regime of the motor will change. Well, this is an expected phenomenon. When I installed nets on plastic windows at home, they tried to impose on me an “ideal net” with the smallest cells, through which “nothing could get through at all.” But it is, to put it mildly, difficult for air to pass through such a mesh - it’s easier not to open the window at all... Therefore, you can’t install a completely fine-mesh mesh. True, dirt will still penetrate through large cells. But this, it seems to me, is obvious.
Another disadvantage of the mesh is sometimes called the need for some modifications in the engine compartment. Personally, I intend to contact a service to install the grid - they won’t reinvent the wheel, but will do everything as it should.
Finally, the mesh is accused of having to be washed anyway. Personally, I don't see anything wrong with this. Once again I will refer to the plastic windows in my apartment - twice a year, trained boys remove all the screens and clean them of dirt. It doesn't annoy me.
Have a nice trip, colleagues!
Sincerely yours Sergeich
The floor goes to the protection of... the radiator!
The value of tuning
Tuning is a modification of a car that allows you to improve its appearance and change its factory characteristics. With the help of tuning, engine efficiency and power are increased, suspensions and braking system performance are improved.
Tuning the grille allows you to improve the appearance of the car, as well as increase the protection of the radiator. Refinishing can hide damage and defects.
Main options
Before starting work, you need to determine the final type of grating. There are several types of modifications. The chosen type determines what materials and tools will be used in the work.
Most often, the radiator grille is replaced with a metal fine mesh. ABS or fiberglass construction is also used. Using silicone glue, various decorative elements (for example, brand labels, letters and even drawings) can be attached to the part.
How to tune it yourself?
Independent modification of the radiator grille is carried out in several stages.
Removing the factory radiator element
To carry out work, the part must be removed. Usually the grille is fixed with bolts and self-tapping screws. But modern models are equipped with plastic latches. Dismantling is carried out carefully so as not to damage the fasteners and grooves intended for them. You can remove the grill in about 20 minutes.
Making LED lighting
LED lighting is placed around the perimeter of the removed part. To install it, you should think about the connection in advance. It cannot be attached to parts that heat up during movement. It is best to install diodes on the grille ribs. You can securely fix the tape using silicone or quick-drying glue.
Why do you need a protective mesh for the radiator grille?
First, let's figure out what functions the radiator itself performs. The radiator is one of the main elements of the car's cooling system, which is located in the nose near the bumper.
During operation, a spark is formed inside the internal combustion engine, which ignites the fuel. It, in turn, releases thermal energy, which is subsequently converted and becomes the driving force for the car. It's no surprise that the engine gets hot all the time. However, overheating of this part can cause partial or complete breakdown of the car. Therefore, cooling is a necessary process for the proper operation of the car.
This is precisely why automakers invented the radiator. It is a system of metal plates and tubes through which coolant circulates. A grille is installed on the outside, which covers the technological openings for oncoming air.
A car radiator is one of the main elements of the cooling system.
Unfortunately, the radiator grille has rather large cells, so it often gets dirty due to particles of dust, sand, gravel and even insects flying into it. Not all motorists pay enough attention to cleaning this element of the car. Professional car washes are guilty of the same thing. Large amounts of debris prevent the cooling system from functioning properly, which can lead to overheating and engine failure.
This is what an unprotected car radiator looks like after use.
There are radiator grilles with small mesh on sale, but their cost is higher than that of conventional grilles.
A protective mesh that is installed on the inside or outside of the grill will help to avoid this. Its small cells prevent even the smallest insects from entering the radiator. In addition, it is quite easy to remove and clean. At the same time, it does not have a negative effect on the oncoming air flow and does not interfere with the operation of the system.
The protective mesh will protect the car radiator from contamination
Mesh on the outside of the grille
Most often, the mesh is installed on the outside of the radiator grille. This method has many advantages:
- you don’t have to dismantle the bumper and grille to install the mesh;
- such a mesh is easier to remove and clean;
- the grill itself will also remain clean;
- You can diversify the appearance of the car.
A protective mesh can be installed in front of the radiator grille
. However, not everyone likes such changes in the appearance of the vehicle. If for this and any other reasons you do not want to mount the mesh from the outside, there is another method for you.
From the inside
In cars of a high price category, even the radiator grille is a design element. Just remember BMW cars: their grilles cannot be confused with any others, they fit so organically into the overall image. It's not surprising that many motorists don't want to hide them. In this case, the method of installing the mesh from the inside comes to the rescue.
The protective mesh can be installed behind the radiator grille
The mesh hidden under the radiator grille will not be conspicuous. At the same time, it will protect against all contamination no less effectively. However, installing an internal mesh also has its drawbacks. For example, the need to dismantle the grill itself. And some cars are designed in such a way that the grille can only be removed together with the bumper. This will take you extra time and effort, but the overall design of the car will remain more harmonious.
In any case, the choice between appearance and effort is up to you, because the functionality of the part will not decrease.
What are standard meshes made of?
The radiator protection mesh can be made of various materials. Aluminum is the most widely used. It is light and quite durable. However, over time, stains appear on the metal due to the influence of chemicals. Also, a car radiator mesh can be made of plastic. It is lightweight and less susceptible to environmental influences. Its main drawback is low strength.
Stainless steel meshes are of high quality. Carbon fiber can also be used, but this material is much more expensive and is used mainly on sports cars.
- Google+
- LJ
- Blogger