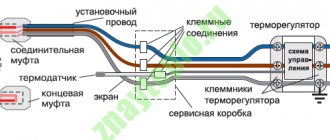
Here you will learn:
- What is baseboard heating?
- Varieties
- Advantages and disadvantages
- DIY installation work
The popularity of baseboard heating is gradually growing. It is characterized by extreme compactness and is not striking when compared with classic heating systems. Let's see how to make a warm baseboard with your own hands and what you need for it. Some sources state that the system will only achieve maximum efficiency if it is assembled by a specialist. But in reality this is far from the case. The main thing is to have a set of tools and straight hands.
Installation Features
When deciding to install a heating device, you don’t have to resort to the services of specialists.
Installing a warm water baseboard with your own hands will not be difficult. Before starting work directly, it is necessary to study the diagram, as well as carry out the necessary calculations and measurements. You should prepare all the necessary tools: adjustable wrenches, pliers, wire cutters, sharp scissors, a hammer and a drill. To install the plinth, you will need thermal boards, as well as additional components. The latter include:
- connecting adapters for various sections and plastic pipes;
- pipes for connection;
- rotary corner pipes;
- protective pipes are red and blue.
Don't forget about the pipe rotation angles
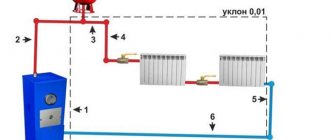
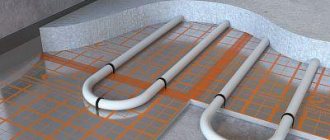
Installation of the water baseboard should be carried out strictly following the instructions. Its installation diagram looks like this:
- Pipes are laid, with the distribution manifold serving as the starting point.
- The distance between the collector connection point and the baseboard itself is measured.
- The pipes are adjusted in size according to the measurements obtained and laid into the wall so that the blue icon is on top and the red icon is on the bottom.
- The place where the plinth is mounted is covered with self-adhesive tape.
- Installation of the aluminum profile starts from the corner.
- The profile is attached to the wall using self-tapping screws or silicone.
- It is necessary to move 15 cm away from the corner, drill holes for the dowels and install the clips at a distance of 40 cm from one another.
- To install convectors, plastic pipes must be adjusted so that they are attached to the baseboard section as accurately and firmly as possible.
- To install the coupling correctly, you need to put a nut and bushing on each pipe and provide them with a rubber gasket.
- A sleeve must be inserted into the plastic pipe for support.
- An adjustable wrench is used to twist the pipes.
- The thermal board is applied to the wall, the number of brass ribs is adjusted (extra ones can be removed using wire cutters).
- The next section is connected using an adapter. During installation, you should make a 1 cm indent under the decorative elements.
- At corners, special corner pipes should be used that follow the shape of the corner. They are installed similarly to pipe connections using bushings, nuts and gaskets.
- The final section is corrugated stainless steel, fastened in a similar way to other couplings.
- The plinth cover is attached as follows: its inner surface is covered with electrical tape, applied to the profile and snapped into place with clips.
- At this stage, decorative plastic plugs and corner joints are installed.
- The last step is to connect to the collector and start the water.
Installation of electric warm baseboard:
Self-installation
The owner can install the purchased equipment himself; for this it is not necessary to have the skills to perform the work professionally, just a modest set of tools, attentiveness and accuracy are enough.
Installing a warm baseboard with your own hands is very simple. The design does not have a coolant, is easy to install and does not require work with pipes.
Set of tools
To install the structure yourself, the craftsman will need the following tools:
- Hammer for attaching skirting boards to load-bearing walls;
- Screwdriver;
- Drill;
- Tape measure, ruler and pencil;
- Connecting wires;
- Level;
- Hacksaw for metal;
- Pliers;
- Box for internal socket.
Preparation for installation
First of all, it is necessary to select the cross-section of the wire connecting the electrical network of the house with the warm baseboard. The operating power of the heating device is indicated on its packaging; depending on this value, the required wire is selected. The minimum cross-section of the wiring in the house and the wire going from it to the equipment is 1.5 mm². If the wiring is smaller, the electrical network at home may not be able to withstand the load. To prevent short circuits, it is necessary to install the plinth only in houses with a high-quality new electrical network.
If you need to connect a whole block of high-power heating devices, then the diameter of the wires must exceed 2.5 cm².
It is necessary to make sure that the machines installed in the house are able to cope with the load from electric heating. The documents for the plinth indicate the number of amperes for which the device is designed. This value must match the one specified on the machine.
At the connection point, you need to install a box under the internal socket and find the power cable to which the baseboard is connected.
Installation sequence
After completing the preparatory work, installation of the warm baseboard begins:
- First of all, the guides are attached to the wall. They are made of plastic, fastened with self-tapping screws or anchors, depending on the wall material. For level mounting at a small elevation above the floor, use a level;
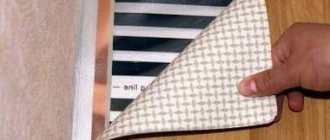
- After this, a material that reflects heat is attached to the wall. It comes complete with the baseboard, so it fits its dimensions and does not require cutting;
- The master measures the length of the mounting bracket and at this distance fastens the upper guides in the same way as the already fixed lower ones;
- The mounting brackets are attached between the guide angles. The distance between them is indicated by the manufacturer on the instructions for the plinth. They bear the main load;
- You can begin installing heating elements only after preparing the entire perimeter of the room. The main element of the plinth is hung on brackets;
- First you need to measure the length of the heating element and cut off the excess with a hacksaw. After this, the edges are processed with sandpaper;
- For ease of fastening, 2 or 3 outer plates are removed using pliers;
- Brass threads are mounted on the pipe;
- The closing loop is screwed onto the threads;
- All bolted connections are additionally pulled;
- The electric baseboard connects to the home network like a regular outlet;
- After connecting, you need to check the operation of the equipment by performing a test run;
- The facing panel is attached to clips.
It is very important to be able to regulate the temperature separately in each room. It is mounted between the first panel and the power supply
First, the thermostat is attached to the wall at a convenient height, then the wires are connected, after which a test run of the system is carried out. During verification, the baseboards are checked in all intended operating modes, and the uniform heating of the panels is checked. After checking, facing boxes are installed and the places where the equipment is connected to electricity are sealed.
It is convenient to equip each room with its own baseboard and equipment for adjusting its power. This will allow, if necessary, to turn off part of the thermal equipment or reduce its power. Such a system will save energy and reduce heat loss at home.
Device and technical features
Externally, the heating device looks unremarkable: it is a long baseboard no more than two tens of centimeters wide.
The design of the device includes:
- radiators made of brass in the form of thin plates, they warm up and give off heat to the air;
- a module containing coolant, pipes through which the liquid circulates;
- decorative closing panel with a slot for the passage of heated air;
- rear strip protecting the wall from the high temperature of the heater.
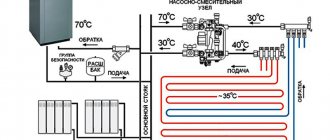
The operating principle of the heater is very simple. The water is heated in the system’s boiler, then the heat is distributed through the pipes around the entire perimeter of the room. The heat flow moves from the floor to the ceiling, uniformly heating the entire space of the room. Heat flows along the walls, warming their surface. The wall also begins to release thermal energy to the air.
The coolant in the baseboard can be heated up to 70 degrees, but maintaining such a high temperature is not recommended due to possible damage to the walls and their decorative coating. The optimal temperature of radiators is about 40 degrees. This indicator will ensure uniform heating of the air in the room to a comfortable temperature of twenty-four degrees.
Installation technology
Installing a warm electric baseboard with your own hands is much easier than a classic radiator or heated floor systems. Before installing a baseboard system, it is necessary to measure the perimeter of the room and determine the power of the devices.
Measuring the perimeter of the room
To work, you will need a screwdriver, a construction knife, a tape measure, pliers and metal scissors or a jigsaw. Installation is carried out after finishing and comes down to the following five steps:
- installation of a lower guide profile around the entire perimeter;
We install the lower guide profile around the perimeter of the room
- securing the insulating foil material;
We attach a strip of heat-reflecting material to the wall
- installation of the upper profile with fastenings;
Attaching brackets to the upper profile
Recommended distance between brackets 50 cm
Installation of the top profile to the wall
We fasten the brackets with self-tapping screws
We use special gaskets
Ready-made fastening system
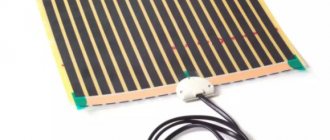
- installation of a heating device - IR film, cables, heating elements and connecting them to the network;
Installation of heating elements
- installation of external decorative panel.
Installation of decorative panel
What is the design of a warm baseboard
As you can guess from the name, this design is very similar to a regular baseboard. The external collapsible box is made of durable materials; its width is about 3 cm and its height is 14 cm. Inside it, a coolant (water or an electric heater) is placed on specially designed holders.
A warm baseboard is laid around the entire perimeter of the room or along one massive wall. It heats the walls, which in turn reflect heat into the room. This thermal radiation provides comfortable and uniform heating, and also has high efficiency. But it should be remembered that the wall must have good thermal conductivity: so, next to wooden walls, a warm baseboard will be ineffective.
Warm skirting boards will perform best along damp and cold walls, in rooms with panoramic glazing (for example, in a greenhouse, insulated balcony), in apartments with high ceilings. You can place them at the head of the bed or next to your workspace by the window. They are installed in a swimming pool, in a store, in an office.
General information
The compact design does not reduce its effectiveness. The time required for design and installation is the same as for installing standard radiators. Masking the heating parts with an aluminum profile, such a plinth does not spoil the interior of the apartment. It has low sides and evenly distributes the heat that flows along the floor and walls of the room.
There are two types of baseboards, which differ in the type of coolant (water, electricity) and, accordingly, structural elements and connections.
Standard indicators
The standard installation, which is manufactured in a factory, has a power of 240 watts. This is the optimal indicator for a room whose perimeter is approximately twenty meters (taking into account the average ceiling height).
Frequently asked questions concern the possibility of making such a radiator yourself. In principle, it makes sense to do this yourself, but you need to be prepared for the fact that the process will take a lot of time, effort and finances. In some cases, such an experiment turns out to be more expensive than buying a ready-made warm baseboard.
Step-by-step instructions for self-installation
Warm plinth can be mounted on any surfaces, for example, wood, masonry, concrete, plasterboard and others.
Self-installation is carried out in the following sequence:
- All output points are provided in advance in the places where the system will be connected. The calculation should be made depending on the power so that it does not exceed the permissible load of the thermostat.
- Supplying power to the installation box. It is installed at a distance of about 5 cm from the floor surface. It is advisable to perform this stage of work under the supervision of a specialist.
- Apply insulating tape, the thickness of which is 3 mm, to a clean surface of the wall (in the area where the plinth is installed). The flammability class of the tape is difficult to ignite.
- Installation of the bottom rail, which is an aluminum profile. The wall is marked at a level at a distance of about 1 cm in height from the floor surface. The panel is applied to the wall and holes for drilling are marked. Dowels are inserted into the holes and the plinth module is secured. All subsequent modules are installed according to this scheme.
- The upper aluminum profile is placed on the clip holders, which are attached in increments of 40 cm.
- An electric heating element is inserted into the lower copper pipe of the heating module (the maximum surface temperature is 120 degrees Celsius, length: 140 W - 70 cm, 200 W - 1 m, 300 W - 1.5 m, 500 W - 2.5 m) , after which the module is inserted into the clips. The heating module must not touch the wall or insulation; the gap between the wall must be at least 4 mm.
- Additionally, the heating elements are insulated with a heat-shrinkable tube, closed with a protective plastic box, and end and corner elements are installed.
- Connecting sections to each other. Docking is carried out using a power heat-resistant (heat resistance of at least 180 degrees) silicone-coated cable. If there is a need, the connecting cable can be hidden; to do this, channels are cut out in the wall in which the cable is placed.
- The lid is used to cover the baseboard.
- After installing all structural elements, the insulation resistance is measured.
- Installation and connection of the thermostat. The thermostat should be installed at a height of about one and a half meters, opposite the heat exchangers next to sockets and switches. To install it, you should place its back part against the wall at the installation site and mark holes for drilling for dowels with a diameter of 6 mm. Close the thermostat cover and check the relay operation.
- Connecting the system to the network. The heat exchangers are connected to the electrical network in parallel. The connection itself is made through a junction box or thermostat.
Baseboard heating is comfortable, beautiful, economical
A radiator heating system and heated floors are not the only way to heat a room. Recently, warm baseboards have become increasingly popular. This type of heating appeared on our market only a few years ago and there is not much experience in its operation yet. However, it is quickly gaining popularity - it is the most discreet and very comfortable type of heating.
Warm baseboard - small heaters located along the floor around the perimeter of the room. They are named so because of their location and size: the thickness of such a heater is 2.5-3 cm, which is comparable to the size of a standard floor plinth. The height is greater: 12-15 cm, but everything looks organic
What is important: such a system does not limit the installation location of furniture and decorative items, since heat is transferred not by convection, but by radiation
This is what baseboard heating looks like. No more other heating devices
Heating baseboard: its positive qualities
During the cold season, you really want your home to be warm and cozy. Central heating cannot always cope with this situation, so we often resort to other effective means by installing additional heating equipment in the house.
Heating baseboard is one of the types of heating that will warm the room and allow you to enjoy the warmth and comfort of your home. This heating method can be used either independently or together with other heating devices.
The warm baseboard is compact and does not take up much space in the house compared to other devices. This plinth is easy to install, since its design is very convenient, you can do it yourself.
A warm warm baseboard has many advantages
The main advantages of warm baseboards:
- Compact;
- Effective;
- It is easy to install and repair;
- Heats the room well from all sides;
- Does not dry out the air in the house;
- Its appearance is aesthetic;
- Has any colors.
The heating baseboard heats not only the floor, but also the walls, which prevents the formation of mold and mildew. It can be of different colors, so it fits into any interior. Its design is compatible with any floor covering, be it carpet, linoleum or wooden parquet.
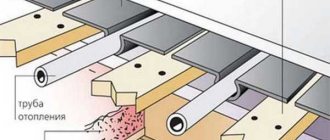
Baseboard heating
Despite the fact that in our country what a warm baseboard is became known not so long ago, in Europe premises have been heated using this method for several decades. This technology is very simple, but at the same time quite convenient. The basis is metal (most often copper) pipes, which are also the heating element. The pipes are installed in the same place where the baseboard usually runs, that is, along the perimeter of the room. Then they are covered with a metal box made of plates with a corrugated surface. Due to this design, the box acts as a heat exchanger, thereby increasing the efficiency of the structure.
In general, a water baseboard consists of the following elements:
- front panel with holes that ensure air flow (standard size: width - 3-4 cm, height - 15-20 cm);
- rear panel - facilitates installation of the structure and protects the wall from constant exposure to high temperatures;
- heating radiator that performs the heating function (standard dimensions - 1 m x 0.4 m x 1.6 m);
- rotating side plugs;
- a heat exchange module consisting of two tubes through which water circulates.
Due to the fact that the baseboard is installed around the perimeter of the entire room, the heat gradually rises, and then the entire room is evenly heated. As a result, this technology does not cause temperature changes. Since the heating element is hidden under the front panel, it is not noticeable, which distinguishes it from massive radiators. As you can see in the photo, the warm baseboard looks very neat; it can be additionally decorated so that it better matches the overall style of the room. The system is effective, but at the same time quite simple to install. Having minimal skills, you can carry out installation without involving professionals.
Heat plinth: design features
It became possible to buy a warm baseboard not so long ago. In fact, this system was designed with the aim of increasing heating efficiency while using less energy. Moreover, such panels look very original, and warm baseboard technology often allows you to completely abandon the use of traditional heating methods using radiators.
Externally, the heating panel looks like an ordinary floor plinth
Externally, the heat plinth is a strip made of aluminum that covers the internal contents of the box. If it were not for its very modest dimensions, one could call it a full-fledged heating device, however, the fact that the box has a low height, does not protrude much from the wall and is mounted along the perimeter of the room on the wall near the floor gives it the right to be called a plinth.
Inside the box there is a heating system, which may differ depending on the type of baseboard chosen. You can understand what the difference is by considering the existing types of warm baseboards.
The principle of operation of baseboard heat as a heating device
Obviously, this heating device got its name due to its location. The warm baseboard is attached in the same place as a regular one - around the perimeter of the room. The main advantage of such a heating system is that the device heats not only the air around it, but also the walls with which it comes into contact. This system allows for better heat retention and reduced heat loss.
The fact that air convection is reduced and the heat is evenly distributed throughout the room, without concentrating in one place, as is often the case with traditional radiators, also has a positive effect. A significant advantage is that due to the slow movement of air from the baseboard to the ceiling, dust practically does not rise from the floor. And this not only makes cleaning much easier, but also has a positive effect on the health of residents.
An electric warm baseboard was used to heat the room.
The temperature limits within which the device operates are 40-70 degrees and using a thermostat you can set the indicator within these limits. According to reviews from the owners, a warm baseboard never allows the air temperature to drop below 20 degrees, and this can be considered a completely comfortable temperature for living. Of course, this applies to cases where the calculations of the required number of elements and their power were carried out correctly.
If we are talking about installing an electric baseboard, then it is also worth noting the fact that, like one section of any traditional radiator, one segment of a warm baseboard emits 190 W of heat. At the same time, the energy consumption for its production is 3 times less, and this is a considerable saving for the entire heating season.
As a heating device, a warm baseboard can be installed in almost any room. Neither the size nor any location of the room can serve as a contraindication to its installation. It is generally accepted that this design option is ideal for rooms with panoramic glazing, where ordinary radiators under the windows simply will not fit.
Warm baseboard is an ideal solution for installation in a room with panoramic windows
How to make a warm baseboard with your own hands
Even if made in Russia, this pleasure is not cheap. But what if you want to try such a system, but don’t have a lot of “extra” money? Do it yourself. There are two working options.
Option one
Unannealed copper pipes with a diameter of 12 mm and roofing copper sheets 0.4 mm thick were used. The order of work is as follows:
- Cut a strip of roofing copper (60 cm) with a grinder into strips of 15 cm.
- The edges of the full length strips should be beaded at an angle of 90 o and the flange length is 7-8 mm. The length of the strips is no more than 3 meters - it is inconvenient to work with large pieces.
- Solder copper tubes to the back side of this plinth. To do this you need solder (plumbing solder containing 3% copper) and a torch. When soldering, point the torch at the tube: the strip is thin and will warp if overheated. The tube can withstand heat normally.
- Bend the ends of the tube slightly before soldering. This will make it more convenient to put adapters on them.
- For assembly, oil and petrol resistant hoses were used that can withstand working with coolant up to 120 o C (internal diameter 12 mm). At the connection points with the pipe they were secured with ordinary clamps.
- To regulate the temperature, a manually adjustable thermostat is installed.
- The joints are covered with similar inserts/plinths made of copper, but without pipes.
- The panels are attached directly to the wall using standard mounting clips (by the pipes). Do not insert them into the recesses - most of the heat is lost.
This system has worked in a wooden house for 9 years. There were no problems or need for repairs. The coolant temperature at the inlet is from 50 o C to 70 o C. In the room, 20-21 o C when increased is too hot.
Watch the video about the features of installing warm baseboards. May be useful.
Second option
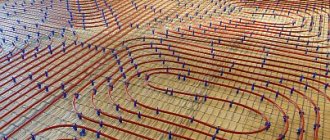
In this case, aluminum profiles for working with drywall were used to make a warm baseboard with your own hands. Holes are cut (sawed) in them with a grinder at the top and bottom, after which they are attached to the walls. Two copper pipes are laid on a thin aluminum ceiling profile, screwed with aluminum wire. This entire structure is laid inside and fixed to the wall so that the pipes are one above the other. The pieces of such a homemade plinth were assembled by welding with copper pipes and fittings. “Front panel” is the same profile, only painted with radiator paint to match the walls (floor). This homemade warm baseboard is less effective and more difficult to clean, but it is also very functional.
“I have a baseboard like this at home. In addition to heated floors. I advise you to install it too. The warm baseboard does its job well. Of course, it cannot be compared with warm floors in terms of power, but still there is noticeable warmth from it.”
“I bought a Megador 600 W for a 9 m2 bedroom. At first it worked at full power, but now we set it to maintain 20 degrees at 200 W. This is enough for my area, we don’t need a higher temperature, we don’t like it. And at the same time, on the wall where the heater is located, our ventilation hole is almost always slightly open. I'm happy."
As you can see, reviews about warm baseboards are positive. This is no wonder: the heating is efficient, comfortable, and even invisible. The only thing that spoils the picture is the high price, but there are options for making it yourself.
Like everything new, the plinth system has many critics and theorists. Their main thesis: “It’s stupid to heat walls and then heat the air. It’s better to heat the air directly, and then start heating the walls.” The point of view is clear. This is what is used for convector heating. But the result and its shortcomings are known to everyone. And for the efficiency of heating the walls, an experiment was carried out: in one room the air was +12 o C, and the walls were heated to +37 o C. And the people in it were sweating. In another, the air was heated to +40 o C, and the walls were cooled to +12 o C, and people were freezing.
Rating of the best warm skirting boards for 2022
Budget samples
2nd place: “Orion” 530 mm
This economical model is distinguished by high reliability and the absence of the need to install shut-off fittings. The sample works like a standard battery, but its heat loss is 6 times less. The body of the device is coated with a special protective compound, which stably protects it from possible corrosion. Can be used around the perimeter of swimming pools and on balconies with French glazing (panoramic windows).
| Name | Index |
| Heater type | Electric |
| Heating power, Watt | 75 |
| Control | Electronic |
| Section length, millimeters | 533 |
| Material | Aluminum |
| Price, rubles | 2700 |
Orion" 530 mm Advantages:
- The box is treated with a special compound;
- Possibility of installation at different sites;
- Budget cost.
Flaws:
Thermostat is missing.
1st place: “Cozy” 1050 mm
Powerful and reliable model. It can be installed either as the only heating element in small rooms or included in heating circuits. Provides residents with special comfort: it does not dry out the air, does not fill it with combustion products, and does not create dust circulation in the room being served.
| Name | Index |
| Heater type | Electric |
| Heating power, Watt | 320 |
| Control | Electronic |
| Section length, millimeters | 1050 |
| Material | Aluminum |
| Price, rubles | 3600 |
Cozy" 1050 mm Advantages:
- Large range of body color variations;
- Increased power;
- There is a thermostat for adjustment.
Flaws:
Afraid of high humidity.
Mid-range models
2nd place: “Orion 1 Cedar”
This model has an extremely pleasant appearance and can be used as a design element when decorating a country house. Sufficient power of this circuit will allow you not to freeze in the coldest times of the year. This sample is characterized by the production of rather long structural elements, which makes it possible to equip them with large perimeter rooms.
| Name | Index |
| Heater type | Electric |
| Heating power, Watt | 150 |
| Control | Electronic |
| Section length, millimeters | 1000 |
| Material | Aluminum |
| Price, rubles | 3800 |
Orion 1 Cedar Advantages:
- Aesthetic appearance;
- Increased power;
- Simplified installation.
Flaws:
Again there is no thermostat.
1st place: “Mr. Tektum 2.0"
Another model designed for design projects. The heating device is made of hot-pressed aluminum alloy, inside of which brass and copper pipes are installed. Due to the fact that the model is liquid, installation is best done after preliminary heat calculations. Most experts recommend using this plinth for cottages and country houses.
| Name | Index |
| Heater type | Liquid |
| Heating power, Watt | 600 |
| Control | Manual |
| Section length, millimeters | 2000 |
| Material | Aluminum alloy |
| Price, rubles | 8600 |
Mr. Tektum 2.0 Advantages:
- High power for liquid instrument;
- Use of special alloys in construction;
- Recommended for design projects.
Flaws:
- High price;
- Difficult to install.
Premium class
2nd place: “Thermodul 13.17”
A rare representative on the Russian market of a line from a Western manufacturer. It is distinguished by the variability of the materials used and its high price. Import and trade into the Russian Federation is possible only with a certificate of conformity. Relatively difficult to install and requires original components for repair. It is better to entrust the installation of such equipment to professionals.
| Name | Index |
| Heater type | Liquid |
| Heating power, Watt | 500 |
| Control | Thermostat |
| Section length, millimeters | 1000 |
| Material | Aluminum alloy |
| Price, rubles | 16500 |
Thermodul 13.17 Advantages:
- The model is controlled by a thermostat;
- The design uses an innovative alloy;
- The warranty period has been extended.
Flaws:
Very high price per linear meter (in the absence of other advantages).
1st place: “Thermodul Combi”
Another expensive model from the Italian brand. It justifies its extremely high price (30,000 rubles/l.m.) 100%, due to the fact that it has a combined operating mode: it can work on both electric coolant and liquid coolant. However, it requires professional installation and adjustment of the entire circuit. The control is fully automated.
| Name | Index |
| Heater type | Liquid/Electric |
| Heating power, Watt | 650 |
| Control | Thermostat, fully automatic |
| Section length, millimeters | 1000 |
| Material | Aluminum alloy, corrugated |
| Price, rubles | 30000 |
Thermodul Combi Advantages:
- Combination of operating modes;
- Fully automatic control;
- The latest materials in construction.
Flaws:
Not identified (for its characteristics).
Advantages of using warm baseboards
The use of such a modern heating system provides many advantages for consumers, namely:
- the ability to save free space due to its compact size, which is very important for small rooms;
- creating comfortable conditions for all living things in a heated room. The warmth of the baseboards provides an optimal microclimate for humans, animals and plants. Especially warm plinth is suitable for corner apartments, where, if used, the walls will be completely warmed up and thus you can forget about the fungus;
- no condensation on the windows and uniform heating of the entire room;
- due to the absence of convection currents, as with traditional heating, the level of dust in the room decreases;
- high efficiency at work;
- absolute safety and ease of operation;
- ease of installation and the ability to fit into any interior due to the variety of designs and color schemes;
- energy savings, which is approximately 40%;
- affordable price.
Pros and cons of the system
Almost invisible
- A warm baseboard system resembles a warm floor, but its installation requires much less cost and effort. In addition, heated floors, especially water-based ones, cannot be installed in every room due to the need to create a concrete screed. The plinth has no such restrictions; for its installation you only need a flat wall. The modular system is mobile; if necessary, it can be dismantled and moved to another location.
- With the help of a warm baseboard, a favorable microclimate is created in the room; slow rising air currents do not raise dust. The temperature in the room will not be high near the ceiling and low near the floor.
- Warming up the walls will forever get rid of dampness and mold in the room; when installed in rooms with large glazing, condensation on the windows disappears.
- The small cross-section of the tubes requires a small volume of water, and this reduces the cost of heating it. The coolant circulates in an accelerated mode, which reduces heat loss in the system by up to 5%. A small amount of water eliminates inertia when it is necessary to change the temperature; all adjustments are made in a short time. Electric baseboards provide savings not due to the coolant, but due to lower energy consumption.
- The low temperature of the heating device results in savings on energy costs. Separate controls in each room allow you to choose the optimal temperature.
- Installation of skirting boards is not difficult, since they consist of ready-made modules that are connected to the power supply or heating system.
- The low temperature of the heating device is safe for furniture, curtains and other objects located nearby.
- The installed baseboard system is almost invisible - it will harmoniously fit into any stylistic design of the room; the color of the aluminum protective panels can be easily matched to the surrounding interior.
Uniform heating
Disadvantages include the high initial cost of a warm baseboard and energy costs when installing an electric baseboard. The peculiarity of its use is the need for constant operation. The low power of a warm baseboard is not designed to quickly warm up the room; it takes time to heat the walls, which will then give off heat.
Water warm baseboard
Particular comfort in residential premises can be created by assembled warm water baseboard with your own hands. If we look at the water plinth from a constructive point of view, we will see compact modules “stretched” in length.
Private households or public institutions are most suitable for installing baseboard water heating systems. The necessary conditions for installing warm baseboards are the presence of a gas boiler and a central water supply.
In some cases, boilers operating on solid and liquid fuels are used. You will also need a reserve tank (water tower) to replenish the water level in the heating system.
Skirting convectors with water coolant are installed around the perimeter of the room. The modular liquid electric heater can be of various lengths. In the corners of the room, the modules are connected with special corner elements, thereby filling the completely heated perimeter of the room. Thanks to this placement of baseboards, the room is heated more evenly than when heating with conventional water radiators.
Otherwise, you may be fined and forced to dismantle the heaters.
Water converter design
The design of the plinth is quite simple. The upper pipe, as a rule, exits the gas boiler system, passes through the entire perimeter of the heated area and passes into the lower return pipe. The lower pipe returns the cooled coolant to the gas boiler.
The pipelines are mounted in the housings of finned heat transferrs. Due to the ribbed structure, the heat transfer surface increases many times over, which significantly contributes to the active circulation of heated air masses.
To install a warm water heating baseboard yourself, you must have sufficient experience in installing plumbing equipment. When we talk below about the features of installing a warm water baseboard, we are addressing precisely such people. This will help when choosing a particular home heating system.
The principle of operation of water skirting boards
Cold air enters through the lower groove of the baseboard body.
Passing through the heat exchanger, the hot air slowly rises, spreading evenly throughout the entire volume of the room.
Installation of baseboard water heating system
In construction supermarkets you can always purchase the ready-made water heating system for baseboards you need. Having even a little experience in plumbing work, you can easily make a warm baseboard with your own hands. heating with warm baseboards, watch this video:
After appropriately marking the mounting points for the brackets and installing them, the liquid modules themselves are installed (see installation of electric baseboards above). Unlike electric heaters, installation of liquid modules requires careful monitoring of the tightness of pipeline connections.
Testing of installed skirting boards
Air molecules are much smaller than water molecules. Practice shows that checking the tightness of connections is more effective by creating high pressure of compressed air inside the pipelines.
Bubbles will appear in areas where leakage occurs. Leaks in connections are eliminated and the entire system is retested for leaks.
Advantages and disadvantages
Now you know that warm baseboards can be water and electric. Let's now look at the pros and cons of baseboard heating, and then move on to the DIY installation process. Let's start with the positive features:
Baseboard heating is an excellent choice for rooms with panoramic glazing.
- Compactness is the most important advantage of a warm baseboard. The miniature dimensions of water and electric baseboard convectors make it possible to make the heating system almost invisible;
- Uniform heating - unlike traditional convector heating, warm baseboards heat rooms more evenly. The air temperature near the floor covering is approximately the same as in the middle of the room ;
- Possibility of heating premises for any purpose - warm baseboards are installed in children's rooms, living rooms, kitchens, office premises, as well as on covered balconies and loggias;
- The ability to heat rooms with panoramic windows - baseboard heating will prevent cold air from entering the room and will combat the formation of condensation.
In addition, warm baseboards can work in conjunction with any other heating devices, for example, wall convectors.
Key disadvantages:
When planning the installation of baseboard heating, make sure that the furniture does not interfere with the movement of air flow.
- When installing warm baseboards with your own hands, you should think about the arrangement of furniture. The thing is that by blocking the baseboard area with a high cabinet, this area will lose its effectiveness;
- Baseboard heating is incompatible with built-in furniture - it covers the installation area;
- High energy consumption is true for electric heated baseboards. Tariffs for electricity are very high, so monthly expenses will be very impressive.
But the compactness and efficiency of baseboard heating more than covers all its shortcomings. Let's now see how to install a warm baseboard with your own hands.
Operating principle and differences
Manufacturers of baseboard heating claim that the system is more economical than all other types of heating. Savings are 20-30%. This happens because lower temperatures are required to achieve a comfortable feeling. This is because most of the heat is transferred by radiation rather than by convection.
Almost all existing heating systems do not create the best thermal picture: warm air accumulates at the top, while cold air remains at the bottom. If the room does not have very high ceilings, the situation is tolerable, but in rooms with large heights this is critical. To equalize the temperature picture, forced convection is used: fans are built into heating devices that more or less effectively mix the air masses. But active air movement carries dust and germs. At the same time, stagnant zones still remain in the corners of the rooms, in which cold air accumulates.
When using baseboard heating there is no thermal cushion at the top, the air is fresh and the feeling is comfortable
Uneven temperatures and dust in the air are not all the troubles of convection heating. There is also dampness that appears on the walls. The fact is that convection heats the air. The walls remain cold. When warm air comes into contact with cold walls, condensation occurs, the walls become wet, and fungi and mold develop. Moreover, this picture is typical for houses and apartments with good insulation.
Baseboard heating works differently
The first important difference: the lower layers of air immediately heat up, which is already comfortable. Gradually and slowly rising up along the walls, the air cools, transferring heat to the walls
Therefore, it turns out that the top is not warmer (or not much warmer) than the bottom.
Only about 20-30% of the heat is spent on heating the air by convection. Everything else goes to heating the walls
And this is the second important difference. Heated air rises along the walls, rather than mixing with the rest (this effect was noticed by the scientist Coand)
Therefore, the rising warm flow cuts off the cold from the walls and heats them. Yes, while the walls heat up and dry out, a lot of energy (and fuel) is consumed. But after that the entire surface begins to radiate heat.
This is where the savings zone begins: a person feels comfortable if the wall temperature is 36-37 o C and the air temperature is 16 o C. We simply feel the heat emanating from the walls with the entire surface of the body. At the same time, the cost of maintaining the temperature of dry walls is low. After all, it is the water contained in the materials that is the best conductor of heat, and the air that replaces it, on the contrary, conducts heat poorly.
This is what one of the options looks like up close
That is why with such heating it is not so important whether there are pieces of furniture along the walls or not: it is mainly the walls that are heated, not the air. Let them take away some of the heat, but then they themselves will begin to give it back
But the walls will heat up anyway.
What systems are used today for heating rooms?
Objects for various purposes must be warm. This is necessary for normal human life. Not only in residential, but also in office, warehouse, industrial, and public premises, various types of heating systems are installed for this purpose.
Heating battery in the interior
Heating can be:
- air;
- water;
- electrical;
- stove.
Classification of the main types of heating systems
A set of equipment usually consists of several main components:
- heat generator;
- heating devices (radiators, heaters, convectors, etc.);
- communication systems (it includes electrical cables, pipelines, air ducts, etc.).
Centralized networks or your own equipment (for example, a boiler) can be used as a source of coolant.
Heating scheme with electric boiler
The most common types of space heating today are air and water.
Prices for Ballu convectors
Convectors Ballu
Air heating
In this case, the air is heated directly.
Air heating at home
Such heating can be organized in different ways:
- using natural or forced circulation of air masses;
- through suspended or floor-mounted equipment;
- direct-flow, recirculation or combined heat exchange.
Air systems can be installed both in private buildings and at large facilities.
Such equipment can be used in private homes
Air heating is a complex structure consisting of a heat source (they can operate on different types of fuel), an air duct network, fans, air distributors, filters, regulators and automation.
pros
- The heating of air masses and the creation of comfortable conditions for living occur within a short period of time.
- System efficiency and efficiency are at a high level.
- It is possible, in addition to the main task, to arrange air conditioning and ventilation of rooms.
- There is no need to use water (or other liquids) as a coolant (hydraulic systems often become a source of problems).
- When using suspended equipment layouts, it is possible to save usable space.
- You can install air heating with your own hands.
Minuses
- Calculating the parameters of system components is not so easy.
- To ensure a normal level of humidity in the room, it is necessary to additionally install devices for humidifying air masses.
- It is often not possible to modernize the system.
- The equipment may be noisy when operating.
Air heating of industrial facilities
Expert opinion
Afanasyev E.V.
Chief editor of the pol-exp.com project Engineer.
Despite some disadvantages of this method, it is considered quite competitive in comparison with the more traditional - water method. And if earlier air heating was more often used in industrial facilities, today many private property owners are inclined to install such systems in their houses and apartments.
Prices for Volcano water fan heaters
Volcano water fan heaters
Water heating
The method of heating the surrounding space by transferring heat from its source through a water system is one of the most popular. Liquid is still the most common coolant. The equipment includes a heating unit, a main network, heating devices, and devices for controlling heat transfer. Pipeline routing can be top, bottom, horizontal, vertical or combined , while communications can sneak in in a hidden way (hidden behind the cladding) or be in plain sight. Constant and variable hydraulic modes, natural and artificial fluid circulation are used. Systems can be one-, two-, three-, four-pipe, manifold or combined.
One- and two-pipe systems
Today, water-heated floors are also increasingly being installed (in autonomous structures).
pros
- Low cost of equipment.
- Possibility of temperature control.
- The use of pipelines with a smaller diameter (when compared with air or steam analogues).
- No noise during system operation.
Minuses
- Due to the inertia of the system, heating and cooling do not occur as quickly.
- The uninterrupted operation of the heat source must be monitored.
- It is better not to leave operating equipment unattended. In this regard, in winter, if there is a need to leave the house for a long period of time, the water has to be drained.
- Installing water heating is not so easy.
- After draining the water, air pockets may form. Metal elements of the system are subject to corrosion.
Recently, underfloor heating has become increasingly popular.
Water heated floor
Using this method, it is possible to create a comfortable microclimate without installing heating devices. In addition, the entire system is hidden from view. In this case, the pipeline network is filled with a concrete screed, on which the floor covering is laid. The coolant (liquid) circulates through the pipes and heats the floor, which becomes the heating device.
Expert opinion
Masalsky A.V.
Editor of the “floor screed” category on the Pol-exp.com portal. Engineering systems specialist.
However, it should be noted that radiators, convectors, and heated floors, among other things, have a common drawback: when they operate, the walls of the room remain cold . And by heating them, you can not only improve the performance characteristics of the walls. A heated wall itself becomes a source of heat.
Example of a house with water heating
The warm baseboard system that appeared not so long ago could be called “warm walls,” because it is they who ultimately become the source of heat. It must be emphasized that it is much more comfortable for a person to be in a room with warm walls and fresh air than in a room whose walls are cold and the air in it is overheated.
Today, more and more owners of apartments and houses use warm baseboards, which can be water or electric, to heat their rooms.
Warm baseboards have become increasingly popular in recent years.
Operating principle of baseboard heating
Baseboard heating is quite effective due to the fact that it is not the air that is heated, but the walls of the room. The walls here act as radiators that maintain the temperature in the room. To ensure that air flows normally to the baseboard coolant and leaves it unhindered, special two slots are provided in the boxes.
For baseboard heating, the main thing is materials that must have high thermal conductivity. Heating the coolant to very high temperatures is not so important here.
It should be noted that this system can operate as a device that lowers the room temperature. It is enough just to fill the system with special coolant. The effect of such an application will be significantly lower than with heating, but quite noticeable.
The advantages of this system should be noted:
- complete absence of convection, which means no suspended dust in the air;
- baseboard heating is absolutely safe for humans;
- heat spreads evenly throughout the room;
- boxes and walls have a temperature safe for animals and humans;
- dry walls and air;
- amazing ease of installation;
- absence of any contraindications for use;
- baseboard radiators look quite aesthetically pleasing and also save space;
- significant fuel savings;
- ease of dismantling and repair;
- possibility of installing thermostats.
- high price of components - aluminum and copper;
- You won’t be able to make proper baseboard heating with your own hands;
- the most permissible length of the heating circuit should definitely not be more than 15 meters;
- the impossibility of any decoration of the baseboard;
- impossibility of installation close to furniture walls;
- placing heating elements very close to the wall leads to rapid destruction of the wall covering.
In today's conditions, when the materials used in finishing and construction help to reduce all heat loss to a minimum, and the installation of double-glazed windows limits the access of air into the room, baseboard-type heating has become quite relevant.
Video “Plinth heating”:
Characteristics
The warm baseboard heating system is very well suited for buildings with poorly insulated walls, in log houses, for example. The heat from the baseboard will warm up vertical surfaces well, rising upward. The comfortable temperature also extends to the floor. There is no feeling of a draft on the legs.
Efficient and cost-effective use of the system allows you to pay lower energy bills. Easy to care for. It is easy to repair and replace elements, so this type of heating is durable. You can adjust the room temperature level by simply pressing a switch.
In general, a large number of components for the manufacture of a structure can be calculated on your own. It is necessary to take into account the size of the rooms, the cost of collectors, tubes made of the desired material, cable, and calculate heat loss. Take into account all elements at the design stage. If you want to study professional literature, you can do everything yourself with high quality and cheap.
Share the post “Warm plinth: Anyone can make a budget heating system with their own hands - Instructions + Video” by copying the link: https://kaksdelatsvoimirukami.ru/tyoplyj-plintus-byudzhetnuyu-sistemu-otopleniya-svoimi-rukami-smozhet-sdelat-kazhdyj- instructions-video/
Installation of warm baseboard
Preparatory work
Before you begin installing a warm baseboard, you must first select the most suitable type: water or electric, depending on the most accessible source. Based on this, further work will be carried out. So, if it is a water baseboard, then you should think about how to connect it to central heating or an individual boiler, and if it is electric, then ensure a safe connection to the outlet.
Determining the number of skirting boards
In order to correctly calculate the required number of baseboards, you need to take into account the total power of such a system, adjusting it for possible heat loss for each room. The latter depend on the level of thermal insulation of walls, glazing of windows, outside air temperature, etc.
The less heat loss, the less power a warm baseboard is needed and, accordingly, the cost of such equipment, which is important. On average, power is calculated using the following formula:
- for an electric baseboard of 10 square meters, approximately 0.5 kW is required;
- for water, for the same area you will need twice as much power.
Determining the installation location
- The warm plinth is installed in one row at a distance of 1 cm from the floor and approximately 15 mm from the wall on two stops. The resulting gap is necessary to prevent overheating.
- First, mark the wall using a tapping thread along the level along which the plinth will be installed.
- Next, mark the holes for drilling by placing the back panel against the wall.
- Having drilled the holes, we insert plastic dowels into them and install the plinth module strictly according to the level. And so on until the end, until all the baseboards are installed.
- After this, we install special power supply jumpers and make grounding.
- Each of the modules is connected in series. At the same time, there should not be more than 17 pieces.
- We turn on the installed plinth to check its functionality and only then can we close the modules with lids and install all the plugs.
Installation and connection of the thermostat
- The thermostat is installed on an open wall at a distance of approximately 1.5 meters from the heating elements.
- To do this, we attach its back panel to the wall in order to mark the holes for drilling.
- We insert 6 mm dowels into the finished holes, and then mount the thermostat to the wall.
Cabling
- The heating elements are connected to the network, as previously mentioned, in parallel.
- The connecting cable can be hidden in the wall by drilling a hole for it or hidden outside in a special box.
- The cable is laid to a junction box or thermostat.
After all work is completed, the operation of the entire system is tested.
Choosing a baseboard infrared heater
In order not to make a mistake when choosing an electric baseboard convector, you first need to get acquainted with the existing varieties. The most in demand both in Moscow and in other cities are infrared devices. Such designs have an operating power of no more than 150 W. They can be used as the main heating method, since they are able to generate 5 times more heat than similar devices.
The design of such a system includes anodized aluminum lamellas, which ensure strong heating of the walls and nearby surfaces. By installing such skirting boards, an effective curtain is created that perfectly protects the room from cold air.
Cable heater device
Skirting boards of this type can be used to heat any premises, except those where high humidity prevails. The advantage of these heating systems is a more simplified assembly scheme. The heating elements are mounted in a box; there is no need to install a manifold or lay supply lines.
Operating principle of a plinth convector
During operation of heating baseboards, maintaining a comfortable temperature in the room is ensured not only by influencing the air in the lower part of the room, but also by transferring heat to the wall surfaces. In order to heat the air by convection, you have to spend about 30% of the total energy, and the rest of it goes to warming the walls.
After the air warms up to the required temperature, it begins to rise up along the walls, where it mixes with warmer air currents. As a result, an air cushion appears. After the walls warm up to a temperature of 37 degrees, they begin to release the resulting heat into the room.
When choosing the best option for a warm baseboard, you need to pay attention to its price. The cost of such a system may vary
Much depends on the features of the device and the characteristics of a particular model. The design of the baseboards has a heating element, which is covered with a light metal strip. This element includes copper tubes to which the radiator plates are connected.
Installation Features
effectively
Installation of warm Megador plinth is carried out in two stages. It all starts with preparing the terminals for connecting the structure, then the supply lines are laid and the cable is connected.
The second stage begins only after finishing the room. When using a water-type heating baseboard, all its elements are first installed, modules are connected to the output elements, after which the circuits are adjusted and the system is pressure tested. In the case of an electric warm baseboard, you first need to install all the elements of the housing, connect them to the circuit terminals, and then take insulation measurements. At the final stage, the thermostat is adjusted.
Particular attention should be paid to calculating the number of sections where it is important to avoid mistakes. Here you need to pay attention to the power of the system and possible heat loss
The final results will differ in each case. It all depends on the quality of thermal insulation of walls, window structures and air temperature. I would like to draw your attention to the fact that when using electric type skirting boards on an area of 10 m2, 0.5 kW will be required. If the water option was chosen, then this figure is doubled.
What is a warm baseboard
Warm baseboard is the latest heating system, which consists of an external collapsible box in which the coolant (pipes for water circulation or electrical conductors) is built-in. Heat transfer occurs due to the supply of electric current to it or to a closed circuit - hot water. Warm baseboards are usually installed around the entire perimeter of the room or along the coldest wall. At first glance, it is no different from a regular baseboard; it has approximately the same thickness from 2.5 to 3.5 centimeters. The only thing is that the height of the warm baseboard is slightly higher than usual and is approximately 14 cm.
There are two types of warm baseboard system:
- that runs on liquid (water or antifreeze) and must be connected to a central heating system or an individual boiler;
- that works from a socket or electric.
Economy and the laws of physics
However, not everything here is as rosy as it seems at first glance. If your entire wall is heated, then heat loss from it increases.
This means that it must initially be made heat-intensive and strive for maximum heat resistance.
Here, for example, is the formula for calculating heat loss known from a physics course:
Where:
- S - wall area
- T = (Tinside - Toutside) - the difference in wall temperatures inside the house and outside
- R – surface heat transfer resistance
From this formula it becomes clear what heat loss primarily depends on. R - both with batteries and with the baseboard you do not change. The wall is the same.
But the parameters in the numerator will be different. The greater the temperature difference (T), the greater the heat loss. Let’s say that when heated by batteries near a window, the wall will conditionally have t=20C.
The temperature along the wall from the radiator to the farthest point (in the corners) is distributed along a gradient. The sections of walls to the right and left of the windows do not warm up at all.
If the entire wall inside the house is heated with a warm baseboard, from the same boiler with the same coolant temperature, then the wall will warm up more. Conventionally, up to +25C, which means, according to the formula, the difference in the numerator will increase, and heat transfer through the walls will increase.
It turns out that the more heat you lose, the more you will have to replace it. It doesn’t matter how this heat is pumped into the room - radiators or thermal baseboards.
As a result, there will be no significant savings and super energy efficiency here.
The same applies to the area - S. The surface heated by the baseboard is much larger than the surface located directly behind the radiator.
The situation can be improved a little if the heating baseboard is placed not only on the external walls of the house (as with radiators), but also on its internal partitions.
Most of the heat generated in this case will remain in the house, rather than trying to immediately escape outside. A little heating of the external walls is useful not only as a source of heating, but also for the building itself. Dampness as such completely disappears.
Considering all of the above, many therefore perceive such innovations with skepticism. There are long-proven and understandable methods - the same radiators under the windows, or heated floors in a screed.
All other tricks are too expensive either at the construction stage or during operation and repair.
For a room of 16 m2 you will need from 10 to 12 meters of plinth. Its price today averages 4000-5000 rubles per meter and more. And this is in addition to the cost of components. Add here the work itself (in Moscow they charge about 1,400 rubles per linear meter), all the rooms in the house and calculate your expenses.
Not everyone can afford such heating.
Is it possible to fully survive the winter with such thermoplinths? Yes, definitely. If there is sufficient linear footage and appropriate coolant temperature.
And numerous reviews on the forums confirm this. To warm up the house on the coldest winter days, the temperature of the coolant extraction in the warm baseboards collector will need to be kept around 75C. On normal days, 50-70C is enough.
Detailed review of thermal skirting boards from forumhouse
The higher the temperature, the more radiant energy you will receive. When it decreases to a level of 45C and below, the warm baseboard turns into a kind of mini-convector, which heats mainly with air flows.
Therefore, do not expect any unrealistic savings from thermal skirting boards. She won't be there. Warm floors are much more profitable in this regard.
However, the system has become widely used and some consumers actively use it both as the main and additional source of heating for their apartment or individual rooms in the house.
Disadvantages of the system
Baseboard water heating also has disadvantages that you should be aware of before deciding to install it:
| Cost of materials | It must be admitted that while the cost of components for a baseboard heating system exceeds traditional batteries. This is a temporary drawback. With the growing popularity of such heating, the market supply will also increase. In the competition, manufacturers will reduce prices, but so far the supply on the market is modest, which cannot be said about prices. |
| Damage to walls where baseboards meet | This flaw in the system can be argued against. Provided the installation is of good quality, this problem should not arise. Difficulties arise only in an emergency situation when the circuit leaks. |
| Reduced work efficiency due to furniture | This problem can be avoided by creating a structure that wraps around large, permanently placed objects. Such maneuvers will lead to additional costs, but will pay off in the absence of energy losses. |
Manufacturers of water heaters
Of course, one of the main conditions for the successful functioning of a heating system based on a water baseboard is the purchase of a high-quality device. And to do this, you need to understand the equipment manufacturers and their offers. Let us highlight here three companies that have managed to establish themselves favorably in the market.
"Mr.Tektum" is a Russian manufacturer that produces water skirting boards with an optimal quality-to-price ratio: these devices are highly functional, but quite affordable. They are easy to recognize even externally thanks to the stylish geometry of the aluminum front panel.
"Rehau" is a German company that produces warm water skirting boards in the best traditions of national quality: durable and reliable. A distinctive feature of the products is durability: the equipment can last for decades without interruption.
Connecting a warm baseboard
“Best Board” is an Austrian brand that offers high-end energy-saving skirting boards. A characteristic feature is improved thermal properties, which are ensured through the use of our own innovative technologies in production.
As you can see, a warm water baseboard is a rather unusual, but steadily gaining popularity heating device. It is effective, durable, but most importantly, easy to install. So, if you have been looking for an alternative to traditional radiators for a long time, rest assured: a high-quality water baseboard, installed in accordance with all the rules, will perfectly cope with this role.
Installation of a warm baseboard system
When a warm water baseboard is installed, PVC pipes from the distribution manifold are first laid, and then the connection points are prepared. You should especially carefully monitor the correctness of the beam layout, since after pouring the screed it will be difficult to change anything. All connections are made during the construction process.
The system is installed only after the finishing of the room is completed. The first module is connected using a coupling, and then all elements are mounted in series. In the corners and at the very end, the connection is made using rotating polyethylene tubes. Each heating circuit is limited to a length of 12.5 m. Heating is carried out near the outer walls of the house. Internal walls are also used. Skirting boards are not installed in areas where plumbing fixtures, household appliances and bulky furniture are located. Then pressure testing is carried out, all circuits are balanced and the automation system is adjusted.
Radiators do not have to occupy the entire perimeter of the room, but must be located along the walls. Air enters the heaters from below and exits through the upper slots of the boxes.
Is the price per meter justified for installing a warm water baseboard?
The data from this table will be useful for calculations.
| product name | Unit | Price per m.p./piece, rub. |
| A heating element | m.p. | 2010 – 2120 |
| Front Panel | m.p. | 670 – 720 |
| Top mounting strip | m.p. | 360 – 400 |
| Bottom mounting strip | m.p. | 190 – 230 |
| Bracket for mounting the heater | PC. | 70 – 90 |
| Inner corner cap | PC. | 70 – 90 |
| External corner cap | PC. | 50 – 60 |
| End cap | PC. | 100 – 120 |
| Fitting for straight sections | PC. | 170 – 200 |
| Flexible tube with seals for 90° and 180° rotation | PC. | 415 – 440 |
To analyze the parameters of a warm water baseboard, the price and reviews should be studied together. The approximate cost of one linear meter of the system is 3,600 rubles. To equip a room of 20 sq. m. when installing a plinth along only two walls, you will need to spend 32,400 rubles. The price of standard aluminum radiators for such a room, together with Mayevsky taps and regulators, is about 8,500 rubles. According to construction forums, ordinary users do not experience significant installation difficulties in both cases.
When painting the outer surface of a water heating baseboard in a certain color to better match the interior, you will have to pay from 900 to 1,400 rubles. for 1 m.p.
Water baseboard heating
The main components of such baseboard heating are baseboard heating radiators, a distribution manifold, and plastic tubes that do not allow oxygen to pass through.
A baseboard heating system can be connected to central heating when the coolant temperature is no more than 85°C and the pressure is no more than 3 atmospheres. It is necessary to maintain such parameters in order to avoid the so-called water hammer. When installing heating, the following recommendations should also be taken into account:
- It is preferable to use copper tubes instead of conventional plastic ones.
- You can use a heat exchanger that receives heat from central heating and is built in using special copper plates.
- Install thermostats to each radiator.
- It is possible to install a special servo drive on a special distribution manifold.
- Install the circulation pump, thermometer and pressure gauge.
Types of electric skirting boards
The issue of cost is one of the main ones that worries buyers of electric baseboard convectors not only in Moscow. Their prices largely depend on the type of construction. Today, baseboard convectors are available in two versions:
- Electric. It uses dry heating elements installed in copper tubes. This design provides more efficient and safe heating of the room. To connect such a system, you will have to lay powerful electrical wiring into the room. If necessary, you can achieve a more economical operating mode by additionally installing a thermostat.
- Water. The main working element is the heating boiler. According to the principle of operation, such a system is very similar to a standard scheme with radiators.
Systems of this type can be used as the main heating device.
The water system includes the following elements:
- a radiator made in the form of a box with a heat exchanger located inside it;
- a distribution manifold in which two lines are installed to ensure the supply and return of coolant;
- set of plastic tubes. They are installed in such a way that a part with a smaller diameter is located in a wider one.
The principle of operation of warm baseboards
The essence of the very idea of heating with warm baseboards is that the heating system is located around the perimeter of the room near the floor. The heated air in the convector slowly rises along the walls. Due to this, the entire volume of the room is heated.
Warm baseboards practically do not take up much space. Despite the high power ratings, you can safely place furniture and other interior items near the convectors. The surface of convectors does not heat up to dangerous levels of temperature that cause burns.
The retail chain offers two types of warm baseboard systems for sale. These are electric baseboards and warm water baseboards. Let's look at each heater.
Electric warm baseboard
The heater consists of two horizontally located copper tubes. A power cable coated with silicone insulation passes through the top tube. A tubular electric heater is threaded into the lower copper tube. The entire system is controlled through an air temperature sensor by a thermoregulation unit.
When the temperature inside the room drops or increases, the heating elements periodically turn on and off, thereby ensuring a constant temperature regime.
Purchase a set of warm baseboards based on calculating the length of the heaters, rotation angles and other related elements. The heating element itself is a tubular electric heater (TEH) enclosed in a copper shell.
In turn, the copper pipe is threaded through a housing of ribbed heat reflectors (radiator). Electric heating modules are produced in several sizes. Depending on the length of the electric heater, its power changes, as can be seen from the table:
| 1 | 700 | 140 |
| 2 | 1000 | 200 |
| 3 | 1500 | 300 |
| 4 | 2500 | 500 |
Installation of electric skirting board
Only a person with extensive experience in electrical work can assemble their floor electric heater manually. Calculating the dimensions of heating elements, making radiator nozzles, installing connecting cables is a very complex and responsible job. Therefore, it is easier to buy ready-made heating elements for warm baseboards.
When a heating set of baseboards has already been purchased, preparatory work begins.
- I install the mounting box at a height of 4–6 cm from the floor. Connect the power wires to the junction box.
- A switch with a thermostat is mounted on the wall at a convenient height.
- A protective tape 3 mm thick is glued to the walls along the entire height of the plinth.
- Markings are applied to the walls for fastenings for heated baseboards.
- Drill holes for dowels in the places where fasteners are to be installed.
- Screws are screwed into the dowel through the technological holes in the brackets.
- The thermal heating module is hung on the installed brackets.
- The modules are connected with electrical wires in parallel.
- A residual current device (RCD) is connected to the system.
- Connect the air temperature sensor.
- The electric baseboard is turned on for control. If a malfunction is detected, correct it immediately.
- Install the plinth covering.
Work related to supplying electricity to the baseboard, connecting to an electric meter, and installing a thermoregulation system is best entrusted to a specialist.
Installation of a warm baseboard ensures complete electrical safety. The connections between the wires and the module contacts are covered with heat-shrinkable tubes. The tubes protect the contact surface from moisture.
Skirting Termia
The design consists of two copper tubes with mounted lamellas made of brass or aluminum. The Termia water-based warm baseboard has high thermal conductivity, which makes it possible to use it in heating systems with low temperatures. When heating water to 70 °C, the thermal power of 1 m of module length is 240 W, which corresponds to the characteristics of an electric heater. When decorative panels of high thermal conductivity made of aluminum profiles are used on a warm water baseboard, heat transfer increases and becomes more uniform.
To increase the efficiency of heat transfer, module connections are made with copper tubes, which are passive heat exchangers. They are usually carried out near the interior walls of the house. The modules are connected to them using the soldering method.
Automation involves the installation of thermal valves with remote sensors located in the rooms at a level convenient for regulation. Control devices are protected with a powder-polymer coating that is resistant to shock and other mechanical influences.
System installation
Before starting work on installing a warm baseboard, it is necessary to determine how much and what materials will be needed. You especially need to think about how it will connect to the network and how secure it will be.
To install a warm baseboard system, you need to purchase an estimated amount of special. It consists of a central heating copper core, a layer of insulation, braiding and one more additional insulation. It has a fairly high resistance value, so the cable will get quite hot when energized.
In addition, you will need to take a thermostat. In essence, it is a traditional rheostat that will regulate the voltage supplied to the heating cable.
Due to this, the temperature in the room will be adjusted. Due to the fact that the system is quite dangerous, it would be better to extend a separate line to it from the panel, through which the connection will be made.
Installation location and rules
- The warm electric baseboard is mounted at a small height from the floor surface - it should be at a height of about 3-6 cm from the surface. In the future, it will be covered with the most ordinary plinth.
- When installing a plinth, make sure that furniture and other room decoration elements do not cover this system, otherwise its efficiency will not be very high. This is due to the fact that it is not the air in the room that will warm up, but pieces of furniture that are not too willing to give off heat to the environment.
- When performing installation, the panels are placed strictly horizontally. No more than 17 panels are placed in one common module, the total power of which should be no more than 200 W. If more than 17 panels are required to heat a room, then each of the similar modules will have to be connected separately into a parallel system.
In order to make the entire structure as safe as possible, the electric warm baseboard is connected through a voltage stabilizer and residual current devices.
Instructions
- First, insulating tape is glued to the wall. It is worth noting that warm plinth can be mounted on any surface - wood, concrete, drywall and so on. A profile made of aluminum and made in the shape of the letter L is attached to this tape. A distance of approximately 40 cm is maintained between adjacent profiles.
- When this is done, the heating element is attached directly. Its length can be different, due to which you can choose a suitable system for one specific room. Make sure that there is some distance between the wall and the cable.
- All elements included in the electric baseboard system must be connected to each other using a special cable that has additional silicone insulation. The critical temperature is around 180 degrees.
- After all the elements are connected, you need to attach the protective box. When all this is done, carefully check that everything was connected correctly. A small voltage is applied to the baseboard, after which you just have to wait a little and feel whether the air temperature in the room has risen.