An unusual heating technology, fundamentally different from the usual systems with radiators under the windows, came to us from European countries recently, although it has been used there for more than twenty years. The name of the innovation speaks for itself - warm baseboard, the demand for it is growing due to its technical advantages and modern design.
You will learn everything about the types of baseboard heating and the features of its operation by reading the article we have proposed. We will talk about the design specifics and rules for constructing all types of baseboard heating systems. Here you will find out where heating baseboards are used and which models are popular among consumers.
Features of baseboard heating
From its invention to the present day, heating has been divided into two types - convection and panel radiant. In the first case, the air is first heated from the hot surface of the heating device (radiator battery, convector), after which it circulates in the room and gradually heats it up.
In the second case, objects in the room are initially heated, and the air is heated from them by useful infrared radiation, which does not dry out the air or remove oxygen from it, and this process is secondary.
Among the old examples are stoves in village houses, tiled stoves in ancient mansions, in a modern interpretation - heated floors, but what about baseboard heating and what type of heating does it belong to?
Heating a room using a warm baseboard allows you to ensure a uniform supply of heat throughout the height and area of the room being treated
Let us turn again to the opinion of the manufacturers. They unanimously claim that the heat radiated along the perimeter rises from the floor to the ceiling along the walls, warms them evenly and creates a kind of curtain from the cold penetrating from the outside. Once warmed up enough, they themselves begin to give off heat.
In fact, the temperature of walls at different heights fluctuates in the range of 26-30 ºС, and in order for heat to transfer from them, the surface must be heated much more strongly. Therefore, talk about the coveted infrared heat emanating from the walls is not so much the truth as a marketing ploy.
The planes of thermoplinths emit maximum heat at the level of the feet. It’s not just pleasant, but also optimal for well-being and health (+)
It is more correct to say that thermal baseboards are also convectors with a high surface temperature. It’s just that the room is heated more evenly by warm air currents, both emanating directly into the room and ascending along the walls. Heated walls are a guarantee that you will not find dampness or mold anywhere on them.
It is also fair to note that as you move upward, the amount of heat decreases, and this is good. It is evenly distributed in the room in the lower and middle zones, reaching the ceiling to a lesser extent. For people, such a microclimate is considered the most comfortable - they do not freeze or feel chilly, but at the same time breathe fresh and cool air.
Voting by our readers
What warm baseboard would you buy or recommend?
Warm baseboard Mr.Tektum
30.00 % ( 9 )
Warm baseboard Orion
30.00 % ( 9 )
Warm skirting board TERMIA
6.67 % ( 2 )
Warm baseboard SoftTerm
3.33 % ( 1 )
Warm baseboard STN
0.00 % ( 0 )
Warm plinth Turbo-Tech
16.67 % ( 5 )
Warm plinth Megador
6.67 % ( 2 )
Warm baseboard Techno Board
0.00 % ( 0 )
Warm baseboard TherModul
0.00 % ( 0 )
Objectively about all the advantages and disadvantages
The ascending heat flow, according to Coanda's physical law, is pressed against the wall. Without mixing with the rest of the air in the room, it heats the vertical surface. At a height of up to one and a half meters, the wall temperature is several degrees higher than in the room, and this creates thermal comfort for the people in it.
During the heating season, the heating system is used for 6-8 hours every day. By multiplying the total power by the number of hours worked per month, we get the monthly energy consumption indicator.
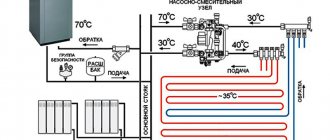
The distribution manifold evenly distributes the coolant among the individual circuits. Its choice is determined by a number of factors - product material, comb throughput, pressure, energy consumption, possibility of further expansion
Do baseboard heaters really save energy resources due to the low temperature of the coolant?
The answer would be this example:
- Room area - 3.5m x 5m (17.5 sq. meters), perimeter - 17 m (minus the doorway - 16 m).
- Room volume with a ceiling height of 2.7 m: 17.5 * 2.7 = 47.25 cubic meters. meters
- The outside temperature in winter is on average -10 ºC.
- To maintain +20-22ºC in a room with normal thermal insulation, 1.5 kW/hour is required. The heating will operate 7 hours a day.
Taking into account 200 W per 1 meter of length when heating the coolant to 65 ºС (see above), we get 200 W * 16 m = 3200 W or 3.2 kW. Since this flow rate is twice as high (3.2 kW/1.5 kW = 2.1), it is possible to reduce the coolant temperature in the same proportion: 65 ºС / 2.1 = 31 ºС.
Let's calculate the monthly electricity consumption: 1.5 kW/hour * 7 hours. * 30 days = 315 kW. More reliable results are obtained by detailed thermal engineering calculations based on complete initial data on the object.
If we compare the efficiency of heated floors and baseboards, then we can argue, if only for the reason that convectors from the floor immediately heat the air, and part of the warm air from the baseboard is taken over by the outer wall, which is constantly fed by the cold outside.
The heat spent on constant heating of cold external walls is a kind of loss. Is their dryness, lack of mold, and dampness a compensation for this? There is also debate on this issue: some say yes, others point out that the humidity in the room is regulated by supply and exhaust ventilation, and not by heating.
If water radiators are connected in series, the coolant will cool while it goes around the entire perimeter. Therefore, the modules are combined in parallel, each pair of incoming and outgoing pipes is output to the collector separately
As for the appearance, the baseboard boxes that cover the heating really look beautiful in the interior, but when there is cabinet furniture in the room, problems arise - it is not possible to go around it in front, and behind it the warm air does not have freedom of movement.
And regarding the absolute absence of dust in the air, it is worth objecting - perhaps there is less of it than with air circulation in traditional heating systems, but it is there, since convection is present.
In general, we can conclude that baseboard heating radiators already have buyers, and over time their number will increase. The limiting factor is the excessively high cost of equipment, which is explained by the use of copper, brass, aluminum in production, i.e. expensive materials.
And installation, if you order it from professionals, is not cheap. Skirting pipe routing is the most complex of all available water heating circuits, but there are also many nuances in the assembly of electric baseboards.
Installation of warm baseboard
For installation you will need tools: adjustable wrenches in a set, a drill with an impact function (or a hammer drill), a hammer, wire cutters, pliers, scissors (to cut plastic). A baseboard heating system can be quickly installed if the connection points are prepared in advance.
Even before purchasing the necessary equipment, you need to plan what power the heating elements need and how to place them around the perimeter of the room.
Assembling a water heating system
Stage 1. We measure the distance from the point where the distribution manifold will be located to the location of the baseboard. We cut two lengths of the protective pipe and two with an allowance of 20 cm for the connecting pipe. We insert the connector into the protective one, and seal the ends with adhesive tape to protect it from dirt.
Installation of a water baseboard heating system: red - main flow, blue - return. The return flow pipe must be located higher
Stage 2. We pull the pipes along the floor without tension so that if extensions are necessary, one or more can be laid nearby. We fix it with mounting tapes, cover it with a protective solution, protecting it from damage, and place it in the right place on the wall 6 cm above the floor and 10-15 cm from the edge of the wall or corner, fix it with cement.
Stage 3. After laying the finished floor, we continue work. We glue an insulating strip along the entire length. We stretch the aluminum edge (also along the entire length of the heating), covering the junction of the wall and the floor. Screw it or secure it with adhesive tape or silicone.
Stage 4. We lay a special profile along the top line, put holders on it at a distance of 15 cm from the corners and every 40 cm along the wall.
Stage 5. To connect heating pipes and heating elements, we use couplings with nuts, bushings and gaskets, in the corners - 90º corner rotary tubes, in the ends - 180º end rotary tubes and plugs. We connect the thermal sections with adapters.
When connecting the heating module, you need to remove 2-3 lamellas from the edge and put connecting nuts, crimping parts, and rubber gaskets on the tubes
Stage 6. Carefully press the connected heating sections into the holders. We put on decorative panels (attach with screws or snap on) and decorative corner elements. We connect the system to the manifold, fill it with water, and test it at operating and maximum pressure.
Like all collector systems, the heating baseboard requires a circulation pump to stimulate the movement of the coolant. Without a pump, it is difficult for heated water to circulate along an extended circuit. However, the use of technical devices affects the overall cost of the system.
The plinth will work if all technological operations were performed without violations. If there is a leak, the problematic connections must be tightened with a wrench. The coolant is supplied through the collector by a circulation pump from the boiler or from a general (centralized) heating system.
Electric heating system assembly
For a warm baseboard, a separate circuit breaker must be made in the electrical panel. Its power is determined by the number of heating modules.
Stage 1. We supply power to the distribution box, which should be near the location of the system at a height of 4-6 cm from the floor.
Installation of an electric heating system: most often, the electric system is used where it is possible to supply the required power, or in small rooms as additional heating
Stage 2. Apply insulating tape to the wall.
Stage 3. We install the lower aluminum profile (edge) and the upper one, onto which we attach holders at the same distance as for the water system - 15 cm from the corners and in increments of 40 cm along the wall. We install a remote thermostat. It should be located at a height of about 1.5 m opposite the system modules and at a distance of at least 2 meters from them.
Stage 4. We insert electric heating elements (heating elements) into the lower pipe of the heating module, fix the modules in the holders so that they do not touch the wall.
The electrical contacts of the heating elements have a thread, two nuts, a retaining ring on a spring, and a heat-shrinkable tube for additional insulation. The modules are connected in parallel using a heat-resistant power cable coated with silicone and heat-resistant up to 180°C.
Stage 5. We close the system with a plastic box from above.
To connect heating modules, a 3-core cable is used: brown wire - phase, blue - zero, green (yellow) - ground. The cable must be grounded
It is best to entrust the connection of the installed heating system to the power supply to an electrical specialist. He will check the reliability of the insulation with measuring instruments, supply electricity and adjust the thermostats.
Assembly and installation of the heating module
Connecting the heating module
- Before installation, it is necessary to measure the distance for connecting them to each other and the wiring. Using a hacksaw, we cut the module into the required parts. We remove the excess slats from the edge of the module with pliers.
- We install a heating element (tubular electric heater) in the lower tube.
- We lay a special (heat-resistant) three-core connecting cable into the upper tube. We cut the cable so that there are ends sufficient for electrical connections, approximately 15 cm.
Assembling an electrical circuit.
- We assemble a system for connecting to the electrical network. We use a single-phase electrical circuit with three conductors: phase, ground, 0. The silicone cable has 3 conductors with a cross-section of 1.5 mm². The connection of tens is carried out according to a parallel circuit. We supply the grounding and the tip of the contact group with a crimp clamp (insulating tape). To connect to the wires, we attach terminals with PVC cuffs: a flat piece is for grounding, and a round terminal is used for the phase.
- We install the heating module into the brackets. Then we insert a plastic wedge between the bracket and the module, ensuring rigid fixation of the heating module. We cut off the protruding part of the wedge with a mounting knife.
- We connect the corresponding contacts of the ten to the phase and neutral wire using a lock washer and a nut with a thread diameter of m4.
- We close the contacts with a coupling, which we heat evenly with a hairdryer. This will ensure tight connections and electrical safety.
Design, scope, price
Thin, elegant heaters that harmonize with the overall decor allow you to implement the most non-standard design ideas.
The peculiarity of the baseboard heating system is that it does not take away any free space from the room, and it can be placed next to furniture, antiques, household appliances, and musical instruments.
The material from which the flooring and walls are made also does not matter - there will be no damage or harm.
A palette of hundreds of colors and shades makes it possible to choose the appearance of the case to your liking. The texture can be a flat and smooth surface or an imitation of granite stone, marble, or wood.
A baseboard radiator will equalize the temperature in colder corner and end rooms; owners of cottages and country houses who want to create an elegant interior in their homes are interested in this technology. And in high-rise buildings, many people want to heat loggias and balconies, and this task is also easily solved using a similar heating scheme.
Wherever baseboard heating is used - in greenhouses and winter gardens, swimming pools and gyms, in museum buildings, concert halls, etc. Panoramic construction is in fashion, but you cannot install ordinary radiators along a wall that is solid glass.
A wide range of textures and shades of the warm baseboard body allows it to be used as a decorative element. In this case, it merged into a single whole with the door frames
Traditional heating also loses in rooms with high ceilings. No matter how much you heat them with radiators, warm air will still rush up to the ceiling, leaving the lower zone cool, and with the help of a thermal baseboard the situation can be easily corrected.
As for the price, the purchase and installation of heated baseboards is comparable to the cost of heated floors. Both will not be cheaper than installing a classic heating system with batteries.
Unfortunately, all energy-efficient devices cannot be called cheap, but the costs are worth it. In order not to overpay, you need to complete the system in advance - each of its elements has its own price. Only a specialist can do this correctly.


