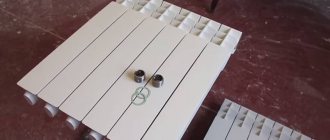
Home » Uncategorized » Extension of heating radiators
Heating bills are constantly rising, but the house still doesn’t feel warm? What could be causing this problem? There may be many answers, but most of them lie in the inability of your cast iron radiators to cope with the resulting load. And in order to increase the efficiency of the radiator, it should be increased.
Complete replacement of batteries will be unnecessary and will lead to high costs; in order to reduce them to a minimum and increase heating efficiency, it is better to move them to optimal conditions and add the required number of sections.
Below we will look at how to increase radiators, the process of installing taps, and painting radiators.
Extension of a cast iron radiator
Connection steps
The operating technology depends on the selected set of fittings and pipe material.
If pipes are laid along the surface of the walls in a room, then the best option is classic metal pipes. If heating lines are laid in advance under the plaster, or in specially designed channels, then a more modern option can be used. For example, polypropylene heat-resistant pipes.
Work with steel pipes is carried out with a standard plumbing tool kit. Plastic pipes and fittings require specialized crimping tools. They are not needed for all fittings. Many systems have a threaded crimp system.
Where will we place it?
Typically, radiators are placed where the greatest heat loss in the apartment is expected. As a rule, this is the area under the window or on the side of the corner wall of the house. Even if the apartment is located in a well-insulated building and is equipped with double-glazed windows, the window is the place where the air temperature will be the lowest during the cold season.
Choosing the optimal location for the radiator
If you do not place a radiator under the window, then the cold air entering from outside will gradually fall down and spread across the floor. From physics lessons we know that warm air moves upward. This means that, moving away from the battery and rising to the ceiling, it will create a kind of barrier to the cold flow from the street. According to SNiP recommendations, the size of the battery should occupy at least 70% of the window, otherwise the warm air will not create the necessary barrier.
General information about heating systems
It is important to initially decide how to connect heating radiators to each other. In the language of specialists, you should decide which method of piping heating devices to use. For all types of heating systems, two methods of laying pipelines are used:
For all types of heating systems, two methods of laying pipelines are used:
Two options: double-sided and one-sided arrangement of the heating pipeline
Single-pipe scheme
Systems in which hot water is transported as a coolant through one line are less efficient for the following reasons:
A useful formula for those who are just planning to “warm up”
- They practically do not allow you to regulate the heating of a separate device;
- As you move away from the coolant source, its temperature gradually drops and the last radiator in the chain may turn out to be barely warm, or even completely cold;
- In the event of an emergency on any part of the network, the heating must be completely turned off.
For your information! The only advantage of this type of heating pipe layout compared to two-pipe is its low price.
Such single-pipe heating systems are used mainly in high-rise buildings with a centralized supply of heat to consumers.
Two-pipe scheme
In the private sector, to create autonomous (loop-circuited to one consumer) heating systems, a two-pipe radiator piping scheme is most often used:
- One of the pipes supplying coolant to the device;
- The other is for the reverse movement to the source of heating of the coolant (boiler).
A simple two-pipe system looks like this
All batteries in the system are connected in parallel, so that the two lines operate completely separately and are connected only at the end radiator.
The two-pipe radiator connection scheme provides the following advantages:
- The ability to regulate the heating of each device in the circuit, which ensures the creation of the most comfortable conditions in various rooms;
- Regardless of the distance between the boiler and the battery, each of the devices heats up equally;
- If repairs or replacement are necessary in any part of the system, it does not require a complete shutdown.
Now we’ll talk about how to properly connect a heating radiator with your own hands.
Selecting the connection location and installation norm
Before connecting a heating radiator in a private home, you must familiarize yourself with the following standards for the installation and placement of these devices:
- The distance from the bottom of the battery to the floor is 10-12 cm.
- The gap from the top of the radiator to the window sill is at least 8-10 cm.
- The distance from the back panel of the device to the wall is at least 2 cm.
Important: Failure to comply with the above standards can lead to a decrease in the level of heat transfer from heating devices and incorrect operation of the entire heating system.
Another important point that is worth considering before installing heating radiators in a private house: their location in the premises. It is considered optimal when they are installed under windows . In this case, they create additional protection from the cold entering the house through window openings.
Please note that in rooms with several windows, it is better to install radiators under each of them, connecting them in sequential order. In corner rooms it is also necessary to install several heating sources.
Radiators connected to the system must have an automatic or manual heating control function. For this purpose, they are equipped with special thermostats designed to select the optimal temperature regime depending on the operating conditions of these devices.
Segmentation
To properly disassemble an aluminum radiator, you will need a special tool - a nipple wrench, which is made specifically for this job. As a rule, it is not available in stores, since it is a product of the mind and labor of plumbing workers. You can get it in two ways.
The first is to try your luck at the local market (if there is one), where various used tools and other useful household items are sold. It is likely that you will find what you are looking for there, and at an affordable price. The second option is to contact any plumbing workshop and ask them to rent a nipple key.
When your search is successfully completed, you can proceed directly to disassembling the equipment. There is a specific order for this procedure.
- The first thing to do is turn off the water in the riser to which the radiator is connected and drain the coolant from the system. If you own a private home, you can do it yourself. If you are dealing with a centralized heating system, then such issues can only be resolved through the organization that manages the building. To do this, you need to write an application and then wait for a specialist to arrive. By the way, if you live in an apartment building, you can carry out such work only during the period when the heating season is already over. Otherwise, you simply will not be able to obtain permission, since stopping the centralized heating system will bring cold not only to yours, but also to your neighbors’ apartments.
- After you have dealt with turning off the water in the system, place containers under the junction of the radiator and the main lines to collect the remaining coolant that will flow out during the separation of the equipment.
- Unscrew the fittings connecting the battery to the main line. At the same time, check their condition. If you notice any defects - cracks or “smoothed” threads - then it is better to replace these elements with new ones. Just keep in mind that not all metals are compatible with aluminum radiators. For example, fittings made of brass or copper should absolutely not be used, as this may cause an electrochemical reaction, which will lead to the onset of corrosion processes.
- After disconnecting, remove the radiator from the brackets holding it.
- Now it’s time to use the very tool that you worked hard to obtain. The nipple key must be inserted into the battery exactly to the place you are going to dismantle. Then you need to get the end of the tool into the hole intended for this on the connecting element. Once you have succeeded, turn the nut half a turn in the desired direction. In general, for this stage it is advisable to invite an assistant who will fix the radiator in one place while you fiddle with the connections. So, turn the nut half a turn, go to the one located on the opposite side, and repeat the same operation there. Thus, by gradually unscrewing each element in turn, you can completely separate one section from the other. Be careful and patient - each nut needs to be turned little by little, about 5-7 mm. Otherwise, the section may become severely skewed, resulting in damage to the radiator elements and the need to replace them.
- After unscrewing the necessary nuts, remove the segment, and then check all the gaskets included with it. The quality and condition of rubber seals plays an important role. Deformed gaskets can cause leakage. Therefore, if there is the slightest doubt about their suitability, it is better to replace these elements with new ones. Moreover, it is advisable to purchase gaskets made of paronite, since this material has proven itself best. If this is not possible, then try to find at least silicone seals. It is not recommended to install rubber ones, as they quickly fail.
Is it possible to install aluminum radiators on central heating?
Due to the poor quality of the working environment of a centralized heating system, the service life of aluminum appliances is shorter than that of other types of devices. This is due to the physical characteristics of aluminum, which is exposed to the coolant.
- Increased gas formation, which can raise the pressure inside the device to critical levels and cause a leak. (To avoid this, do not turn off both taps at the same time, and you can install an automatic air vent).
- Wear of pipes due to the high coefficient of thermal expansion of aluminum.
- Weak corrosion resistance of the material, which reduces its service life.
The conclusion is the following: it is possible to connect aluminum appliances to central heating, but their service life will be slightly shorter than when connected to individual heating.
How to check the connection of two heating radiators
The main way to check the correctness of the system assembly on your own is crimping. To perform the procedure take:
- piece of pipe DU-15;
- tire nipple;
- pump with pressure gauge from the car.
The nipple will need to be soldered onto a tube inserted inside the radiator. For testing, it is enough to use a pump to create a pressure of 1 atm in the sections. If there is no whistle when air masses exit the device, the actions were performed correctly, the gaskets are of high quality, and the nipples are tightly tightened.
Important! A good way to check the tightness of the structure is to use colored water or a soap solution. The battery is filled with liquid for several hours and checked for leaks. Only after thorough testing will it be possible to return the heating radiator to its place
It is not always possible to make the connection the way it should be done the first time, and the operation of faulty radiators is fraught with serious problems. If several sections have been built up, check whether the current brackets will support the weight of the new radiator or not. If in doubt, it would be better to replace the brackets or attach a holder to the wall (it will prevent the structure from collapsing)
Only after thorough testing will it be possible to return the heating radiator to its place. It is not always possible to make the connection the way it should be done the first time, and the operation of faulty radiators is fraught with serious problems. If several sections have been built up, check whether the current brackets will support the weight of the new radiator or not. If in doubt, it would be better to replace the brackets or attach a holder to the wall (it will prevent the structure from collapsing).
Crimping is a mandatory step in connecting sections and should not be skipped
You need to assemble the sections in the same way as removing them, but in reverse order. It’s easy to carry out the work, just have the necessary tools and components on hand and be prepared to act according to the rules. You cannot violate the instructions here; for example, failure to flush the radiator before attaching a new section can result in a shortened service life of the system or insufficient quality heating.
Important! The maximum number of sections in any heating radiator is 16. If there are more of them, the battery is divided in two, then they are extended.
How necessary is a circulation pump in the house?
If you have autonomous heating (again, you will live in your own house), should you install a circulation pump or not? If your system is made without a circulation pump, when the heat flows “by gravity” due to the pressure difference and the battery temperature was 35 degrees, then with a circulation pump at speed “2” it will become 1.5-2.5 degrees hotter, or maybe and more. Well, naturally the heat exchange will be more intense.
However, you have to pay for all the “advantages” in this business. It’s as if a light bulb with a power of about 100 W (or less, depending on what speed the pump operates) will be “burning” around the clock. At low battery temperatures there is no point in setting the maximum speed, the water will not have time to heat up, at high temperatures at low speed the heat exchange will slow down.
Well, what else needs to be taken into account. Whether you have a pump running all the time or only temporarily in severe frosts, the heating system should function without a pump. An indispensable condition for this, even with a very good design, is the presence of a proper slope (rolling hill) along the path of the coolant. The greater the slope (steeper the hill), the better. Therefore, when testing an installed heating system, it is first necessary to check its operation with the pump turned off. Uniform and rapid heating of the system will indicate that there will be no problems here. Cold areas will force you to look for design flaws at the stage of manufacturing the system and, above all, installing pipes.
Well, our batteries are not bad at heating, but the heat disappears somewhere. Yes, it most likely disappears into the street.
Step-by-step installation instructions
Now let's figure out how to properly install bimetallic radiators. Typically, a mounting kit is sold complete with the unit, which includes:
- brackets for hanging the device on the wall;
- one plug;
- two plugs with internal one and a half inch threads;
- air vent.
As for the cost of installing a bimetallic radiator, it is $32 (2100 rubles). You will have to pay separately for installing a bypass - $15 (1000 rubles), and for threading pipes you will have to pay an additional $1.5 (65 rubles).
Tools and materials
Installation of bimetallic radiators is carried out using the following materials and tools:
- perforator;
- building level;
- drill;
- pencil;
- ruler;
- roulette;
- open-end and adjustable wrenches;
- battery;
- butt key;
- radiator wrench with a blade at the end measuring 24 mm;
- brackets;
- installation kit;
- radiator gaskets;
- tow;
- sealing paste;
- fum tape;
- dowels and screws.
Fittings for connecting a bimetal device
In addition to the installation kit that comes with the battery, purchase a pair of ½-inch ball valves, which will allow you to repair and remove the heating device without stopping the operation of the network. They must have internal and external threads. It is better to immediately take control valves, which additionally allow you to regulate the heat transfer of the unit, increasing or decreasing the flow of circulating coolant. Mounting cast iron heating radiators and how much installation costs
In addition to shut-off and control valves, in some cases Mayevsky taps are installed. Moreover, you can purchase a traditional needle valve or install an automatic air vent.
Connection diagrams
As a rule, the connection diagram of the heating device to the network depends on the characteristics of the pipeline layout.
There are three connection options:
- saddle;
- unilateral;
- diagonal.
The saddle connection diagram for bimetallic radiators involves installing shut-off valves on both sides of the device in the two lower pipes. A Mayevsky valve is installed in the upper pipe, which is the most distant along the coolant flow.
One-way connection is used for single-pipe vertical wiring, which is most often used in an apartment building. In this case, shut-off valves are installed on the upper and lower pipes on one side of the device. The supply pipeline is connected at the top, and the return pipeline at the bottom.
With a diagonal connection, the most efficient and optimal heat transfer of the heating device is achieved. The supply is connected to the upper branch pipe on one side, and the outlet is made from the lower branch pipe, located diagonally to the supply branch.
Preparation of materials and tools
Before adding sections to the bimetallic radiator, you need to prepare the following materials and tools:
- Section for retrofitting.
- Special wrench for pipes (gas).
- Intersectional seals for batteries.
- Set of heating nipples.
- Emery cloth.
- Radiator key.
- Side battery plugs with left-hand and right-hand threads.
- Paronite gaskets.
Submitting an application
Before checking your international passport for validity on the website of the Federal Migration Service (now the Main Directorate for Migration Affairs of the Ministry of Internal Affairs), you need to take into account that biometric documents are not checked in this way. Citizens should contact the employees of the Ministry of Internal Affairs department on migration issues in person with a corresponding application. The reliability of this method is beyond doubt. In addition, you can find out from an employee of the Ministry of Internal Affairs whether the foreign passport issued before the suspended conviction is valid.
A response to a registered request is given after 30 days. The applicant receives a written response about the authenticity or invalidity of the foreign passport. This method is necessary to receive an official response. It can be presented to the court and other government bodies.
So is it possible or not to take the battery out onto the balcony?
In accordance with the Housing Code of the Russian Federation, Article 15, paragraph 5, a balcony or loggia does not belong to living space, and therefore reconstruction is prohibited here. At the same time, there are nuances that, with great effort, still make it possible to legalize the transfer of the battery to the balcony.
I said earlier in my blog that a balcony without heating will never become truly warm, and therefore using it as a living space will be almost impossible. Insulation and glazing with metal-plastic profiles serve as good thermal insulation, protecting the space from cold air entering inside and heat leakage to the outside. But to keep your balcony or loggia warm at any time of the year, you need to think about heating. At this stage of repair, many people are thinking about the heartbreaking question of whether it is possible to take the battery out onto the balcony.
We connect radiators to different water circulation systems
The heating fluid, which is usually ordinary water, circulates in the system in two ways - forced or natural.
Forced operation of the coolant is carried out thanks to a water pump pushing water through the pipe. Of course, such a pumping device is an element of the overall heating scheme. Installation of such a unit is either carried out directly next to the heating equipment - a boiler, for example, or is initially included in its “original” package. You will find out how to choose a heating radiator for your apartment in a separate article.
1. Single-pipe series natural circulation heating system 2. Two-pipe parallel natural circulation heating system
Another system, which has natural circulation, is very effective and efficient in places where power surges most often occur. In the indicated scheme of such circulation there is no pumping device, but there is a place for a non-volatile boiler. The movement of liquid through the system is carried out due to the displacement of a cooled coolant by a hot stream of water.
Factors to consider when implementing radiator connections:
- specifics of the laid heating main;
- its length and so on.
The process of installing additional heating batteries according to the letter of the law
Installation of additional heating radiators in the apartment is possible only if there are no changes to the existing heating riser. Thus, there are several options for getting out of this situation:
- Connection from risers to a standard radiator equipped with a Mayevsky tap;
- Parallel connection of batteries;
- Increasing the number of radiator sections.
It is worth noting that all changes made are subject to mandatory approval and registration. But due to the provisions of the current legislation, the installation of an additional heating radiator will require much more time and increased costs for the preparation of project documentation, work on cutting into the overall system, as well as installation of equipment, which, by the way, must also have specific parameters calculated individually.
Installation of additional heating devices in a private house
In autonomous systems, things are completely different. To install another heating source, just select the location of the future battery. It is worth noting that the implementation of the idea is distinguished by its versatility: you can use any convenient type of battery, number of sections, etc.
In addition, care should be taken to install special valves and taps necessary for timely venting of the system without the need to turn off the water circulation through the riser.
Carrying out specific work from
Since 2008, it has managed to establish itself as the most reliable contractor providing services to residents of Moscow and the Moscow region. Over the years of successful activity in this segment of the service market, the company’s specialists have managed to implement dozens of complex projects, unquestioningly fulfilling their obligations to clients.
Cooperation with us has a number of advantages associated with:
- Competent advice from professionals with extensive experience;
- Efficiency of installation and repair work of any complexity;
- Justified, profitable and attractive prices for services;
- Guarantee of the quality of work performed by Almstroy specialists.
You can take advantage of the benefits of cooperation with professionals simply by calling the number indicated in the corresponding section of the site!
". We selected the material over the phone and explained everything as needed. The master did his job 100% perfectly!”
Client: Peter What we did: Replaced the batteries and heated towel rail
“We selected the material over the phone and explained everything as needed. Master Galich Andrey arrived on time and did his job 100% perfectly. Well done!”
Installing heating radiators with your own hands in an apartment
First, you should familiarize yourself with the list of necessary tools. You need to stock up on a drill with a pobedit bit. The list of tools includes torque wrenches, a screwdriver, pliers, a tape measure, a level, and a pencil and ruler. In general, the typical composition of a tool box.
Installation stages:
To begin with, the heating system is turned off and the liquid is drained. In private buildings, a pump is used for these purposes, but in apartments you will need to contact the housing and communal services. Then the old structures are disconnected. Next, markings are made for the brackets. For correct and level installation, you will have to use a building level. Horizontal installation will eliminate gas contamination of the system and allow water to be completely drained. Then the brackets are installed
It is important to test the devices for strength by pressing them with your weight. For cast iron and aluminum radiators, only 2 fasteners are used. Plastic will require more elements
The walls must be clean, smooth, and plastered. Then the shut-off valves are installed. All connections are reliably sealed. Then the pipes are connected. To connect the structure to the pipeline, you will need to make threads on the pipes. Nowadays metal-plastic pipes are used for heating.
Plastic will require more elements. The walls must be clean, smooth, and plastered. Then the shut-off valves are installed. All connections are reliably sealed. Then the pipes are connected. To connect the structure to the pipeline, you will need to make threads on the pipes. Nowadays metal-plastic pipes are used for heating.
To eliminate leaks, use a torque wrench. This is a mandatory element when installing aluminum pipes, which necessarily involves installing an air valve. In this case, the force on the tool should not exceed 12 kg.
To seal the joints, tow or any other sealant is used. After installation, crimping will be required. This work should be entrusted to a professional. He has a special tool and the necessary skills. If a leak is detected, the nipple will need to be adjusted.
What are the criteria for choosing radiators for an apartment?
When the weaknesses of central heating are already known, you can imagine what criteria good batteries should meet:
For radiators, the pressure declared by the manufacturer must be greater than the pressure in the heating system. Let's look at the numbers as an example. In five-story buildings of the old layout, this indicator is no more than 5-8 atmospheres. Modern multi-storey buildings are heated under pressure up to 15 atmospheres; We will separately highlight the ability to resist water hammer. Because it is difficult to protect yourself from pressure changes when you are in an apartment, it is better to prevent this in advance. By the way, if you often hear noise and humming in the batteries, it is better to contact your utility service, as this may be causing problems with the pressure; The water quality in the old system is poor, so the batteries must adequately withstand its chemical attack without deforming. It is necessary to install radiators with a special coating on the inside or chemically neutral material for the walls
Their thickness should be such that sand particles and small stones do not rub it; When choosing suitable radiators for an apartment, it is important to remember their main function - to heat. It is better to choose radiators with high heat output; the appearance of the radiators also plays a role
It’s unlikely that anyone will like the old and scary cast-iron appliances of incomprehensible shape that used to stand in every corner. Batteries should look harmonious in the apartment; lifetime. There is nothing to comment here. The less time you have to bother with installing these large and expensive devices, the more profitable it is for the owners.
We recommend: How to install central heating on a balcony?
Pre-assembly of devices
Before installing the structure and connecting to the system, sections of heating radiators are sometimes connected to each other. You can perform all the steps without involving specialists if you become familiar with the process of joining the elements in detail.
Tools and materials
- A radiator wrench, the price of which is low, is a typical tool that is used when assembling such structures.
- Traditional nipples are small pipes with double-sided threads.
- The material for threaded connections of heating radiators is supplied in the form of silicone gaskets.
This is how you can schematically represent a radiator key.
Growth algorithm
If necessary, the number of modules of a particular device can be increased or damaged parts can be replaced.
The connection of sections of aluminum radiators is provided for by their design, which cannot be said about panel products that are supplied ready-made.
- First of all, the end holes intended for joining individual elements must be freed from the installed plugs. They are on each side.
- A silicone gasket or seal made of any other material is placed on the part of the product that is free of threads. If positioned incorrectly, leaks may occur.
- The nipple is carefully screwed into a special aluminum manifold. In total, you need to make several turns. It is not recommended to tighten the part too much.
- After preliminary fixation of the nipple, the aluminum heating radiators are connected. The holes of the prepared section are aligned with the installed part by light pressure.
- Using a special wrench, the nipple is tightened. Double thread allows the two parts to fit together. After twisting, the joint is completely sealed.
The connection of bimetallic radiators to each other is carried out approximately as follows.
Types of battery connection to the heating system
When it becomes necessary to expand the radiator, it is very important to follow all the rules for dismantling the old section in case of its breakdown or installing a new one to increase its heat transfer. If the new element is connected incorrectly, the efficiency of the entire structure may decrease by 40-50%
This will manifest itself in the form of uneven heating of all sections or even a breakthrough at the points of their connection.
An important factor is how the battery is connected to the heating system, because a violation of the circuit always leads to heat loss. As a rule, aluminum heating radiators are connected:
- Serial connection, which is used in single-pipe heating systems. It is considered the most financially profitable type of connection, since it uses less building materials, but is less effective in heating a home. As a rule, in this case, those heaters that are closer to the boiler will be hot, and as they move away from it, they will get colder.
- The parallel type uses two pipes that are connected to the radiator through the upper and lower sections. Provides the best heating, since the coolant is evenly distributed throughout all elements of the system. This type of connection allows the installation of thermostats, which gives the user the opportunity to decide for himself how much heat he needs.
- The through connection ensures unhindered passage of the coolant through the entire system without “stopping” in the heating radiators.
The connection of sections of aluminum radiators and subsequent connection to the heating network must be carried out strictly according to the diagram in a certain sequence so that they are not only effective, but also economical.
Extension - how to extend radiators correctly
The sections of bimetallic radiators are connected in the following sequence of operations:
The removed radiator is installed on a flat base, and an additional section is placed opposite it. It should be taken into account that one of its sides is equipped with a right-hand thread, and the other with a left-hand thread. Then you need to take the nipple, positioning it in such a way as to ensure that the threads on the sections being connected match. Next, it is screwed onto the left end of the battery by one turn of thread. Upon completion of the procedure, do the same with the element for the lower part of the radiator. After this, the sections prepared for connection are tightly placed next to each other. A seal is laid between them, measuring the distance to the nipple (for this you will need a radiator wrench). It is inserted to the measured length into a special niche on the reverse end of the radiator
In order to turn the radiator wrench, a pipe wrench is used. When tightening the nipple, it is important to ensure that it is simultaneously immersed inside the opposite battery sections. Upon completion of this procedure, use the radiator wrench to make three full turns.
This helps ensure that the nipple is fixed as tightly as possible. At the next stage, the radiator key is moved to the other side of the heating device. The screwing procedure is carried out in the same order as with the lower part. An important condition: at the end of the process, the switched sections should stand as tightly as possible. Finally, side plugs and paronite gaskets are installed on the battery. For these purposes you will need a pipe wrench. It is important to ensure that they are screwed in as tightly as possible to create a good seal. This will ensure that no water will seep through the joint. This is the last operation in expanding the heating system battery.
Additional recommendations
Installation of taps is not a mandatory procedure and is optional. In cases where increasing the power of the heating device will require installation on one or several additional sections, the instructions described above are used for this. This also applies to working with other types of radiators, since adding a section to aluminum radiators is no different.
The main thing is to follow the given sequence of operations and not to rush. Bimetallic radiators are connected as tightly as possible. This will guarantee that everything will be done correctly, and the heating of the house will receive the necessary increase.
What is needed for installation
Installation of heating radiators of any type requires devices and consumables. The set of necessary materials is almost the same, but for cast iron batteries, for example, the plugs are large, and they do not install a Mayevsky valve, but instead, somewhere at the highest point of the system, they install an automatic air vent. But the installation of aluminum and bimetallic heating radiators is absolutely the same.
Steel panel ones also have some differences, but only in terms of hanging - they come with brackets, and on the back panel there are special arms cast from metal, with which the heater clings to the hooks of the brackets.
These are the arms that hook the hooks
Mayevsky crane or automatic air vent
This is a small device for releasing air that may accumulate in the radiator. Placed on the free upper outlet (collector). It must be on every heating device when installing aluminum and bimetallic radiators. The size of this device is significantly smaller than the diameter of the manifold, so you will also need an adapter, but Mayevsky taps usually come complete with adapters, you just need to know the diameter of the manifold (connection dimensions).
Mayevsky crane and method of its installation
In addition to the Mayevsky crane, there are also automatic air vents. They can also be installed on radiators, but they are slightly larger in size and for some reason are only available in a brass or nickel-plated case. Not in white enamel. In general, the picture is unattractive and, although they deflate automatically, they are rarely installed.
This is what a compact automatic air vent looks like (there are more bulky models)
Stub
The side-connected radiator has four outputs. Two of them are occupied by the supply and return pipelines, on the third they install a Mayevsky valve. The fourth entrance is closed with a plug. It, like most modern batteries, is most often painted with white enamel and does not spoil the appearance at all.
Where to install the Mayevsky plug and tap for different connection methods
Shut-off valves
You will need two more ball valves or shut-off valves that can be adjusted. They are placed on each battery at the input and output. If these are ordinary ball valves, they are needed so that, if necessary, you can turn off the radiator and remove it (emergency repairs, replacement during the heating season). In this case, even if something happens to the radiator, you will cut it off, and the rest of the system will work. The advantage of this solution is the low price of ball valves, the disadvantage is the impossibility of adjusting heat transfer.
Radiator taps
Almost the same tasks, but with the ability to change the intensity of the coolant flow, are performed by shut-off control valves. They are more expensive, but they also allow you to adjust the heat transfer (make it less), and they look better externally; they are available in straight and angular versions, so the piping itself is more accurate.
If desired, you can install a thermostat on the coolant supply after the ball valve. This is a relatively small device that allows you to change the heat output of a heating device. If the radiator does not heat well, you cannot install them - it will be even worse, since they can only reduce the flow. There are different thermostats for batteries - automatic electronic ones, but more often they use the simplest one - mechanical.
Related materials and tools
You will also need hooks or brackets for hanging on walls. Their number depends on the size of the batteries:
- if there are no more than 8 sections or the length of the radiator is no more than 1.2 m, two mounting points on top and one on the bottom are sufficient;
- For every next 50 cm or 5-6 sections, add one fastener at the top and bottom.
You also need fum tape or linen winding and plumbing paste to seal the joints. You will also need a drill with drills, a level (preferably a level, but a regular bubble one will do), and a number of dowels. You will also need equipment for connecting pipes and fittings, but it depends on the type of pipes. That's all.
https://youtube.com/watch?v=nnQz2VA7C_M
Features and rules of placement
Any heating equipment is a complex system where each component has its own role. The most important part of the entire system is the heat exchange units, which are the final link in the transfer of heat energy in the house. These include ordinary radiators, open or closed convector devices, water floor heating devices, which are pipe profiles laid based on certain rules.
Any type of radiator is installed indoors according to general rules. There is a specific installation procedure that must be followed. The installation procedure will not cause any particular difficulties, but there are many nuances in this matter. So, first of all, they affect the installation site. In most cases, the heating installation is placed in areas of the most significant heat loss, for example, under window openings. Even modern energy-saving double-glazed windows cannot trap warm air in the room. Old wooden frames need not be mentioned.
If there is no radiator structure under the windows, cold air masses descend along the wall and spread across the floor. The situation changes after installing the battery: warm air rising to the ceiling prevents cold air from falling down. Remember that the effectiveness of such protection depends on the size of the heating device: it must be at least 70% of the width of the window. For this reason, small radiators will not provide the appropriate degree of comfort. In the lateral zones there will be areas with a cool air mass descending to the lower level. You will be able to see the “sweating” of glass and walls. The collision points of heated and cold air will become covered with condensation, and dampness will form in the room.
Therefore, do not try to purchase a sample that has the highest heat transfer. They are suitable for areas with harsh climatic conditions. In this case, it would be useful to install a heat curtain at the front door. This is the second problem area in private residential buildings. Residents of the first floors of apartment buildings often encounter it. The principles for placing the heater are simple: installation is carried out close to the entrance. Determine the site based on the layout features and pipe laying capabilities.
In addition to recommendations regarding installation length, experts advise adhering to the location standards under window frames in relation to the floor, window sills and walls.
The heating installation should be placed exactly in the center of the window. Before installation, find the center and mark it. Then, in both directions, calculate the interval to the fastening points. The gap between the product and the floor should be from 8 to 14 centimeters. If you make it smaller, cleaning under the radiator will be difficult; a larger distance will cause the formation of zones with cool air.
Measure 10-12 centimeters between the window sill and the radiator and begin installation. A closer location will worsen convection and reduce thermal output. The distance between the wall and the back wall of the device is 3-5 centimeters. Thanks to this gap, normal convection and heat distribution will be ensured. A shorter distance will cause dust to settle on the wall.
In addition, batteries can be installed in:
- extended interwindow spaces are a popular alternative option;
- corners and “blind” walls of corner rooms - enhance heating of spaces characterized by increased heat loss due to increased exposure to wind;
- bathrooms, pantries, bathrooms, in which one or two sides are connected by a load-bearing wall;
- unheated entrances, hallways of private houses;
- apartment corridors of the first floors of multi-storey buildings.
Modern examples of heating devices can be installed under the balcony door or above the entrance to the balcony.
Variety of heating radiators
The most traditional are cast iron models of heating radiators, which are familiar to everyone. Today, these units are used extremely rarely due to their large weight and the impossibility of installation in heating systems that operate automatically. However, these devices also have their own advantages, which distinguish them from batteries made from other materials.
First of all, the design of the heating radiator made of cast iron allows it to withstand severe pressure drops
In addition, such batteries are resistant to the appearance of corrosive deposits on them and withstand the effects of harmful impurities in the coolant, which is also important
The design of a panel-type heating radiator is somewhat different. First of all, these devices are significantly lighter than cast iron batteries. In addition, their walls are less thick, which reduces their inertia. The operating principle of a panel-type steel heating radiator is based on greater heat transfer compared to other models. In addition, the appearance of these devices is much more modern. Many consumers appreciate aluminum heating radiators. These radiators are also very light in weight, their heat dissipation is quite acceptable, and the design can be very different.
Sometimes you can find heating devices where aluminum is not the only material included in the product. In inexpensive devices, silicon is added as an addition, preventing rupture of the structure in the event of serious changes in pressure and temperature.
And those devices that are more expensive may contain zinc and titanium, since these substances are designed to provide the structure with increased resistance to various types of mechanical damage and protection against corrosion.
Preparation
Before the extension process itself, the battery must be removed and proper preparation done.
The preparatory work is as follows:
- Cleaning the heating device from dirt and rust;
- Checking the integrity of threaded holes and the presence of foreign formations on them in the form of growths that arise during the operational period due to hard and chlorinated water;
- If you find them, you can get rid of build-ups using sandpaper, but you should be careful to avoid damage, which can later lead to leaks at the joints.
How to add sections
After you have experimentally determined that the reason for the cool temperature in the house is not a clogged radiator, you should find a store near your home (so that you don’t have to travel far away and thereby waste your time) that sells heating equipment. You need to buy the same sections that your radiator is equipped with - made of cast iron, aluminum, or bimetallic.
It should not happen that you select inappropriate sections - because of such an error, you simply will not be able to add them, that is, the money spent will be thrown away, so be careful. The procedure for increasing sections is carried out in the same sequence of actions for all types of heating radiators.
To join sections, you need a connecting nut - nipple
Let's proceed directly to increasing the number of sections. The first step is to unscrew the fitting using a radiator wrench on the side to which you plan to add one or more elements. After you have unscrewed the fitting, a nipple (connecting nut) is placed in the area where the sections join. The following important feature must be taken into account: the threads at different ends of the nipple are different, and in order to correctly install new sections you must follow the following rules:
- The right side of the nipple should be directed towards the direction where the connection to the new element will be made;
- Accordingly, the left one is towards the already present sections of the heating radiator.
In order to prevent further leakage of the battery, you should put intersection gaskets on the nipple (they can be rubber, paranitic, or gel)
At the same time, they must be put on carefully and carefully - this will guarantee that the gasket will be positioned as evenly as possible, without unwanted distortions. Next you need to tighten the thread. This action should also be carried out without sudden movements, in a leisurely rhythm, and carefully
If you want to build a high-quality heating radiator, then there can be no rush
This action should also be carried out without sudden movements, in a leisurely rhythm, and carefully. If you want to build a high-quality heating radiator, then there can be no rush.
To prevent leakage, an intersection gasket is required
Damage to metal threads is extremely undesirable - this may result in not the most harmless problems, the solution of which will require you to additionally spend your own time and financial resources.
The enlarged radiator must be placed back on the bracket and the connection to the central heating pipe restored. To do this, you need to arm yourself with a wrench of the appropriate diameter and tow, which is necessary for wrapping the pipe threads when screwing the radiator.
It’s not difficult to add sections to a heating radiator; you don’t need to work in a team of heating installers for 10 years. But this process cannot be done without a serious approach, the availability of basic tools and the removal of your personal time. However, you can resort to the second option for solving the problem of insufficient heating of the room - becoming a client of a company providing such services, whose employees will do everything themselves, quickly and efficiently.
Calculation of the required number of sections
Table for calculating the number of battery sections.
Once you have decided on the choice of radiator, you need to correctly calculate its size. After all, even the most efficient radiator will not provide heat in the room if its dimensions are not capable of heating the room.
The basic value for calculating the size of the radiator and the number of sections is the area of the room. We offer a simplified (household) option for calculating the number of radiator sections.
As a standard, to provide the necessary heat in a room, 100 W per 1 square meter of area is sufficient. In a simple mathematical way we calculate:
Q is the required heat transfer from the radiator.
S is the area of the room.
This formula will tell you what radiator power to use to heat a room if the radiator is a one-piece, non-separable structure. If its scheme involves building up additional sections, then we add one more parameter to these calculations:
N – required number of radiator sections.
Qс – specific thermal power of one section.
To make the calculations correctly, you do not need a higher technical education. Just pick up a tape measure and measure the area of the room.
Please note that this formula is suitable for a standard apartment with a ceiling height of 2.7 meters; if the height of your ceilings is much higher, we recommend doubling the required number of sections!
Features of connecting sections of the device
Separately, it is worth considering the answer to the question of how to connect two bimetallic heating radiators to each other, that is, increase the number of sections. Sectional units made of bimetal come with a standard number of sections equal to 10. If necessary, this number can be reduced or increased by purchasing additional elements.
To unscrew the extra sections, you will need a special radiator wrench. The width of the blade at the end should be 24 mm, the total length of the key should be no less than the length of eight sections.
We proceed further in this order:
First, pay attention to the direction of the thread on the hole in the end of the heater. At the junction of the sections, insert the key so that the tool blade is in the area where the nipple is located. Turn the key against the direction of the thread
At this moment, a characteristic click should be heard. After this, completely unscrew the nipple and separate the parts of the heating device.
To add an additional section, work must be done in the reverse order:
We lay the radiator and pre-prepared sections on a flat surface. It is better to work on a floor covered with plastic film. We move the additional sectional element towards the device and install it at the junction of the nipple with the gaskets. We begin to carefully tighten the nipples. Since this element has a left-hand thread on one side and a right-hand thread on the other, during tightening the two sections are simultaneously attracted to each other. First, slightly grab the nipples on the lower and upper manifold, and then tighten them tighter
In this case, it is important to make the same number of revolutions on the lower and upper connecting elements so that the structure stands level without distortions relative to the entire device.
To ensure that the sectional unit was assembled correctly and efficiently, it must be checked for leaks. To do this, the device must be pressurized with compressed air. This can also be done using colored water or soap solution. The liquid is poured into the battery and after a few hours it is checked to see if there are any leaks.
Ability to add sections
Sectional type batteries are strengthened by adding one or more sections to them. At the same time, the apartment owner will not have to pay more for heating, unless, of course, special meters are installed in the home to record coolant consumption. The size and number of radiators does not affect the fixed bill amount, but the air temperature in the apartment increases significantly.
It should be noted that if the system power is initially incorrectly calculated (this applies to houses with individual heating), increasing the area of the batteries is not the best way to increase heat transfer. This method will significantly increase the load on the network.
conclusions
A balcony with a heater can become a full-fledged room. Heat can be transferred into it in various ways: simple and exotic. When using solar panels for an apartment, all electricity for heating will be free, but installation will be expensive. The innovative warm skirting board is the ideal solution for small balconies. The simplest heating option is a conventional battery, but for its installation you will need to obtain permission from the BTI.
YouTube responded with an error: The request cannot be completed because you have exceeded your quota.
- Related Posts
