The very idea of insulating a house with sawdust cannot but raise doubts, because crushed wood is a fire hazard and susceptible to rotting. Can it be used to backfill frame walls, floors and ceilings? Oddly enough, yes. And if everything is done correctly, the house will last for decades.
Sawdust insulation can confidently be called a time-tested technology. In the USSR it was actively used, which is reflected in SNIP II-A.7-62 “Construction heating engineering. Design Standards" 1962. Moreover, sawdust-fill houses erected in the 19th century still stand and are in use today.
To be fair, it is worth noting that most old buildings have rather thin walls - about 10-12 cm, and in cold weather they have to be heavily heated. In modern houses, the layer of sawdust insulation is much thicker - 30-35 cm, and they fully comply with heat transfer resistance standards. But what makes progressive developers abandon polyurethane foam and stone wool in favor of wood waste?
Advantages of sawdust
An important advantage of sawdust is its low cost.
Bag with a capacity of 50 l. costs on average 100-300 rubles, a compressed briquette weighing 20 kg will cost 200-230 rubles. And with some luck, you can get wood waste for free. Many industries are ready to give them away for free in order to save themselves the hassle of garbage disposal.
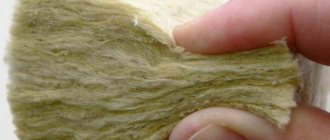
According to the thermal insulation characteristics of sawdust, covered with a layer of 10 cm, corresponds to 8-9 cm of mineral wool or 7 cm of polystyrene foam
However, the affordable price is not the only advantage of sawdust. This material has amazing durability. Synthetic insulation materials, such as polystyrene foam, polystyrene foam and polyurethane foam, last on average about 30 years (PIR boards retain their stated characteristics for up to 50 years). Mineral wool “lives” a little longer - 50-70 years. Shredded wood can retain its performance properties for 100 years or even more.
It is also worth noting such a useful quality for insulation as vapor permeability. Sawdust “breathes” perfectly, which has a beneficial effect on the microclimate of the house. In addition, the developer has the opportunity to save on vapor barrier membranes, which are simply not needed for this type of thermal insulation.
But that is not all. A house insulated with sawdust is never too damp or dry. The fact is that crushed wood is able to absorb condensation if the air becomes too humid, and evaporate it in the opposite situation. Polymer materials cannot boast of this.
And finally, let us mention the environmental friendliness of sawdust. They do not emit unpleasant “chemical” odors and do not pose a threat to the health of the inhabitants of the house.
Insulation technology
Often, dry sawdust or blocks of it are used to insulate the attic floor along the beams.
The technology consists of 3 stages:
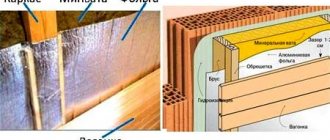
- Membrane installation. First, the beams and subfloor of the attic are wrapped in a vapor barrier membrane, with the vapor-permeable side facing down to allow air to pass through the sawdust. To save money, some use glassine, but this option is worse.
- Installation of insulation. Then sawdust is poured between the beams or blocks are laid.
- Installation of vapor barrier. A layer of the same vapor barrier is stretched over the beams on top. A ventilation gap of 20–50 mm is left between the membrane and the insulation. After which you can lay the floor of the attic.
If the bathhouse floor is insulated, then instead of a vapor barrier, waterproofing is attached to the bottom, most often foil or polyethylene. But for baths there is an even better option: a cement or clay mixture can be laid between the beams in its raw form and immediately leveled (as in the photo below), here you can do without a vapor barrier at all.
Laying the raw mixture directly between the beams
Disadvantages of sawdust
Of course, speaking about the advantages of sawdust, we cannot help but talk about the disadvantages. The first and main one is fire hazard . Despite the fact that compacted insulation does not readily ignite and smolders rather than blazes with a bright flame, it is much more afraid of fire than other materials.
In a house insulated with sawdust, it is important to strictly follow fire safety rules and keep a fire extinguisher on hand. A fire alarm would also be a good idea.
When giving preference to wood insulation, you should take into account that mice can live inside frame walls. However, this applies to all fill-in insulation. A fine-mesh metal mesh will provide reliable protection against rodents.
Another problem is susceptibility to rot, which can occur due to leaks, ineffective ventilation, etc.
And finally, the complexity of the installation process. Sawdust cannot simply be poured out of a bag and left to its own devices. They will settle, decreasing in volume by one and a half to two times, and voids will form at the top of the walls, which will become bridges of cold. Tamping required. It is made using a small wooden block or cutting a board every 20 cm of material.
In addition, pouring with lime milk is advisable. It makes tamping more efficient and also serves as an antiseptic for the wood, preventing possible rotting.
Watering with cement laitance should be done in spring or early summer so that the insulation has time to dry completely by the beginning of winter
Unfortunately, compaction cannot completely solve the settlement problem. After some time, the sawdust will be compressed even more under its own weight, and the backfill will need to be replenished. To do this, it is necessary to provide technical holes in the structure of the frame wall.
Insulation of walls with sawdust
Roof insulation
Floor insulation
What are the pros and cons of this type of insulation?
Advantages:
- environmentally friendly material, no harm to health or the environment;
- it is so easy to insulate with it that a novice repairman can do it;
- heat saving is very high, especially when a mixture with clay or cement is used;
- the material is very cheap from those used for ceiling insulation, and sometimes it can be purchased completely free of charge;
- the house will be insulated for a long time; of course, both the quality of work and the thickness of the layer play a big role.
How to determine the thickness of the insulation layer?
All other things being equal, sawdust requires a greater wall thickness than mineral wool and other artificial insulation materials. Which one depends on the region in which construction is taking place, the material of the enclosing structures and a number of other factors. In the most general terms, we can say that houses for year-round use require insulation with a thickness of at least 30-35 cm (for an energy-efficient building, a thickness of 40-50 cm is recommended); for a summer house or house for seasonal use, 25 cm may be sufficient.
Determining the amount of backfill material is quite simple. You need to multiply the perimeter of the house by the thickness and height of the walls, without subtracting the area of windows and doors (so that there is a reserve). If the floors are insulated with the same material, you need to make similar calculations and sum up the numbers. And then multiply the result by two, since sawdust, remember, settles quite strongly.
Insulating the attic with sawdust: preparation and methods
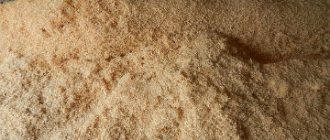
Sawdust is wood shavings that are formed as a result of processing wood materials. Insulating an attic with sawdust is an old and proven method that does not require serious financial and labor costs. This method of insulation is perfect for both commercial and residential buildings.
How to choose suitable sawdust for insulation?
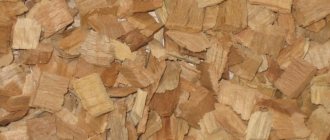
Both small and large sawdust are suitable for protecting a house from freezing, but the former are slightly warmer than the latter. You can also use wood chips and shavings. Both are cooler than sawdust, and the difference is on average 15-20%.
At the end of the topic, we note that it is advisable to dry the sawdust well before filling it. To do this, they are scattered under a canopy in a layer of no more than 50 cm and raked a couple of times a day for better ventilation.
Softwood sawdust most effectively resists rotting due to its high resin content - a natural antiseptic
Methods for insulating an attic with sawdust
1. Insulation with plaster
.
Before actual work, sawdust should be treated with an antiseptic composition. Next, the resulting mixture is thoroughly dried and mixed with fluff lime. Its use will protect the thermal insulation composition from small rodents - mice and rats.
The amount of fluff lime should be 10% of the total mass of the base composition that will be laid on the attic floor. The prepared mixture is thoroughly mixed to obtain a homogeneous composition. To achieve uniformity of the composition, prepare a wooden or iron shield, on which the components are mixed with shovels until smooth.
To ensure that the insulating composition does not shrink over time and become loose, which will lead to a noticeable deterioration in the characteristics of the heat-insulating layer, it must be supplemented. To do this, add 5% gypsum to 10% fluff lime and 85% sawdust.
When preparing the mixture, I use moistened sawdust. First of all, sawdust is mixed with fluff lime. After this, gypsum is added and the resulting solution begins to be quickly laid, because the gypsum component quickly hardens. Taking this into account, it is necessary to prepare the mixture in small portions so that everything is laid before the gypsum hardens.
. Otherwise, there is a high probability that the prepared mixture will harden even before it is laid on the ceiling.
The resulting mass, after the above-described manipulations, will have a porous structure and good heat-insulating parameters. Shrinkage, which will occur artificially due to the addition of lime, will increase the service life of the heat insulator and improve its thermal insulation characteristics. The prepared insulation is poured into the roof cavity 20-30 cm thick. After laying the insulation, it must be compacted well. After compaction, a dense layer of thermal insulation is obtained, which prevents heat from leaking from the interior of the house.
2. Insulation with clay
.
When preparing a solution with clay, sawdust must meet the criteria described above. To begin with, take five or six buckets of clay, which are filled with water. The clay should be well soaked, after which it is thoroughly mixed with water until a homogeneous mass is formed. Sawdust is poured into a pre-prepared container and the clay solution begins to be added little by little. The resulting mixture should have medium thickness and a homogeneous composition.
On the surface of the ceiling, from the attic side, ordinary film or glassine is laid, which is secured using a construction stapler. For summer rooms, the solution is laid in a layer of at least 5 cm, and for winter rooms in a layer of 10-15 cm and lightly compacted. The solution is then left to dry for several days. After drying, the layer of thermal insulation of clay and sawdust is examined for cracks. If any are identified, they are sealed with mortar or simply clay. After these manipulations, the insulation layer remains to dry longer until it hardens completely. After this, you can lay down the flooring from the boards for movement around the attic space.
For greater clarity, we suggest you watch the thematic video below.
Thermal insulation of a bath ceiling with sawdust
When installing a bath ceiling, the ceiling from below is hemmed with boards. Where the chimney pipe is laid, the boards are insulated with a piece of stainless steel and basalt wool.
The sequence of installation of thermal insulation of the floor is as follows:
- Lay a layer of vapor barrier with overlapping strips and gluing the joints. Place the material on the walls to a height of 100-150 mm.
- Lay out the sawdust mixture in layers, level it and compact it. For summer baths, the optimal insulation thickness is 50 mm, and for buildings used all year round - at least 150 mm.
- Let the insulation dry. Seal any cracks that appear. To reduce the likelihood of cracks forming, add salt to the prepared solution at the rate that 10 liters of water will require 75-90 grams.
- The mixture will dry within a month. After this, cover the surface with a layer of lime and lay a vapor barrier.
- Complete the rough plank flooring.
To protect a wooden building from fire, hide all wires in corrugated hoses and cover the ends with fire-resistant material. The described recipes for mixtures for thermal insulation of ceilings are suitable for insulating the walls of residential and commercial buildings.
Laying insulation
What layer of sawdust is needed to insulate the ceiling depends on the composition of the thermal insulation. You can use pure sawdust or a mixture of sawdust with other materials, such as lime, cement or gypsum.
Clean sawdust
The installation sequence consists of the following steps:
- On the prepared surface of the attic floor, sawdust is scattered in a layer up to 200 mm thick. The surface is carefully leveled to the same level as the top edge of the beams. However, you should not compact the layer.
- A layer of stove ash is poured on top. You can use a vapor-permeable membrane instead. This layer will effectively remove moisture from the material to protect it from rotting. Due to one-sided vapor permeability, the membranes do not allow moisture from the room to penetrate into the insulation.
- After this, a plank floor is laid over the beams. Be sure to leave a small gap between the boards to ventilate the floor structure. Although in the case of an unused attic, it is not necessary to lay flooring.
If the use of clean shavings is not suitable for some reason, the question arises of what to mix sawdust with to insulate the ceiling.
With the addition of lime and cement
Sawdust in combination with cement and lime is suitable for insulating the ceiling. To prepare the insulation, take all the ingredients in the following proportions:
- lime - one part;
- water - from five to ten parts;
- dried shavings - ten parts;
- cement - one part;
- copper sulfate to protect against rot and mold.
Sequence of preparation of the mixture:
How to make a ceiling in a private wooden house and do-it-yourself finishing
- First mix lime and cement.
- Place the prepared dried sawdust in a container of sufficient volume (you can take a concrete mixer).
- Add the cement-lime mixture there and mix thoroughly.
- Slowly pour in the copper sulfate solution. To prepare it, dissolve three tablespoons of the substance in ten liters of water. Use a protective mask and gloves while mixing.
- Mix all ingredients well. The mixture is ready when, after squeezing in your hand, a crumbly mass is formed from which water does not drain.
Important! If the mixture is prepared to insulate a bath ceiling, then copper sulfate is not used, because when the insulation is heated, it can be released in the form of harmful fumes into the air.
The prepared solution is scattered over the attic floor in a layer 250 mm thick. It is carefully compacted, otherwise after drying it will become porous and shrink.
With the addition of lime and clay
All ingredients are taken in the following proportions:
- lime - one part;
- dried sawdust - ten parts;
- clay - five parts;
- water - from seven to fourteen parts.
Cooking process:
- Add a little water (no more than two parts) to the clay until completely soaked. The mixture is stirred until a creamy consistency without lumps is obtained.
- Separately mix sawdust with lime and add them to the clay solution. Stir the mixture and add shavings if necessary.
- To check the readiness of the solution, use a wooden stick. It is inserted into the mass vertically and wait a few minutes. If during this time the stick does not fall, then the composition is ready. If the solution is prepared too thin, it is allowed to sit for a day. During this time, excess moisture will evaporate.
If a mixture with the addition of gypsum is used, then laying and compacting is carried out as quickly as possible, since the gypsum sets quickly. For the same reason, the solution is prepared in small batches.
Liquid mixture of sawdust
The liquid mixture is laid in several layers of small thickness. Each layer is carefully leveled and compacted. Laying continues until the top of the floor beams is reached.
A thin layer of ash is poured on top to protect against mold and pests. After 2-3 weeks, the liquid mass will completely dry. After this, a layer of vapor barrier is laid. To do this, polyethylene film is attached to the floor beams with brackets.
After laying any type of insulation, a rough or finished plank floor is installed on top of the beams, depending on the purpose of the room. You can also lay metal reinforcing mesh over the beams and pour a cement screed.
Scattering sawdust over the ceiling
Filling the attic with sawdust in an even layer, of course, will not work. It is necessary to further level them. It is very convenient to do this by making a kind of shovel - just screw a piece of board to the handle and the convenient tool is ready. And then evenly distribute each batch, raised and poured onto the floor, according to the level of the laid beams. Wood dust, rising during work with sawdust, can become clogged in the respiratory tract and cause irritation of mucous membranes and skin. Do not neglect the elements of personal protection. A simple respirator, gloves, safety glasses. Clothes should be tightly buttoned and tucked in.
Ceiling preparation
Before starting work, the surface must first be prepared:
How to properly and how to insulate a ceiling in a wooden house with a cold roof
- Hem the plane with a board 2.5-3 cm thick, the width depends on the pitch of the beams. The boards selected are tongue and groove, planed, and dry.
- The plank flooring is laid on top of the laid vapor barrier layer, in a continuous order. Fix with nails 100 mm long, screws with a stem length of 50-60 mm. Two hardware is enough for each fastening point.
On a note! Drive nails into boards at an angle so that the direction of adjacent nails does not coincide - this will strengthen the fastening.
Impregnate all wooden elements with antiseptic and fire retardants, and it is best to do this before starting work. If the hemming boards are not sufficiently dried, dry them, then process them and dry them again.
Special option for ceiling insulation using sawdust
Not everyone knows the intricacies of insulating the ceiling plane in houses built of wood. In general, the insulation method is similar to that described above, but has a number of important nuances:
- All structures consisting of wooden elements must be treated with a special water-based antiseptic before the insulation process. In addition, a fire protection solution is applied. Large cracks can be removed by blowing in foam.
- Special geotextiles are laid on the base of the ceiling.
- First, coarse shavings are introduced into the space between the floor beams, and on top of it - a layer of sawdust of the smallest size.
- A final layer of impermeable fabric (agrotextile) is placed on top. Then the thermal insulation is covered with boards or a selected material in sheets (OSB, plywood, etc.).
With this installation method, the use of films and membranes for vapor barrier is not required. The steam escaping from the living space of the rooms easily penetrates the thickness of the loose insulation. After which it is also easily removed into the external environment using air ventilation. In a house built of wood, there is no problem of condensation or an abundance of water vapor. Adding lime in this case does not make any sense. Under the influence of carbon dioxide brought by water vapor, this substance will become ordinary chalk in just a few months. To protect the insulation from pests, it is better to use ash or fine slag.
About sawdust as a material
Today, a variety of materials are used for thermal insulation of roofs, wall structures, floors, attics or interfloor ceilings. But sawdust, slag and shavings are considered the cheapest raw materials for creating an insulation system. Due to their low price, they are widely used in construction.
Sawdust is the cheapest option for insulating an attic.
Opponents of sawdust put forward arguments that waste from the wood processing industry has outlived its usefulness. But our grandfathers and great-grandfathers often covered roofs or walls with them, and many structures still exist. Moreover, the thermal insulation characteristics have not deteriorated, despite the impressive service life. The main advantages of using sawdust as insulation:
- availability;
- environmental friendliness;
- durability;
- ease of installation.
Ensuring the functionality of sawdust as insulation
We have already mentioned the need to protect sawdust from high humidity, but sawdust insulation technologies are not limited to just one method of elementary filling with dry sawdust. Since wood waste is highly flammable, sawdust as insulation can be treated with fire-fighting mixtures. There is an option when sawdust is poured onto a layer of river sand (0.5 cm), mixed with quicklime and carbide (this also works well against mice), and covered on top with a layer of slag and dry earth (5 cm). Sometimes the top layer of insulation is covered with clay.
A mixture is often used where lime, gypsum, and cement are added to sawdust as additional components. Insulating a house with sawdust does not mean giving up new technologies. Sometimes this is just an opportunity to optimize your costs taking into account modern technologies and traditional materials.
The Teplostroy company has significant experience in insulating residential buildings; we are ready to give advice on proper insulation of a house, select hydro- and vapor barrier materials, and deliver them to the site.
Arrangement of sawdust on the attic floor
The vapor barrier membrane is spread over the entire surface of the ceiling. If you decide to use polyethylene film, you should take into account its susceptibility to mechanical damage and poor resistance to low temperatures - ensure a loose fit, without interference. The vapor barrier should cover not only the space between the beams, but also the beams themselves (describe the surface). It is advisable to seal all joints with tape or lay them with a significant overlap. And sawdust is already placed on the vapor barrier - over the entire surface of the ceiling, filling the space between the beams in an even layer. It is only necessary to ensure that the chimney is thoroughly insulated with fire-resistant material from organic insulation.