Here you will learn:
- Design of a Russian stove with a stove bench
- Advantages and disadvantages of the oven
- Choosing an order
- How to build a Russian stove yourself
- Preparation of clay solution
- Construction techniques
- Do it yourself or order work
- Correct operation
The main distinguishing feature of such a device is the large dimensions of the furnace. In order for an adult to fit on the floors, the length of the entire structure must exceed two meters and the width one and a half meters. The bed itself is located above an elongated furnace, which ensures a constant flow of heat.
Previously, in traditional models, the floors were located under the ceiling, at a height of about 1.8 m, and were climbed onto them using an attached ladder.
This ensured longer preservation of heat - when the hut cooled down in the morning, on the floors, due to the distance from the floor, the temperature was still quite high.
Nowadays, the bed is placed at a comfortable level of about one meter, because modern materials have better thermal insulation of the house.
Reference. In previous years, a high furnace was traditionally built - in addition to heating functions, it was used as a home mini-bath, so it had to accommodate a person, which also influenced the height of the floors.
The scheme, which includes both a hob and a bed, remains the most common. To build such a structure, lightweight schemes have been developed that even a not very experienced builder can handle. The disadvantage of such a stove will be the reduced efficiency of heating the room compared to other models.
Design of a Russian stove with a stove bench
Dimensions of a classic stove: width about one and a half meters (two arshins); length - just over two meters (three arshins); the bed was placed at a height of approximately human height - approximately 180 centimeters (or two and a half arshins), the height of the hearth was approximately 45 cm, the height of the hearth was taken equal to the height of the table.
The stove was erected on a foundation made of small fragments of brick, stones, or less often on a log foundation (oak, pine and other species). The structure was erected at the same time as the house, but their foundations are by no means built together; isolation is a must. The oven itself was built either from baked bricks or from adobe (in those families where income did not allow the use of red brick for construction). The first “dymnitsa” (chimneys) were made of wood, then, due to the fire hazard of the material, wood was replaced with stone and brick.
Furnace design: furnace - firebox, place where fuel combustion occurs; pole and sub-rack - auxiliary table for dishes and a niche under it; under – the bottom of the firebox; hailo - a hole for releasing smoke into the hut; oven - space for storing firewood; mouth - a hole for storing firewood, closed with a flap.
Improved heater options
Many Russian masters were involved in the modernization of the classic stove - I. Kuznetsov, I. Podgorodnikov, A Emshanov, A. Batsulin. The essence of the changes is as follows: the details of the old design were taken as a basis - the vaulted furnace, the bend and the high above the mouth. New functional elements were added to them:
- Instead of a hearth, a hob is placed, and a small flood is arranged below. A parallel summer passage shaft is laid out, connected at the top with the main smoke collector.
- Hot gases from the additional firebox are directed through smoke circulations made in the lower part - the stove. Then the combustion products are discharged into a common pipe.
An example of modernization - in winter mode, gases from the furnace and furnace heat the lower part of the structure - At the end or on the sides of the furnace, vertical channels are installed, again leading to the lower zone under the firebox, then into the chimney.
- The channels from the firebox go into the attached heating panel and out through a combined pipe.
- The firebox is made from the bottom of the furnace and communicates with it through a grate installed in the hearth (bottom) of the main firebox. Gas ducts from the furnace penetrate the furnace and converge into a vertical shaft leading into the chimney.
Note. The changes made allow the stove to be heated in two ways: in Russian (the smoke comes out through the mouth and high) and in the heating and cooking mode (gases move around the channels).
Another example - there are vertical passages in the side wall that form a heating shield.
We tried to clearly describe common concepts; there are many more existing options. The purpose of the changes is to improve heat transfer and functionality of the basic design. If desired, a water circuit register or an oven is mounted inside the flues (the cabinet is placed next to the firebox).
Now we will analyze the updated options in detail using specific examples - with drawings and procedures.
Advantages and disadvantages of the oven
Among the positive qualities of the heating device, the following is noted:
- Cheap design. To build the unit, you will need a minimum of materials: red brick, clay and sand.
- Economical. The efficiency of the simplest device exceeds 60%, and the efficiency of a more complex design is more than 80%.
- Works equally well on various types of solid fuel.
- Functionality (cooking, heating, warm sleeping place).
- The long operating time of the stove allows it to be heated once a day.
- Has therapeutic properties. Food is cooked in it without direct contact with fire and superheated gases. At the same time, the optimal temperature for cooking is maintained. Thanks to these features, carcinogens and toxins are not formed in food. As for relaxing on a bed, six hours of sleep is enough to feel alert and alert in the morning.
- Safety of use. The flame burns deep in the furnace. Sparks can only appear in severe frost.
- Durability. Service life exceeds 30 years.
- The interior of the room with the Russian stove is original, unlike any other.
Disadvantages of a heating unit include the following:
- Possibility of using only solid fuel, which burns slowly. Something that burns quickly requires a lot of air, which can lead to a fire hazard.
- The need for fuel procurement.
- Low heat transfer.
- Not suitable for apartment buildings due to poor smoke circulation. If there is only one channel, combustion products will be removed from the furnace that is heated hotter than the others, while other units will begin to smoke.
- It will take a day to completely heat the device when cold weather sets in.
- The slightest flaws made during the construction of the unit can manifest themselves during operation.
- Takes up a lot of space in the house.
- The need to get rid of waste.
- The air below does not warm up. However, today it is possible to create equipment with bottom heating.
Specifications
Modern modernized Russian stoves with a built-in surface for cooking allow you to slightly modify the usual design options and customize them “to suit you.” Using a stove, you can use an additional source of heating, since in this case it becomes possible to heat the side panel or lower stove part without the main firebox running.
In the case of side heating, the adjacent room will be supplied with heat. As for the lower heating, all the walls of the heating chamber are heated here. Thanks to this feature, one large room can be heated while cooking.
Choosing an order
A stove with a stove bench is, first of all, a correctly chosen scheme and order. It depends on it how effective, useful and safe such a heating device will be installed in the house.
A large, spacious lounger warms up well and transfers some of the heat into the room
A large open hearth partially performs the heating function and is intended for cooking
It’s interesting to know: such a brick structure, powered by wood, can have either small dimensions, a bench and combustion chamber, or a more complex structure. The second type involves building a stove with your own hands, additionally equipped with an oven and hob.
Stoves with a stove bench and a hob can also be used for comfortable rest, drying berries, mushrooms, clothes, and shoes.
In addition, brick stoves with a stove bench provide more efficient, uniform heating of rooms. The best heating units are those based on combustion chambers equipped with a long-burning function. Also, long-burning fireboxes belong to the category of the most efficient and economical in terms of consumption of firewood and other types of solid fuel.
A small Swede for a summer residence, equipped with a trestle bed
A stove with a stove bench can be constructed with your own hands according to the Swedish principle. For this, appropriate drawings, orders, and videos are selected. This unit is also complemented by a hob and oven.
Swedish brick stoves are complemented by many stove makers with a stove bench. They are installed between two rooms (bedroom and kitchen) and are capable of uniformly heating rooms with a total area of up to 30 square meters.
The unit, assembled with your own hands from brick, operates in summer and winter mode. To operate in summer, it is necessary to open two existing dampers at once. In the winter season, only one opens, due to which the entire oven begins to warm up, and the heated air masses begin to pass through a long chimney system.
It is interesting to know: the base of such a unit is small, its size is 1148x765 millimeters, with the dimensions of the trestle bed being 1785x638 millimeters.
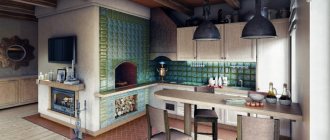
The lining of the Russian stove with a sunbed is made with one of the most expensive materials - tiles
All traditional Russian stoves installed decades ago were additionally plastered
For construction we will need:
- Red brick 900 units;
- fireclay brick 200 units;
- Blower, door for the combustion compartment, fire doors, grate, hob, steel corners (purchased separately or made to order).
How to build a Russian stove yourself
Classic stoves had dimensions of approximately 2000x3000 mm. Modern designs are considered dimensional if they reach a size of 1500x2300 mm. Small structures include structures with a length and width of up to 1800 mm.
There are several types of similar designs. But they all consist of a number of common elements:
- heating stove;
- bed;
- oven;
- hob;
- ash pit.
There may also be a place for utensils and a woodshed. To build a structure, you need to have an ordering diagram. The article discusses in detail the order of masonry. But first you need to take care of the base.
Work process for constructing a furnace
Foundation structure
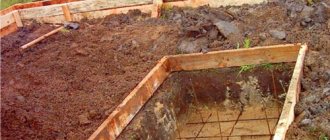
The total weight of the structure will be several tons. Such a mass requires the creation of a solid foundation. The base area should be approximately 10-15% larger than the stove base.
The depth of the pit for filling is determined at the rate of 50 mm for every 1000 kg of weight. In our case, we will need an impressive pit.
Remember! The minimum distance of brickwork from the wall is 15 cm
Having retreated the required distance from the wall, they dig a hole, the bottom of which is covered with sand and rubble. Bulk materials are thoroughly compacted. The main depth of the pit is reinforced with steel and filled with concrete. The top of the foundation should be several centimeters below the floor level.
The foundation is allowed to stand for about a month. Cement-sand mixtures crystallize within 4 weeks. The minimum curing period for concrete is 2 weeks. But it’s better not to rush things.
After the composition has completely set, the base is waterproofed. This builds protection against possible penetration of groundwater into the thickness of the furnace. Now you can start laying.
The procedure for laying a stove with a comfortable bench
To build a stove structure, heat-resistant fireclay and/or red bricks, clay and metal fittings (doors, valves) are used.
Order of the stove masonry
When laying a stove with a comfortable bench, you must follow the order. It will not be easy for a non-specialist to understand the jungle of the diagram, so each row is illustrated separately.
Recommendation! If you do not have a professional background as a stove-maker or bricklayer, use the level more often. Achieve strict horizontal and vertical masonry.
- Lay out the first row. This is the most critical stage, on which the quality of the rest of the masonry depends.
- It works the same way.
- The blower door is mounted on this row. It must be taken into account that when heated, metal fittings will increase in volume. Therefore, it is necessary to install the door, avoiding touching it end to end. Typically, strips of asbestos are placed between the stove dampers and the masonry to compensate for expansion.
- Here the schematic laying continues in the same vein as in the previous row. The brick turns out to be “flush” with the fittings.
- Here they start laying the firebox. For this reason, the chamber is reinforced with a lining - it can be seen in the illustration by its different shade. The channel arrangement starts. Install 3 doors for cleaning chambers. The blower damper is completely covered with brick.
- The row duplicates the previous one. The fittings are completely covered with fire-resistant ceramics. The grate is also placed here. Be sure to monitor the brick dressing.
- Arrange caps (vertical channels). The firebox is reinforced with heat-resistant material. Install the firebox door.
- The installation of caps and linings continues. Lifting and lowering “passages” are formed.
- The row duplicates the previous one.
- The row duplicates the previous ones. The caps are already almost 100% laid out here. The lining layer is still being formed.
- The firebox damper is completely covered with masonry. 4 suction channels are installed. The first is carried out from the firebox - into the lifting one, a pair - between the caps. Since the formation of the boundary between the firebox chamber and the chimney (hail) begins here, the fourth channel is made from it - into the side hood.
- In general, the 11th row is being duplicated. The caps are already completely done. Other elements in the process of formation. The lining at this stage tapers into a dome-shaped structure.
- Fireproof reinforcement of the firebox is completed. The firebox and caps are also completed.
- The formation of the overlap continues. At this stage, it is especially important to control the vertical and horizontal, while not forgetting to correctly tie the masonry.
- The formation of the channel continues, which is clearly visible in the illustration. One of the features of this wood-burning structure is the presence of an original side designed for filling with sand. This is not necessary, but warm sand increases the healing properties of the bed. Installing the side does not require much effort, so it is recommended not to abandon it - it will most likely come in handy during the operation of the stove.
- From this to the twentieth rows form a smoke exhaust channel and a protective wall. Despite the lightness of the “extension”, you should carefully monitor the quality of the dressing.
- The next step is to install the stove damper on the smoke exhaust duct.
- This row ends the laying of the protective wall. The chimney damper is completely closed.
- The chimney is laid out from this row to the end. After this, the stove is ready. Despite the intricacy of the design, such a stove with a stove bench can be made with your own hands even by a person far from the stove business.
Recommendation! However, despite the step-by-step instructions, it is better to consult a professional. An experienced stove maker will be able to take into account the individual characteristics of the house and advise on the optimal layout of the structure.
Another ordering option
We will not dwell on this option in detail. From the previous diagram it is easy to understand what each element in the illustration represents.
Figure 5. Layout diagram of another furnace option
This model is one of the simplest. However, it is effective and efficient. Unlike more complex structures, the execution of this one can also be entrusted to even a relatively unprepared homeowner.
Figure 6. Alternative design with a bed
Damper design
The design of the damper is shown in the figure below, where 1 is a sheet of roofing steel, 2 is a handle made of strip steel, 3 is legs made of strip steel to stabilize the damper, 4 is a frame made of angle steel 25x25x3 mm.
It is recommended to make a frame from strip or angle steel and insert it into the masonry of the mouth and then fasten it. In this case, it will serve as formwork when making the arch.
1 – roofing steel sheet; 2 – handle made of strip steel; 3 – legs made of strip steel for stability of the damper; 4 – frame made of angle steel.
Another diagram of the furnace masonry
*
We will not dwell on this option in detail. From the previous diagram it is easy to understand what each element in the illustration represents.
Figure 5. Layout diagram of another furnace option
This model is one of the simplest. However, it is effective and efficient. Unlike more complex structures, the execution of this one can also be entrusted to even a relatively unprepared homeowner.
Figure 6. Alternative design with a bed
Preparation of clay solution
To build and paint a Russian stove at your dacha with your own hands, you will need 3.5 m3 of mortar. To do this, take a certain amount of components and dilute them with water.
You can use an iron barrel as a container. Soak the clay in water and leave it for a couple of days. Next, add sand, and thoroughly mix the entire solution with your feet (after putting on rubber boots) until the mixture is homogeneous. Since the width of masonry joints is no more than 3 mm for fireclay bricks, all large pebbles must be removed from the mortar.
Installation process
If you nevertheless decide to lay the furnace with your own hands, then familiarize yourself with the features and technology of carrying out the main work. This will help you complete the process correctly and avoid mistakes during installation. According to experts, many are able to complete all stages of construction without outside help.
Foundation and foundation
It is very important to take care of constructing a reliable foundation for a brick structure. It must withstand heavy loads and not sag under them.
The lower part of the oven is reserved for baking and remains free. It is convenient to store household supplies and kitchen utensils there. Concrete slabs or steel beams in combination with brick are chosen as the floor for the oven.
Due to the high fire danger, the use of wooden supports is not recommended, but is not prohibited. If you still cannot replace such material with anything, do not forget about antiseptic wood treatment. Otherwise, the ceiling may be damaged by insects.
It is also necessary to pay attention to the seams and their correct processing. They should look neat after applying the cement mortar. External walls are plastered with conventional mixtures intended for interior decoration.
Construction techniques
Opeche
The wooden guard supports a stove weighing up to 1600 pounds (approximately 750 kg), i.e. small or medium without baking. It is made in the form of a log house with two belts, backfilled with rubble and a flooring made of beams. The flooring is covered with felt, properly soaked in a liquid solution of fatty clay, and roofing iron is applied over it.
Wooden stoves are a fire hazard and are now prohibited. Now Russian stoves are placed on a foundation made of brick or concrete blocks, or simply on a concrete floor. If the stove is on a foundation and it is intended to be lined, the foundation around the perimeter must be additionally extended by half a brick, taking into account the mortar layer.
Arches and vaults
Arches and vaults are laid out from an ODD number of bricks on formwork on wooden templates - circles. First, a life-size cross-sectional drawing of the arch is made, then the castle bricks are hemmed onto the wedge. A do-it-yourselfer need not try to lay out a vault with a direct lock or without a lock; not every experienced mason can do this.
Next, the circles are prepared taking into account the thickness of the formwork boards and the vault is laid on them without a lock. Then you need to thickly lubricate the grooves of the locks with the solution and insert the locks into the groove. The next stage is to gradually hammer the locks into place one by one and in several passes. You can't get by with a mallet; you have to use a log. But you can’t beat like crazy; you need to use the inertia of a heavy log, and not the force of a sharp blow.
The quality of the vault closure is controlled by squeezing out the mortar sausages from the seams: it should be more or less uniform over the entire surface. The thick solution flows slowly, so you need to take breaks between passes. The result is a prestressed structure; Only such a vault will last for many decades.
Material consumption
The classic Russian stove described above, depending on the size, requires approximately the following amount of materials:
- Small - 1500 bricks and 0.8 cubic meters. m of solution.
- Average - 2100 bricks and 1.1 cubic meters. m of solution.
- Large - 2500 bricks and 1.35 cubic meters. m of solution.
Note: “approximately” means that some of the material in inexperienced hands will go into battle. Most likely, the vaults will have to be rebuilt at first.
Possible difficulties
When building it yourself and lacking experience, it’s easy to make some mistakes:
- Use of low-quality materials - cheap bricks often have defects or crack when heated to high temperatures.
- If you do not soak the brick before construction, it will draw moisture from the mortar, which will lead to uneven drying and deterioration of the strength and tightness of the masonry.
- The seams between the bricks are filled unevenly and not tightly enough - this later leads to a violation of the seal.
To avoid these and other mistakes, before starting work, it is better to seek advice from an experienced specialist.
What tools are needed?
To build a heat source at home, you need to prepare a basic set of tools:
- hammer-pick;
- Master OK;
- rule;
- grinder, cutting wheels for stone, metal;
- measuring instruments - building level, ruler, square, plumb line;
- carpentry tools to assemble the foundation formwork;
- wooden arrangement;
- several containers and devices for mixing the solution and breaking up the clay.
For construction you will need bricks and a sand-clay mixture for mortar. The amount of material should be based on the scale of the work. You will also need stove fittings - a blower, combustion and cleaning doors, grates, a smoke damper, a hob.
Do it yourself or order work
Does it make sense to take on such complex work yourself? How much does the work of an experienced and reliable stove-maker cost? If 100% of the cost of materials, as is customary in general construction work, then it is not that expensive.
By no means, not twice as much against the material. You can come across offers to build a stove for 20,000 rubles, but this is obvious nonsense. Let's try to figure it out ourselves.
Russian stove with stove
A stove maker works in mid-latitudes for six months, and always with an apprentice. Considering their employment at 100% of working time, the salary of a master at 25,000 rubles, and an assistant at 15,000, and the work completion time is 7 working days (this is a completely realistic period), we find that a simple stove will cost no less than 45,000 rubles, and a Russian stove with a stove and water heater (see figure) at 55,000-60,000 rubles.
But in a week it will be possible to heat it. There is only one condition: the master must tell where, when and to whom he has already installed the stoves, and they must be inspected personally. Good masters always stock up on recommendations, and if they hesitate and mumble, it’s better to turn to someone else.
Foundation
The stove has impressive dimensions and weighs a lot, so it needs reliable support.
The work algorithm is as follows:
- Prepare the pit. Calculate the dimensions based on the stove base. On each side you need a margin of 15 cm. Go deep by 50-70 cm.
- Pour sand, pour water, compact it so that the thickness of the waterproofing becomes 15-20 cm. Pour more sand, pour water and level it.
- Lay out the roofing material in 2 layers.
- Install the formwork and cover it with film.
- Mix cement, sand and crushed stone 1:3:5. Use water to get a semi-liquid mixture.
- Pour cement mixed with gravel into the formwork, 20 cm high. Pierce this layer several times to let the air out, compact it.
- While the solution has not hardened, install the reinforcement. Height above concrete 5-7 cm.
- Fill another layer of 10-15 cm, when it sets, lay the reinforcing mesh.
- Fill the entire formwork with mortar and level it.
- Lay roofing felt in 1 layer.
If you are planning a small stove, then a guard base is allowed. Install it on the floor beams. Such a base is a frame made of timber or logs with 2 crowns. To strengthen the beams and stabilize the furnace, intermediate piles are driven into the center. Rubble is poured into the free space, with felt soaked in liquid clay on top. This base can support construction up to 700 kg. If the weight is greater, then a slab foundation is needed.
Correct operation
To use the device correctly and safely, the following rules must be observed:
- Carefully monitor the condition of the chimney and clean it from ash in a timely manner.
- Before each kindling, check the quality of the draft - this will help prevent smoke from entering the room.
- If the stove has not been used for a long time, a thorough inspection is carried out for damage and cracks.
- You should not light a stove while intoxicated or very tired; it is not recommended to leave small children alone near a burning stove.
Precise construction and compliance with all operating rules will ensure high-quality operation of the stove, efficient heating of the house, and the preparation of delicious traditional dishes.
Varieties
A do-it-yourself stove can be built with a shield built into the body (structure) of the stove, and then in appearance it is indistinguishable from the stove, pos. 1 in Fig. The rough-slab is compact, the least material-intensive, the lightest, and requires a minimum amount of additional construction work, but its thermal power is limited to 10-12 kW, and then with great effort. Therefore, rough slabs are installed mostly in seasonal dachas (spring-autumn) with occasional trips there in winter, hunting lodges, etc. An important advantage of a rough slab is that it can be built without a foundation directly on the floor, if its load-bearing capacity is at least 500 kgf/sq. m.
Types of rough ovens
A rough structure with an attached shield (item 2) is structurally more complex and heavier, although a simplified foundation (see below) is also suitable for it, but its thermal power is potentially greater. A wood-burning grub with an attached shield can develop up to 16-18 kW; on coal - up to 20-22 kW. The diagram of the flow of flue gases in the hood with a shield is given in pos. 3; This is how the popular Galanka stove was built. However, you need to know that there is no point in building a furnace with more than 3 revolutions: such a furnace with a single cycle will be simpler and cheaper. In addition, during construction it will be necessary to pay special attention to some of the features of rough stoves, the consideration of which is devoted to a significant part of the article.
Note: roughing on wood can also be done with a stove bench, see below. It is not advisable to heat such a stove with coal; the stove will overheat.
Why is it rude - rude
Visually, a rough stove can be distinguished from a stove with a later added shield due to the integrity of the structure (item 4), but in essence they are one and the same. The calculation of a heat-efficient furnace is very complex and requires fairly deep knowledge of heating engineering, and the development of a furnace design based on its results also requires solid practical experience. It is much easier to design and build a rough fire because its furnace (fire) part and the shield are calculated separately, and then “molded” together according to the rules for pairing building structures, taking into account the requirements of heating engineering. Naturally, the thermal efficiency of the resulting device will be lower, because the interaction of the thermal cycles of the fire part and the shield is not taken into account, and it is by taking it into account that it is possible to increase the efficiency of a single cycle furnace. Therefore, if you live in an area with a harsh climate, a rude stove may only make sense for you as a seasonal stove for temporary use.