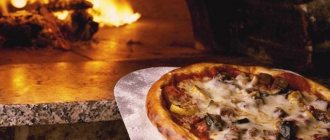
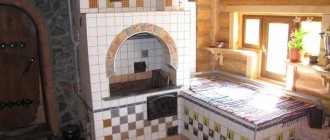
This oven is used specifically for baking pizza or bread. Her homeland is Italy. We talked about the principle of operation and main design features in the article “What is a Pompeian stove.” It is the arch that distinguishes it from a regular barbecue oven. The roof of a wood-burning pizza oven can be shaped like a hemisphere, or it can look like a barrel cut lengthwise. This is the so-called “cooperage” vault.
Now we want to offer you a project for a pizza oven with a barrel vault.
All brick ovens for cooking are built from fireproof materials: fireclay bricks held together with fireproof mortar on fireclay clay.
The stove is heated with wood, then, when the wood burns out and the combustion chamber warms up, the coals are moved to the side. The pizza or bread is placed directly on the brick oven and cooked using residual heat.
Attention! Pictures can be enlarged by clicking!
DIY pizza oven
Dear visitors of the site “Visiting Samodelkina”, in the article offered to you we will talk, as you probably guessed from the title, about the construction of a miracle oven for baking bread and pizza.
Today, suburban construction is very developed, a lot of people want to live closer to nature, breathe fresh air, drink clean spring water, and just enjoy life) Suburban construction is encouraged by the authorities, as well as business, that is, the authorities allow, well and the business provides all the necessary materials for the construction of a house, or any other building. Also, in addition to building private houses and dachas, people try to bring the coziness and warmth of home to the site as much as possible, namely, they build all kinds of barbecues from different types of materials, iron or brick, make barbecues, tandoors, all kinds of ovens, all these buildings are different, Every owner tries to do something unusual and unique.
With a fireplace on the site, relaxation becomes doubly pleasant; you can always cook a lot of delicious delicacies) and just sit by an open fire with a cup of tea and think about various topics, what could be better.
So our author got the idea of creating an oven for baking bread and pizza in his summer cottage. The main task facing the master was to make the oven small in size and quite compact, as well as save as much as possible. After much thought and searching, he came across an article on the Internet, where the photo showed a small functional stove with a detailed description of the construction stages. This oven was invented in Italy and is called Pompeian, as you know Italians are big fans of pizza, in fact they gave this cheesecake to the whole world)
The author really liked the dimensions, besides, this stove does not require a foundation; under its base you can make either a metal table, or some kind of structure made of boards and timber.
For construction, the master collected used bricks, he made 2 pallets of them and made a base for the stove, and also prepared all the related materials. And so, in order to understand how the author managed to build this miracle, you should very carefully familiarize yourself with the photographic material made by the author for his followers, as well as study the list of necessary materials and tools for subsequent work.
Materials
1) used brick 2) 2 pallets 3) cement 4) sand 5) gravel 6) clay 7) bucket
Tools
1) shovel 2) mallet 3) spatula 4) trowel 5) hammer 6) hacksaw 7) ax
And so, first of all, the author prepares the site for the location of the future furnace.
Next, prepare the solution and knock together 2 pallets.
Thick plywood is nailed on top and sides are made from boards, where the cement slab will subsequently be poured.
Fills and levels the base.
I left it to harden for a week, then I decided to test whether the base would withstand the weight of the oven, and to imitate it I stacked all the prepared bricks.
Everything is fine) I sorted it out.
Started laying.
I made an arch and an opening.
He does everything very carefully and measuredly.
Step by step.
The preliminary preparation is ready.
Then he proceeds to laying the dome.
Pay attention to the pipe, its author made it from a simple bucket. Row after row the dome rises
Row after row the dome rises.
For ease of laying, a pile of sand wrapped in plastic film is placed inside the cone.
There's just a little bit left.
And now the dome is ready.
Then the craftsman plastered the stove.
I let it dry for another day.
This is what happened.
Oven inside.
Tries to flood and check traction.
Everything is fine, we can move on to serious matters.
According to tradition, the first pancake is lumpy)
Attempt No. 2
Become the author of the site, publish your own articles, descriptions of homemade products and pay for the text. Read more here.
Construction Materials
Fireproof Bricks
The so-called fire brick is used in pizza ovens due to its ability to withstand high temperatures. These bricks are made from fire clay with high alumina content.
Refractory solution
In some places where it is difficult or impossible to use refractory bricks, refractory mortar is hammered in. However, it should be taken into account that the maximum use of refractory mortar should not be more than 6 mm. A higher value leads to cracking of the furnace body. Avoid using fireproofing mortar to fill oven holes or empty spaces. It is suitable for external use only. It is used on the furnace dome in places where there is no direct contact with fire. If you do not want to buy pre-mixed fireproof mortars, you can use the following recipe:
3 parts sand 1 part Portland cement 1 part lime 1 part fire clay
Cement
Additional Information: Concrete for Wood Stove
Cement is a powdery substance made from fired clay and lime that is used as a binder in construction projects. Cement is mixed with other components in various proportions to form various mixtures such as mortars and concretes.
What is a Pompeian oven?
A Pompeian or Roman oven (Italian, dome, Neapolitan, etc.) is a culinary stone, wood-burning, dome-type oven, not intended for heating, used exclusively for cooking. Often used by pizzerias to bake pizza. Powered by wood. It has a dome, which provides the exceptional characteristics of this Italian stove. Allows you to prepare pizza, bread and other famous dishes. Italy is considered the birthplace of the Pompeian stove. In the Roman city of Pompeii, historians found a perfectly preserved oven, hence its name. This type of stove has been known to the world for about 3000 years.
Features of the Italian stove:
- The dome ensures rational distribution of thermal energy and its minimal losses. Because of this element, heat is not wasted and is retained inside the oven for a long time.
- The small dimensions allow the stove structure to be placed in a place convenient for the owner. The structure is mobile.
- Unlike the Russian stove, the Pompeian stove has an oval arch and is significantly lighter.
- Such stove structures have a lot of weight, which primarily determines the heat capacity and economic efficiency of the stove.
- It runs on wood and is not intended for space heating.
- Heats up quickly - in about 30-60 minutes the oven is fully ready for use.
Types of Pompeii ovens:
- Tuscan ovens are miniature in size. The dome is a regular hemisphere; the height of the dome is equal to the radius of the stove. The Tuscan type of oven is designed for baking pizza and other foods.
- Neapolitan stoves are also a special case of the Pompeian stove; the main difference is the lack of a clear geometric shape and parameters. Has a small dome. Since these types of ovens are often larger than the Tuscan design, they can cook pizza much faster.
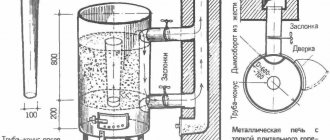
Essential elements:
- Under is the place where firewood is placed.
- A vault is a hemisphere made of bricks.
- The firebox is the place where food is prepared.
- The chimney is built from baked solid bricks. It can be laid directly from bricks or from metal and ceramic blanks and pipes.
Story
Historically, there have been many variations of pizza that have been present in various civilizations around the world. It first appeared in Egypt as bread. However, the Italian version of this dish consists of tomato, cheese, and other seasonings and toppings. This particular pizza was created by baker Raffaele Esposito in Naples for the visit of King Umberto and Queen Margherita to Italy back in 1889. His creation was an instant hit. Since then, pizza has evolved and has different cooking methods. Today, there is a wide variety of pizza on the market, chefs offer different ways of preparing it, and everyone claims to make the best. The furnaces themselves have different shapes, sizes, power, and mobility. The Romans were able to create the modern type of pizza oven thousands of years ago. The famous Pompeian pizza oven has become the main name of the design for many. These patterned ovens excavated from Pompeii are still in excellent condition and can be viewed.
Making a pizza oven with your own hands step by step
Vermiculite formwork and body
We mark two circles on a sheet of plywood. The inner one is slightly smaller than the diameter of a gymnastic ball. The outer wall is made of vermiculite at a distance of thickness. We make a template for the furnace entrance tunnel from plywood cuttings.
We place the inflated gymnastic ball in a sawn circle just below its middle. To do this, we place the plywood base sheet on 4 legs so that the ball can rest on the ground with the flap down.
We cover the side of the oven tunnel mold with thick cardboard so that the template fits tightly to the gymnastic ball, and there is practically no gap between them.
Next we attach the chimney pipe holder. We additionally secure it with nylon ties. Cover the mold completely with plastic wrap, which will protect it from the solution sticking.
Vermiculite is used for heat-insulating and fire-resistant materials and structures. This material can withstand temperature changes from -260 to +1200°C. Mix it and Portland cement in a ratio of 6:1. We make a dry mixture and mix it with 2 parts of water. You can mix by hand or with a mixer.
We start coating the mold from the lower level, which may not exceed 10 cm. This work can be done by hand or with a suitable spatula.
The initial level of the solution should cover the bottom of the ball and the rim of the entrance tunnel. It needs to be allowed to dry for about 5 hours and then continue working.
The next layer is to cover the entire surface of the ball with the solution. To level the mortar, it is convenient to use a rubber spatula for grouting tile joints.
After the solution has completely hardened, the gymnastic ball is removed from the mold. This is easy to do by bleeding the air out of it. The rest of the mold can also be easily removed by simply moving the oven. The plastic film must be removed.
Stove base
Having placed fireclay bricks on the second piece of plywood tabletop, we make table legs for it. A solid wooden beam or a beam spliced from boards is suitable for them. We cut it on a miter saw and secure it under the tabletop with self-tapping screws. We also use it to make the drawers for the table base.
We frame the tabletop with slats 2 fireclay bricks high. You should end up with a frame like this on top of the table top (photo).
At the bottom of the legs you can equip a slatted flooring for a woodpile.
We cover the framed tabletop with plastic film, thereby ensuring moisture protection for the wood and shedding of sand, which will be located as the initial layer under the bricks.
We pour sand, compacting it on the tabletop so that the layer of fireclay bricks is laid flush with the edges of the frame.
Installation of the furnace body
We place the oven body in its place on the countertop. Having outlined its outline, we apply a small layer of fresh mortar over it instead of glue, and place the stove body on it.
A special solution of refractory cement will help improve the thermal insulation of the furnace. Dry mixtures for furnace work are sold in buckets or bags and can withstand temperatures above 1200C. When heated, they do not crack and maintain the integrity of the layer applied from them.
We cover the entrance tunnel with cardboard and film and coat the entire oven body with this solution. We also line the countertop with polyethylene so as not to stain it with the tinted solution.
Conclusion
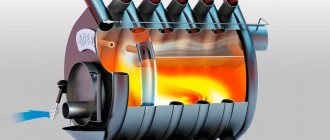
We place firewood into the finished oven. The principle of operation is very simple: in the far part there is a firebox of burning logs, and the dish being prepared is located right in front of it. The heat from the fire spreads throughout the dome, being closed by the chimney outlet.
Simple, compact, tasty and very fast - a truly Italian approach to cooking!
Main components of the design of furnace equipment
There are many options for constructing a Pompeian stove, which differ in building materials, dimensions, components, and design. We will use instructions with general recommendations and the traditional sequence of work.
Structural elements of the equipment:
- Foundation , which is a solid slab made of reinforced concrete, 10-20 cm thick.
- Pedestal for the stove. It is made from cinder blocks measuring 20x20x40 cm each. Stand parameters: width and length 120 cm, height – 80 cm. The tabletop is a monolithic reinforced concrete slab 10 cm thick. Fireclay brick acts as a layer that provides thermal insulation between the stand and the structure of the equipment.
- Bake. Its internal diameter is 84 cm, which means that the vault of the dome, in accordance with the accepted proportions, is 42 cm. At the same time, we will carry out thermal insulation work, laying the first layer of double-thick mineral wool, and the second of a cement mixture with perlite additives. Instead of the latter, you can use vermiculite or expanded clay.
Device structure
If we compare this design with other options for food ovens, it is one of the simplest. It includes:
- Foundation.
- A table that can be raised to a height that is convenient for you.
- A fire pit where wood is lit and then food is cooked.
- Semicircular vault made of refractory bricks.
- Chimney.
- Exterior finishing and thermal insulation.
Final result
Foundation and table
A wood-burning pizza oven has a fairly impressive weight of at least 600 kg. Therefore, a foundation must be poured under it. This is a slab structure with a reinforcing metal frame from the shallow category. The foundation is poured as a free-standing element.
The table, as mentioned above, rises in height to a level convenient for you. It is erected from concrete blocks. The design of the table itself is a box with a niche inside in which firewood is stored. But the upper surface is a two-layer structure.
- This is a reinforced concrete lintel with a reinforced frame made of metal reinforcement.
- This is a heat-insulating screed, which includes concrete mortar, perlite (fine river sand) and expanded clay.
Construction of the vault - initial stage
Vault and chimney
This is, in fact, a wood-fired pizza oven itself. The quality of the prepared pizza will depend on its correct construction. Previously, and today in Italy, it is made of stone or clay. But stove makers believe that the optimal, albeit expensive, option is fireclay brick. It perfectly withstands high temperatures and open flames of fire.
The chimney is located in the front part of the unit itself near the combustion opening. Since the temperature of the exhaust gases is not as high as inside the combustion chamber, the chimney pipe can be raised from ordinary building bricks.
Construction of the vault - final stage
Thermal insulation
This is one of the most important points. It is the insulation of the stove roof that determines how much fuel will be consumed to warm it up. And the better the thermal insulation, the less firewood you will use. Under the device is already insulated using expanded clay concrete, but the vault can be insulated using various materials and technologies.
- The outer side of the vault can be covered with traditional thermal insulation materials. For example, basalt wool or glass wool.
- You can cover the vault with a thick layer of cement-perlite mortar.
- You can build an additional casing around the stove from the same building brick. The gap between the two parts of the unit can be filled with expanded clay or perlite.
Why is thermal insulation so necessary? It's all about the principle of operation of the Pompeian stove. After all, the basis of everything that happens inside the firebox is the burning of wood, the release of enormous thermal energy, which rises up to the dome of the arch, is reflected from it and again enters the combustion space. That is, the result is a strong concentration of heat inside the combustion chamber. This is why a wood-burning pizza oven is economical in terms of fuel consumption.
Construction costs
For the planned construction of a pompeii in any form or composition, costs will vary depending on the source materials and the size of the furnace body. On a small budget, you need to look for free or improvised materials to build your stove. These can be any bricks that are left over from the construction site and the house. Costs are likely to increase when choosing quality bricks to build a large oven, along with load-bearing structures and coverings and stylish cladding. Hiring a contractor for the raw materials to build the stove will be more expensive. If one is looking to reduce the burden of selecting the materials needed to build a fireplace, purchasing a pre-fabricated, partially formed kit is an option.
Revving up the pizza oven
After the finished stove has completely dried, it is accelerated. To do this, carry out at least 7 firings with an interval of 24 hours:
- the first heating is carried out with dry straw with a volume of up to 2.5 kg;
- the second heating is carried out with the addition of chips weighing 500 Gy to the straw;
- the third time, 4 kg of wood chips are used;
- the fourth heating is reduced to the use of one dry small log;
- all subsequent ignitions are performed with the addition of one log each time.
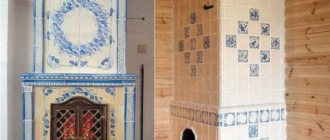
If an outdoor stove structure is being built, then it is advisable to place it under a canopy. This will increase the service life of furnace equipment. In this case, the street structure is additionally plastered with two layers:
- a layer of heat-resistant plaster up to 1.2 cm thick;
- decorative plaster on a moisture-resistant base, 5 mm thick.
Only a high-quality, self-built wood-burning oven will make it possible to prepare not only delicious pizza, but also other works of culinary art right on the site of your country house. This will save a person from having to order tasteless semi-finished products heated in the microwave of the nearest pizzeria or look for a decent restaurant with a Pompeian oven.
Construction time
The time and effort required to build a pizza oven depends largely on the materials and size of your structure. Sources of professional materials such as fire bricks and other required components may not be available depending on your location and local industry. However, for a professional builder with access to the necessary materials and skills, building any furnace is quick and easy compared to DIY weekend construction. Building a prefabricated furnace typically requires less skill and allows for the use of cheap and readily available materials. These models are recommended for beginners to gain experience building a pizza oven without incurring the large expense and time commitment of a large brick oven.
Common problems
There are a number of common questions regarding a pizza oven in terms of its construction and use.
Possible problems that must be taken into account by the owner:
Maintaining the correct temperature in the firebox. Prevention and repair. Protection from the elements of nature, especially water. Preventing tough pizza. Prevents overly smoky flavor. Preventing soggy pizza.
Design features
According to historians, the first Pompeian ovens appeared in Italy and then spread throughout the Iberian Peninsula within a very short time. Initially, such structures were built for preparing simple food. They were not used for heating, since there was no need for home heating in those regions.
Later, this type of oven spread throughout the world. It is also known as a tandoor or Neapolitan oven. An important design feature of such a furnace is the presence of a dome that distributes heat throughout the entire internal volume. In addition, it significantly reduces heat loss and provides stable traction.
The Pompeian oven is small in size. Most often it is installed outdoors, since that is what it was originally created for.
You will need the help of a master when studying the drawings
The Neapolitan stove has certain similarities with the traditional Russian stove, but its heating efficiency is higher. It will take several hours to heat a Russian oven to the temperature required for cooking pies. In the Italian equivalent, you can start cooking them in just 30 minutes.
This efficiency is explained by the lower thermal mass. The thickness of its walls is only 12 cm. This allows them to warm up to a temperature of +370°C within 1 hour.
The temperature inside the Pompeian oven is self-regulating. This is achieved in an original way. As the maximum temperature values increase, the amount of gases in the combustion chamber increases significantly. As they rise, they actually block the access of oxygen from the mouth of the pipe. Because of this, the combustion intensity decreases, and then the temperature. The amount of gases decreases, and oxygen access to the firebox is restored.
This cycle is constantly repeated, which ensures that the temperature is optimal for cooking food.
How does the Pompeian stove work:
Option made from clay (without brick)
Making a Pompeii oven from clay, without using bricks, is a simple process. The foundation and tabletop are made in the same way as in the case of the classical design, but the model is made from coarse sand (screenings). A clay dome is laid on top of it.
Pompeii made of clay
Device
It is best to use special clay; you can purchase it at a construction warehouse. How to properly make an Italian design from clay is well shown in this video:
A Pompeii clay oven is installed with your own hands in the same order as when constructed from other materials. After the dome is installed, a chimney is made - any materials can be used for its construction, including ordinary brick.
Expert opinion Nikolay Davydov Stove maker with 15 years of experience
As in the case of a brick Pompeian stove, waterproofing and thermal insulation are required, which will ensure a long service life, as well as cladding, which will protect the structure from irritating factors (rain, hail, snow).
The Pompeii clay pizza oven is a simple design to construct - anyone can make one like this.
First firing
Before lighting the stove for the first time, you must make sure that all materials are completely dry and the concrete or mortar has set. The longer you let the concrete dry, the stronger it becomes. You can wrap the structure in salophan or a damp cloth to prolong drying time.
During the first ignition, the water remaining in the masonry turns into steam, and can lead to cracks at this stage. For this reason, it is important to let the oven sit until it is completely dry. Heating of the furnace itself must be done gradually. This also applies to brick and stone ovens. When starting the fire for the first time, you need to light a small fire and gradually increase the load of wood. Try not to use large firewood as this can cause the heat to build up quickly. The initial kindling should be spread over a 6 hour period. After you first fire up the fireplace, it should be carefully inspected for signs of cracks in weak points. In subsequent burns, you can use larger logs and heat the oven to its full potential.
Health and Safety
For your health and the safety of your loved ones, do not use any materials in the oven that may contain Asbestos.
Use only new vermiculite products. New vermiculite products do not contain hazardous materials. It is important to have a fire extinguisher on hand in case of an emergency. The oven can become very hot (370 degrees Celsius) and thus may cause burns if not handled carefully. We warn about the danger for pets and children.
Kiln firing methods vary widely, but generally referred to as "top down" the fire will burn cleaner, produce less smoke, and heat the kiln faster and with less fuel burned. Do not use the oven naked. Use a long grip when handling pots and a pizza shovel. Do not use liquid fuels such as gasoline or lighter fluid. Do not use water to extinguish fire. Water causes a negative effect on the structure of materials. Allow the oven to cool naturally. Use a metal shovel and bucket to remove any remaining coal and ash. It is important to ensure that the ashes are completely cooled.
Cooking food
Pompeika is designed to give great taste and easy to make pizza. The oven is designed in such a way that the pizza cooks evenly and comes out much faster than in a conventional gas or electric oven. For these reasons, it is not surprising that modern chefs in Italy still prefer to make pizza in a wood-fired oven!
Repair
Typically, a wood stove requires regular cleaning.
Once the oven has cooled, you can use a scoop or scraper to scoop out any ash that has accumulated in the center or sides and carefully sweep it out of the oven. The stove chimney also needs regular cleaning and inspection. You may need a ladder to check for nests or other objects that might get caught in the chimney. In short, to keep your furnace functioning properly, you need to clean it regularly and make sure the vents are clear and unclogged.