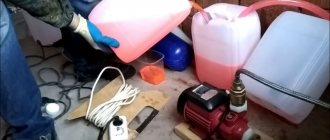
Sooner or later there comes a time when it becomes necessary to replace the pipes in the bathroom due to objective necessity.
Unfortunately, no one can avoid the onset of this situation; you can only be fully prepared when the moment comes. This is what we suggest you do. In this article we will look in detail at the reasons why the issue of replacement becomes relevant. We will also analyze all the stages of replacing pipes in the bathroom, starting from dismantling old communications, selecting materials and laying new ones.
The article presents video materials and detailed instructions with which you can easily do everything yourself.
When do you need to change pipes?
The most common reason for replacing pipes is the low resistance of cast iron and steel types to corrosion. Over time, they wear out, which leads to leaks. Over the years of operation, a layer of deposits accumulates on the inner surface of the pipes, which reduces the efficiency of the entire system, since less coolant flows into it. When radiators are clogged with rust, they stop heating, although the riser remains hot.
Replacement is made when, due to an error in the design, the heating of the room is connected through the “return”, so it is cold there. The inability to bleed air from the pipes leads to cooling of the radiators and noise in the riser. Old heating systems did not provide for the installation of taps to shut off the pipes in each room. Therefore, in emergency cases, it is necessary to turn off the heating riser of the entire entrance.
Why are polypropylene pipes better than metal ones?
Polypropylene pipes have many advantages over metal ones, because:
- are not afraid of corrosion and the formation of calcium deposits;
- protected from stray currents;
- resistant to both high and low temperatures;
- do not burst when water in the system freezes;
- easy to install without laborious welding work;
- They are an order of magnitude cheaper than metal pipes.
Another important advantage of PP pipes over metal ones is low thermal conductivity. When the coolant passes through polypropylene pipes, its thermal energy is not spent on heating the pipeline, as is the case with steel or copper pipes.
Thanks to this, replacing metal pipes with polypropylene pipes in the heating system can increase the heat transfer of radiators by 40%. The service life of PP pipes for hot water supply and heating systems reaches 25 years, and for cold water supply – 50 years.
When is the best time to change the system?
The best time is summer. The pipes are empty, so you don’t have to worry about complaints from your neighbors next door. There is enough time to think through the project to the smallest detail, consult with specialists if necessary, go shopping and stock up on materials, and then slowly and carefully make the replacement. But you will be able to test it only at the beginning of the heating season. However, in emergency cases or when leaks begin to appear frequently, you will have to start replacing, regardless of the time of year.
Conclusions and useful video on the topic
You can clearly see the process of laying pipes in the presented video.
The process of replacing the water supply and sewerage system in the bathroom is quite within the capabilities of a master who has some skills in working with plastic pipes. By carefully following the instructions and using high-quality materials, such operations can be completed fairly quickly.
Newly installed communications made of modern plastic will reliably serve for a long period of time.
Would you like to tell us about how you changed the pipes in the bathroom yourself? It is possible that you know technological subtleties that will be useful to site visitors. Please write comments in the block below, post photographs and ask questions on the topic.
Selection of materials
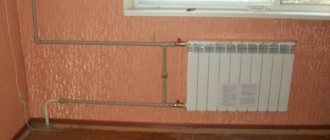
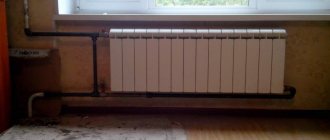
In order for the updated system to be effective and durable, you need to choose the right elements. The reliability of the system depends on the pipes, so when choosing, you need to pay special attention to them. If a leaking radiator is easy to quickly disconnect from the system, then due to a leak in the wiring, you will have to shut off the riser for a long time. When drawing up a project, you should take into account the installation of shut-off valves at radiators. Ball models are best suited for this, providing reliable overlap. Batteries are selected depending on operating pressure, coolant composition, and heat transfer efficiency.
Pipes
A variety of materials are used for their manufacture, each having its own advantages and disadvantages. Heating pipes must be:
- durable;
- durable;
- can withstand high pressure and withstand hydraulic shocks without damage;
- chemically inert;
- resistant to corrosion;
- withstand temperatures of at least 95 ⁰C;
- environmentally friendly;
- with a smooth inner surface that prevents the formation of plaque and does not create much resistance to the movement of the coolant.
In addition, they should be easy to install with the possibility of subsequent system upgrades. For example, to install another radiator or tap. Pipes made of the following materials meet the listed requirements:
- Stainless steel containing at least 20% chromium and nickel is not subject to corrosion and deposit accumulation. The service life is at least 50 years, but the high cost prevents widespread use.
- Ordinary carbon steel , despite its strength and low price, quickly rusts and becomes overgrown with salt deposits. Needs constant care and painting. It is not currently used for the installation of in-house systems, but is used for repairing old ones.
- Copper is durable (service life up to 100 years), chemically inert, and has bactericidal properties. High strength allows the use of thin-walled pipes in systems with high pressure. However, they have the highest price and complex installation. Therefore, copper pipes are rarely used for heating.
- Polypropylene - can last for half a century without succumbing to corrosion or becoming overgrown with salts. It has good strength, withstands high temperatures, and is inexpensive. Using a variety of fittings, systems of any complexity can be easily installed, but its sensitivity to ultraviolet radiation should be taken into account.
- Cross-linked polyethylene is not inferior to polypropylene in its basic characteristics, and even surpasses it in strength. With strong heating (above 95 ⁰C) it can change shape. Due to the higher price it is used less often.
- Metal-plastic pipes made of polypropylene - covered with aluminum foil. Therefore, their reliability is higher, but their flexibility is less. Other characteristics are the same.
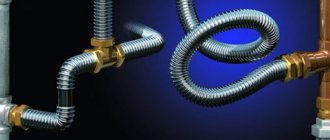
- Corrugated stainless steel pipe bends very well, which makes it possible to install systems of complex configurations with a minimum number of connections. It holds pressure and temperature well, but can be damaged by an accidental blow, so protective covers should be installed after installation. Fittings require regular maintenance (tightening nuts, changing gaskets). In terms of price it ranks second after copper.
A good option for installation would be plastic and aluminum-reinforced pipes. They are inexpensive, and in basic parameters they are no worse than their metal counterparts. To protect stainless steel and copper products from stray currents, grounding is needed, but not every home has it. For private housing, the material is selected depending on preferences and financial capabilities.
Radiators
Without replacing the heating batteries, even very durable new risers will not ensure reliable operation of the system. The requirements for radiators are not as stringent as for communications, so when choosing, more attention is paid to the appearance and efficiency of heat transfer. The stores offer:
- Modern cast-iron radiators , unlike Soviet batteries, are compact, and models made in retro style look elegant. They are durable and do not corrode. However, the heavy weight makes installation difficult, and fragile cast iron can suffer from water hammer.
- Aluminum radiators are varied in design and inexpensive. In a private home, where the system is filled with purified water with normal acidity, they will last up to 20 years. The pH value of the coolant should not exceed 8; at a higher value, a chemical reaction occurs with the release of hydrogen. To release it, a crane will be installed. Based on the manufacturing method, extrusion and injection molding radiators are distinguished. The first ones consist of three compressed parts. The manifolds are injection molded and the middle is formed using an extruder. The second sections are made by injection molding, so their strength is higher.
- Bimetallic radiators - consist of steel or copper pipes, on top of which an aluminum shell is pressed, providing good heat transfer. Sectional and monolithic varieties are available. The first ones can be increased or reduced if necessary. The latter can withstand up to 100 atm, so they are installed in high-rise buildings with high-pressure heating systems, where water hammer is not uncommon. There are cheap options in which only the vertical tubes between the collectors are made of steel, and the other parts are made of aluminum. They have better heat transfer, but lower reliability.
- Steel radiators are inexpensive, weigh little, and have good heat transfer. The design is either panel or tubular. When manufacturing the first, two sheets with extruded grooves are welded through which the coolant will flow. The radiator is assembled from one or more such panels. Modifications with fins have higher thermal output, but dust accumulates on them, which is difficult to remove. Tubular models consist of two collectors connected to each other by vertical sections. They are more durable, but also more expensive.
Tools and materials that we will need during work
Replacing plastic pipes in the bathroom involves the use of a certain set of tools and devices for installing water supply networks. Its composition is determined by the characteristics of the materials used.
Tools for working with PVC products include cutting scissors. The main requirement when performing this operation is strict perpendicularity of the cut, since the main connection methods are cold welding or socket joining. In this case, sometimes, in addition to the rubber cuff, an additional sealant seal is used.
If the choice of replacement for the bathroom is polypropylene products for internal wiring, then for joining you will need a soldering iron of a special design and a cutting device.
The physical characteristics of polypropylene products do not allow them to be produced in rolls, so connections play an important role in laying.
During installation, a variety of fittings are used, allowing you to create water supply networks of any complexity. If necessary, the use of combined components for the metal-plastic transition is provided.
When installing polyethylene pipes for joining during installation, two different methods are used: for products with a diameter of 20 - 63 millimeters, fittings are used, for other sizes - end welding.
Cross-linked polyethylene products are used to create networks for both cold and hot water supply in the bathroom. The connection is made with specially designed compression fittings. Crimping devices are used to install them.
When working with metal-plastic products, the ends of the parts that need to be joined are cleaned. It is performed with a special tool - a trimmer, which also must be available.
Obviously, other general-purpose tools may be needed during the work process:
- Electric drill for drilling holes in walls for installing brackets - holders.
- Drills or drills for concrete of the required sizes.
- A hammer drill for punching holes in walls through which replacement pipes will pass.
- A cement-sand mixture will be needed to seal holes in the walls after laying, respectively, a trowel and other tools.
- To cut an old water supply when replacing the system, you will need an angle grinder - an angle grinder, equipped with a disk for cutting metal.
- Fasteners for installing pipes, including brackets, dowels (plastic inserts into holes), screws.
- Screwdriver or set of screwdrivers.
The amount of basic materials depends on the chosen water supply installation scheme.
Advantages and disadvantages of plastic pipes
Polymer products have a lot of advantages, among which it is worth highlighting:
- Long service life (modern plastic pipes can sometimes last about 100 years);
- Light weight of the material;
- Full resistance to corrosion;
- Ease of installation;
- Good strength properties;
- Good level of sound insulation;
- High elasticity;
- Environmental safety (plastic pipes do not change the chemical composition of transported water);
- Low degree of thermal conductivity;
- Versatility;
- Ease of transportation;
- Low cost.
The list of advantages looks impressive. The described qualities have provided plastic pipes with recognition and the title of one of the best materials for arranging any pipelines - it’s not just that old pipes are replaced with plastic ones in most houses and apartments.
Of course, plastic pipes also have disadvantages, but their list looks much more modest than the list of advantages:
- Polymer pipes have restrictions on the temperature of transported substances (specific values depend on the material);
- Variety of installation technologies (different technologies are used to install different types of plastic pipes);
- Susceptibility to certain types of alkalis and acids (when choosing pipes for transporting aggressive substances, you have to carefully study their characteristics).
Choosing the installation method
There are two methods of normal installation of plastic pipes - welding and press fitting. Welding is divided into two types - cold (using epoxy glue) and hot (using a welding machine).
Cold method
Cold welding is not only a method, but also the name of the main consumable when using it. Nowadays, almost every hardware store sells fast-hardening, reliable glue that allows you to firmly connect plastic pipes together. This method is more resource-intensive than hot welding, but does not require an expensive welding machine. It will also require a little more time - the glue needs to harden, and money, since the material, although inexpensive, requires a lot of it.
On the other hand, it prevents the appearance of sagging inside the pipes, which increases their normal service life. We recommend using this method, since durability and reliability are more important than immediate savings in time and money.
Welding
The classic method of joining pipes, not only plastic, but also metal. Requires a powerful power source, as well as a set of equipment - a welding machine, a protective mask, etc. This method is faster than cold welding and is traditionally considered more reliable. But, as studies have shown, cold welding is not inferior to hot welding in terms of speed and reliability. On the other hand, improper use of hot welding can lead to the formation of beads on the pipes, which is guaranteed to lead to pipe clogging in the next few years.
Metal-plastic pipes
Metal-plastic pipe This is the most common option today.
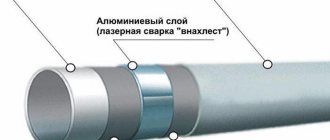
This is explained simply - very easy and affordable installation, plus the inexpensive cost of materials. It turns out to be a kind of budget-home option. This pipe is a five-layer structure in which the outer and inner polyethylene layers are glued to an aluminum layer with adhesive layers. The result is a kind of sandwich that is easy to bend and assemble.
Advantages of a metal-plastic pipe:
- Easy to assemble. Repairing pipes in an apartment is like putting together a children's construction set.
- Pipeline cost. This is the most economical method of piping.
- Savings on workers' compensation. The amount saved is quite significant. You yourself are quite capable of assembling the entire pipe at the proper level, unless you change the valves at the entrance to the apartment with the help of professionals.
- You can always cut into a finished pipeline, and it won’t take much time.
Minuses:
- Over time, the connections will become loose and will need to be tightened. Therefore, such a pipe can only be hidden in the floor or walls if it is installed using press equipment.
- Quite low reliability. The joints may begin to leak as a result of water hammer or a large temperature difference.
Advice: when choosing a pipe, make sure that it does not flake and is seamless. Otherwise, you won’t have any hassle during installation.
There are a number of nuances in how to properly connect metal-plastic pipes:
- Cut the pipe with special scissors, which you hold strictly perpendicular to the pipe. Otherwise, an uneven cut will cause problems when tightening the fitting nut.
Cutting a metal-plastic pipe
- Calibrate the edge of the pipe with the nut and ring on to ensure an even calibration without distortion.
Pipe calibration
- Use a spring-loaded pipe bender whenever possible. A metal-plastic pipe bends very easily, but if the bend is significant, it can simply “fold.”
Metal-plastic: installation
One of the simplest ways to arrange a home water supply. Composite tubes hold pressure well, bend easily during assembly, and are reliably connected if the installation rules have not been violated. The most popular diameters are 16 and 20 mm. Both open and closed wiring will look good. It is recommended to use a collector circuit.
What will you need?
- Materials: special fittings, pipe fasteners (clamps, ties), flax and sealant.
- Tool:
- pipe cutter and pipe bender for metal-plastic products;
- special press jaws;
- adjustable and Swedish (gas) keys.
How to assemble a pipeline with your own hands?
- Assembly (as in other cases) begins with the creation of a circuit. When planning, it is recommended to provide as few tees and adapters as possible. They reduce water pressure.
- It is important to carefully calculate the lengths of all elements (pipe sections). Cut them and prepare them for installation: bending and cleaning the ends. Using a gauge, trim the ends of the workpieces.
- Using collet or compression fittings, connect the systems into a single whole.
This is what the connection looks like
Installation differences:
- using collets: first a threaded union nut is put on the tube, and then a split ring. All this is inserted into the fitting and tightened tightly;
- using compression fittings: here the role of the ring is played by a wider split sleeve. It is also placed after the nut. When fixing it in the fitting, it is necessary to apply force;
- Push fittings: no tools are needed to create the connection. The tube is inserted into the element and it is fixed. Preventing leaks is achieved thanks to water pressure, which acts on the wedge and reliably presses the edges of the tube;
- Press fittings are used to create permanent connections (without the possibility of disassembly). The pipe must be cut evenly and calibrated. A special sleeve is put on it, and a fitting is inserted inside. Using pliers they press everything together.
Assembling press fittings
When assembling threaded connections, you need to use fum tape or flax.
Video - Metal-plastic assembly process
Classification of plastic pipes
There are several polymer-based materials. The final products differ in their composition and production technology, so before purchasing you need to study them in order to choose the best option.
The following types of plastic pipes are found on the market:
- Metal-plastic (MP) . This material is made, as the name suggests, of metal and plastic. This combination can withstand exposure to both low and high temperatures – certain types of metal-plastic pipes can operate at a carrier temperature of 900 degrees. The main disadvantage of this material is its low flexibility, so bending the pipes must be done very carefully.
- Polyethylene (PE) . Polyethylene pipes can be installed even at sub-zero temperatures, which is why they are often used for urgent repairs. When choosing PE pipes, you need to pay attention to the fact that it can be designed to work under conditions of either low or high pressure.
- Cross-linked polyethylene (PES) . This material is made under pressure using various additives, and the method of its production is called “cross-linking” - hence the name. Cross-linked polyethylene can be used both in water supply and heating systems - the characteristics allow the pipes to operate at a fairly high temperature.
- Polyvinyl chloride (PVC) . One of the components used for the production of PVC pipes is chloride, the effect of which on the human body cannot be called positive. Polyvinyl chloride pipes are not used when laying household pipelines.
- Polypropylene (PP) . Polypropylene pipes are the optimal material for laying water supply systems. The multilayer design provides such pipes with good strength and the ability to operate at high temperatures. Among the disadvantages, it is worth noting very poor elasticity and the inability to painlessly replace individual elements - the connection of polypropylene pipes is carried out by welding, so the damaged areas will have to be completely cut out.
How to replace the coil?
Even a beginner can do this. To replace a worn-out water heater, you need to follow a number of steps:
- Shut off the water - turn off the valves on the stopcocks of the risers or use the manifold to turn off the coil.
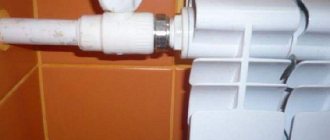
Shut off water - Using an adjustable wrench, disconnect the union nuts securing the product to the system and carefully remove the coil.
Unscrewing the heated towel rail - Install the new product in the same place using adapters (if necessary). Seal the threads with fulente or flax.
- Gradually increase the pressure to the nominal pressure and check for leaks.
Tip: it is recommended to purchase products with a minimum of welds. They are considered more durable.
Copper pipes
Copper pipes were previously considered elite when there were no plastic pipelines.
Copper has a number of positive properties for which it continues to be praised to this day:
- The antibacterial effect of copper is well known, which is the main reason for its use.
- Thermal conductivity. Copper is an excellent heat transfer agent, allowing it to operate over a very wide temperature range, especially in the refrigeration industry. Copper does not become brittle at low temperatures.
- Reliability and aesthetics. Copper withstands high pressure, its linear expansion is minimal, i.e. it does not “play” when temperatures change.
- Copper is a natural, environmentally friendly material.
Main causes of breakdowns
When it comes to free-flow systems, breakdowns are extremely rare, provided that the pipe capacity has been calculated correctly. The cause of the accident may be, perhaps, external mechanical influence or the use of pipes for other purposes. So, if polypropylene pipes marked PN 10 are installed in a hot water supply system, they are unlikely to withstand this, since the maximum temperature they can withstand is +45°C in a heated floor system.
When it comes to pressure systems, the situation is different. Significant excess pressure can lead to water flowing at the junction of polypropylene pipes. Even a small amount of moisture, reminiscent of dew drops, is enough to understand that the seal is broken and repairs are required. To know how to fix a leak in a polypropylene pipe, you need to figure out what caused it. There are several reasons for this:
- Initially, the heating temperature of the welding machine was incorrectly selected, which caused poor-quality soldering. As a rule, each pipe diameter has its own temperature regime, so you should know the standards that indicate the heating time of the device. The only thing that can be done in such a situation is to cut out the area with the fitting and replace it.
- If the pipeline was connected using tightening fittings, then it is enough to tighten the nuts to stop the leak. If they are damaged, you will have to remove the fittings and install new ones.
- If a compression fitting was used, the pressing may have been performed poorly. In this case, experts recommend not to clamp the old fitting again, but to remove it and replace it with a new one.
- If, when preparing polypropylene pipes for soldering, their cuts were not cleaned and processed, then over time this will lead to leaks. Burrs will not allow you to create a high-quality connection between the pipe and the fitting. In this case, the leaking unit is cut off, the ends of the pipe are cleaned and reconnected.
- Sometimes repair of polypropylene pipes is required when they were connected by adhesive. The reason may be poor-quality glue or putting the system into operation too quickly when the glue has not yet completely set.
You can repair a damaged section of pipe in the following ways:
- A clamp clamp and waterproof sealant will work as a temporary solution. It is enough to treat the rupture area with the product and tighten the screws on the clamp to eliminate the leak. This method allows you to “cure” a polypropylene pipe for a fairly long time without completely shutting down the system.
- Cold welding has long been a quick way to solve pipe problems. It is enough to knead it thoroughly, apply it to a crack or joint, let it dry, and the pipe is ready for use again.
- If the system does not operate under high pressure, then an adhesive bandage will be a good way to eliminate the leak. It uses a bandage impregnated with polypropylene glue and clamping clamps. The good thing about this method is that it does not require turning off the circuit.
- Adhesive tape is only acceptable as a short-term means of eliminating leaks. It needs to be wrapped around the pipe in several turns and secured.
Any repair work on the heating circuit is carried out only after disconnecting the area with the leak from the main network and draining the coolant.
Replacement of water supply and heating system pipes with polypropylene
Installation of a new pipeline based on PP pipes can be done with minimal experience and a simple arsenal of tools.
First you need to draw up a diagram of the new engineering system and mark out the areas where the new pipes will run. You can navigate old pipes by measuring their length and drawing a wiring diagram on paper.
Before starting work, you should prepare the necessary equipment and materials, paying special attention to the type of pipes that will be used.
Tools required for work:
- grinder for cutting old metal pipes;
- special wrenches for twisting threaded connections;
- soldering machine for PP pipes (“iron”).
Depending on the engineering system to be modernized, you need to purchase the appropriate types of pipes. They differ in diameter and wall thickness, the presence/absence of a reinforcing layer, and the nominal temperature and pressure in the system.
Note! These parameters can be clarified with the housing office or management company (for an apartment building), or you can view the design of the engineering system (for a private house).
For the installation of heating systems, pipes reinforced with aluminum or fiberglass with a diameter of 20, 25 and 32 mm are used. The greater the length of the pipeline, the larger the cross-section of the pipe should be.
You can choose the right pipe by studying the markings on polypropylene products. It indicates the type of material, diameter and wall thickness, pipe class according to the nominal temperature and the maximum permissible operating pressure.
In addition to pipes, you need to buy the required number of coupling connections - fittings, as well as materials for sealing joints (fuel tape, oil seals, rubber seals - depending on the type of system).
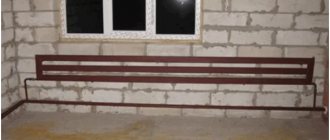
It is necessary to note the installation locations of new radiators (usually old cast iron batteries are replaced with new aluminum or bimetallic ones).
To connect pipes and fittings made of polypropylene, a special soldering apparatus is used to weld pipes by heating.
Do not forget about tools for cutting pipes - special scissors, as well as liquid for degreasing pipes before soldering.
Important! Before starting work, you must make sure that the water in the system is shut off. In apartment buildings, any pipe replacement work affects communications in neighbors’ apartments on the top and bottom floors. It is advisable to warn them about temporary inconveniences, or notify the housing office of the need to shut off the water along the riser.
Dismantling old pipes
Having drained the water from the system, you can begin to dismantle the old elements of the system - plumbing fixtures (if necessary), heating radiators.
Water is drained from the battery through a special valve. As a rule, an old cast-iron battery can no longer be repaired; it must be thrown away and replaced with a new type of radiator - bimetallic, steel or aluminum. After dismantling the battery, the old metal pipes are cut with a grinder 3-5 cm from the ceiling and floor. After cutting the pipe, you need to put adapters in its place.
Preparation for installation of PP pipes
Pre-purchased polypropylene pipes must be cut in accordance with the pipeline installation diagram. This must be done with special scissors (sold in hardware stores).
Attention! When replacing pipes in heating systems with polypropylene ones, it is necessary to take into account thermal expansion. When heated, such pipes tend to increase in length by 1.5-1.7 cm. This figure must be added to the estimated length of the pipeline, and also care must be taken to movably fix the pipes along the walls.
Fittings for polypropylene and connections to metal pipes
To connect pipes to each other, special transition elements - fittings - are used. They are products made of polypropylene, as well as combined models made of polypropylene with a metal liner.
We recommend that you read: Is metal-plastic or polypropylene better for plumbing?
Fittings with internal metal threads are used to connect PP pipes with metal elements - pipes, adapters, ball valves.
To replace engineering systems, several main types of fittings are used:
- coupling - used for connecting in a straight section, as well as for connecting two pipes of different diameters;
- angular (angles) - needed to connect pipes at right angles for installation in places where the pipeline turns;
- tees - fittings for wiring (for example, to create a branch for introducing a hose from a washing machine to the sewer).
For PP pipes, it is necessary to use special fasteners - plastic brackets that are screwed to the wall using self-tapping screws. Their diameter must match the diameter of the pipes.
Attention! On pipe sections near the wall or in the corner of the room, it is necessary to use special movable fasteners to ensure free movement of pipes during linear expansion. It is necessary to leave a gap near the walls and especially in the corners.
Dismantling of outdated communications
Dismantling occurs in the following sequence:
- Initially, you need to turn off the water on the hot and cold water supply risers.
- Before you make the replacement yourself, you need to dismantle the old networks. To do this, you need to disconnect the inlet pipe from the riser, and make sure that the inlet shut-off valve holds water well; if necessary, install a plug in this place. Even with a small leak, flooding of neighbors below is inevitable, and this should be avoided.
- Dismantled materials must be cut into sections. This is done to make it convenient to take them out of the apartment or house.
- Remove the water supply fixtures on the walls of the room by first removing the tiles (if any) from the walls. It should be borne in mind that it is not recommended to reuse them, since modern methods of installation and design of clamps are very different from those used previously. It is necessary to remove not only the clamps or brackets, but also the dowels with which they were secured. Holes in the walls must be carefully sealed with cement-sand mortar or its equivalent.
- Dismantling of the drain system is carried out by disassembling the connections. The fastenings from them are first removed. Concrete supports that determine the slope of the plumbing system cannot be replaced; they must be left in place. They can be used when installing a new sewer system to maintain the standard slope.
The reason for replacing them is the age of the old drain system. Previously, cast iron products were used, the inner surface of which is rough, which contributes to increased clogging, and therefore requires frequent cleaning when clogged.
Therefore, replacing the drain pipe in the bathroom seems to be a mandatory step. The drain system riser is usually located in the toilet room; only with combined bathrooms can it be found in the bathroom. But this object is not the responsibility of the tenant or the owner of the property; the management company must take care of its replacement .
Replacement of the pipe riser in the bathtub must be carried out by the utility organization at the request of the homeowner.
Creation of new heating
Installation of a new structure for conducting heat into the room is carried out using several schemes: single-pipe and two-pipe wiring. The latter option is considered more effective and reliable.
If the work is carried out in a private house, you will need to first install the boiler. Connection of heating and gas equipment can only be carried out by a specialist. After equipping the boiler room, it is necessary to mark out the future heating structure as a whole. Further work is carried out according to the following scheme:
- Connection of riser pipes with intermediate pipes to radiators is carried out;
- Bimetallic radiators are being installed. Before mounting the battery on the wall, you can glue a sheet of foil to reduce heat loss. You can also create a canopy on the battery that will protect the window sill from heating and allow hot air to be directed directly into the room;
- To connect plastic pipes, fittings are used, which must first be treated with sealant;
- Before pulling the pipes, wrap the end with film to prevent dirt from getting inside;
- Next, the system is filled with water and passes through all elements under maximum pressure;
- In new houses, they began to replace water with antifreeze in the heating system. The liquid is resistant to low temperatures. It does not freeze even at -50 degrees.
Organizational issue when replacing a riser
Installation of new equipment is impossible without dismantling the old one. In this case, the difficulty arises in replacing the riser in the bathroom, since it affects the neighbors above and below.
It is not enough to change a piece of pipe in one apartment; it is also important to carry out work in the ceilings, where there are also structural elements. They pose a considerable threat: cement damages pipes over time, which can lead to leaks, which are quite difficult to identify and eliminate.
To resolve the issue with your neighbors, you can do the following:
- Get written confirmation from the neighbors below that in the event of a leak in the old riser, they will not make claims. For residents living above, try having them sign a document guaranteeing payment for possible damage caused by a break in old communications. Very often this approach brings results, and neighbors agree to joint repair work.
- You can contact the Housing Office with an offer to make full payment for replacing the riser. In this case, the mission of persuading uncooperative neighbors is assigned to representatives of the management company.
It should be remembered that even in a privatized apartment, all central communications located in it belong to public utilities.
Zoning
Designers do not advise giving in to fashion trends and copying design ideas without taking into account dimensions, location and other nuances. Before planning and arranging furniture, every detail is thought through.
There are several simple rules that experts advise you to follow:
- Let the room have natural light. To do this, remove excess walls (except for load-bearing ones).
- If the rooms in the apartment are small (12 sq. m or 16 sq. m), the layout of the kitchen combined with the dining room will be the right solution.
- If the ventilation system is not designed correctly, the smell of food will spread throughout the apartment.
Partitions
The interior of the kitchen and living room begins to be thought out from the junction of the two zones.
- Here are some of the ways and objects that delimit space:
- installation of a bar counter;
- kitchen island;
- big table;
- installation of a low partition.
Designers advise installing a wide counter, since you can sit at it like at a regular table, and high chairs are quite suitable for the whole family.
However, in small rooms (16 sq m), narrow counters are installed. Kitchen islands are convenient to use, but are only suitable for large kitchen-dining rooms (25 sq m or 30 sq m). Capital low partitions are installed only if it has been decided in advance what they will be used for (for example, as a TV stand).
Finishing
If the kitchen combined with the living room has the same floor covering, then there are no special rules for carrying out the work. When combining different materials, take into account in advance where they will be joined.
For example, laminate flooring creates unsightly joints with tiles. The main thing is that the floor is flat without curved joints, as they will be noticeable.
Kitchen cabinets that are mounted on the walls should reach the ceilings. In some cases, craftsmen “lower” the ceiling with plasterboard.
Preparatory work
Professionals recommend replacing entire pipes. Soldering different materials within the same pipe is not allowed. Installation of pipes with a smaller diameter than previously installed is strictly prohibited.
- Usually the same diameter is used that was left with the old heating pipes.
- After selecting and purchasing materials, you need to begin disassembling the riser.
- All water must be drained from the heating system or shut off, which is done by coordinating the work with employees from the management company or housing department.
In a country house, you can upgrade the heating system at any time (it all depends on the wishes of the owner).
Furniture items
A few examples of furnishing a kitchen combined with a living room:
- 1. Sofa. It becomes an object that zones space. The sofa is placed with its back facing the place where food is prepared. In small rooms (less than 20 sq m) a corner is placed, which is placed against a wall installed perpendicular or parallel to the kitchen.
- 2. Set. According to designers, minimalist models without elaborate details look modern. The service, vases or glasses are placed on an open shelf. You can buy a fashionable display case for them. Furniture is placed near the wall. If the space is large (20 sq. m, 25 sq. m or 30 sq. m), then in the central part you can install an island, which also has sections for kitchen appliances.
- 3. Furniture set. The style should be combined with the design of both rooms. In small rooms, a compact table and chairs made of transparent material or painted in light colors look good. You can add a table with a round top to your living room interior. In spacious rooms, the kit is installed near the wall or in the central part. An elongated rectangular dining table would look good here.
Multi-level floor
To zone the space, craftsmen install floors at different levels. They advise installing a podium to separate the kitchen and dining room. This option is considered one of the most practical because, among other things, the owners have additional free space where they can hide something.
It is convenient to use boxes or crates for this. Wicker baskets will look good. But such space can remain free.
For podiums, reliable materials are selected that can withstand heavy loads. Usually builders make wooden or metal podiums.
However, such a design should not be made if there are small children in the family, since the podium can become an obstacle for him. In addition, various floor coverings can be used.
They will zone the space between the living room and the kitchen and protect the podium from damage. For example, tiles are laid in the kitchen area, and laminate flooring in the dining room. The main thing is to choose colors and textures and combine the finishes correctly.
Frequent errors and problems
The most common errors in the installation of heating systems are:
- non-compliance with the project;
- lack of Mayevsky cranes. Air enters the system due to poor operation of the pumps in the boiler room, and comes out dissolved in water - it needs to be bled off periodically;
- when pouring a heated floor with a screed, the system’s tightness is not checked;
- they filled the floor heating system with screed without filling it with water - as a result, the screed cracked;
- Poor soldering and welding of pipes can lead to leakage.
How to change a faucet
To replace this device you must:
- shut off the water supply to this circuit at the collector;
- unscrew the flexible hot and cold water connections from the mixer;
- unscrew the clamping nut and remove the mixer from the socket;
- install the new device in the reverse order;
- turn on the water in the circuit, check the connections for leaks.
Watch video - changing the mixer
How to change a bathroom faucet
Replacement of the pipe in the bathroom to the mixer is carried out as necessary when a leak is detected, if it is impossible to shorten it. You can do this yourself without the participation of a plumber.
Cost of replacing heating system pipes
Prices for replacing heating pipes in an apartment:
| 1 | Installation, battery wiring | from 3,500 rub. | |
| 2 | Installation, battery piping (apartment) | from 4,000 rub. | |
| 3 | Installation of heating risers up to Ø 40 mm | from 150 rub. | |
| 4 | Installation of a heating system heating system up to Ø 40 mm with insulation, 2 pipes (without excavation work) | from 700 rub. | |
| 5 | Installing a heating pump | from 3,000 rub. | |
| 6 | Installation of RB heating | from 3,000 rub. | |
| 7 | Installation of taps, gate valves, balancing valves | from 600 rub. | |
| 8 | Pressure testing of the heating system of a private house | from 3,000 rub. | |
| 9 | Diagnostics of the heating system, on-site (up to 50 km) | from from 2,000 rub. | |
| 10 | Repair and modernization of the heating system | price according to agreement | |
Replacing heating pipes is a difficult but important process
TOP 5 mistakes when installing plastic water pipes
In this section we have collected the most offensive and popular mistakes when installing plastic pipes.
- Incorrectly marked boundary of the pipe entrance to the electrical fitting. It will force you to lose one fitting and two pipes, but overall nothing fatal.
- Too much force when butt welding. Again, there are two pipes on the list of losses, but you lost them not because of inattention, but because of your own zeal.
- Loosely fitting bevels during cold welding. The result will be a weak connection that will only be held in place by glue.
- Pipes not cleared of dust and grease during welding. The result will be a weak connection that will simply fall apart after a few years.
- Incorrectly measured fitting size before cutting pipes. Will force you to ruin all the material. There is no solution, and the process itself is characterized by large financial and time losses, for which this error receives first place. As the saying goes: “Measure twice, cut once.”
We sincerely hope that this article will help you avoid mistakes and make the process of replacing pipes enjoyable! And if you can share your experience in installing water pipes, or know some interesting secret - write in the comments and we will definitely discuss your information!