Author: Yuriy Fedorovich Kolesnikov, thermal power engineer
When hunting, fishing and on a camping trip, it is vital to quickly warm up and prepare food when there is an acute shortage of fuel; perhaps without leaving the tent. At the dacha - in the summer, cook dinner or boil water without wasting gas, without starting the house stove or without building an outdoor summer house. The choice of one or another portable compact heating and cooking device or campfire equipment is another matter. But in any case, a device known as a wood chipper or Bond stove will help out: such a stove using waste wood fuel can be built from scrap materials using only a knife, it is omnivorous and in some of the most difficult cases (see below) it can properly perform its function in places where wood fuel is not and cannot be.
A country wood chip stove weighs up to 1.5-2 kg when folded and has a volume of less than 2 cubic meters. dm allows you to cook soup for your family; the portable one is three times lighter for preparing one serving and when folded it takes up 0.2-0.3 cubic meters. dm. The cost of high-quality materials for a durable wood chipper is unlikely to require more than 300 rubles, and you can almost always get by with free spare parts. For reference: a more or less reliable all-weather gas burner will cost from 1000 rubles; You will need to purchase an additional 3 liter cylinder for it. All this equipment will pull (with a filled cylinder) 4-5 kg and take up the same amount of cubic meters. dm.
Homemade wood chip stoves for summer cottages and camping
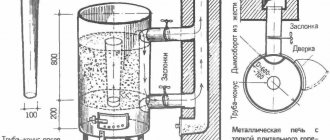
Efficient heating with a dry pipe system. Drawing
An original and proven heating method can be a dry pipe laid through a Finnish candle fire.
If the tent is large, you can run the pipe into a fire or smoldering coal pit. This method is just gaining popularity, but it outperforms others in its simplicity, efficiency, safety and transportability. Photo 2. Drawing of heating a tent using a dry pipe system. Cold air moves through the pipe, being heated by the fire along the way.
How to make a dry pipe with your own hands: materials and tools
No special tools are required. A metal file, a file, and a sealant made of heat-resistant silicone are enough.
As pipes, it is better to use aluminum rods from a vacuum cleaner and a bow from an armored bed, which has a shaped shape, which is ideal for installation in a “Finnish candle”. All joints must be tight and open with noticeable force.
How the system works. Does it burn for a long time?
Finnish candle - a fire inside a log. It is done like this: a log 50-70 cm long is split, the middle is selected with an ax and kindling is laid in its place. The log is collected and tied with wire. The candle is installed above the ground, the draft of burning gases passes through the burning channel. The intensity of combustion is regulated by the lid and installation height.
You can adapt a Finnish candle to heat a tent by passing a pipe through the burning middle of a log. The pipe should be shaped, the log is “put on” on the vertical section.
Cold air is taken in through the lower horizontal section, heated in a smoldering log and supplied through an air duct into the tent.
In severe frosts, it is better to insulate the air duct with non-flammable basalt wool insulation. Then heat loss will be minimal.
The advantages of this heating method:
- Safety. The firebox is located outside the tent, combustion products do not mix with the heated air. The possibility of fire or suffocation is practically eliminated, and by increasing the lower air duct, we move the air intake away from the combustion source.
- Ease of manufacture. Ready-made tubes connected into sockets are commercially available.
- Transportability. The weight of the entire installation, including the axe, is only 2 kilograms.
- Versatility of use. Wherever there is a log of a certain length, you can light a Finnish candle. The heartwood of a tree burns better - it has a certain moisture content.
- The burning time of the log is from 3 to 6 hours depending on the thickness. This is quite enough to sleep warm.
What to consider when using dry pipes
When heating a tent using a dry pipe passed through a Finnish candle, a simple fire or a coal pit, the following difficulties may arise:
- Inappropriate pipe diameter. The larger the tent, the larger the diameter of the pipes.
- Leaks at pipe joints. Carbon monoxide enters through them. The diameter is selected so as to fit perfectly tightly. There should be no joints inside the fire pit.
- The air intake is located too close to the fire. Ideally, it should be extended and taken out of the tent. Air exchange will be ideal, this will save heat.
- It is better to use stainless steel 1-2 mm thick as a heating pipe. For lightness, supply pipes are made of aluminum or thin stainless steel.
- You can protect the fabric from fire by stretching a screen of frozen wet gauze between the fire and the tent.
- To prevent the fire from tilting and falling, it is advisable to prop it up or tie it to a support.
In descriptions of the adventures of geologists, the method of heating a hut using clay pipes is considered a curiosity. However, if you have a sealed dry-pipe system, you can heat a small two- or three-person tent in this way.
Advantages and disadvantages
Long combustion rocket stoves have the following advantages:
- high efficiency - at least 85%;
- high speed of heating the room - 50 m² will become warm in less than 1 hour;
- absence of soot - the exhaust during fuel combustion does not form soot, but is formed in the form of steam and carbon;
- the ability to operate on solid fuel of any type;
- low consumption - the fuel consumption of a rocket stove is 4 - 5 times less than a conventional stove under equal conditions: combustion time and heating temperature;
- the possibility of installing a warm bed;
- the duration of heat retention in a well-heated structure without adding fuel is up to 12 hours.
This stove has many advantages, but there are also disadvantages
Disadvantages include:
- manual method of controlling a heating device - fuel burns out quickly and requires regular reporting;
- the high heating temperature of some structural elements threatens owners with burns in case of accidental contact;
- the heating speed does not allow the use of a rocket stove for baths;
- the aesthetic component of such a device is not for everyone and is not suitable for every interior;
- danger of carbon monoxide entering living rooms.
How the design works
The main requirements for a camping stove are lightness and compactness. It can be easily assembled and disassembled in order to put it in a backpack. The simplest camping stove consists of a minimum of elements and does not require a chimney or a housing with heat-saving properties. Among the main components of this device are the combustion chamber and the blower.
This design allows the fuel, be it wood chips or wood, to completely decompose, while the heat is directed straight upward.
You can do without blowing by constructing just one combustion chamber, for example, from two mugs. This oven can be used to heat food. But in order to speed up the heating time several times and increase the efficiency of the device, you can use a small battery-powered fan as a blower. The result is complete combustion of the fuel with a high flame and no smoke.
Design and principle of operation
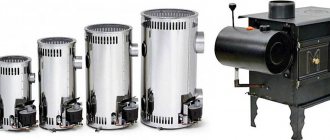
A camping potbelly stove is a miniature stove that works on the principle of its “big sister” - the potbelly stove. The stove is easy to use when relaxing outside the city. For heating small tents and cooking food, the stove has plenty of power.
The stove starts with a body mounted on legs. Different designs require different shapes and sizes, however, to make the concept easier to understand, it will be easier to imagine the body as a regular square.
The body is divided into three parts:
- blower;
- firebox;
- smoke circulation.
Further details:
The vent is the lower part of the stove. The bottom for it is the bottom of the furnace body, and the upper wall, separating the ash pan and the firebox, is made in the form of a lattice made of iron grates.
Made this for:
- Providing oxygen access to the combustion zone;
- Gradual emptying of the firebox.
Firewood that has burned into charcoal falls into the ash pit through the grate, making room for a new batch of firewood. In most drawings, the blower is allocated 1/5 of the total volume of the body.
This value may vary depending on the design. A sash is required. It serves as a channel for oxygen access and a door through which burnt coal is removed.
The firebox is the main part, the fuel receiver and the chamber in which combustion is maintained. Most of the internal volume is separated for it - from a third to a half. Just as in the previous case, a sash is required. Through it, firewood will be supplied to the combustion zone.
Smoke circulation is a system for increasing the heat transfer of the stove. A smoke circulation system is implemented by installing a number of partitions parallel to the base of the stove in the upper part of the stove body.
When assembled, they will form a zigzag-shaped box in which smoke is retained, giving off more heat. This reduces the traction force, but the amount of heat emitted by the stove increases disproportionately
On some models, the smoke circulation system is located not above the firebox, but perpendicular to the body. A rectangular area is separated under it, equal to the length of the case at the rear wall. In this case, the partitions are not located parallel to the base, but perpendicular.
Operating principle of the stove:
The combustible material, firewood, is loaded into the firebox and then set on fire. The firebox flap is always tightly closed during combustion and opens only to load a new batch of firewood. During the combustion process, the lower flap opens a couple of centimeters
This will allow oxygen to enter the wood combustion zone and maintain combustion. Attention! There is no need to open the ashpit completely - in this case, the wood will burn out 3-5 times faster and the stove will not be able to properly release heat. The ashpit should be opened completely in cases where it is necessary to clear it of coals. The rest of the time it should be slightly open. Air will flow through the gap, feeding the fire and creating draft. Under the influence of this draft, air will enter the stove from below, heating up, and then, together with the smoke, will leave through the only opening - the chimney.
With pyrolysis
Turbo - not turbo?
Homemade supercharged wood chipper
“Turbo” is a catchy slogan, and manufacturers and traders under it launched supercharged chippers to the masses; they are repeated by many amateurs, see fig. on right. But on a hike, it’s enough to be a novice travel companion to understand: batteries for a boost motor are an energy-dependent stove and a completely unnecessary expense. Also, the micromotor and fan are prone to breakdowns in hiking conditions, and the boost pipe sticks out and interferes with proper packing of the backpack. However, hunters, fishermen and tourists, right up to the toughest pros, who go to the “seven” (the route of the highest, 7th, category of difficulty) should not discount the turbo chippers at all.
In fact, a turbo wood chipper is a pyrolysis camp stove, the diagram of which is shown in Fig. below the list; other sizes can be taken proportionally. Fuel is loaded to the bottom edge of the secondary air holes; ignition - from above. American tourists brought the wood chipper to this state. It must be said that careful attention to detail was the strongest side of American technical culture during its heyday; now, alas, there are clear signs of decline. For a solo hike, the pyrolysis stove-wood chipper is too big, but if a group goes, then it shows undoubted advantages:
- A batch of 2-3 dozen pine cones can make lunch for 2-3 people.
- The high temperature zone is concentrated along the axis of the stove (where the flame is in the picture), so a durable pyrolysis wood chipper can be made from cans or thin galvanized steel.
- It can also operate on dry gas hydrate fuel (dry alcohol).
- Without modification, it can be used as a heating system in surface combustion mode, see at the end.
- An overturned burning stove needs to be immediately placed straight so that it continues to work.
- The scattering of sparks and smoldering coals is eliminated, and the bottom heats up to less than 80 degrees, so launching in a tent is possible.
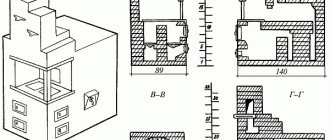
Diagram of the design of a pyrolysis camp stove-wood chipper
The last case is, of course, an emergency. It is necessary to take precautions so as not to get burned, and under no circumstances climb into sleeping bags until the stove has completely burned out and is empty of ash. In addition, if the tent is made of synthetics, you need to put some kind of tarpaulin or something similar under the stove, otherwise the bottom of the tent in that place will become brittle.
Partial pyrolysis
American interest in full pyrolysis in camp stoves is largely due to local environmental regulations; True, outside the zone of its action, tourists there have a terribly ugly attitude towards nature. So, you can collect cones, but you can’t take them from a tree. Raise dry wood from the ground - no thicker than a certain size. In some states and Canada, you can go to jail for breaking off a live branch. And he violated it - in the wildest wilderness, an inspector suddenly appears out of nowhere with an M14 rifle, and then, as in Tsarist Russia: once it comes down to the protocol, it’s a matter of shit.
In the Russian Federation, there are no draconian restrictions on the use of natural resources yet, so domestic hobbyists prefer to make fairly effective, but much simpler structural wood chippers with partial pyrolysis and variable combustion modes. At first, such a stove burns like a flame. As the light fractions of the fuel burn out and its load settles, the role of pyrolysis with afterburning from secondary air becomes increasingly stronger, and the coals burn down to ash through pyrolysis. In terms of efficiency, camp stoves with variable combustion modes are somewhat inferior to pure pyrolysis stoves, but their temperature regime is almost as even and cooking takes almost the same amount of time. All samples considered below (except for the emergency ones at the end) work exactly according to this principle.
The simplest version of a rocket stove
A simple rocket-type camping stove is easy to make, saves time and resources during use, and is compact in size and dimensions. All work will require you to spend 2-3 hours with the preparation of tools and materials, which is very convenient when camping or in a summer cottage.
A design feature that needs to be taken into account is that the lower part of the unit, which acts as the bottom of the fuel chamber (grid), must be made movable. This is done to facilitate the process of laying firewood and loading it into the combustion bunker.
If wood chips are used, the retractable structural element serves as a convenient stand during the process of adding fuel to the stove. Additionally, the moving part greatly facilitates the process of cleaning the unit from ash.
A simple rocket stove made from a pipe
Preparation of materials
To make a rocket stove you will need to purchase:
- Pipe with a square cross-section (15 cm×15cm×3, 40.5 cm) – 1 pc.
- The pipe is also square in shape (it is optimal to choose 15 cm × 15 cm × 3, 30 cm) – 1 pc.
- Steel strip (recommended dimensions 30 cm × 5 cm × 3 mm) – you need to buy 4 pieces of such elements.
- Another option for steel strips (with parameters ideal for work: 14 cm × 5 cm × 3 mm) – 2 pcs.
- A grille, also made of good metal (steel) (choose dimensions 30cm×14cm) – 1 piece.
Additionally, you will need to buy a steel rod (3:5 mm) - 2.5 meters in order to make the grate yourself if desired. A high-quality Robinson oven with your own hands means minimal financial investment, a little attention and time.
Tools
To carry out all the necessary work you will need:
- Bulgarian.
- Welding.
- Metal scissors.
You should also have safety glasses and gloves.
Work is carried out according to the diagram and drawing indicated below:
Drawing of the simplest rocket furnace made from a profile pipe
Manufacturing instructions
All work on creating a heating device must be carried out in stages. The guide to action consists of several steps that must be followed sequentially:
- Square pipes must be cut into pieces of the size required according to the drawing.
- Make markings on them, taking into account that one of their edges will need to be cut (the cut angle is 45 degrees). The work is carried out using a grinder.
- The resulting pipes will need to be carefully welded - the result should be a structure shaped like a boot.
When making a Robinson oven with your own hands and using drawings, it is important to follow the recommendations for the size of the parts contained there. The next steps will be:
- Cuts are made (on top of the pipe or on its sides) - the dimensions are 20 mm deep and 3.5 mm wide (a stand for installing containers will be installed in them).
- Steel strip (which has parameters 30cm×5cm×3mm), 1 piece purchased, must be cut exactly in half.
- Mark the second remaining strip of steel (also with parameters 30cm×5cm×3mm) exactly in the middle.
- To ensure high-quality completion of all stages of work, weld elements on both sides of the cut strip to it (you should get a cross-shaped shape).
- Steel strips (dimensions to be chosen are 30cm × 5cm × 3 mm) - the remaining 2 pieces and the remaining 14 cm long sections are welded into a frame that will be retractable.
- The elements are welded not side by side, but overlapping.
Next, the following work is carried out, which are final.
On top of the finished frame, using a spot welding machine, a finished grille (purchased additionally/specially) or parts of a good steel rod cut to the required length are attached. The distance at which the parts are attached is 1 cm. Then, a stand is installed on top of the pipe, and the grate is pushed into the combustion hopper. The main work on the production of the furnace can be considered completed.
The stage of verification and test behavior begins. You need to put some solid fuel in the firebox and light the stove; if no problems are identified in its operation, you need to wait for all structural elements to cool completely. Finally, you can paint the stove to protect the parts from corrosion. For this, heat-resistant paint is used. You can increase the operating comfort by welding a handle to the combustion chamber door.
For example
The simplest flaming wood chipper can be built from ORDNING cutlery dryers sold in IKEA, trade article 300.118.32, pos. 1 and 2 in Fig. The advantage of this workpiece is the material, quite thick food grade stainless steel, so the “IKEA” wood chipper will last a long time. However, it is only suitable for a morning mug of tea or soup from a bag, so the blank needs to be supplemented with a burner made of bolts (item 4): the diameter of the ORDNING is 130 mm, which is a bit too much for a traveling mug.
Wood chip stove from cutlery dryer
Already with soup on the IKEA wood chipper, problems arise: one load even of pine or birch chips is not enough, so you have to cut out a window for additional loading, pos. 3. It is inconvenient to put small chips into it, especially in the cold with numb hands. The Ikea wood chipper is not very stable, and a clumsy beginner will almost certainly topple it when adding fuel.
Finally, you can only run the IKEA wood chipper outdoors, but then you need legs. No matter how you make them (positions 5 and 6), in the backpack they cling to something and tear something. In general, an IKEA wood chipper will be useful if you take it in the trunk on a fishing trip or at the dacha for quickly heating small portions of food.
Video: example of making wood chips from an IKEA dryer
Hiking tips
The process of preparing for work is simple. Key points to consider:
- it is prohibited to lay out or store wood fuel directly in front of the firebox opening to avoid a fire;
- Coals from the combustion chamber must be removed carefully (not in a tent), they should not burn or smolder.
The oven in working condition must be:
- away from flammable materials, the recommended distance is at least 0.5 meters;
- There should be free space above the stove.
If large models are used, then it must be taken into account that there should be a distance of 1.5 meters in front of the door. Some models have special hooks. They will be needed when you need to open the lid/door.
Are used:
- dry/natural moisture firewood (chopped/small logs);
- branches;
- cones (dry);
- compressed wood waste;
- wood chips
Some heating systems are designed to use small buds.
Attention! In the event of a sudden fire in the stove, the space next to it can be used to extinguish not only water, but also sand and earth. The ideal option is a fire extinguisher (available if traveling by car)
Types of mini-stoves
Tourist stores offer a good selection of camping stoves, which are popularly called “fireless campfires,” “wooden primus stoves,” or “Indian candles.” There are many simple and more complex models, and each of them has its own characteristics. Bushbox camping stove , despite its popularity and complex design, has a number of inconveniences. To ignite it, you need to use only a certain type of fuel. The combustion process cannot be regulated, which is why the wood burns out very quickly, and the food does not have time to cook.
Many factory-produced camping stoves were designed for car tourism, so they are often large in size.
As an alternative to a stove when camping, you can use a grill. But, firstly, it is not very convenient to transport, and secondly, difficulties arise with fuel. This design requires special firewood, which leaves behind coals after combustion, and not all types of wood have this property.
Therefore, a stove heated with ordinary wood is more suitable for tourism. This design combines a number of advantages:
- Lightweight and easy to transport due to low weight.
- Ease of use and ability to adjust power. When choosing a small container for the body, for example, a mug or a tin can, the oven is suitable for heating small volumes. If you use a bucket as a body, then using this stove you can prepare lunch for a large company.
- Unpretentiousness in fuel. Any combustible materials are suitable for ignition: branches, firewood, pine cones, dry grass and leaves.
- High efficiency thanks to specialized design.
- Low fuel consumption. By burning just a few wood chips, you can boil a liter of water. Due to the fact that the wood burns first in the middle, then along the edges, the camp stove heats up evenly, and the wood itself can smolder for a very long time.
- Possibility of universal use.
- Safety . Due to the fact that the fire burns inside the wood, the body remains warm and can be safely held in your hands. When the fire crackles, the sparks remain inside the jar and cannot harm others.
Stove "Antoshka"
This popular version of the tourist-camping type of stove will require a little more time to manufacture independently. The Antoshka model rocket stove is distinguished by its convenient design. A special feature of this type of furnace is the presence of an additional plane heated during operation of the unit.
It is also a stand for a container (hob) and a room heating amplifier. Consequently, the Antoshka stove can be used to provide hot water to a country house or a tourist camp.
Stove "Antoshka"
Materials
In order to make a stove yourself, you need to purchase the following set of materials:
- Square pipes (with material parameters 15 cm×15cm×3 mm. The length is also taken into account, which in this option should be 40.5 cm) - 1 piece and (15cm×15cm×3 mm, also the length of the element is 18 cm) - 1 piece and (10 cm×10cm×3 mm, with product length 60.5 cm) – 1 piece.
- Metal/steel plate (30cm×15cm×3mm) – 1 pc.
- The plate is also made of good, heat-resistant metal (the parameters should be as follows - 15cm × 15cm × 3 mm) - 1 pc.
- High-quality metal corner (5cm×5cm×3, length 30 cm) – 1 pc.
- Larger metal corner (5cm×5cm×3, length 40.5 cm) – 1 pc.
Additionally, you will need reinforcement/rod with a diameter of 8 mm, the length of the material in this version is 30 cm - you will need to purchase 4 such rods.
To make a grate with your own efforts, you will need reinforcement with a diameter of 8 mm, its length is 17 cm - 8 pieces
It is important not to forget to purchase triangular metal gussets that will need to be used to install the hob; the steel in them should be 3 mm - 2 pieces
Tools
To carry out all the necessary work you will need, as in the previous version:
- Bulgarian.
- Welding (for reliable fastening of all elements).
- Marker.
- Metal scissors (for working with small elements).
You should also have safety glasses and gloves.
Manufacturing stages
To make the Antoshka stove you will need to do:
- Mark the existing pipe in the materials (place it vertically).
- Then make neat cuts on it, making them at an angle of 300.
- In the back of the pipe intended for the firebox, cut a hole whose size is 12x10 cm.
Second part of the work:
At the bottom of the element, it is also important not to forget to cut a hole, the size of which will increase slightly and will be 15x15 cm according to the drawing. Next, you will need to connect these two elements. The rear wall of the firebox must be welded with a plate made of fire-resistant and high-quality steel prepared in advance for this purpose.
Afterwards, pieces of metal rods need to be welded to the lower hole of the Robinson rocket stove variation from the outside. The distance at which the work is carried out is 1-1.2 cm. Further work involves the following actions:
- To manufacture such a part of the heating unit as the blower chamber (air intake), a piece of 18 cm in size is used, which is part of a square pipe. Without it, the operation of the oven as a whole is not allowed for safety reasons.
- You need to make a cut on it at an angle of 300 (in the end, the size of this part of the structure is 10x18 cm).
The resulting part should have a bottom and two walls. It is best to place it on stands - this will ensure comfort for subsequent work. They are made from metal corners and attached by welding to the bottom of the structure.
Next, work begins on the main part of the furnace (upper). The steps will be as follows:
The firebox of the future furnace (upper hole) - the pipe included in the materials package is welded to it or otherwise attached (if there is no welding)
It is important to mount it in a strictly vertical position. It is important to remember here that maximum care must be taken. Triangular-shaped products made of metal (it’s better not to skimp on quality here) need to be placed on an edge, which will increase the stability of this part of the structure to create the necessary combination of elements. They are then welded/attached to the pipe and additionally to the top of the structure. The creation of the unit continues by welding a plate measuring 3 dm × 1.5 dm × 3 mm to the edge of the combustion hole, which is located at the top (in front of the master performing the work).
The final part of the creation: you need to weld corners to the top of the vertically located pipe - this will be a stand on which a container for cooking or heating food is installed. The reinforcement needs to be bent (900 - semicircle), the resulting corners are welded to the pipe on four sides at a distance of 30 cm from each other.
Types of combustion
The simplest wood chipper is actually a flame-burning basket roaster. Make one from purchased semi-finished products for 150-200 rubles. You can do it at home in half an hour (see below), but a wood chipper on a flame will turn out to be very voracious. In nature, you will need to prepare a platform for it, like for a fire: embers from the side holes can be shot quite far. In terms of heating technology, a flaming wood chipper has one advantage over a fire: the fuel load does not spread, so you can use difficult-to-burn materials such as pine cones, mountain and desert shrubs.
A good wood chip stove uses pyrolysis and afterburning of waste gases (wood gas) to one degree or another; There are also purely pyrolysis, especially economical wood chippers, see below about turbo stoves. Cost-effectiveness combined with even greater omnivorousness brings wood chippers with pyrolysis to the forefront when there is a shortage of fuel. In emergency situations, a wood chipper with sluggish, but very long and extremely economical surface combustion can literally be a lifesaver, see at the end.
Types of rocket stoves
In this section we will look at the most common types of rocket stoves used in field and stationary conditions.
Simple metal stoves
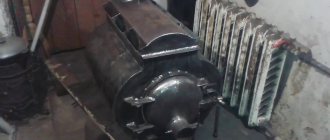
The simplest wood-burning jet stove is made from an L-shaped piece of large-diameter metal pipe. The horizontal part is short, it represents the firebox. The combustion chamber is located in the vertical part of the pipe, where wood actively burns. A small metal plate is often welded into the horizontal section, forming a blower. After warming up, the rocket furnace enters operating mode, and a flame bursts out of its vertical section (flame tube).
Such rocket stoves are used for cooking food in camping or outdoor conditions - due to their small area, they produce little heat, and the vast majority of the thermal energy is lost through the fire tube. Kettles, frying pans and pots are placed on this pipe so that the raging flame ensures their heating. To maintain traction, there are stands in the upper part of the pipe, on which the dishes are placed - combustion products can freely come out.
To make a metal rocket furnace made from an L-shaped piece of pipe more efficient, it is equipped with a metal casing made from an old barrel. A blower can be seen at the bottom of the barrel, and a fire tube peeks out from the top. If necessary, the internal volume is filled with insulation, for example, ash - it does not burn and retains heat well.
Metal rocket stoves with vertical fireboxes located at an angle to the flame tube are the most convenient. Often the combustion openings are closed with lids; in this case, air is taken through the ash pan. Sometimes the firebox is made larger in diameter than the flame tube to ensure long-lasting combustion.
Simple brick ovens
A small-sized brick rocket stove is another simplest option for building a rocket stove with your own hands. Its assembly does not require cement mortar; it is enough to stack the bricks on top of each other to get a convenient brick outdoor unit for cooking at your disposal. In the section on self-assembly of rocket stoves, we will invite you to familiarize yourself with the simplest procedure for self-assembly.
A rocket stove, made with your own hands from brick, can be used to heat households. In this case, a simple arrangement is not enough - you will have to build a stationary version using a special cement mortar. There are many procedures for this, you just have to choose the appropriate option. By the way, some versions of such furnaces include a water circuit.
Advantage of brick rocket kilns:
- Simple design;
- Long-term heat retention;
- The ability to create a comfortable warm bed.
Some models are made combined, using both steel and bricks.
Sophisticated rocket stoves
A jet stove for heating households or for a bath is characterized by increased complexity. The main link here is still the riser (fire tube), enclosed in a metal casing. Its upper part can be used for cooking, forming a kind of cooking surface. The firebox is made large to accommodate an increased amount of solid fuel. The starting materials are metal, bricks and clay.
Based on clay coating, streamlined rocket furnaces of irregular shape are made, which is well perceived by human vision.
There are projects for wood-burning rocket stoves that include additional modules. Their construction schemes include small boilers for preparing hot water, hobs, water jackets and even small ovens. Such stoves will help heat households and create comfortable living conditions for people.
A rocket boiler with a water jacket, created on the basis of a wood-burning stove, will help warm up a multi-room building. It is equipped with a water circuit for heating the coolant. Additional convenience is created by samples with beds - these beds are created on the basis of thermal channels between the flame and chimney pipes.
Tent stoves - main types and features
Like any other equipment, a stove for a tent is selected according to two main criteria - the purpose of the tent and its volume. In the first case, it is recommended to consider heating devices according to the following criteria: tents for all-season hikes, summer tents, fishing tents. Separately, it is worth mentioning such tents as mountaineering ones. All these houses have their own heating and equipment requirements. Thus, an ordinary tourist tent, designed for outdoor activities only in the spring and summer, most likely does not have a special valve for installing a heating stove. Winter tents are characterized not only by the presence of such a window, but also by the presence of a special insert made of non-flammable fabric with a hole for the chimney. But a mountaineering tent is characterized by a low silhouette, so only equipment with a minimal risk of carbon monoxide emissions is applicable here.
As for the volume of the tent, here, first of all, it means the capacity of the tent, the presence of several rooms, and of course how many people it is designed for.
Depending on this, the stove for the tent is selected according to its power and the type of fuel used:
- Wood-burning camping stove;
- Kerosene stove;
- Automotive fuel stove;
- Gas-burner;
- Electric heating option;
- Heating option from an external heat source.
And although all these devices are designed to heat the volume of the tent in the natural environment, very stringent safety requirements apply to them.
Which stove for a winter tent to choose?
To choose a stove for a tent, you should rely on the size of the heated room and the type of fuel being used. It is also important to remember that for overnight trips it is better to take wood-burning ones. They are equipped with a chimney, which will prevent you from getting burned if you go fishing overnight. Gas ones often do not have an air outlet and require constant ventilation.
Gas infrared
In this method we will tell you how to assemble such an installation yourself, because... building an infrared burner is very difficult.
Materials and tools
For production you will need:
- Infrared ceramic burner.
- Gas cylinder.
- Oxygen hose 2 m with a diameter of 0.4-0.6 cm.
- Clamp 2pcs
- Screwdriver
- Nozzle for liquefied gas or natural gas (depending on the fuel used).
- Retaining ring
When choosing a ceramic heating pad, it is better to give preference to small models - gas is consumed more economically. The peculiarity of infrared heating is that it heats objects, not air, so if possible, it is good to have a stand under the heating pad, which will allow you to direct the energy.
Manufacturing instructions
The diagram clearly describes the principle of operation of the stove. The gas-air mixture allows you to achieve high temperatures with the least risk of fire.
Principle of operation
Essential elements
- Place the nozzle into the connection hole of the infrared burner.
- Attach the retaining ring on the reverse side.
- Place a clamp on the oxygen hose to prevent gas leakage.
- Connect to the nozzle, tighten the clamp with a screwdriver.
- Connect the gas cylinder to the hose, also using a clamp.
- To light the heater, you need to hold a match to the ceramic heating pad. It is forbidden to ignite gas near the nozzle. Fuel can be propane, argon and natural gas. When replacing fuel, you need to change the type of injector. The gas camp stove is ready.
Type of infrared gas stove for a tent
Operating rules
A camp stove for a tent should not only heat the space, but also serve as an assistant in cooking.
Infrared heaters are not intended for this, but craftsmen have learned to cook on the following tiles:
- You need to place the heating pad with the radiating side up, and place two stones or bricks on the sides.
- Place metal rods or skewers on the bricks.
- Place dishes on top for cooking and heating canned goods.
A 200g can will last for 2 hours, after which you need to replace it with a new one. The gas cylinder must stand upright. It is prohibited to leave the stove unattended. Ventilate the tent from time to time. The surface temperature of the ceramic heater is 800-900 degrees.
Description of pyrolysis and gas furnaces
Pyrolysis and gas stoves are very convenient for use on hikes and vacations outside the city. They are characterized by an excellent combustion process, so they are quite suitable for quick cooking in the fresh air. But you cannot make such stoves yourself; they are purchased in specialized stores.
The pyrolysis stove is highly efficient, so the models presented from the retail chain have a fairly high price. Compared to wood stoves, this option is characterized by greater productivity. Those who decide to make such a device with their own hands must have special knowledge and materials. In addition, it should be borne in mind that a homemade stove in nature does not give the desired effect.
Among the advantages of a pyrolysis oven are safety and environmental friendliness. In such a device you can burn excess garbage and cook food; the fire in them burns constantly without failure. The pyrolysis furnace is made from steel that is resistant to high heat.
A camping gas stove is also suitable for traveling out of town or camping with a tent. In the retail chain, such devices are presented in a wide range; you can choose a stove of any color and cost. The gas oven runs on a special cartridge that requires regular replacement. However, you can cook food on such a device without difficulty.
Before going on vacation outside the city or camping with a tent, you should take care of all the necessary things, including a camp stove. For regular use, it is better to purchase a good stove for tourism in a specialized store. And for occasional and very rare trips to relax in the fresh air, you can use self-made devices that do not require spending money, effort and time.
Why do you need a camping stoveDesign features of a camping stove and its advantagesMaking a mini-stove from a tin canUsing unnecessary pots to make a stoveDo-it-yourself folding camping stoveDescription of pyrolysis and gas stovesVideo
Outdoor recreation is almost always accompanied by setting up a tent and lighting a fire. It is on the fire that you can prepare delicious fish soup, tea and other healthy food. However, nature does not always allow you to enjoy these pleasant moments; sometimes rain prevents this or it takes a very long time to get to the forest. In this case, you can make a camp stove with your own hands, especially since this process cannot be called complicated.
A device such as a camp stove can easily replace a fire. At the same time, it requires less fuel than when lighting an open fire.
In addition, the following can be used as fuel:
- Cones.
- Tree bark.
- Woodchips.
- Dry branches and reeds.
- Cooled used coals.
It should be noted that when burning the same amount of fuel, a stove produces much more heat than a fire. Therefore, the oven can cook more food in a shorter period of time.
All furnace devices are divided into two types: single-walled and double-walled. In addition, the stove can be folding or made in a mini version. A camp stove can be made at home or directly at your vacation spot. In both cases, the process makes it easier to use the drawings.
To make a camping stove, various available materials are used, including unnecessary pots, cans from preservatives, or ordinary metal sheets.
When choosing a material, it should be taken into account that the stove must meet the following requirements:
- Low heat consumption.
- Low weight and dimensions.
- The ability to heat dishes, not air.
The best stoves for a tent for winter fishing (TOP 7 rating)
Below are the products you should pay attention to when choosing a stove for your tent. The TOP 7 included:
Tramp TRG-036 1.3 kW
This small, portable stove heats small spaces easily. The design is made of good metal materials. Above the infrared emitter there is a convenient grill for heating food. The stove runs on gas, which is enough for about 3-4 hours of operation. A good solution for a small tent.
- Length, mm “290”.
- Width, mm "231".
- Height, mm “247”.
- Weight, kg "2.34".
- Power, kW “1.3”.
Price in Russia from 2500 rubles.
ADVANTAGES:
- high build quality
- light weight
- heats small rooms well
- all declared functions work
- warranty period 1 year
FLAWS:
- not detected
Tramp TRG-036 1.3 kW
Turbo stove-wood chipper “Ogonyok”
High power wood stove. The heat from the stove can boil water and warm the air in the tent in a short time. The high power of the device is achieved due to the built-in electric air blower, powered by batteries. The stove is easy to install, and due to constant inflation, it can heat well using wet wood.
- Supercharger power supply “AA batteries, 2 pcs.”
- Length, mm “120”.
- Width, mm "110"
- Weight, kg "0.6".
Price in Russia from 2000 rubles.
ADVANTAGES:
- three operating modes
- works stably at low temperatures
- Any available material is suitable as fuel
- One set of batteries lasts more than 50 hours
- On the stand you can place dishes not only with a diameter larger than the diameter of the stove itself, but also with a smaller diameter, for example, a tin can
FLAWS:
- not detected
Turbo stove Wood chipper
Small tourist stove with screen
A good wood-burning stove that looks like a small “potbelly stove”. The stove is made of high-quality metal, which allows it to withstand high temperature loads. Its cubic shape allows it to transfer heat well in all directions. Also on its upper part, it is convenient to use for heating water and food.
- Length, mm “230”.
- Width, mm “230”.
- Depth, mm “500”.
- Weight, kg "4.5".
Price in Russia from 1500 rubles.
ADVANTAGES:
- low weight and volume
- the best choice for hiking fishing trips
- safe and easy to use
- suitable for heating a 2-3 person winter tent
- very convenient for cooking, as well as hot and cold smoked dishes
FLAWS:
- not detected
Shore Economy Small with removable screens
Camping stove Savotta Stove with heaters
A fairly large and heavy stove for large tents. It has a lot of weight due to the high-quality steel from which it is made. Suitable for heating rooms that can accommodate up to 10 people. The stove has a high percentage of heat transfer and can be used to heat a bathhouse. Due to the adjustable power of the flame, you can quickly heat up the tent without spending a lot of firewood, and due to the compartment in which you can put stones, you can turn the tent into a camp sauna. A good travel solution that is suitable for a long hike.
- Length, mm “300”.
- Width, mm “280”.
- Depth, mm “450”.
- Weight, kg "18.5".
Has a compartment for dumping ash. Price in Russia from 28,000 rubles.
ADVANTAGES:
- The furnace body is made of steel 3 mm thick.
- long-term operation and high heat dissipation
- the volumetric combustion chamber allows the use of large firewood
- The legs design is removable, convenient for transportation and carrying.
- stable combustion even with minimal air access
FLAWS:
- not detected
Camping stove Savotta Stove with heaters
Mobile oven NMK Tourist
Small mobile wood-heating stove. It is easy to install, and due to high-quality steel walls, the tent quickly heats up. Suitable for both a small tent and a tent for 5-10 people. The stove performs well in extreme cold and, due to its elongated design, allows you to place several pots on it for cooking.
- Width, mm “280”.
- Depth, mm “450”.
- Height, mm “470”.
- Weight, kg "18.5".
Price in Russia from 14,000 rubles.
ADVANTAGES:
- made entirely of stainless steel
- compact, the legs fold easily and the oven takes up very little space
- the surface of the oven can be used as a hob on which you can cook food and heat water
- when using a special heater (purchased separately) and stones, it functions as a sauna stove
- Great for 5-10 person tent
FLAWS:
- not detected
Mobile oven NMK Tourist
Poshekhonka, Large, with screen
Lightweight and reliable portable stove, perfect for heating a small tent. Due to its light weight, the stove is suitable for hiking and does not take up much space in the tent. According to the manufacturer, the stainless steel from which the stove is made will allow it to last longer. It has 2 removable screens, due to which the heating area is adjusted.
- Length, mm “340”.
- Width, mm “230”.
- Depth, mm “330”.
- Height, mm “480”.
- Weight, kg “3.5”.
Price in Russia from 9500 rubles.
ADVANTAGES:
- small dimensions
- weight 6.5 kg, great for hiking and fishing trips
- the stove body is used as a heating surface for cooking food or boiling water
- can be used as a smokehouse
- bag-case included
FLAWS:
- steel thickness 0.5 mm.
Poshekhonka Small with screen
Gas stove TOURIST MINI AFRICA 1.2 kW
A compact gas heater will allow you to quickly warm up in a small tent. Has extremely mixed reviews from customers. Its main advantage is its size and fuel consumption. On one cylinder it is capable of heating a two-person tent for up to 6 hours. Can quickly boil small volumes of water.
- Length, mm “300”.
- Width, mm “130”.
- Height, mm “260”.
- Weight, kg "1.5".
Price in Russia from 3500 rubles.
ADVANTAGES:
- compactness
- neat assembly
- economical fuel consumption
- Stable burner operation even at minimum
- quickly heats up a small room
FLAWS:
- according to reviews, it doesn’t always light up the first time
Gas stove TOURIST MINI AFRICA 1.2 kW