For restoration and elimination of defective cracks, a special or personally prepared putty for the stove is used. Professional compositions have good heat resistance, so they will last longer, but will also cost more. But everyone can prepare such a product with their own hands; it will have no less high-quality properties, and will cost less. We propose to consider each of the suitable means for sealing in today's publication.
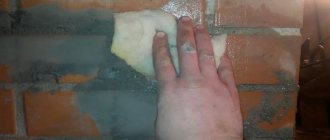
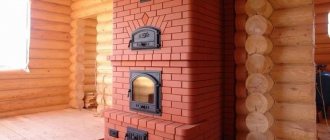
Covering a brick oven in a house with a special solution Source eco-kotly.ru
How to cover up cracks to make it secure
To eliminate all kinds of holes that have formed during regular operation of the furnace, they try to use reliable compounds that cope with the problem the first time. In this section we will look at some of these tools.
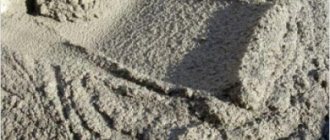
Fireclay clay
Ready-made fireclay clay provides reliable sealing of joints that do not deform under constant exposure to high temperatures. The dried composition is characterized by a high level of vapor permeability and endurance when exposed to wet steam under high pressure.
Deep cracks on a brick wall from a home stove Source pechdoc.ru
The material is also considered environmentally friendly, since it does not emit toxic fumes when heated, and accordingly is harmless to people and animals. In order to prepare such a solution, you will need:
- one part of cement (grade “500”);
- two parts of fireclay clay (can be purchased at a special store);
- seven parts of river sand.
A little history
More than 4 thousand years ago, one of our ancestors came up with the idea of lining the hearth with stones. Later, a kind of exhaust pipe made of leather was installed above it to remove smoke. This was exactly the prototype of the stove in the lands of the Slavs. For a long time, this design remained virtually unchanged, and even today, if you want to get to know it better, you can probably find such a stove in the bathhouses of nearby villages.
An obligatory stage in the construction of a furnace is its coating. For many years, the most reliable solution in this matter has been clay mortar.
Initially, the oven was made of stones that were not fastened together in any way, then they came up with the idea of using a mixture of clay and broken shards to coat the cracks between the stones. Over time, the design gradually changed, the stones were replaced by clay bricks. As a result of such transformations, the stove acquired a familiar appearance to everyone.
In Kievan Rus, the stove dominated the hut, because it warmed the house, they cooked food in it, and it treated rheumatism and radiculitis with its warmth much more effectively than advertised remedies. Therefore, it is not surprising that in those days a good stove maker was treated with almost more respect than a clergyman.
Nowadays, there are several types of stoves in use: Russian, fireplaces, heating, heating-cooking and sauna. But any furnace is usually made of refractory bricks, which are held together with refractory (so-called fireclay) mortar. Masonry today remains a difficult task - akin to art - and requires good skills and great skill from the performer.
Video description
Plastering a brick oven with your own hands.
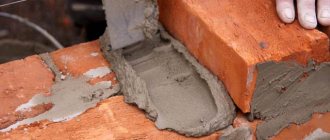
Special oven glue is not diluted in large quantities as it tends to harden quickly. After this, it cannot be used a second time, since repeated dilution will cause the composition to lose its strong qualities.
Using special oven glue to seal joints between brick joints in a home oven Source waysi.ru
Goals
If you plan to use water in everyday life, especially for drinking and cooking, cleaning it from clay is necessary. It allows:
- reduce turbidity - even in small concentrations, clay suspension reduces the transparency of water and makes it unsuitable for drinking;
- soften water and remove impurities from it - water containing dissolved clay, in terms of hardness, as a rule, does not meet the requirements of GOST “Drinking Water”, and is also often unsuitable for domestic needs;
- eliminate odor - drinking water, according to regulatory documents, should not have any foreign odors.
- disinfect water at the initial stage of purification, since clay suspension often contains dangerous microorganisms, algae, protozoa and other biological objects.
Guide to oven coating: technology to follow
If the question arises of how to coat the stove with clay or any other means to eliminate cracks, it is recommended to follow the algorithm below. It will make it possible to do all the work efficiently the first time and without additional modifications. The process consists of the following steps:
- In the resulting gap, remove any remaining old plaster and all dust. Next, deepen this crack by 1 cm. This way you increase the repair space, which makes the sealing process more convenient. Re-dispose of all waste.
- Coat all prepared areas with water and primer, and then heat the oven so that all the liquid evaporates. Put out the fire, when all the steam has completely disappeared, it should be emanating from the surface of the oven.
- While the walls of the structure are still hot, coat the prepared areas with a clay solution. At this point, it is important not to overdo it and apply a thin layer of oven caulk.
- Afterwards, take a reinforcing mesh or burlap and secure it with small self-tapping screws to the damage so that they completely overlap.
- Next, prepare the grout solution and carefully apply two layers to the defective areas using a spatula.
Leave the structure until completely dry. Remember that lighting a fire in it immediately after caulking in order to dry the seams faster is strictly prohibited. Trying to speed up the process will result in even more cracking. At this stage, the question of how to accurately coat the outside of the stove has been resolved.
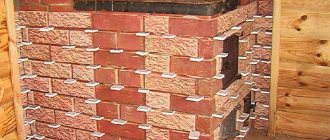
Repairing a brick kiln against cracks in the seams Source sdelai-lestnicu.ru
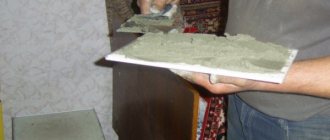
What kind of putty should I use?
Clay and sand
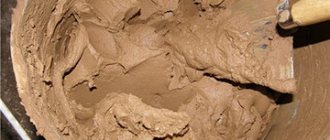
Covering cracks with a clay mixture is the most economical and easiest way to restore a stove structure. You can use any clay. It is important that it contains a minimum amount of impurities. If the raw material is of high quality, then after soaking it should have an oily, homogeneous and, most importantly, plastic structure. At the same time, the quality of restoration is no worse if the stove was repaired using expensive modern means. Before you start covering with clay, you should understand the features of preparing the solution.
How to make clay putty yourself
The preparation of the mixture is done in stages.
- Before mixing the components, the clay must first be kept (soaked) in warm water for 12 hours.
- Knead the softened clay until smooth so that there are no lumps left in it.
- To obtain a mixture for putty, you need to take clay and sand in a ratio of 4:2, respectively. The last component should be pre-sifted. The amount of liquid is taken depending on the moisture level of the components.
- If you want the stove to be white, add lime to the putty and knead everything thoroughly until a homogeneous consistency is obtained. The prepared mixture is covered with polyethylene and kept for 12 hours.
- The settled compound is kneaded a second time. Roll a piece of putty into a ball in your palms and squeeze it. If it starts to crack, you need to add water to the mixture.
- Lightly heat the oven, spray water into the cracks, and then start caulking.
- To prevent new defects from appearing, straw is added to the clay. A more reliable method is to use a plaster mesh. If the solution is applied to a surface covered with this material, you will forget about cracks for a long time.
Fireclay clay
Fire clay is often used to repair old stoves. The material has increased fire resistance. Furnace structures finished with it are durable. This material is sold in all construction stores and markets in 20 kg bags. It's inexpensive. The working mixture is prepared strictly according to the accompanying instructions placed on the packaging.
How to repair a firebox in a brick stove
If the question arises of how to repair cracks in a brick stove inside, you should try to minimize the heating of the walls using additional lining. This process involves the installation of special barrier partitions that absorb the entire thermal shock. The inside of the firebox is lined with one of the following materials:
- Cast iron. This is a fairly reliable type of raw material, it is distinguished by its durability and can withstand both loads and constant high temperatures. When introducing it, be sure to leave a small air gap between it and the brick wall.
- Steel. The material will last less than the previous one, since it tends to burn out quickly. An air cushion must be created behind such a layer. To maintain it at the same distance on all sides, a corrugated layer is laid. It will burn out after the first use of the stove, and the back space will remain free.
- Fireclay brick with markings ША-6 and ШБ-6. These models are not installed tightly to the stationary walls of the furnace. The approximate gap will be 7-10 mm. The brick is laid on fireclay mortar, which has increased stickiness.
Restoration of the firebox and removal of cracks in a brick kiln Source pechdoc.ru
Step-by-step instructions for making the mixture
The stove is made to heat a country house, it is used not as an additional, but as the main heating option. In this regard, the load on the elements increases; at all stages of masonry, the recommendations of professionals must be strictly followed. We have already mentioned that the reliability, duration and safety of operation of the stove largely depends on the quality of the mixture. In the middle zone of our country, clay is everywhere; there is no need to waste a lot of time searching for it. As for the quality of clay, in the vast majority of cases it can be used to make a mixture; the final properties of the solution are regulated by changing the amount of sand.
The best clay is in industrial quarries
But this does not mean that you need to specifically go in search of brick factories; you can dig a hole on your site and collect clay. A few buckets of clay and sand are enough for a stove; the total number of bricks rarely exceeds 600–700 pieces. How to properly prepare a solution from clay?
Step 1. Dig up the clay. This can be done on any site with a suitable soil structure. As we have already said, no one will do any analysis of the clay; there is neither the opportunity nor the need for this. In our case, the clay was harvested in the forest; there were enough traces of previous harvests in it; you can dig clay from old pits.
Clay can be dug up in the forest or on your own plot
For one large rural stove, it is recommended to fill a barrel with a capacity of 200 liters. There is no need to compact it; let the soil lie freely and there will be air gaps between the individual lumps. The fact is that the clay must be soaked for at least a day; the cracks will ensure the penetration of water throughout the entire volume. The longer the material is soaked, the better its quality, the more uniform it is, and the easier it is to make the mixture.
The clay is poured into a container of suitable size.
Step 2. Fill the clay with water. We have already mentioned that the correct technology requires that the soil be wet for at least a day. Immediately prepare river sand and a sieve. The mesh size of the sieve is 0.5–0.6 mm. There is no need to make it smaller - it will be difficult to pass the mixture through. And if you use a sieve with large cells, the stones will interfere with the work. Our seam thickness is about one centimeter, stones of five millimeters do not create problems.
The clay must be filled with clean water and left for at least a day.
Step 3. After the clay has infused, begin stirring the composition. It is recommended to do this for the first time using the following algorithm:
- Mix the clay and water thoroughly in a container. It is necessary to use powerful mixers, the clay is mixed tightly;
- if there are pebbles in the solution, then filter it through the prepared sieve. All large impurities should be removed;
- add sand to the clay at a rate of approximately 1:3 (three parts sand per part clay);
- Stir the mixture and add water as needed. The consistency of the mixture should resemble rich sour cream.
Construction mixer price
Construction mixer
The quality of the mixture is determined by eye. If it hardly slides off the surface of the trowel and large marks remain on it, then there is a lot of clay in such a solution, add sand. If the composition falls easily, the trowel is completely clean, then you need to reduce the amount of sand. This is how experienced stove makers make up the proportions; in addition to finishing experiments, they can learn a lot about the physical characteristics of clay and sand by eye.
Determining the correct consistency of the solution
How to seal cracks in a metal stove
You may also need to decide how to cover the cracks in a metal stove, because it gradually burns out, and it is not always easy to allocate funds for repairs. Clay grout can be used as a restoration product. It is important to make a thick enough layer that will prevent combustion products from escaping from the firebox. The clay should be diluted in the traditional way, you can add a small amount of ash from the same oven and mix thoroughly until smooth.
Repairing a metal furnace by welding exfoliated metal fragments Source ipk-rotor.ru
If a hole or crack in the metal appears in the area where the chimney meets the stove chamber itself, then you need to take a small plate of metal, coat it with stove glue and fasten it to the deformed area. Seal the space on top with the same composition. To solve this issue, a reinforcing mesh is also used, which is subsequently plastered.
Methods
Water purification from clay suspension takes place at the first stages of water treatment. Methods and forms of purification, as well as the types of equipment used, will depend on the initial quality of the water based on its analysis data. The more water is contaminated with clay, the more stages of purification it goes through.
So, purifying water from clay includes:
- settling is the initial stage of water treatment, allowing large and heavy clay particles to settle to the bottom;
- the use of a hydrocyclone is a method of purifying water from mechanical impurities that do not settle; operates on the principle of a centrifuge, when large particles are concentrated near the walls of the device, and purified water is collected in the central part;
- filtering is a method of purifying water by passing it through a special membrane, the pores of which are smaller than the particles of pollution that are captured;
- filtration through clarifier filters - the action is similar to filtering;
- coagulation - adding special substances to water that promote the enlargement of suspended particles, which can subsequently be removed by filtration;
- film filtration is a method in which the filter material is covered with a film of clay suspension, including even very small particles.
Each of the listed methods is usually used in combination with others, since they all represent stages of one process.
Types of cracks and features of their repair
Having figured out how to coat a brick stove when deformations appear, you need to familiarize yourself with the types of cracks that appear. Conventionally, they are divided into cobwebs and other types. The first type of cracks is classified as non-through, and therefore their treatment is much easier. To seal a sealed surface in this way, you need to follow a step-by-step algorithm:
- clean the surface and use a chisel to remove excess plaster and debris that is stuck in the cracks;
- then clean the surface nearby with a metal brush, sweep away excess dust;
- treat the prepared surface with a primer so that it penetrates into the cracks;
- mix cement with water until the consistency of liquid sour cream is formed, take a brush and treat the damaged areas with it.
Go over the cracks several times to ensure the damage is completely filled. Otherwise they will appear again very soon.
Preparation of materials for preparing mortar for laying a stove
The easiest way to prepare sand. It is dried because the raw material cannot be sifted. And then they are sown on a mesh with a mesh size of 1.5 - 2 mm. The task is to remove pebbles and impurities.
Clay is more of a hassle. In the classic version they did this. Clay was dug up in advance, ridges about a meter high were formed from it, moistened and left for the winter. Water, penetrating into the pores of the clay, freezing, destroyed the structure of the clay, crushing it. After such exposure, the clay easily dispersed in water, creating a homogeneous suspension - clay milk.
Then the clay was mulched. Stir with excess water in a tall barrel and leave. Heavy impurities (stones and sand) collected at the bottom of the container. Light impurities (roots, grass, other debris) simply floated up. They were easy to assemble and remove. After waiting a little (a day or two), the lightened, settled water was removed from above, and the middle layer with clean clay was collected and used for further preparation. If the clay turned out to be thin or heavily contaminated, the mulching procedure was repeated several times. Today they also resort to it, but in full only in cases of extreme need - when there is no fatty or normal clay.
Afterwards the clay was left to “ripen”. They simply filled it with water and waited for all the organic matter to rot. The process is quite smelly and long - about one and a half to two months. The “rotten” water was not changed. The smell served as a marker for the completion of the process. As soon as the stench disappeared, the clay was considered ready. This meant that all organic impurities in the clay were removed.
Today, rarely does anyone allow themselves the luxury of long clay preparation. Therefore, the preparation process is shortened as much as possible.
First of all, the clay is soaked for several days, stirring daily with a mixer. Any grass and roots that float (or are wound around the mixer auger) are removed. As soon as the water settles, the excess is carefully drained, and the soaked clay dough is scooped out to prepare the solution. The stones are removed from the bottom, and the remaining lumps of clay are again filled with water.
If there are a lot of lumps and foreign inclusions, it is filtered through a sieve with the same mesh as for sifting sand.
The prepared clay milk should have the consistency of thick cream.
Video description
Oven for frying. How to put terracotta on glue.
On a note! In order not to make a mistake with the choice of grout, it is better to use ordinary clay, but first it should be checked for fat content. They do it this way: take five parts of clay and mix each of them with sand in different proportions, diluting with water. Then they make a bun from each mixture and throw it on the ground. The one that crashed is the fattest. Accordingly, the composition is ideal for sealing furnaces.
Removing Impurities
Almost all quarry clays and sands contain impurities and require purification. Remains of plants, roots, grains of sand, pebbles, and pieces of crushed stone are removed from raw materials in various ways.
How to remove impurities from clay
Impurities greatly degrade the quality of the masonry. Purification of raw materials is carried out in three stages:
- manual sampling of plant remains, roots, crushed stone, pebbles;
- sifting through a metal sieve with a hole size of 1.5 mm;
- soaking clay;
- rubbing through a metal fine-mesh sieve.
Photo 2. The process of sifting clay through a metal sieve. You need to press it with your palm so that all the particles pass through the mesh evenly.
In practice, to clean clay for mortar, craftsmen do without the labor-intensive process of soaking the raw materials.
How to remove impurities from sand
The sand is considered prepared when the water passing through it becomes clear. To prepare the material, you need to do the following:
- Plant remains, roots, and large stones are manually selected from the sand.
- After a rough sampling, the material is sifted through a metal sieve with a mesh size of 1.5 mm.
- The sand is placed in a burlap bag (or net) and washed with running water. A hose is used for flushing; water is supplied under pressure.
Lime based
Method No. 4
The optimal composition of the finished mass is obtained in the following proportions - 3:1 (for 3 volumes of sand 1 volume of cement grade M 300 or 400). Before mixing, all components are sifted through a fine-mesh sieve. Sifted sand is poured into a deep container, cement is added and mixed until smooth. At the end water is added.
The finished mixture must be brought to a thick and viscous consistency. Determining the appropriate density is quite simple - the composition should remain mobile, but not flow off the shovel when it is rotated up to 45 degrees.
To build a monolithic stove, it is recommended to use refractory concrete mixture in the following proportions (parts):
- Cement (M 400) – 1;
- Crushed stone or gravel – 2;
- Fine sand – 2;
- Fireclay sand – 0.4.
In order for the stove-maker to have a solid foundation, it is recommended to prepare a masonry mortar consisting of coarse gravel, sand, and cement (proportions 3:3:1).
To increase strength, you can use quartz chips. The refractory concrete mixture is coarse-grained, has increased density and is waterproof.
For proper mixing of 25 kg of finished mixture, 10 liters of water are required. The optimal mixing method is mechanical using a concrete mixer. The finished composition hardens quickly, so it is recommended to use it immediately after preparation.
The construction of a furnace has its own distinctive features regarding the correct choice of composition and preparation of masonry mortar. Different compositions are used for different structural elements.
How long will it take to dry?
The oven cannot be used after repair until all applied layers are completely dry. How long this will take depends on the composition used. Heat-resistant glue dries in a matter of hours; the sand-clay mixture will take a day.
Important! Try to plan repairs for the summer, when the furnace is not in use. This will allow enough time for any composition to dry completely.
How to plaster a wooden house with clay. Clay plaster
Clay plaster is unique among all other types of plaster for interior and exterior walls. The growing interest in clay plasters has recently been associated with the trend of choosing natural, environmentally friendly materials for finishing. Clay is also used for plastering wet rooms (except for showers and walls that are directly affected by water and moisture), but clay plasters are most widely used for masonry and finishing of fireplaces and stoves. Decorative clay plasters with fillers made of straw, sawdust, and plastic fiber occupy a special place in the decoration of eco-interiors. One of the main advantages of clay as a material for plaster is the absolute naturalness and environmental friendliness of the composition. Red and white clay are more common. Natural clay is a sedimentary rock that does not contain mineral components harmful to human health; in addition, clay plasters are able to adsorb harmful components from the air of the home and bind them, which makes clay walls the best finishing option for people prone to allergies. This beneficial effect for the indoor microclimate is complemented by the ability of clay walls to regulate humidity in the house: a layer of clay easily absorbs excess moisture and just as easily releases it back into the indoor air when the humidity level decreases. A few more benefits of clay finishes:
- Ability to conduct heat;
- Hygroscopicity and the ability to accumulate and release moisture;
- The plastic properties of clays make it possible to plaster surfaces operating under conditions of strong heating and sudden cooling: stoves and fireplaces, chimneys;
- Cost-effective, low prices for materials. Possibility of independently procuring clays of excellent quality. Preparing clay is a fairly long but simple process;
- The hardness of clay is less than that of cement plaster, but is sufficient to protect enclosing structures from both mechanical and thermal influences. Clay is impractical only for exterior plinths, but with reinforcing fiber in combination with lime and other binders it is also used for exterior plasters;
- Clays can be used more than once.
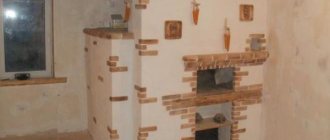
Photo
Below are the best real photos of properly plastered stoves:
Tags: putty for stoves, mortar for the stove to prevent cracking, repair of a brick stove, what to put on the stove
Why do you need a clay castle around the foundation?
The design of the clay castle itself performs several functions:
- Protection of the foundation from moisture.
- Additional dense cushion for the sole of the base.
- Reducing the pressure of groundwater and melt water on foundation walls.
Of course, modern materials cope with waterproofing several times more effectively.
But a clay castle has the main advantage of being cheap and accessible. After all, you don’t have to buy clay, but collect it from reservoirs or quarries. This material has several more pleasant features:
- fat content, which makes it possible not to use additional materials in the sole area for insulation from moisture;
- the density of the dried substance prevents the foundation from cracking or crumbling;
- ease of use, meaning any amount of material can be used for the lock.
But for all its splendor, clay also has some not very pleasant sides:
- Short-lived protection - after 5-6 years the lock should be rebuilt, removing the previous layer.
- Not always good quality - due to sand impurities, the clay becomes less fatty and freezes strongly, losing its properties.
- Low waterproofing of vertical surfaces - additional waterproofing is required for the external and internal walls of the foundation.
Even with such nuances, you should not refuse a clay castle around the foundation.
This will save significant amounts of money on insulation and other construction work. It is worth knowing that the closer the groundwater comes to the foundations, the more short-lived the castle will be. Therefore, to drain water from foundations, drainage is often performed along the entire perimeter near the base of the house.