The first question that a person who is planning to change the batteries in the house is faced with is which mount for heating radiators to choose? After all, there are quite a lot of both the batteries themselves and the brackets for them, and those that come included are often the cheapest and do not fit all walls. Next, we will look at what battery mounts exist and how to choose them correctly, and for homemade ones, I will tell you how to mount the battery with your own hands in accordance with the standards.
The mount for heating radiator batteries is selected according to requirements such as the weight and model of the battery, plus the wall material.
Characteristic
Brackets for heating radiators are fastening elements of any design, shape, and size , made of steel, cast iron or other metals or alloys.
Products are divided into:
- hanging fasteners designed to secure the radiator to the wall;
- floor stands.
There are both adjustable and non-adjustable holders of both varieties.
Important! The key to proper installation of any heating battery is the selection of fasteners that match the characteristics of the model being installed. It is optimal to use those that come with the radiator.
Results
Brackets for radiators are of different types and types: for wall and floor installation. The standard ones that come with the kit are reliable, but they are more difficult to work with. Planks and devices for quick installation save time, but cost a lot.
The heating appliance market is striking in its diversity. But the familiar cast iron radiators are still popular due to their many advantages. They are durable, corrosion resistant, easy to use and very durable. But even the most reliable device may one day require replacement. You can solve the question of how to hang a heating radiator on brackets yourself. The main thing is to have experience, the necessary materials and take into account some installation nuances.
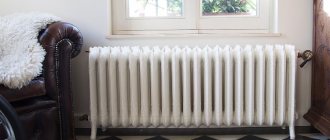
Modern cast iron radiators are an example of style
Wall mount
The wall-mounted method of mounting batteries is the most common when installing heating systems. The selection of fasteners is carried out taking into account the weight of the battery and the material from which it is made.
Fasteners for cast iron batteries
These clamps are distinguished by their massiveness and increased strength. As a rule, in price lists they are marked “reinforced”.
Photo 1. Brackets for cast iron heating radiators. The products are highly durable.
For wall mounting of cast iron radiators, the following types of fasteners are used:
- Non-adjustable cast iron fasteners.
- Adjustable, made of steel. They allow you to change the distance between the wall and the radiator, which makes it possible to make adjustments in height and horizontally.
- Pin holders made of steel.
- Holders on the bar. This is a steel strip with two hooks for attaching the upper and lower battery collectors, which is attached vertically to the wall.
Attention! When installing cast iron radiators, it is important not only to select suitable fasteners, but also to take into account the wall material. For brick and concrete, as a rule, standard hanging brackets are sufficient. For plasterboard or wooden walls, reinforced floor fasteners are used that can take the main load.
For aluminum and bimetallic radiators
Unlike cast iron analogues, fasteners are lighter and less massive.
are used for wall mounting :
- Corner fasteners made of steel. Depending on the mass of the radiator, conventional or reinforced models are used. They have two recesses that allow it to be fixed to both the lower and upper manifold.
- Steel pin holders. They are divided into molded and round models.
- Universal wall fasteners with polymer coating. The brackets themselves are made of steel, and the polymer pad serves to prevent the battery from moving due to thermal expansion.
Installation process
Work on installing heating radiators in this way can be done with your own hands. There are practically no special differences when compared with traditional installation. The only difference is that the fasteners are fixed not to the wall, but to the lower plane.
This is approximately how the fastening is carried out.
Required Tools
- A screwdriver is required to tighten the screws that secure the part.
- A simple pencil will be needed to mark the places where fasteners are installed.
- You will need a tape measure for measurements, because you will have to determine the distance between the brackets.
- An electric drill is required to drill holes if the installation is on a concrete floor.
- Using a hammer, you will hammer in the dowels that are used to hold the screws.
When installing on a concrete floor, dowels will be required.
Sequencing
When installing a floor mount for cast iron heating radiators or aluminum analogues, it is necessary to select the correct bracket.
In the first case, the devices will weigh much more, which means more durable parts will be required to hold them.
- At the initial stage, marking is carried out . Using a tape measure, the distance between elements is measured. The installation locations are marked with a simple pencil.
- Using an electric drill, the holes are prepared, after which the dowels are driven into them with a hammer . When installing, be careful not to break the auxiliary fasteners.
- Using a screwdriver, the holders are securely screwed on . Typically, each bracket is secured with two or three self-tapping screws. They need to be tightened well.
- Heating devices are hung on fixed parts . The nuts on the holders are tightened well. At the last stage, the pipes of the heating communication system are simply connected.
A long radiator looks very interesting in the interior.
Attention! If a model with a metal chain is used as the main holder, then when installing heating radiators, you only have to tighten the nut on one side.
Floor mounting method
It is used much less frequently compared to the mounted one.
Main reasons for choosing floor installation:
- Inconsistency of wall material with the required load. Relevant for aerated concrete and plasterboard walls.
- The need to strengthen the wall mounting. Used for heavy weight models, primarily cast iron.
- Cannot be placed on the wall due to lack of space.
- Lack of a suitable wall (a panoramic window is installed in the room).
- Design decision.
Among the main types of floor holders are:
- Adjustable fasteners. Some models are equipped with plastic covers.
- Non-adjustable holders. Some models are also equipped with plastic covers.
- Combined holders.
- Special holders with a width of 80 to 100 mm.
Photo 2. Brackets for floor installation of radiators. They are racks that are attached to the floor.
Floor-standing types are made of cast iron, steel or other alloys designed to support the weight of certain battery models.
Calculation of the required number of brackets
As a rule, independent calculation is not required, since this information is contained in the technical documentation for the radiator . There are also recommendations regarding the use of brackets of certain models.
Calculation for wall mounting:
- For cast iron batteries, where the number of sections is from 2 to 9, 3 pieces are required , two of which hold the battery on top, one on the bottom . If the number of sections is greater, brackets are added based on the average calculation: 1 fastener per 3 sections.
- For aluminum batteries with a number of sections from 2 to 12, 3 brackets are also required: on top and bottom - 2 and 1, respectively . Additional holders are added based on the average calculation: 1 fastener for 4-5 sections.
- For bimetallic radiators, the number of fasteners is similar to aluminum ones if there are fewer than ten sections. Additional holders are added at the rate of: 1 fastener for 4-5 sections.
The number of racks for installation on the floor is selected based on: 2 holders per battery with a number of sections up to 10 . For every 4 subsequent sections, 1 fastener is added.
Marking and installation
For placing radiators, areas located directly under the windows are considered optimal.
What the regulations tell us
It is extremely rare that the instructions that come with the unit contain detailed installation recommendations. Manufacturers believe that professionals will install the battery; therefore, they only need the technical characteristics of the radiator.
We will try to understand the source documents. At the moment, all issues regarding radiators are regulated by 2 documents - GOST 31311-2005 “Heating devices” and SNiP 3.05.01-85 “Internal sanitary systems”. There is no point in retelling the documents; you can find them on the Internet, so we will only go over the points relating to the installation of radiators.
| Illustrations | Recommendations |
| Central axial. |
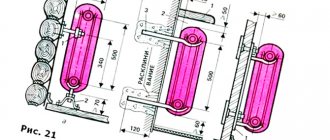
· First of all, remember - the vertical center line of the window opening must coincide with the center center line of the radiator;
· It is desirable that the width of the radiator occupies about 75% of the width of the window opening.
· The minimum gap between the floor and the battery is 60 mm;
· The minimum gap between the battery and the bottom edge of the window sill is 50 mm.
· There is no clearly fixed gap between the wall and the radiator. The minimum recommended in GOSTs is 25 mm, maximum 50 mm. It is possible to do more, but less is not advisable, since air circulation is disrupted;
· On the question of how many fasteners are needed for a heating radiator, SNiP 3.05.01-85 says that for mounting batteries up to 8 sections in size, 2 brackets along the upper axis and 1 along the lower axis are sufficient;
· Further, when adding each subsequent 5 sections, 1 bracket is added at the top and bottom;
· A stand is used under the floor radiator to mount the radiator. The number of such racks is selected similarly to the mounted version, that is, for a radiator of up to 8 sections there are 2 racks and then 1 rack is added for every 5 sections.
Advice: to increase heat transfer, before installing the battery, cover the wall with foil, or better yet, with foil insulation such as rolled polyethylene foam (penofol) or polystyrene foam. In this case, foil insulation with a thickness of 5–7 mm is sufficient.
Foil insulation on the wall under the radiator significantly increases heat transfer.
Optimal choice
Choosing the right mounts is easy and anyone can do it.
the operating efficiency and safety of heating equipment depends on the correct choice of fasteners .
To minimize possible risks, use the services of qualified specialists who can select suitable fasteners and perform installation work, taking into account all the nuances that are sometimes not obvious to non-professionals.
The procedure for installing radiators does not depend on their type: the rules remain the same, only the fasteners change. If installation under a window is intended, the following distances must be observed: from the floor should be at least 80-120 mm, to the window sill at least 60-100 mm, to the wall - 30-50 mm. It is also necessary to decide on the quantity and location of fasteners.
The number of brackets (hooks) per battery depends on its length. If there are few sections - up to 8-10 pieces - then two holders are required at the top, and at least one more at the bottom. If there are more than 10 sections, install three supports on top and two below. For each next five to seven sections of cast iron radiators and ten tubular and aluminum ones, the number of fasteners increases: one holder is added at the top and one at the bottom.
Methods of using various types of fasteners for sectional radiators
SNiP requirements
Any construction work, including the installation of heating radiators, is carried out in accordance with certain rules and regulations. The technical data sheet of each heating device contains detailed information regarding the type of battery mount. However, it would be a good idea to familiarize yourself with the requirements specified in SNiP 3.05.01-85.
Here are the main standards:
- The location of the heating device is considered optimal if its central point is as close as possible or completely coincides with the central vertical axis of the window. Deviation in one direction or another is allowed no more than 20 mm.
- The width of the heating device should be about 50-75% of the window size. This norm is not strictly mandatory and is rather advisory in nature. The fact is that the reliability of fastening for heating radiator batteries does not depend on their size - it will only affect the amount of heat transfer.
- The distance from the radiator to the floor covering must be at least 60 mm - this is a fire safety requirement.
- There must be a gap of at least 25 mm between the heating radiator and the wall, and even better - 30-50 mm.
- There must also be a gap between the window sill and the battery - at least 50 mm.
- It is important to choose the right number of support points, that is, wall mounts for heating radiators. For a radiator with 6-8 sections you will need two upper and one lower holder. For every subsequent 5-7 sections, you will need to add one more holder at the top and bottom.
- In the same way, the number of floor racks for radiators is selected. A battery of 6-8 teeth is installed on two support points, and with the addition of each subsequent 5-7 sections, another mount is installed.
- The number of heating radiator cells should not be too large. If the system operates in conditions with natural circulation of water, for example in a private house, no more than 12 teeth in a row can be installed there. If we are talking about multi-storey buildings in which the coolant circulates under constant pressure, it is permissible to install a radiator with a total number of sections of up to 24 pieces.
Please note that to reduce heat loss as a result of pointless heating of the external wall, it is recommended to place heat-insulating foil material behind the radiator. It will redirect heat waves indoors.
Marking the installation locations of the brackets
Since it is better to place the radiator strictly in the middle of the window opening, find the middle on the wall and draw a vertical line. After which there are two options: with the lower wiring, draw a horizontal line that will mark the upper edge of the installed radiator. When replacing a radiator with a side connection, the location of the supply pipes is important. Therefore, in this case, we draw a horizontal line that comes from the upper (usually supply) pipe.
Measure the distances between the fasteners on the battery, and set them aside relative to the marked lines. Sometimes you have to attach fasteners and measure it this way: it depends on the type of heating device and on the type of brackets or holders used.
How to install a radiator correctly, read the article “Installing batteries with your own hands: rules and technology”
To securely fasten the radiator, it is important to choose the right fasteners. There are a large number of brackets designed for different types of radiators.
Work technology
Owners of private houses can replace radiators at any time convenient for them. To do this, just turn off the boiler and drain the water from the heating circuit. But in an apartment in a multi-storey building, the replacement of the radiator will have to be previously agreed upon with the servicing utility organization.
If all installation work is carried out in the summer, when the heating is turned off, there will be fewer difficulties. However, you will still have to clarify whether water was drained from the system or not.
Please note that many experienced mechanics advise replacing radiators while the central heating is running. This is done because when the coolant is supplied to the circuit under pressure, you can immediately check the functionality of the radiator - if the installation was carried out incorrectly, leaks will occur.
The efficiency of their operation will depend on how well the radiators are mounted to the floor or to the wall. The fasteners must be installed absolutely level, since if they are skewed, problems may arise when connecting the system.
Using available means - a pencil, a level, a plumb line and a tape measure - perform the initial markings. Mark the central axis of the window, which should coincide with the middle of the radiator. A horizontal line is drawn through this point along which the upper supports will be attached.
In cases where there is only one lower support element, it is mounted on the central axis. If there are several of them, another horizontal line is drawn parallel to the top line. After marking, begin drilling holes and installing brackets.
Fasteners for cast iron batteries
Since these are the heaviest heating devices, the holders for them are the most massive: they must hold considerable weight for years. These can be individual or curved pins attached to a bar. In any case, when making mounts for cast iron batteries, thicker metal is used. In price lists it usually comes with the addition of “reinforced”. Can be painted (standard color is white) or not. Some manufacturers paint it in the desired color upon request (when ordering a radiator, specify the type of fastener and its color).
The mount for a cast iron battery is made reinforced: made of thicker metal
When purchasing, you will need to take into account the dimensions: fastenings for sections of different depths are made specially, since it is necessary to ensure a distance to the wall of at least 3-5 cm.
Methods of fastening aluminum and bimetallic radiators
Products that are very similar in shape are used. Only they are made from thinner metal. In general, brackets for sectional radiators of any type are very similar. There are universal corner brackets for aluminum and bimetallic radiators. They have a recess at the top and bottom for the collector, so they can be mounted on both the right and left.
Special corner brackets for lightweight sectional radiators
There are no floor-standing aluminum or bimetallic radiators. But there are racks that allow you to install any of them on the floor. In this case, the rack is first fixed to the floor, and then the heating device is installed and secured on it.
Floor mounting of aluminum radiators helps if the walls cannot withstand even such a small weight (if they are made of plasterboard or aerated concrete, or other similar materials).
Any sectional radiator can be mounted on such racks
You won’t be able to hang anything on the now fashionable glass wall. But then you need to pay attention to what the entire structure looks like from the reverse side. In this case, for heating it is more advisable to use convectors built into the floor, floor-standing models of tubular radiators (at the same time they can serve as a fence), and cast-iron retro radiators.
Fasteners for steel heating devices
There are two different types in this group: tubular and panel radiators. They have different designs and, accordingly, different fastenings.
In panel radiators, brackets are welded on the rear wall, with the help of which they are hung on brackets. The shape of this type of fastener is different: it is designed specifically for staples.
In panel radiators, brackets are welded on the rear wall
When installing panel radiators, it is necessary to strictly monitor the vertical position of the brackets. High precision is required: four or six staples must fit exactly onto the hooks. It is also important that the wall is perfectly flat and smooth. In general, using conventional brackets, panel radiators are quite difficult to hang. It is easier to work with other types of holders.
Standard bracket for panel radiator
Since the mass of the heating device is small, it is quite enough to fix it on the upper brackets and install stops at the bottom that will give it direction in the horizontal plane. They are not attached to the wall, but are hooked onto a bracket and simply rest against the wall. For reliability, the part that faces the wall is expanded.
This is what a set of brackets for tubular steel batteries looks like: the upper collector is hung on the hooks, and plastic stops are placed below
There are also special mounting strips for easy installation. They are a strip of metal with plastic clips at the top and bottom. When using this fastener, there is no need for brackets on the rear panel. The slats are fixed to the wall, a radiator is inserted into them, which is held in place by plastic hooks.
Rail for quick installation of panel batteries
Fasteners for tubular radiators are similar to sectional ones: the same hooks, only of a different size, often equipped with plastic covers.
There is also a special fastener with SMB tube grips. This is a strip of steel with plastic clips and a shelf at the bottom that serves as a support for the radiator. This mounting plate can be used if the weight of the device filled with water does not exceed 100 kg. Installation is simple: place the battery on the shelf, bring the top edge closer to the latches. They grab the nearest tube and a click is heard. The radiator is installed, the supply pipes can be connected.
Bar for quick installation of a tubular radiator with shelf and clamps
There is a second option for quick installation: SVD fasteners. It consists of two parts. One is attached to the radiator, the second to the wall. Then they are connected to each other and secured with a steel loop.
Another type of holder for tubular models: two parts, one is attached to the wall, the second is attached to the pipe. They are held together with a wire fastener.
Floor mounting for tubular radiators can be of several types: tubular supports that are welded at the factory, or stands with hooks. Radiators are hung on such racks, and the racks themselves are attached to the floor.
Types of brackets
There are 2 types of brackets based on the mounting location: wall-mounted and floor-mounted. Most often they are sold as a set.
If the battery is mounted near aerated concrete, plasterboard partitions or near a floor-high window (the wall does not allow the installation of brackets), only floor stands are used.
Depending on the type of battery, the fasteners are also divided into holders:
- for cast iron;
- steel;
- aluminum or bimetallic batteries.
Brackets for cast iron radiators
Brackets for heavy cast iron batteries are often marked “reinforced”; especially durable material is used for their manufacture, and the mounts themselves are massive.
Pin . Standard, used for small structures.
Appearance – individual pins or hooks installed on one strip. They are easy to install. To do this, a recess is drilled in the wall (more than 12 cm in depth). A dowel is driven in into which the fasteners for the battery are screwed. The recess itself is cemented.
Fastenings for “screws” . Used on large structures where conventional mounting on radiator pin holders is not possible.
Floor-standing . They are produced in two types: with height adjustment and non-adjustable.
The arcs that secure the battery can be made from solid steel wire or from dynamic links fastened together.
This type of fastener is used both in combination with wall brackets and as independent structures that are installed in places where wall mounting is impossible.
Brackets for steel radiators
Steel radiators differ in shape (tubular and panel). Fasteners for these types of radiators accordingly have their own characteristics.
Panel batteries have brackets on the back side:
When installing a standard bracket, precise markings are required; the brackets must be accurately placed on the hooks:
Therefore, another set of fasteners is more often used, including an upper hook and a lower stop. The lower stop is fixed with a hook on the battery bracket, but is not mounted on the wall, but only rests, which allows you to accurately set the vertical position of the radiator.
Fastening tubular radiators
For tubular heat exchangers, a similar kit is used, only the shape of the upper hook is adapted for hanging the upper pipe of the collector.
Another popular mount for lightweight tubular radiators (whose weight together with the coolant is no more than 100 kg) are strips that are fixed on the wall, and the battery is installed on the bottom shelf and secured with plastic grips. This fastener is designated as an SMB holder.
Another way to install steel batteries is with SVD fasteners. The holder consists of two parts. One is fixed on the wall, the second on the radiator. During installation, they are connected to each other with a loop:
Brackets for aluminum and bimetallic batteries
If you select fasteners for sectional heating radiators, their design is not much different from fasteners for cast iron radiators. Only the thickness of the metal can be less.
Aluminum and bimetallic radiators are not available in a floor-standing version, but if necessary, the conventional design can be mounted on racks (this is often used in buildings with glass walls):
Corner holders are also used for lightweight structures. The corner bracket can be mounted on the left or right thanks to the recesses on both sides.
As our brief review shows, there is a wide variety of mounting materials for radiators. However, many manufacturers produce batteries that come with a set of brackets. On the one hand, this makes installation easier, but in situations with non-standard walls, the user has to independently select the desired mounting option for the batteries.
General information
Structurally, floor radiators are no different from their counterparts – wall-mounted units. The difference lies only in the method of their installation, as well as in the design, which includes some innovations.
However, the need to change the method of installation and fastening of radiators arose not only because of the desire of manufacturers to create something new. As you know, there is nothing more eternal than cast iron, and this statement is still relevant. Just imagine how much a battery from it will weigh, especially a working one?
In the photo - hidden floor heating radiators
The wall on which such a load will be attached must be concrete. At the same time, people are now increasingly moving outside the city to private houses, where partitions are often made of plasterboard.
Considering the height and weight of only one section of a cast iron radiator, which is at least 20 kg, it is recommended to install it only on the floor, since the walls may not withstand such a load.
Floor mount for aluminum radiators with chain
The lineup
In the manufacture of radiators, both wall-mounted and floor-mounted, the same materials are used:
In the production of such batteries, two materials are used - aluminum and steel. Moreover, the latter is used in the manufacture of pipes through which the coolant passes, and the body is made of the same aluminum.
Thanks to the internal structure of such a radiator, it is able to withstand very high pressure in the system.
These batteries also have a longer service life.
Option for installing a floor cast iron radiator
Positive and negative qualities
The main advantage of a floor radiator is the simplest installation process, which does not require drilling into the wall. In addition, a reliable heating device of sufficiently heavy weight can be installed on the floor.
There will be no load on the wall, which will ensure its long service life. The legs designed for installing such batteries are also very reliable and can easily support the weight of the device throughout its entire service life.
Reliable floor stand for bimetallic and aluminum batteries
Tip: use a floor radiator to create thermal curtains in places where wall mounting is not possible.
To ensure greater reliability, the floor radiator can be mounted on the floor, for which special brackets are purchased; installation instructions are usually included. The wiring for such devices is hidden and laid under the floor, which significantly improves the appearance of residential premises.
Advice: remember that this process requires deliberate actions and the creation of the necessary conditions to avoid equipment failure.
Steel adjustable floor mount for cast iron radiators
What could be an alternative?
Although the design of modern floor radiators allows them to become an interior decoration, installing them yourself requires free space.
If there is none, and you don’t want to spoil the wall, you should pay attention to other types of heating devices.
- Skirting convectors, which are installed in a niche located in the floor. Such a device is considered the most efficient, since the heat from it comes from below, where the cold air descends. You can cover the niche using a special decorative grille.
Legs for installing cast iron radiators on the floor
- Air-water heating devices, complete with a fan. They can be suspended from the ceiling, directing hot air flows downward.
- Oil heaters, which are also placed on the floor, also effectively release heat. If necessary, such a heater can be moved to the room where it is coldest.
Installation features
Location. The radiator is most often installed under the windows.
Particular attention should be paid to the distance from the radiator to the floor, windows, and walls, so that after installation the thermal energy is spent on heating the air in the room.
The following location is considered optimal:
- From the floor – 10-15 cm;
- From the windowsill – 6-10 cm;
- From the wall - 3-5 cm.
For a small battery (up to 8-10 sections), two upper and one lower holder are installed. If the number of sections increases, another upper and lower bracket is added to each fragment. The battery fragment is calculated depending on the material:
- the cast iron fragment is equal to 6-7 sections;
- a battery fragment made of lighter materials (aluminum, steel) can reach 10 sections.
Wall mounting systems
The main condition for wall mounting is that the material of the mounting system matches the material of the radiator. Since cast iron models are heavy, the fasteners must be quite strong and massive. The material for them is usually steel. Steel, and even more so aluminum radiators are much lighter, so fasteners can be taken less massive, from lighter alloys.
Installation on brick or concrete walls
A drill or bolt is used to make a hole whose diameter is larger than the diameter of the radiator bracket; a little cement mortar or gypsum putty is added to it. After the solution has hardened, the plastic dowel from the kit is inserted, and then the fasteners are screwed in. The mounting depth in the wall must be at least 12 cm.
Calculation of the number of fasteners and their installation locations
The distance from the battery to the wall depends both on the type of battery itself and on whether the pipes are laid inside the wall or on top of it. Wall mounts are placed in 2 rows to support the radiator by both pipes - upper and lower. Their number is calculated as follows: at least one bracket per 1 sq. m surface of the heating device.
There are at least 3 wall brackets for the battery - 1 at the bottom and 2 at the top. The holes for the top fastenings must be located strictly on a horizontal line.
Therefore, they must be marked using a building level. If there are several batteries in the room, then it is better to make a template out of plywood using the holes for the first one, this will speed up the process of installing all subsequent ones.
How to choose a battery holder?
When choosing a bracket for a heating radiator, you need to pay attention to:
- Alloy composition. It must be hard, durable, non-toxic;
- Product coating. To protect against corrosion and rust, the product must not only be painted, but also galvanized;
- Dimensions (length and thickness of the product) and maximum withstand load;
- The presence of a coating that softens noise arising from thermal expansion;
- Possibility of additional adjustment of distances to the floor and wall.