- 1 What are camping stoves for? 1.1 Video - Camping stove. Detailed review
- 6.1 Video – Making a camp stove
When relaxing in nature, sooner or later you will need a fire - to heat canned food, cook porridge or boil tea. Of course, you can light an open fire, but sometimes the lack of forest or rain does not allow this. A camp stove, made with your own hands and delivered with the same hands, comes to the rescue! We will talk about how to make such a structure in today’s article.
What are camping stoves for?
A camp stove is an effective “substitute” for a fire. But, unlike the same fire, it requires very little fuel. It can be:
- dry branches;
- tree bark, chips, cones;
- reed;
- coals left over from an old fire.
Note! The ratio of heat generated to fuel loaded in a camp stove is several times higher than in a campfire. In other words, with the same volume of fuel, the amount of heat is not the same.
It turns out that, having the same amount of firewood, you can cook dinner on the stove, but, alas, you won’t be able to do this on a fire. Thanks to domestic craftsmen, today there are many different modifications of camping structures. Conventionally, they are all divided into single- and double-walled. You can them:
- build at a resting place, using available materials;
- make ahead using an old pan, tin cans, sheet metal, etc.
At the same time, the camp stove itself should consume minimal amounts of fuel, be small-sized, light, convenient, and also heat the dishes, not the surrounding air.
Video - Camping stove. Detailed review
Under the bowler hat
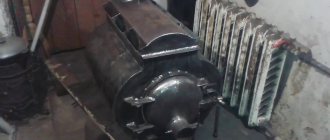
Most of all, tourists, hunters and fishermen use wood chippers. A typical set of their equipment also includes an army bowler hat, so a wood chipper for a bowler hat is an object quite in demand. Unfortunately, if the authors of the most advanced designs on thermal engineering know anything, they successfully ignore this information. There are few sufficiently fully developed designs; one of them is shown in Fig. The legs and burner made from fragments of a hacksaw (middle in the top row) are visible for clarity; Normally they are placed in a pot.
Design and drawing with dimensions of a camp wood chip stove for an army cauldron
The material of the product is canned tin or thin galvanized. The bottom pattern is traced along the lid of the pot: there is a flange on it, in the stowed position the pot fits into the stove with a minimum gap and no extra volume is required for installation. Additional holes in the bottom for the mounting brackets of the legs are shown with red arrows.
Special for the bowler
Once upon a time, Soviet “Sporting Goods” sold tourist mini-kettles. Those who served in the communications troops as cable operators or at small-channel radio relay stations R-405, R-405, etc., and often traveled to points, were surprised to recognize in them the “secret” pots for cooking food from high-calorie concentrates, which were equipped with their equipment rooms. Only in the army was a special pot supplied with a stove for dry alcohol and fine fuel, i.e. wood chipper In Gorbachev’s times, its description was published by MK (declassified?); For a drawing of a wood chipper for a tourist pot, see Fig. The air flow for afterburning wood gas is fully ensured by the gaps between the spokes of the burner with a diameter of 2 and 4 mm holes for them. The advantage of this wood chipper is very fast cooking and absolute windproofness. No laws of heating engineering prevent you from making the same stove for an ordinary army bowler.
Drawings of a camp stove-wood chipper for a camping pot
Note: the best material for a wood chip stove for a boiler is stainless steel from the tank of an old washing machine. It is quite difficult to process, but the stove will be light, durable, easy to clean and eternal. It will also become a little more economical (stainless steel conducts heat worse than structural steel) and will be less overgrown with soot.
Design features and its advantages
As we found out, a camp stove is an extremely useful device, which is difficult to do without when fishing or just relaxing outside the city. If we talk about standard stoves with grates, they require large volumes of firewood due to good draft. In short, the fuel burns out quickly.
But in structures without a bottom, where firewood lies directly on the ground, combustion slows down, the coals smolder for a long time, and after loading a new portion, flare-up occurs instantly. But the draft in this case is poor, and heat is practically not accumulated.
In hiking designs with stands, traction is maximum. If the dish you plan to cook should be cooked over low heat, then the stove should simply be placed on the ground, thereby blocking the grate. In this case, the supply of oxygen deteriorates, combustion slows down, and the time, accordingly, is extended. But regardless of the design, all stoves of this type have significant advantages, including:
- efficiency;
- versatility and independence from weather conditions;
- efficiency;
- compactness;
- long burning without smoke formation;
- ease of use and transportation;
- power adjustment;
- safety;
- performance.
We also add that due to the fact that the wood burns from the inside, the stove body does not heat up much. You can even hold it in your hands for a while, since wood effectively insulates heat. But, of course, you always need to be careful when working with open fire!
Making holes in the bottom of a large jar
First, draw a line along the bottom edge of the can. This line is needed to mark the points for the ventilation holes. In this case, a special dye is used for marking, but nothing will happen if you do it with a simple marker.
We drill holes along the line we marked. Their number and size are of great importance for the operation of the stove. If there are too few of them, there will be no traction, if there are too many, then the wood will burn out very quickly. Therefore, it is better not to overdo it here in order to be able to drill more holes after testing.
Option #1. Miniature stove made from a tin can
The most primitive single-wall option is a DIY camp stove made from a tin can. In the process of creating it, you will need an ordinary tin can or an iron mug, but always of a minimum size (about the size of a tall glass). In the future, you will have to perform such actions.
Step 1. First, make a couple of holes in the bottom of the mug or jar to create draft (they will serve as sources for supplying air to the body). It is important that these holes coincide with the internal air flow channel. There is another option - to make one large hole in the bottom, but in this case the coals may fall out.
Step 2. Then fill the jar with small (about the thickness of a finger) wooden blocks so that they do not extend beyond the edges of the jar. The stacking of firewood should be strictly vertical (something like an “Indian candle”).
Step 3. After this, remove the block from the body, which is located in the center - this will provide a channel for the passage of air.
Step 4. Place paper or dry grass into the formed channel and set it on fire.
Step 5. This design, the volume of which will be approximately 500 ml, will burn for about 25 minutes, which is more than enough to whip up something. The area will not be filled with smoke!
Step 6. Of course, if many people take part in the hike, then the jar should be larger - at least by one or two liters. But in this case, to obtain stable combustion, thicker firewood must be used, and in larger quantities.
The flame “produced” using this design will burn for about 60 minutes. This is enough to properly boil potatoes and fry shish kebab on smoldering coals. This is just one of the manufacturing options. Now let's move on to the next one.
A short review of rarely seen camping stoves
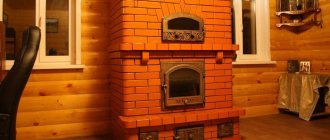
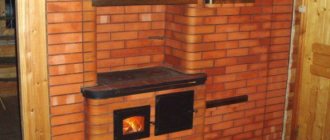
There are several more options for assembling structures for cooking in camp conditions. Rocket stoves are characterized by a high level of efficiency. They are monolithic (non-removable) structures built from:
- heat-resistant concrete;
- steel pipes;
- red brick with high fire resistance.
It is unrealistic to transport such structures in a car. Therefore, they are usually erected in dachas.
Pyrolysis stoves, having a high efficiency rate, are very difficult to build with your own hands. Only experienced tourists with engineering skills can do this task. Such installations are made from special grades of steel, which are characterized by high heat resistance.
An Indian candle is an exotic version of a camp stove. It is believed that he came to us from America. This rare design is made like this:
- They find a large log (log) that is necessarily hollow inside. Splits into 4 parts.
- The resulting workpiece is thoroughly cleaned from the inside.
- Separate pieces of logs are connected to each other (with nails or in another way).
Small twigs, dried grass, and birch bark are placed inside the assembled wooden structure and set on fire. The flame can be adjusted. The deeper you push the fuel used into the Indian candle, the stronger the fire will be.
It is optimal to use an aspen log to make the described exotic stove. It is undesirable to use birch and coniferous blanks. The former give off too strong a flame, the latter, when burning, emit a lot of sparks and shoot.
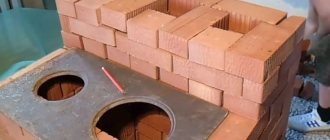
Option #2. Making a stove from pots
If you plan to make a two-layer oven, you can use stainless steel pans, which are also called tanks with lids (they are quite cheap). This design is perfect for a hike, as it is budget-friendly and easy to implement. The costs for it are practically zero, it will effectively replace a fire, and the fuel for its operation can be found in any forest.
From a constructive point of view, a two-layer oven is two pans of different sizes inserted into each other. An opening of approximately ? height in order to load fuel. But at the bottom there are parallel grate slots with rotating bridges or ordinary holes.
A stand is placed on this grate. Then the stand is loaded with firewood, and a second smaller container is placed on top of all this - it will be heated by the flame. The second pan will be surrounded by fire and the heated walls of a larger container, due to which fuel consumption is minimized and the heat generated is saved.
Note! The bow for the pot must be made in the form of a separate removable element.
The described design of a camping stove is extremely simple, and therefore is compact and portable. You can easily pick it up along with the burning wood and move it to another place (if, for example, it starts to rain and the fire needs to be moved under a canopy).
Heating the rocket
The rocket stove is not one of those stoves that are completely self-adjusting to fuel quality and external conditions. At the beginning of fuel combustion, the hopper lid in a small stove should be opened completely. At the moment the stove begins to hum, cover it until the sound is reduced to the maximum. Next, you need to gradually cover the access of air, you need to navigate by the sound from the oven.
If the damper slams shut for a couple of minutes, it’s okay; if you open it, the stove will light up again. For the first time, the rocket stove must be flooded with paper and fuel must be constantly supplied through the blower. In subsequent uses, it can be heated with recycled materials, including wood.
Option #3. DIY folding camp stove
A very effective design, the manufacture of which, however, requires more time and effort, as well as preliminary preparation. First you need to acquire the following consumables and equipment:
- roulette;
- Bulgarian;
- electric drill, as well as a set of drills for it;
- file;
- pliers;
- bicycle spokes;
- piano hinges;
- sheet of metal 1 millimeter thick.
We also note that in order to make a folding stove, you can use:
- iron sheets from the body of an old gas stove or refrigerator;
- side walls from an old computer system unit (these options can replace sheet steel).
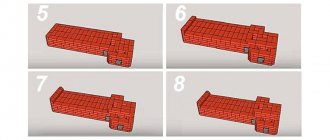
Note! When starting to create a folding camp stove, be sure to familiarize yourself with its sketch, and also create templates for the planned structural elements based on it.
During the work, you will need to perform the following algorithm of actions.
Step 1. First, mark all structural elements on sheet metal using prepared templates, then cut out these elements using a grinder.
Step 2. Make holes in the piece that will be used to arrange the bottom.
Step 3: Next, file the edges of the holes to remove any burrs.
Step 4. Connect the side walls of the structure together using piano hinges with rivets. As a result, you should get a kind of box.
Step 5. Along the entire perimeter of the bottom, as well as on the lower edges of the side walls, special “ears” bent in one direction must be provided in advance.
Step 6. An element is placed under the formed box, which will serve as the bottom, while the “ears” of the two elements will align on each side and form a tube. Pins made from knitting needles must be inserted into this tube. This little trick allows you to make the stove more stable in its operating state. In addition, if necessary, the structure can be easily disassembled for transportation or storage.
Step 7. On the grate, make additional protrusions installed in the holes that are cut on the sides.
Step 8. There will also be another hole in the sidewall through which fuel will be loaded.
Step 9. The cutouts made in the top of the box not only increase traction, but they can also be used to place skewers.
A little history
The wood chip stove, apparently, was invented by Russian gold miners in Chukotka, when American canned food began to arrive there through Alaska (then still Russian). After Alaska became the property of the United States, many of our compatriots remained there; The surname of the main character of one of the famous stories of Jack London's Alaskan cycle is Souvarine. To the American prospectors and pioneers of the Klondike, the wood chipper was known as the Russian Can Stove.
The properties of wood chips as a means of survival were fully appreciated by Stalin's prisoners. From them, the NKVD guards also learned about the wood chipper. Pre-war survival manuals for scouts include instructions for making wood chips. It was nicknamed Bond's stove thanks to the screenwriter of one of the Bond series - an avid hunter, fisherman and single tourist. The screenwriter and the actor who played Agent 007 in that episode need to say a huge thank you without any pretense. Einstein once put it: “If you have an apple and I have an apple, and we exchange them, then we will each have an apple left. And if you have an idea and I have an idea, and we share them, then each of us will have two ideas.” The idea of the Russian Can Stove saved the lives of dozens of people already during the exploration of the Klondike; by now their number, worldwide, is likely to be in the hundreds, if not thousands.
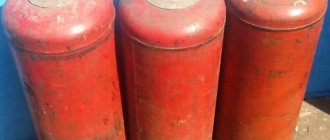
Option number 4. Construction of several tin cans
First you need to prepare three canning jars (two smaller and one larger). After that, take these tools:
- metal scissors;
- asbestos;
- marker.
Follow these steps:
Step 1. Make blanks. Take a large jar, step back about 20 centimeters from the bottom, place a smaller jar there and circle it with a marker. An even circle should form.
Step 2. Cut a hole in this circle, make sure that the jar fits into it, but with difficulty.
Step 3. Make a similar hole in a smaller jar. Place the smaller one in the larger one.
Step 4. Make parallel cuts of approximately 2-3 centimeters on one side of the jar.
Step 5. Take the lid from a large jar and make a hole in it for a small one. Sand the cuts.
Step 6. On the wall of the jar, make vertical slits of approximately 1.5-2 centimeters.
Step 7. Fill the voids between the cans with asbestos, then close the lid and bend the metal.
Step 8. Take a piece of tin and make a shelf for firewood from it, secure it.
Step 9. Now just attach a handle to make it convenient to carry the structure. That’s it, your DIY camp stove is ready! You can paint it.
Making an auxiliary device
This wooden block is not part of the stove, but serves to make it. With its help, it will be more convenient for you to drill holes and perform other operations. Insert the block into the jar and draw two lines with a marker approximately at the level of the lid.
The distance between the lines should be approximately 7–8 millimeters.
Carefully cut out a rectangular notch. The top edge of the can should fit freely into this recess.
Let's position the wooden block in such a way that it provides reliable support for the can. The upper edge should fit comfortably into the notch we made.
Material selection
For the manufacture of wood chip stoves, acid-resistant and heat-resistant steel grades are used, because they not only tolerate high temperatures well, but are also resistant to condensation that forms during ignition.
This metal is used for the internal lining of furnaces and boilers, as well as for the manufacture of drums and internal casings of washing machines.
It is also necessary to choose the thickness of the metal correctly. After all, the thinner the part, the less rigid and durable it will be (even if it weighs less), but at the same time it is noticeably easier to process. And the thicker it is, the stronger the structure will be, but the greater its weight, and the processing will be noticeably more difficult.
Therefore, most often for home-made stoves, stainless steel with a thickness of 1–1.5 mm is used, although both thinner and thicker metal can be used.
As a basis for the manufacture of round heating devices, you can use spoon dryers of various diameters, made of food grade stainless steel.
Such dryers can be bought on AliExpress and other sites for a low price. Metal thermoses are well suited for creating pyrolysis stoves, because they are also made of stainless steel.
However, they are quite difficult to drill due to their round shape and the inability to use a drilling machine, and for complete pyrolysis, the air flow in the combustion zone should be minimal, and in the afterburning zone located above the combustion zone, maximum.
Often, various steel containers are used to make wood chips, such as:
- saucepans;
- mugs;
- pots;
- banks.
The main selection conditions are:
- heat resistance;
- acid resistance;
- compliance with the size and shape of the water container that will be installed on top.
Basic requirements for heating devices for tents
A tent heater should be both simple and easy to use. In addition, it must meet several requirements:
- Safety. Implies the absence of factors dangerous to the user. The air in the tent should not be polluted, so it is necessary to exclude the possibility of fuel being released or spilled. In nature, far from civilization, there is nowhere to wait for emergency medical help.
- Compactness. It is unlikely that anyone would want to carry a large heater or take up the entire trunk of a car. It is preferable to choose a device that is small and easy to transport.
- Multifunctionality. It is desirable that the device can be used not only for heating, but also for cooking, boiling water, drying clothes and shoes.
- Economical. An important parameter is the amount of fuel burned. It is unlikely that a tourist or fisherman will be pleased with the increased consumption of expensive fuel.
Reliable heating of a tent is an important condition for a comfortable overnight stay in the field or fishing on ice.
You can make a portable heating device for a tent with your own hands, using a minimum of tools and materials. The simplest options include a candle heater and a Finnish (taiga) candle.
Types of combustion
The combustion of the stove is based on the process of pyrolysis and the use of gases released from the fuel to maintain the fire.
At the same time, such stoves are considered economical, and in an emergency even life-saving. After all, sometimes a wood chipper is capable of producing heat during a sluggish but long burning.
With pyrolysis
Pyrolysis wood chippers that operate using the pyrolysis process, that is, with additional pressurization, are called “turbo stoves.” The wood chip pyrolysis camp stove was invented by American tourists who showed ingenuity and diligence in developing the apparatus.
The catchy slogan “turbo” was released to the masses, but travelers understand that energy dependence on a supercharging motor operating on batteries is not needed. Such additional elements break, and the pipes interfere with the rational packing of a hiking backpack and take up valuable space for a tourist heading out alone.
However, large groups, professional hunters, fishermen or tourists heading to distant places along routes of the highest degree of difficulty are not recommended to abandon turbo stoves.
The main advantages of pyrolysis stoves are:
- the ability to prepare lunch for 3 people when loading the combustion chamber with 20–30 pine cones;
- the highest temperature is concentrated along the axis of the stove, so when making the device at home, it is quite acceptable to use cans of canned food or thin galvanized metal;
- the possibility of using dry alcohol as fuel;
- after overturning, the turbo stove will continue to burn, provided that it was immediately placed on a flat surface in the same condition;
- In surface combustion mode, the stove is used for heating. Sparks do not fly through the metal walls, and the bottom does not warm up above 80 degrees, which makes it possible to use a wood chipper for a tent.
Note!
When using a pyrolysis wood chipper in a tent, you need to be vigilant and wait until the fuel burns out completely and clean it of ash. A tarpaulin or other heat-resistant material is placed under the stove, which will prevent the synthetics from melting and prevent the tent material from becoming brittle in the future. Otherwise, the tourist risks getting burned.
Partial pyrolysis
The invention of pyrolysis stoves by Americans is explained by environmental legislation, which strictly regulates the behavior of citizens in the forest. That is, American tourists are allowed to collect dead trees or cones from the ground, but breaking trees is unacceptable.
Such actions are punishable by large fines, and in some states, such violation of the law can result in imprisonment. In Russia, the laws are not so harsh and the use of natural resources is not limited to such an extent. This fact largely explains the preference of citizens to use simplified designs - with partial pyrolysis.
When the fuel partially burns and settles, pyrolysis is included in the process. That is, the remaining coal burns to the state of ash from the secondary air.
On a note!
If we compare such stoves, partial pyrolysis is inferior in terms of fuel efficiency. However, the temperature conditions inside the combustion chamber are the same and it takes equal time to prepare dinner.
Use with army bowler hat
Army bowler hats, still used to arm Russian soldiers, are popular among tourists. Foreign kettles are also available in stores.
Each of them has its own specific shape, so the pot and wood chips are selected at the same time. The manufacturer indicates on the wood chipper the recommended pot model or dimensions. They must be taken into account in order to achieve maximum effect when placing the pot over the wood chips for quick heating.
The distance between the walls of the stove and the pot should not exceed 5 mm. Otherwise, if the pot is larger in diameter than the stove, then it will take longer until the liquid boils.
If the wood chip burner itself is wider, then some of the fuel will be wasted, and the tourist will have to carry extra weight with him. As an exception, we can highlight wood chippers for an army cauldron, designed for 2 containers at once.
Can a candle heater be used to boil water and cook food?
The considered options for candle heaters can be used not only for heating, but also for cooking. Boiling water with this device is quite simple, using a small pot, metal mug or kettle. You can also prepare a simple dish, such as scrambled eggs or porridge. Boiling a large volume of water, for example, for washing or washing, of course, will be impossible, but it will be possible to solve minimal comfort issues.
You can easily prepare a simple dish using a DIY candle heater
How to build a stove on a camping trip using improvised materials
Let's look at three options for homemade stoves that you can easily make with your own hands.
Option 1. Tin can as an oven
The most affordable and easiest way to build a mini-stove is to use a tin can. You can even use an iron mug. In this case, the main thing is that the parameters of the future camping stove coincide with the dimensions of the tall glass.
How to create a simple but functional device in a matter of minutes is described step by step in the instructions:
- First of all, holes are made in the bottom of the body (mugs or jars) to provide traction: one large one or several small ones so that the coals do not fall out.
- Then the camp stove is filled with small wood logs according to the “Indian candle” principle, that is, they are placed in a vertical position, without protruding beyond the edges of the jar. The thickness of the wood should approximately correspond to the thickness of your finger.
- The next step is to remove the block of wood located in the center of the structure from the oven. The resulting space will become a channel for the passage of air masses. By the way, they should coincide with the holes made in the bottom earlier.
- Let's start lighting the stove. To do this, you need to place a small piece of paper or a bunch of dry grass into the resulting air channel and set it on fire.
- The volume of the finished device is about 500 ml. Such a container can burn for about 25 minutes, and this is quite enough for preparing a simple dish or boiling water. The main thing is that the surrounding area will not be exposed to smoke.
Using the same principle, you can create more powerful camping stoves, for example, if the company consists of several people. To do this, you need to take a container of 1-2 liters and, accordingly, increase the amount of firewood.
Option 3. Folding camp stove
To create such a design you need to spend a little more effort and time than in the two previous cases. But the effectiveness of such a device fully justifies the effort.
First you need to do the preparatory work and stock up on the necessary materials and tools. You will need a tape measure, a grinder, a drill, a file, pliers, bicycle spokes, piano hinges and 1 mm thick sheet steel.
Working on a folding stove is not difficult. Just follow these steps:
- On the prepared steel sheets, it is necessary to use a stencil to outline the contours of future structural parts, which are cut out with a grinder.
- Of the resulting elements, set aside one, which will be used as the bottom of the stove. Then you need to make holes in it for the grate.
- The edges of the resulting holes must be carefully sanded with a file to remove all irregularities and nicks.
- Now it's time to make the body of the main structure. To do this, you need to connect the side parts using piano hinges with rivets.
- For future fastenings, it is necessary to construct special grooves along the entire perimeter of the bottom and along the underside of the side walls.
- Now you can connect the main body, which consists of side walls and bottom. This is done in such a way that the ears prepared at the previous stage coincide, forming a tube into which pins made from knitting needles are inserted. This small nuance adds stability to the oven during operation. The whole design is so well thought out that, if desired, it can always be disassembled for movement and convenient storage.
- One of the important stages in the manufacture of a prefabricated furnace is the creation of a combustion chamber. To do this, a window is made in the side of the body for storing firewood.
- The grate needs to be provided with additional protrusions that are inserted into the holes on the sides.
- For optimal operation of the furnace, it is necessary to take care of the air supply. If you make holes in the upper part of the box, then in the future they may be useful for laying skewers instead of a barbecue.
No trip to nature is complete without barbecue or any other dish cooked over a fire. It is better to foresee in advance which particular source of fire will be at the center of all events. A fire is not always a convenient solution, but a camp stove is useful in any weather. Despite the availability and abundance of models presented in travel stores, you can always build a camp stove yourself. The main thing is that this will require a minimum of time and materials.
When relaxing in nature, sooner or later you will need a fire - to heat canned food, cook porridge or boil tea. Of course, you can light an open fire, but sometimes the lack of forest or rain does not allow this. A camp stove, made with your own hands and delivered with the same hands, comes to the rescue! We will talk about how to make such a structure in today’s article.
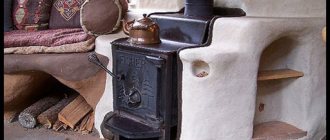
Earthen (pit) tandoor
Another design of an earthen tandoor.
For the jug, a small pit is dug in the ground, and 10 cm of sand is poured onto the bottom. For the foundation, a grid is placed on top of the sand, evenly filled with concrete mortar. When the facade dries, the main work on the invention of the tandoor begins. Refractory blocks are laid in a circle, and a special pipe for air supply is installed. The next rows of bricks are laid along the edges of the desired tandoor, without gaps, and so that the top of the boiler is half the size of the middle of the stove.
When the stove dries, all its gaps and joints are sealed with kaolin clay. As soon as the first layer dries, the next one is applied, but straw is added to the solution. This layer serves as an insulating partition. The last layer consists of a cement mixture with clay. The free spaces between the bricks and the walls of the pit are filled with sand, salt and clay, after which the invention is hardened. Also, for a new stove you should prepare a lid - a metal sheet with a handle, so that the heat is retained for as long as possible.
Is it possible to make a tent heater yourself?
Portable heaters are not cheap, so many tourists and fishermen prefer to make devices for warmth and lighting themselves. On the Internet you can find many options for making such structures. Most of them do not require any expensive materials or tools, and some are even made from improvised materials.
With a minimum of financial costs and effort, the result will be an economical stove, which will be enough to heat a small tent, light and prepare hot food or drinks.
Using inexpensive and accessible materials, you can make a tent heater with your own hands
Principle of operation
It doesn’t matter whether the stove was made independently according to its original drawing or purchased at a specialized retail outlet, you need to know the basic laws of heat engineering according to which any heating structure works.
The combustion process consists of heating the fuel, when moisture evaporates and some flammable substances are released, direct ignition and burning of the fuel. The efficiency of a heating device implies the level of its heat exchange with the surrounding space, that is, radiated heat and the intensity of convection.
The first factor depends on the degree of heating of the furnace, the area of the heat exchanger and the material used to make the device. The second depends on the shape of the furnace and the direction of hot air flows.