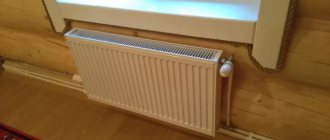
If you live in an apartment that still has old cast-iron radiators installed, heated by coolant from the central system, then you are probably familiar with the situation when in the spring the temperature outside is already above zero, and the radiators heat up like in winter. Something similar happens in the fall, but in reverse. In general, there is little comfort from such heating, but there is a way to cope with the problem, and it is applicable not only for apartments, but also for private houses. So, why do you need a thermostat for a heating battery, how does it work, how to use it and how to install it yourself - we will talk about all this in today’s article.
Thermostat for radiator
Why do you need a thermostat?
A temperature regulator installed on radiators allows you to control the amount of heat entering a specific room by increasing or decreasing the flow of coolant liquid. With its help, you can not only set a comfortable temperature in each room, but also save money if the apartment is equipped with a heat meter.
In apartment buildings, when the temperature in the room is too high, the owners are forced to open the windows, heating the street. If you have to pay for heat according to standards, as often happens in Khrushchev-era buildings, then it’s not so scary. But with heat meters, residents' money literally flies out the window. And another situation: there is no point in fully heating the apartment when no one is at home.
The position of owners of autonomous heating systems is more favorable. They can regulate the heat supply to the apartment at the outlet of the boiler. But without using thermostats, it will not be possible to ensure a comfortable temperature in all rooms.
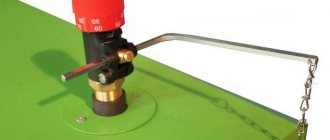
Removal Features
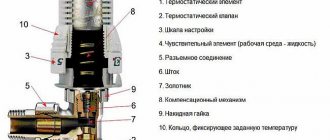
The structure of the thermostat is shown
The temperature regulator consists of two parts: a valve and a thermostatic element.
Removing the thermostatic element itself does not present any problems: it is easy to do by hand, and if it is clamped a little tighter, you will have to use pliers.
Once the head is removed you will be able to see the stem. It should be moved back and forth several times, and then left wrung out for a while.
In most cases, the battery will begin to warm up normally. Once it has warmed up, you can put the regulator head back in place.
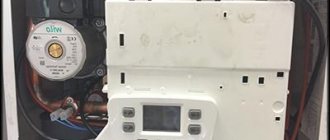
If this does not help, you need to remove and replace the thermostat valve itself.
The thermostat valve is more complicated.
In most forums devoted to this topic, when asked “how to remove a thermostat from a battery,” a recommendation is given to contact a plumber. If for some reason you cannot do this, then you will have to disconnect the radiator from the system.
How to turn off a heating radiator with a thermostat? This can be done if there is an additional shut-off valve. However, most apartment buildings simply do not install it. If there is no shut-off valve, you will have to drain the heating system.
We hope that the article was useful to you. Share it on social networks with your friends, please.
The design and principle of operation of the thermostat
The design of a standard thermostat for a heating radiator consists of a valve and a special thermostatic head. In the device under consideration, the valve is the so-called executive device. The thermostatic head includes a special cylinder with a working substance. This substance is sensitive to temperature changes and it is thanks to it that the thermostat can perform its main function.
Thermostat for radiator
With increasing temperature, the volume of the substance in question increases. Reducing the temperature leads to the opposite reaction. With such changes in the volume of the substance, the pressure rod associated with the cylinder moves.
The thermostat head is mounted on the valve. With constant expansion and compression of the substance, the rod compresses or releases a special locking spring-loaded cone, which opens or closes the passage hole, controlling the supply of the main coolant.
DANFOSS radiator thermostat valves
The radiator thermostat can operate using gas and liquid working substances. In accordance with this parameter, existing devices are divided into gas-filled and liquid. Thermostats with gas working fluid respond more quickly to temperature changes. Liquid ones react more accurately to pressure differences in the cylinder, which allows for the most accurate temperature control.
Thermostat
The thermostat operates on the same principle in both simple one-pipe and two-pipe heating systems. The difference lies only in the value of the valve resistance: in one-pipe heating systems this parameter is noticeably lower than in two-pipe heating.
A suitable thermostat should be selected at the stage of design and development of engineering systems. If the device is installed on already installed and connected heating batteries, its operating efficiency will be significantly reduced.
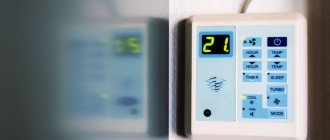
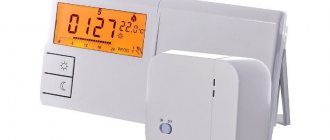
Electronic thermostat
Thermostats with manual and automatic program control are available for sale. Software models are more convenient. Their design is such that they allow you to control the temperature in the heated room, adjusting to a variety of additional factors, for example, the time of day. Electromechanical devices are only capable of maintaining the temperature at one set level.
Corner radiator thermostat
A mechanical thermostat works on the principle of an iron: after heating the room to a set temperature, the device turns off, and as soon as the air cools a couple of degrees, it turns on again.
Thermal valve - structure, purpose, types
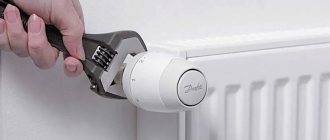
The valve in the thermostat is very similar in structure to a regular valve. There is a seat and a shut-off cone that opens/closes the gap for coolant flow. The temperature of the heating radiator is regulated in this way: by the amount of coolant passing through the radiator.
Sectional view of thermostatic valve
The valves are installed differently for one-pipe and two-pipe wiring. The hydraulic resistance of a valve for a one-pipe system is much lower (at least two times) - this is the only way to balance it. You can't mix up the valves - it won't heat. For systems with natural circulation, valves for single-pipe systems are suitable. When installing them, the hydraulic resistance, of course, increases, but the system will be able to work.
Types of thermal agent
Most often, liquid and gas are used in its role. Because of this, the following types of thermal heads are distinguished:
cheaper and simpler . For this reason, they are represented by a very large number of models. However, they manage the battery more slowly.
The gas regulator for the heating battery has less inertia, due to which it is able to react quickly enough to changes in room temperature.
In practice, the difference between the two types of response is very small. Therefore, when choosing, it is better to focus on the quality of performance. It also depends on the manufacturer.
Almost all types of thermostats are capable of setting the temperature, the range of which is +6...+28 °C. Of course, there are options designed to set other temperature levels. However, as the temperature range increases, the price rises.
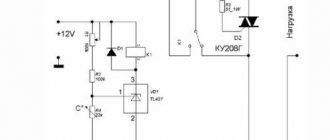
Connection diagram for high power heated floors
When connecting, be sure to check the power that the thermostat can pass through. Usually it is designed for a load of no more than 16A (3.7 kW at a voltage of 230V).
This is exactly the maximum value. It is recommended to use the device under a constant load of no more than 70% of this power.
In this case, the device will last a long time and function properly. The switch that switches the contact quickly fails when overheated. And along with it you will have to change the entire device.
For loads greater than 3.7 kW, a modular contactor will be required.
The connection diagram in this case will change to the following.
Here, instead of the load, the wires from the regulator go to the contacts of the switching coil (A1-A2), and the heating cable itself is connected to the power terminals of the starter (1-2 or 3-4).
Types and selection of thermostats
Based on their design, radiator valves are divided into 3 groups:
- straight;
- corner;
- as part of a set for connecting heating devices.
If everything is clear with straight and angular thermostats, then we should say something about the headset separately. It allows you to simultaneously install a thermostat on the radiator and connect it to pipes coming directly from the floor. Although the price of such a headset will be more than traditional pipe connections, such a connection will look much more aesthetically pleasing.
Radiator connection set with built-in thermostat
For two-pipe systems with a heating circulation pump, any of the valves listed is suitable; the only question is how to connect the heating device, and from a technical point of view, they are all the same. Another thing is a single-pipe circuit; for it it is better to buy a special battery temperature regulator with an increased flow area of the seat. Such thermostats have less hydraulic resistance, which is clearly visible in the diagram:
In addition to valves, you should also choose thermal heads for batteries, and here is an immediate recommendation: the valve and head must be from the same manufacturer, and the connecting threads must match. The standard thread on the valve is M28 and M30. In general, the choice of head designs is not too wide - in addition to conventional elements with a built-in bellows, there are also products with an electronic control unit and display. These thermostats are programmable and can be set to maintain different room temperatures throughout the day.
Advice. When choosing a programmable thermostatic head, remember that it requires power from batteries or mains. In order for the thermostat to work correctly, you will have to monitor the availability of power.
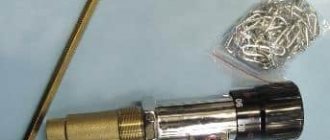
In cases where it is planned to install heating devices behind screens or the windows of the room are intended to be covered with thick curtains, conventional thermocouples may not function correctly. Due to weak air movement in the radiator area, the temperature behind the screen and in front of it may differ by a couple of degrees, so in addition to the thermostat, it is worth buying a remote sensor with a capillary tube.
The sensor behind the screen will control the thermostat via a capillary tube, focusing on the correct temperature in the room. There is also a more advanced version in the form of a remote regulator, which is also connected by a capillary tube. But here you need to be more careful: not all valves are suitable for such thermal heads, so when choosing a thermostat you need to consult with the seller.
How to choose a thermostat for heating radiators
In the countries of the post-Soviet space, up to 40% of energy resources are spent on the needs of heating and ventilation of buildings, this is several times more than in advanced European countries. The issue of energy saving is more pressing than ever, especially against the backdrop of the constant increase in energy costs. One of the devices that allows you to save thermal energy in the house is a battery thermostat, whose installation can reduce heat consumption by up to 20%. But for this it is necessary to correctly select the regulators for the heating system and install them
Recommendations for selection
Depending on the type of heating system and the installation conditions of the device, valve-thermal head kits in various combinations can be used to control the flow of coolant. In single-pipe heating systems, it is recommended to install valves with increased flow capacity and low hydraulic resistance (DANFOSS product markings are RA-G, RA-KE, RA-KEW).
The same recommendation applies to two-pipe gravity systems, where the coolant circulates naturally, without forced stimulation. If the heating circuit is two-pipe with a circulation pump, then you should choose a valve with the ability to adjust the flow capacity (DANFOSS markings - RA-N, RA-K, RA-KW). This adjustment is quite simple and does not require a special tool.
When the issue of valve selection has been resolved, you need to decide on the type of thermal head. They are offered in the following versions:
- With an internal thermoelement (as in the diagram presented above).
- With remote temperature sensor.
- With external regulator.
- Electronic (programmable).
- Anti-vandal.
A conventional thermostat for heating radiators with an internal sensor is accepted for installation if it is possible to position its axis horizontally so that the room air freely flows around the body of the device, as shown in the figure:
Attention! It is not allowed to install the thermostat on the battery in a vertical position; the heat flow rising from the supply pipe and valve body will affect the bellows, as a result of which the device will not work correctly.
If horizontal installation of the head is not possible, then it is better to purchase an external temperature sensor for it, complete with a capillary tube 2 m long. It is at this distance from the radiator that this device can be placed by attaching it to the wall:
In addition to vertical installation, there are other objective reasons for purchasing a remote sensor:
- heating radiators with temperature controllers are located behind thick curtains;
- in the immediate vicinity of the thermal head there are pipes with hot water or there is another heat source;
- the battery stands under a wide window sill;
- the internal thermoelement enters the draft zone.
In rooms with high demands on the interior, batteries are often hidden under decorative screens made of various materials. In such cases, a thermostat trapped under the casing registers the temperature of the hot air accumulating in the upper zone and can completely shut off the coolant. Moreover, access to the head control is completely blocked. In this situation, the choice should be made in favor of an external regulator combined with a sensor. Options for its placement are shown in the figure:
Electronic thermostats with a display also come in two types: with built-in and removable control unit. The latter differs in that the electronic unit is disconnected from the thermal head, after which it continues to function as usual. The purpose of such devices is to regulate the temperature in the room according to the time of day in accordance with the program. This allows heating power to be reduced during working hours, when no one is home and in other similar cases, which leads to additional energy savings.
When there are small children in the house who want to try everything with their own hands, it is better to install a vandal-proof thermostat with a casing that protects the device settings from unqualified intervention. This also applies to thermostats located in other public buildings: kindergartens, schools, hospitals, and so on.
Thermostatic heads
There are three types of thermostatic elements for heating thermostats - manual, mechanical and electronic. They all perform the same functions, but in different ways, provide different levels of comfort, and have different capabilities.
Manual
Manual thermostatic heads work like a regular faucet - you turn the regulator in one direction or another, allowing more or less coolant to flow through. The cheapest and most reliable, but not the most convenient devices. To change the heat transfer, you must manually turn the valve.
Manual thermal head - the simplest and most reliable option
These devices are quite inexpensive, they can be installed at the inlet and outlet of a heating radiator instead of ball valves. Any of them can be adjusted.
Mechanical
A more complex device that maintains the set temperature automatically. The basis of this type of thermostatic head is a bellows. This is a small elastic cylinder that is filled with a temperature agent. A temperature agent is a gas or liquid that has a high coefficient of expansion - when heated, it greatly increases in volume.
Thermostat device for a heating radiator with a mechanical thermostatic head
The bellows supports the rod, which blocks the flow area of the valve. Until the substance in the bellows heats up, the rod is raised. As the temperature rises, the cylinder begins to increase in size (gas or liquid expands), it puts pressure on the rod, which increasingly blocks the flow area. Less and less coolant passes through the radiator, and it gradually cools down. The substance in the bellows also cools down, due to which the cylinder decreases in size, the rod rises, more coolant passes through the radiator, and it begins to warm up a little. Then the cycle repeats.
Gas or liquid
With such a device, the room temperature is fairly maintained at exactly +- 1°C, but in general the delta depends on how inert the substance in the bellows is. It can be filled with some kind of gas or liquid. Gases react faster to temperature changes, but are technologically more difficult to produce.
Liquid or gas bellows - not much difference
Liquids change volumes a little more slowly, but are easier to produce. In general, the difference in the accuracy of temperature maintenance is about half a degree, which is almost impossible to notice. As a result, most of the presented thermostats for heating radiators are equipped with thermal heads with liquid bellows.
With remote sensor
The mechanical thermostatic head should be installed so that it faces the room. This way the temperature is measured more accurately. Since they are quite large in size, this installation method is not always possible. For these cases, you can install a thermostat for the heating radiator with a remote sensor. The temperature sensor is connected to the head using a capillary tube. You can place it at any point where you prefer to measure air temperature.
With remote sensor
All changes in heat transfer from the radiator will occur depending on the air temperature in the room. The only disadvantage of this solution is the high cost of such models. But the temperature is maintained more accurately.
| Name/Company | Setting range | Operating temperature range | Control type | Functions/purpose | Connection type | Price |
| Danfoss living eco | from 6°C to 28°C | from 0°C to 40°C | Electronic | Programmable | RA AND M30X1.5 | 70$ |
| Danfoss RA 2994 with gas bellows | from 6°C to 26°C | from 0°C to 40°C | Mechanical | For any radiators | clip-on | 20$ |
| Danfoss RAW-K with liquid sponge | from 8°C to 28°C | from 0°C to 40°C | Mechanical | For steel panel radiators | M30x1.5 | 20$ |
| Danfoss RAX with liquid sponge | from 8°C to 28°C | from 0°C to 40°C | Mechanical | For design radiators white, black, chrome | M30x1.5 | 25$ |
| HERZ H 1 7260 98 with liquid sponge | from 6°C to 28°C | Mechanical | M 30 x 1.5 | 11$ | ||
| Oventrop "Uni XH" with liquid sponge | from 7°C to 28°C | Mechanical | with zero mark | M 30 x 1.5 | 18$ | |
| Oventrop "Uni CH" with liquid sponge | from 7°C to 28°C | Mechanical | without zero mark | M 30 x 1.5 | 20$ |
Installation and adjustment
The thermostat works well when its installation is carried out according to all the rules and taking into account some nuances. In order for its operation to be effective, durable, and correct, it is necessary to initially ensure free access, especially if these are mechanical control devices. The automatic thermostatic element must not be covered with curtains or radiator screens. As a result, the analysis of temperature fluctuations may have errors.
Before directly installing the thermostat, all water is drained from the heating system. Prepare the necessary equipment and installation kit for connection, not forgetting the components. The device must be installed perpendicular to the location of the radiator panel. It is worth remembering that the direction of the heat supply flow must coincide with the direction of the thermostat arrow.
If the position of the thermal head after installation is vertical, this will affect the correct operation of the bellows. However, this nuance does not apply to devices with a remote sensor or an external control unit. You cannot install the thermostat where it will be constantly exposed to sunlight. In addition, the device does not always operate correctly if its location is near large household appliances that generate thermal radiation. The same rule applies to hidden-type options that are hidden inside niches to increase the aesthetic appeal of the interior of the room.
How to do?
If there is no heating in the apartment or house when connecting, you need to open the thermostat completely. This will save the valve from deformation and the regulator from clogging. If the installation is carried out in a private house with two or more floors, work starts from the top, since warm air always rises
Do you need land?
Also note that the protective grounding is directly to the thermostat itself at class=”aligncenter” width=”700″ height=”434″[/img]
This can be a separate, separate terminal through which the heating cable shield is connected to the protective conductor.
The thermostats themselves even have a “square within a square” icon, which means a device with double insulation.
These marks are typically found on portable tools that do not require a grounding pin on the power cord plug.
How to install correctly
They install a thermostat for a heating radiator at the inlet or outlet of the heating device - there is no difference, they work with equal success in both positions. How to choose a place to install?
According to the recommended installation height. There is such a clause in the technical specifications. Each device is configured at the factory - they are calibrated to control the temperature at a certain height and usually this is the upper radiator manifold. In this case, the heat regulator is installed at a height of 60-80 cm; it is convenient to adjust it manually if necessary.
Installation diagrams for heat regulators for radiators
If you have a bottom saddle connection (pipes fit only from the bottom), there are three options - look for a device that can be installed at the bottom, install a model with a remote sensor, or reconfigure the thermal head. The procedure is simple; the description must be in the passport. All you need is to have a thermometer and at certain moments turn the head in one direction, then in the other direction.
Installation is standard - on fum tape or linen winding with packaging paste
The installation process itself is standard. The valve has a thread. The appropriate fittings are selected for it or a matching thread is cut on the metal pipe.
One important point that those who want to install a thermostat for a heating radiator in apartment buildings should remember. If you have a single-pipe installation, they can only be installed if there is a bypass - a section of pipe that stands in front of the battery and connects the two pipes to each other.
If you have a similar wiring (there may not be a pipe on the right), a bypass is required. The thermostat should be installed immediately behind the radiator
Otherwise, you will regulate the entire riser, which your neighbors will definitely not like. For such a violation, a very substantial fine can be issued. Therefore, it is better to install a bypass (if not).
For your information
In some models, the head is attached to the valve body using a threaded connection, while in others it simply snaps into place. When threading, it is tightened by hand and slightly tightened with a wrench. In a device with latches, you need to set the handle to the “MAX” position, insert the head into the corresponding groove and press until you hear a click. If the device is assembled correctly, the thermal head will rotate easily and smoothly.
Some people think that in order to connect an infrared heater to a thermostat, you need to proceed in much the same way as with a liquid heating system. But this is not true, because connecting a thermostat to an infrared heater is a completely different process. First of all, due to fundamental differences in the principles of operation of regulators. The temperature of the radiators is regulated by shutting off the coolant flowing through the thermostat. In an infrared heater, liquid does not flow, and its temperature is regulated by disconnecting from the network when the required air temperature is reached.
Another fundamental difference in connecting a thermostat to an infrared heater is that the thermostat must be connected to the electrical network that powers the heating device in order to be able to turn it off. In heating system radiators, such a need exists only for digital thermostats. And only in order to be able to program the microcircuit and track the result on the display.
Thermostat installation location
The operation of the thermostatic regulator is influenced by:
- direct sunlight;
- air temperature outside the window;
- air circulation speed in the room;
- additional heat sources.
In multi-storey private houses, thermostats are primarily installed on the upper floors. This is due to the fact that warm air rises, increasing the temperature difference across the height of the building.
In single-story ones, radiators located closer to the heating unit have higher priority.
The best option is to install small-capacity radiators with highly sensitive thermostats installed on the supply section of the main line. The only condition is that heating devices should not be covered with curtains, panels or grilles. Otherwise, you will need a thermostat with a remote sensor.
Thermostatic temperature regulators for heating batteries are installed on the supply section of the heating system directly in front of the radiator.
Changing thermostat settings
Thermostat modes for the radiator
Thermostat modes (numbers on the thermal head):
- Snowflake - anti-freeze mode (6.5 ˚C);
- 1 — stairs, lobbies (12 ˚C);
- 2 — bedrooms (16 ˚C), night mode (14 ˚C);
- 3 — living rooms, dining rooms (20 ˚C), kitchen, corridor (18 ˚C);
- 4 – bathrooms (24 ˚C), offices and children’s bedrooms (22 ˚C)
- 5 — swimming pool premises (28 ˚C).
Technically, there are no parts inside this element of the heating system that require a change in position. The setting consists of determining the temperature at which it becomes comfortable to be in the room, and further shifting the regulator knob. To do this you need to perform simple manipulations:
- The heating system must work.
- The thermometer should be placed where it is desirable to more accurately measure air parameters. Moreover, the doors to the room must be closed.
- The thermostat is turned to the left - this means that the coolant hole is open and the battery is hot.
- When the room becomes uncomfortable - too hot, turn the knob to the right. The battery will begin to cool down.
- As soon as a feeling of comfort appears, you need to turn the regulator, but this should be done slowly, listening. As soon as noise appears and the battery begins to heat up again, you need to change the value at which the device pointer was at that moment. This is the setting that is performed when the room feels cool and you need to increase the air temperature to a comfortable level.
FAQ
Is it possible to use one thermostat in several rooms at the same time?
Yes, the thermostat can be used in similar rooms, it can be a toilet and a bathroom, a corridor and a kitchen, a hallway and a corridor.
Is it possible to connect two independent underfloor heating circuits to one regulator? Are there such thermostats?
Yes, there is such a thermostat. For example, the I-Warm 730 model.
Is it possible to connect two different floors, cable and film, to one thermostat?
No. Cable and film flooring have different performance characteristics that require individual adjustment.
Is it possible to install the regulator in a standard socket box?
Yes, it is in a standard single box with a diameter of 68 mm that thermostats are installed, except for TR 730 - it is installed in a one-and-a-half box (oval shape).
How to find out how many heated floors can be connected to one thermostat?
To calculate, you need a current formula - I=P/U The current in the thermostat is 16 A, hence: P = I*U = 16 A * 220 V = 3520 W. To find out how many heated floors can be connected to the thermostat, just divide the power of the thermostat (3520 W) by the rated power of 1 sq./m of heated floor.
Are thermostat settings lost if there is a power outage?
It all depends on the model. For example, the TKV 60 thermostat, after turning off the power, resets the settings to factory settings and, after applying voltage, begins to heat the floor, and the E51, E91, E92 thermostats have a built-in battery and retain the settings even when the voltage is turned off.
What is hysteresis?
Hysteresis is the difference between the temperature at which the heater turns on and off. For example, the sensor is set to 25 degrees, and the floor turns on when it cools down to 23 degrees. The difference between these indicators is hysteresis.
The thermostat does not turn on the floor immediately, what is the reason?
Incorrect operation or incorrect installation of the temperature sensor.
The benefits of heating thermostats
It is known that the temperature in different rooms of the house cannot be the same. It is also not necessary to constantly maintain one or another temperature regime.
For example, in the bedroom at night it is necessary to lower the temperature to 17-18°C. This has a positive effect on sleep and helps get rid of headaches.
The thermostatic valve, also known as a thermostat, is designed to change the volume of coolant passing through the device. Changes depend on ambient temperature. All types of thermostats include two main elements: a thermostatic valve and a thermal head - a mechanism for influencing the valve. In the most complex modifications, the thermostatic valve is controlled by an external temperature sensor, which sends commands to the thermal head depending on changes in the temperature background. A thermostat with a thermal head equipped with a bellows mechanism allows you to automate the supply of coolant to the device. The simplest version of the thermostat is equipped with a thermal head for manual control. If necessary, a simple mechanical thermal head can be easily replaced with a bellows head. All options for thermostats are divided into devices for single-pipe and two-pipe heating circuits. Thermostats for two-pipe circuits are designed for significant pressure drops. They are divided into two groups: with adjustable hydraulic resistance and without this function. Installing thermostats next to heating devices makes it possible to set the optimal temperature for each room according to its purpose. Purpose of the thermostatic valve. Required components of a thermostat. Thermostat with remote temperature sensor. Thermal head for automatic control. The thermostatic valve or valve is the main component. Regulating device for single-pipe circuits. Thermostatic valve for two-pipe systems. Advantages of installing thermostats for heating appliances
The optimal temperature in the kitchen is 19°C. This is due to the fact that there are a lot of heating equipment in the room, which generates additional heat. If the temperature in the bathroom is below 24-26 ° C, then the room will feel damp. Therefore, it is important to ensure high temperature here.
If the house has a children's room, then its temperature range may vary. For a child under one year old, a temperature of 23-24°C will be required; for older children, 21-22°C will be sufficient. In other rooms, the temperature can vary from 18 to 22°C.
A comfortable temperature background is selected depending on the purpose of the room and partly on the time of day
At night, you can lower the air temperature in all rooms. It is not necessary to maintain a high temperature in the home if the house will be empty for some time, as well as during sunny warm days, when some electrical appliances are operating that generate heat, etc.
In these cases, installing a thermostat has a positive effect on the microclimate - the air does not overheat and does not dry out.
The table shows that in living rooms during the cold season the temperature should be 18-23°C. Low temperatures are acceptable on the landing and in the pantry - 12-19°C
The thermostat solves the following problems:
- allows you to create a certain temperature regime in rooms for different purposes;
- saves boiler life, reduces the amount of consumables for system maintenance (up to 50%);
- It becomes possible to perform an emergency battery shutdown without shutting down the entire riser.
It should be remembered that using a thermostat it is impossible to increase the efficiency of the battery or increase its heat transfer. People with an individual heating system will be able to save on consumables. Residents of apartment buildings can only regulate the temperature in the room using a thermostat.
Useful tips
Before you begin adjusting the thermostat, close all doors and windows in your home tightly. This is necessary in order to understand whether the device regulates the temperature.
During setup, keep a room thermometer near the radiator. If you are setting up a mechanical thermostat, you should first open it to maximum; when the temperature rises by 5-6 degrees, you can gradually close the flow of water.
When the mechanical valve heats up noticeably, it means water has entered the radiator and the temperature has reached its maximum.
Do not be afraid of noise in the batteries, it will appear every time the rod rises and water is drawn into the system. This applies to both mechanical and electronic thermostats.
If the electronic thermostat does not have a valve to mechanically shut off the water flow, you need to install a ball valve on the pipe in front of the valve. This is necessary so that the water can be turned off in an emergency or while the thermostat is being repaired.
An automatic thermostat may not work well on older cast iron radiators. Since cast iron cools slowly, the thermostat may respond to temperature changes with a significant delay. In this case, experts recommend installing a regular tap on the water supply and a balancing tap on the return pipe.
It makes no sense to install a thermostat on every radiator in the house. If there are two radiators in the room, the thermostat is placed on one, which is larger. This is enough to regulate the temperature in the room.
A thermostat for radiators is a great way to save energy. In winter, you no longer have to open windows for ventilation. You should not buy too cheap Chinese thermostats, they will very quickly become unusable. Remember, the main thing is to choose a quality device that will serve you for many years.
Sources:
- https://mr-build.ru/otoplenie/kak-ustanovit-termoregulyator-na-batareyu-otopleniya.html
- https://vse-otoplenie.ru/termoregulator-dla-radiatora-otoplenia-princip-raboty-sposob-ustanovki-i-nastrojki
- https://teplosten24.ru/kak-pravilno-ustanovit-termoregulyator-na-batareyu.html
- https://otivent.com/kak-vybrat-i-ustanovit-termoregulyatory-na-batarei
- https://stroychik.ru/otoplenie/termoregulyator-dlya-radiatora
- https://remkasam.ru/kak-proizvesti-ustanovku-termoregulyatora-na-radiator-otopleniya.html
- https://svoydom.info/%D1%82%D0%B5%D1%80%D0%BC%D0%BE%D1%80%D0%B5%D0%B3%D1%83%D0%BB%D1 %8F%D1%82%D0%BE%D1%80-%D0%B4%D0%BB%D1%8F-%D1%80%D0%B0%D0%B4%D0%B8%D0%B0%D1 %82%D0%BE%D1%80%D0%BE%D0%B2/
- https://sovet-ingenera.com/otoplenie/radiator-obogrev/regulyatory-temperatury-dlya-batarej-otopleniya.html
- https://gidstroitelstva.ru/ustanovka-termoregulyatorov-na-radiatory-otopleniya/