From the author: hello, friends! The modern market offers a huge number of different heating radiators. They compare favorably with those clumsy products that were previously installed in all apartment buildings. Moreover, the difference lies not only in appearance, but also in functionality, as well as ease of operation.
Of course, for ease of use, you need to know at least basic information about batteries - for example, how to disassemble a bimetallic heating radiator and then reassemble it. This procedure is necessary in two cases.
The first is increasing the number of sections. If you do not have enough heat generated by the battery, you can simply disassemble it, insert a couple of additional segments and enjoy a comfortable temperature in your apartment or house.
The second case is the need for repair work. Even the highest quality radiator is not immune from breakdowns. Moreover, the most common cases are not the consequences of design flaws, but external mechanical influence. For example, radiators often suffer due to active children's games.
In any case, the problem is solved quite simply. To do this you will need a minimum set of tools, your hands and a small amount of time.
How to temporarily remove a heating radiator
This article is about how to temporarily remove a heating radiator.
to replace it or paint the wall behind it. Removing the radiator is not at all difficult, as it might seem at first glance; we will talk about this in the article. First of all, you must understand the consequences of a failed attempt to remove the radiator: if you do not know how to remove the radiator correctly, a leak may subsequently appear and you will ruin the flooring . However, if you pay attention to our tips, you will eliminate all problems at once, during radiator removal process
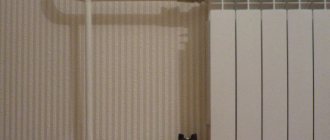
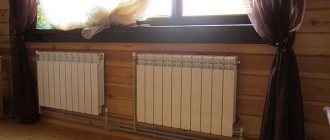
First of all, we must show you the main elements of the radiator: at the top right - the control valve, at the bottom left - the shut-off valve (for regulating the water supply), at the top left - the Mayevsky valve for bleeding air from the heating radiator.
Using a control valve, you can adjust the flow of incoming water into the radiator by opening or closing the valve, you will regulate its heating temperature by increasing and decreasing it accordingly. Using the shut-off valve, you can adjust the intensity at which the water will flow out. Most often, such a valve is used to balance all radiators and is installed on each one.
First of all, close the valves. The adjusting one is closed by hand, and the locking one is closed using a hex key.
TIP: When you close the shut-off valve, remember how many turns you made so that you can then open it the same amount.
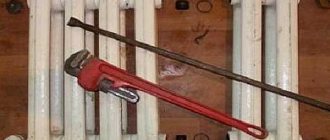
Now you need to disconnect the radiator from the valves. To do this you will need a wrench or a gas wrench. The faucet structure consists of an American type (removable coupling). Unscrew the American nut to separate the radiator from the valve.
TIP: To avoid damaging the flooring, place unnecessary rags under the radiator.
Unscrew the shut-off valve...
We unscrew the control valve in the same way... For reliability, use a second wrench to hold the American fitting while unscrewing the nut.
The last step is to remove the radiator from the brackets. The best advice we can give you is that you remove the radiator with someone, as a radiator with water is very heavy. This operation requires at least two people.
ADVICE. If you will be painting the wall behind the radiator, seal the valves in bags or paper.
During the process of painting or gluing the wall, place the radiator so that it does not get scratched. When you are finished painting, hang the new radiator you bought or the old one on the brackets.
With the radiator hanging in place, connect the valve and radiator using an American tie rod. When tightening the shut-off valve, remember the number of turns you had to turn to close it and open it exactly the same amount.
Open the control valve to supply coolant, while you need to open the Mayevsky tap so that air comes out through it and the radiator is filled with water. After water drips from the Mayevsky tap, turn it off, this will mean that the radiator is filled with coolant.
Thanks for reading our article on how to temporarily remove a radiator. and our other articles. Don't forget to Love our projects and share them with your friends using social widgets.
The essence of the problem
Quick-disassembly fitting system The need to remove the heating battery in an apartment may arise for a number of reasons.
Most often there is a desire to replace old elements left over from Soviet times with new ones with an elegant appearance and increased efficiency. It often becomes necessary to clean batteries (radiators) when they become clogged and it is not possible to wash them without disassembling the system.
Finally, there is a need for a temporary obstacle to carrying out repairs in an apartment, when the battery simply interferes with the work on the wall located behind it.
Whatever the reasons, the essence of the question is how to disconnect and remove the heating batteries without damaging the joints with the system. Most often, this task concerns a cast iron product that is connected according to a standard pattern. Please note that connection diagrams can be of different options:
- Joining on the slopes. This is how an old cast iron battery was most often connected. The connection was ensured by a bundle of a pipe with an extended threaded section (squeeze) and a lock nut.
- Fitting system (“American”). This connection is used when modern batteries are installed. The system includes quick-disconnect fittings with union-type nuts.
- Welding connection - previously used when connecting radiators-convectors shaped like a tubular coil. Such batteries were installed by welding.
In addition to the type of connection, heating radiators are divided according to the method of supplying coolant, which also implies certain features in dismantling the device. To connect to a common heating system, the batteries provide an inlet and outlet of a pipe with coolant. They can be located on 1 (one-sided eyeliner) or 2 sides. In addition, the direction of coolant supply plays an important role. It can be supplied from below or from above.
Which heating radiators are best to choose, you can familiarize yourself with the technical characteristics of bimetallic heating radiators on the following pages of our website:
To replace the battery we need:
- bimetallic radiator;
- a set of nuts and plugs for the radiator;
- connecting elements in two copies: tee, coupling, tap with Euro nut (American);
- a piece of corrugated galvanized pipe 60-70 cm long;
- a pair of brackets for hanging the radiator.
Since heating system pipes most often have a diameter of 3/4 inch, we buy a set of nuts and plugs for the radiator exactly for this size. We take taps, couplings and tees with a size of 3/4 inches. The tee connector going to the jumper should be 1/2 inch in size (the coolant flow through the radiator must be greater than through the jumper), and accordingly the galvanized pipe should be 1/2 inch in size.
If you are using a different type of heating pipe, you may need different fittings.
Step 1. Draining the coolant and dismantling the cast iron battery
We begin work by shutting off the heating riser and draining the water. To dismantle the old radiator, you need to unscrew the nuts connecting the radiator to the pipes, and remove it from the hanging hooks.
Unscrew the nuts carefully, without damaging the threads on the pipes.
We install a bimetallic radiator by installing a jumper between the “supply” and “return” pipes. This will make it possible in the future to remove the battery without draining the water, and regulate the temperature by blocking the flow of coolant passing through the radiator.
Step 2. Prepare elements for connecting the new radiator to the pipes
We assemble the fittings together, connect the euro nut with the radiator nut, and use flax or fum tape at the joints.
We assemble the second set of elements in the same way (it is necessary to take into account that in the first case the tee will look down, in the second - up) and twist everything together with the pipes.
Step 3. Prepare and install the battery
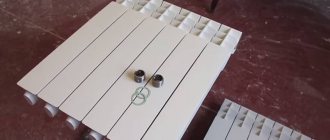
According to its design features, the bimetallic radiator has four holes (two input and two output) for various connection schemes. We screw the plugs from the kit into those radiator holes that we don’t need (the nuts and plugs in the kit have O-rings, so the use of fum tape is not necessary here).
Be careful, one of the plugs is equipped with a Mayevsky valve for bleeding air; it should be installed in the upper part of the radiator.
We screw American nuts into the coolant inlet and outlet holes.
First, we hang the battery on the pipes, connecting the Euronuts with the taps, setting the battery level, and using a pencil we put marks on the wall for drilling holes for the hooks.
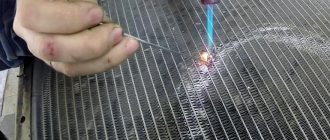
Heating element for cast iron battery
A heating element mounted in a cast iron radiator allows you to warm up the room when it is not possible to start the heating system in the usual way. The heating element itself is nothing more than a metal pipe with a spiral sealed in the middle. When installing a heating element in a cast iron radiator, you can achieve optimal temperature values in a small room: garage, kitchen, greenhouse or any other outbuilding.
The main advantages of electric heating elements:
- Possibility of installation in a battery made of cast iron and other materials;
- Automatic control of water heating temperature;
- Using a heater as the main heat source;
- Easy to install.
Anyone can install the described device. The heating elements are equipped with temperature control mechanisms and overload protection. The heater just needs to be installed in the radiator socket and connected to a power source. Before operating the heating element, the heating system must be completely filled with water or another type of coolant.
The heater in the radiator must be in a horizontal position. It usually works in two modes. If the device is used in the system as the main heating source, then the room will warm up to the set temperature, and a special thermostat will maintain the temperature at the specified parameters.
If the heating element is used in a country house or in an auxiliary room, then the main task of the heater will be considered to be minimal heating of the system to protect against freezing. In this case, the device is set to minimum power.
Types of heating systems
There are 3 categories here - single-pipe, two-pipe and collector; they differ in the level of heat supply and the specifics of connecting structural elements.
Types of heating systems
Single-pipe
The equipment is combined into a bundle in such a way that the coolant moves through only one pipe, sequentially passes through each radiator and, already cooled, enters the boiler. This simple installation method is widely used in multi-storey buildings. Disadvantage of the solution: more and more cooling water passes through each subsequent battery, and accordingly the rooms are heated worse. There is no possibility of individual repair of one radiator; in an emergency, you will have to turn off the riser.
Two-pipe
Thanks to the parallel connection of the batteries, the hot coolant is supplied to each of them through one pipe separately. The entire complex of equipment is heated evenly, the cooled water flows into a separate return pipe, through which it is transferred to the boiler, where it is reheated. It is also not difficult to assemble the system; if replacement is necessary, you only need to disconnect one radiator.
Collector
This complex scheme is used for heating cottages: separate pipes must be connected to each radiator. Usually professionals are involved in its installation.
Signs of damage or “I didn’t touch anything”
Let us note several possible reasons for the failure of heating radiators:
- The radiator was chosen incorrectly from the very beginning. Depending on the diameter of the pipes, the pressure and temperature of the water in the system, different types of radiators are installed.
- Repair of a heating battery can also be caused by the fact that it was incorrectly connected to the pipes of the heating system.
- If the central heating system creates harsh working conditions. For example, if the coolant has increased acidity and sharp pressure changes are observed, this leads to the metal experiencing electrostatic or electrochemical corrosion.
- If the coolant is of poor quality, it will form deposits at the joints of the battery sections and in the places where the pipes are attached.
- Poor quality coolant will also clog radiators and pipes - this will entail the frequent need to flush them.
Plaque in heating system pipes
- Intersectional gaskets can wear out and threaded nipples can be destroyed. Therefore, you need to regularly change the gaskets between sections.
- Clicking noises in the heating radiator are not necessarily a breakdown, but if they appear, you need to call a specialist; you may need to soundproof the heating radiators. Since the heating radiator makes noise, it can cause discomfort or cause its breakdown.
Now let’s outline the main signs that your batteries require careful inspection and repair in the future or urgently:
- When the heating season is in full swing in the literal sense of the word, the rooms suddenly become noticeably colder, that is, the heating radiator does not heat.
- Plaque has appeared at the joints and fastening points; this may cause the heating radiator to not work in the future.
- The heating battery has leaked or the heating radiator has burst.
If your batteries are already older than you, it is better to replace them, because, most likely, you are guaranteed to permanently repair the heating battery yourself. After all, modern models will be more efficient, since their thermal conductivity is higher: the rooms will become warmer, and heating costs will be lower. In addition, the new batteries will be more beautiful.
Sometimes it's easier to replace an old battery than to repair itIf it is not possible to replace the batteries, then you will have to repair the heating radiator yourself, and as soon as possible. It’s best - whether it’s a problem of how to fix a leaking heating battery, or you just hear noise in the heating batteries, immediately contact specialists who will carry out professional diagnostics.
Assembly
Assembling a bimetallic radiator is no more difficult than disassembling it. To do this, several steps must be taken.
- Place all battery cells on a flat surface.
- Carefully inspect each threaded connection and then clean thoroughly. Even if your radiator is fresh from the factory, the threads still need some work. First, remove any paint from the end sections if there is any. Any excess layer will interfere with the tightness of the connection, which can lead to leaks. Second, sand the threads. The grain size should be very fine. Otherwise, you risk scratching the element. And this, again, will cause a violation of the tightness of the connection.
- Now it is necessary to carry out the procedure for degreasing the end sections. This is done using gasoline. Gaskets should be washed with soap and water for the same purpose. The degreasing procedure is not mandatory for those systems where water is used as a coolant. But if antifreeze leaks in the batteries, you should still pay attention to treating with gasoline, since the “antifreeze” is extremely fluid and can penetrate even microscopic holes.
- Once everything is ready, you can proceed directly to assembly. Place gaskets on the nipple connector and then connect the radiator sections on both sides. Next, using the same special tool, tighten the nuts. This is done in exactly the same way as in the case of unscrewing - carefully, with small turns, work with each nipple in turn. There is no need to tighten it too much, since bimetallic radiators are quite soft and the threads can be damaged.
- When the battery is completely assembled, install a special plug on one of the end holes, and a Mayevsky tap on the other. It should be purchased even if it was not previously on this radiator. With this equipment you can easily get rid of air pockets that form in the battery.
As you can see, the process of disassembling and assembling a modern heating radiator is, in general, a trivial matter, accessible to everyone. It's no more difficult than assembling a car from a construction set. With careful attention and a careful approach, you will definitely do an excellent job with this job. Good luck!
Why is this necessary?
Dismantling is necessary in the following cases:
In case of intersectional leaks of a cast iron battery at a short distance from the connections. If there are many sections, the length of the radiator wrench is often not enough to reach the required pair of nipples on the side of the blind plugs. The only solution is to disassemble the radiator from the supply side;
Leaking between sections is a typical disease of cast iron batteries.
- In case of fistulas on the connections to the radiator. To replace the hose (on threads or welding), you need to completely remove the heating device;
- When replacing radiators with new ones (with higher thermal power or more aesthetically attractive);
- When restoring radiators by annealing them;
Cast iron sections clogged with petrified silt can be brought into working condition by heating them (for example, in a fire) and tapping them with a wooden or rubber mallet. The burnt dirt is poured out through the collectors. Of course, after annealing, the intersection gaskets must be replaced.
When renovating a room. Plastering a wall or wallpapering behind a radiator, you will agree, is quite problematic.
To wallpaper a window sill niche, it is better to remove the battery.
Choosing a location for installing batteries
When installing heating systems, at the first stage, heating devices are installed, equipped with shut-off and control valves, and after that the laying of pipes begins. Any battery can be installed temporarily and removed from its mounts while cutting the groove or performing other work.
Therefore, it is recommended to connect bimetallic heating radiators without removing the packaging polyethylene film, or by wrapping it yourself to protect it from dust, dirt and possible damage. The film can only be removed when conducting thermal tests of the heating system.
The basic requirements for installing sectional batteries are given by the manufacturer in the technical data sheet of each model. However, there are general mandatory conditions for installing bimetallic heating radiators:
- the middle of the radiator must coincide with the center of the window under which it is installed;
- the upper plane of the device must be positioned strictly horizontally;
- all batteries in the room must be at the same height;
- the distance from the back wall of the sections to the wall is not less than 30 mm and not more than 50 mm;
- the distance from the floor and window sill to the heating device should not be less than 100 mm.
The last condition does not define the high setting correctly. If you raise the bottom of the radiator to a height of more than 150 mm, then the possibility of insufficient heating of the lower space of the room is likely.
How to disassemble aluminum into sections
To disassemble an aluminum radiator, you need to prepare a radiator, nipple and open-end wrenches, an angle grinder, a pry bar and an adjustable wrench.
Procedure for disassembling an aluminum radiator:
- spread a rag or newspaper to prevent battery fluids from leaking;
- turn off the heat supply to the radiator;
- twist all adapters and plugs from the ends;
- Use a nipple wrench to unscrew the upper and lower nuts, turning clockwise;
- check the integrity of the threads on the battery;
- place O-rings on the nuts;
- Gradually unscrew the sections, maintaining the distance and avoiding skewing between them.
Thus, it is very important to distinguish between radiators and correctly classify heating batteries. The skill of disassembling batteries will be useful in case of unforeseen emergency situations caused by leaks or noise in the radiator itself
When disassembling, you must strictly follow the plan and carefully carry out each stage.
HelpfulUseless
Dismantling of bimetallic and aluminum sectional products
To disconnect the radiator from the system and remove it from its mounting location, you must do the following:
- Stop water circulation and relieve pressure.
- If the heating battery is hot, you need to wait until it cools down and then disconnect it from the system. To do this, you need to unscrew the connecting couplings at the inlet and outlet.
- Move the coupling away from the radiator along the pipe and remove the device from the brackets.
- Drain the remaining water and place the product in the disassembly area, face up.
- Pull out and rinse the filter immediately to prevent dirt from drying on it.
Dismantling of bimetallic and aluminum sectional products
At the next stage, the radiator is disassembled into separate sections. To avoid damage during operation, you need to figure out which way to turn the nipple nut. This element is a ring-shaped nut with an external thread and grooves inside on both sides. In this case, one nut has both right and left threads. If you unscrew it, the adjacent sections of the battery will evenly move apart, and when twisted, they will tighten.
Manufacturers usually make marks on the face of plugs and sleeves that indicate thread directions. O denotes right-hand thread, “S” denotes left-hand thread. To accurately determine the direction of movement, it is recommended to take a loose nipple nut and try to attach it to the threads in the radiator. Having decided which way it twists, it will become clear where to turn the key to separate the sections.
Important! If you turn the nipple nut in the wrong direction, you can easily break the threads on it and on the heating battery
Having decided on the direction of the thread, insert the nipple wrench into the radiator and slide it towards the desired nut. The notches on the tool will help you do this. When it is in the grooves, insert the lever into the hole on the other side. It will take force to move the nut out of place. Call an assistant to fix the radiator in one place.
Repair of bimetallic radiators
When the nut has moved half a turn, go to the other side to unscrew the second one and do the same. After making sure that both nuts rotate without applying much physical force, gradually unscrew one side or the other, moving 5-7 mm.
Gasket between radiator sections
After disconnection, take away the metal spacers that were between the sections. If they are in good condition, then they can be installed back during reassembly; if in bad condition, then use them as a sample for purchasing new ones. Silicone gaskets must be changed.
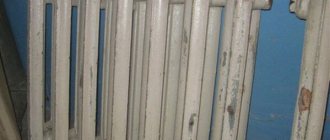
Dismantling cast iron radiators
The most common are cast iron radiators MC140. During their operation, which in some cases is 30 years or more, they have shown themselves only at their best:
- accumulates heat;
- resistant to poor quality coolant;
- ease of maintenance;
- reliable and have a long service life (from 10 years and above)
How to disassemble this grandfather? And it’s very simple, because structurally all radiators are assembled according to the same principle: using nipple nuts and gaskets for tightness. True, in those ancient times, tow with paint was screwed onto the nut and there was a rubber gasket.
Cast iron radiators in some systems last for 50 years, it is clear that disassembling them will not be easy
There are no problems disassembling the new radiator. But you’ll have to tinker with the old one:
- Over time, the joint between the sections “sticks”;
- the internal protrusions for the key are corroded by the coolant.
This is why dismantling the old “cast iron” is quite problematic.
Another difficulty in working with cast iron is its heavy weight. The weight of one “clean” section is 7.5 kg. A 10-section battery weighs 75 kg, so it’s best to carry it with two people. Before disassembling the radiator, it is best to remove and wash it. A battery that is light in weight can be washed in the bath, after laying down a rag. To do this, it is best to take a piece of hose, connect it to a cold water tap and rinse thoroughly. If you hate to dirty the bathtub, you can go out into the yard. All that matters is the presence of water, you also need a drain: there will be more than enough of any horror in the water.
Only a strong person can carry cast iron batteries alone
The place for disassembling the radiator is chosen to be level and quite spacious. If you live in a multi-story building, then this work can be done on the staircase. Tools you will need:
- radiator key;
- chisel, hammer, small sledgehammer;
- brush with metal bristles, blowtorch;
- several boards or blocks for lining under the battery;
- plumbing wrench No. 2,3 for unscrewing side plugs (footers) and plugs.
A few words about the key: you are unlikely to find something like this in a store; it’s easier to look in the market or borrow from a plumber you know.
The key is a round rod with a diameter of 18 mm. On one side it is flattened in the form of a spatula to the internal size: its width is 28x40 mm and its thickness is 6 mm. On the other hand, a ring is welded to it, into which a lever is inserted for rotation. The length of the key is defined as ½ the length of the largest radiator plus approximately 300 mm. You can make such a “miracle” from a suitable piece of half-inch pipe by flattening one end. But this option is only suitable for disassembling a new radiator.
Number of sections of bimetallic radiators
How many sections there will be on a bimetallic radiator has a direct impact on the choice of connection method. A battery of up to 8 sections can be connected with a side, bottom saddle or diagonal connection. If there are more than 8 sections, it is better to use a diagonal connection.
When using side switching, a flow extender will be required. This refers to a tube inserted into the supply manifold. It helps out in situations where the side connection provides heating only for the first sections. Thanks to the tube inserted inside, the coolant flows further than the inlet, heating the surface of the device more evenly.
Flow extension length options:
- 2/3 batteries.
- To the center of the last section.
Different cases show the effectiveness of both the first and second options. The main thing is that a noticeable optimization of radiator heating is achieved. Sometimes it happens that installation to the middle of the last section provokes a decrease in the heating level of the first sections. In this case, it is recommended to shorten the tube. But such situations rarely occur, which is influenced by the pressure in the riser and the cross-section of the liner.