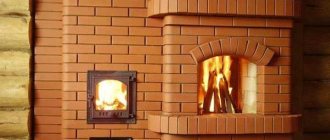
A brick stove is the main functional element of any Russian steam room, which is traditionally made of heat-resistant red brick. The construction market offers a wide range of ready-made stove designs, but bathhouse owners decide to build a Russian stove with their own hands.
A classic brick stove for a bathhouse with a heater, built with one’s own hands, makes it possible to safely heat the room, maintain optimal temperature conditions, produce clean and thick steam, and is a decorative interior element.
Selecting material for constructing a furnace
Currently, there are many available schemes for constructing a furnace, but a novice master is recommended to choose the simplest drawing.
What kind of brick should a stove be built from? Choosing the right building material is not easy. If you have limited financial resources, you can choose red brick of dubious quality.
However, the dimensions of such material rarely correspond to accepted standards; for this reason, quite wide seams can be obtained - up to 11 mm, which is absolutely unacceptable when constructing a stove.
Often, a sauna stove is built from fireclay brick, which consists of 75% heat-resistant clay. This material is resistant to overheating and high humidity, cracking and deformation. In terms of technical and operational characteristics, fireclay bricks are superior to all existing analogues, but the price is much higher.
The firebox is built from fireclay bricks, and it is better to build a chimney from fire-resistant red bricks.
For construction work you will need clay, which you can get yourself or purchase at a specialized point along with bricks.
To build a brick stove, you need to prepare the following materials:
- fireclay;
- heat-resistant brick;
- coarse clay and sand;
- a grate, a door for the ash pit and combustion chamber, cleaning wells, a cast-iron stove and a grate;
- asbestos cord;
- heating tank;
- zinc wire;
- corner;
- roofing felt
These materials are enough to build a simple brick oven with your own hands.
Basic principles for creating a safe sauna stove design
When starting to review information on the arrangement and construction of a sauna stove, you need to study the basics of safety rules and regulations in order to avoid further unpleasant consequences that their violation may lead to.
- According to traditional rules, the construction of the stove is carried out near the wall, which is opposite to the shelves in the steam room. The furnace design is created in such a way that a distance of about 30-40 centimeters is maintained between the heating parts of the finished furnace and the raw materials that form the combustion. If special protection from asbestos sheet is provided, then this distance can be reduced to 15-20 centimeters.
- A gap must be left between the chimney and the roof covering in contact with it, which is filled with fireproof material. Asbestos cord is often used for this purpose. The above-mentioned gap with asbestos insulation must be closed with a metal figured overlay.
- To provide additional protection, the floor in front of the furnace is covered with a sheet of metal, the thickness of which must be at least 10 mm. This sheet will provide additional protection against fire of the floor covering if embers accidentally fall out of the firebox.
Only after studying the basic safety rules can you proceed to preparing materials and appropriate tools.
Preparing construction tools
To build a brick sauna stove with your own hands, it is recommended to prepare working tools:
- grinder with a circle;
- electric drill with a special attachment;
- wide plastic container for solution;
- Master OK;
- level;
- tape measure and pencil;
- metal strips.
This is a basic list of tools, but if desired, it can be expanded with additional equipment.
At the stage of choosing a place where a small brick oven will be located, as well as preparing a construction project, it is important to take into account the basic requirements for the future design:
- Firebox safety doors should face the door.
- The base for the stove device must be at least 75 × 75 cm in size and up to 22 cm in height.
- The shelves should be located along the wall near which the stove is installed.
- Heating stoves made of bricks are built in compliance with the technological gaps between the walls of the structures and the walls of the steam room.
Conclusion
Do-it-yourself stoves are often used to heat a sauna room. They are reliable, economical and very beautiful. There are two types of heater stoves.
A sauna stove with an open heater heats the room quickly, but a device with a closed heater retains heat much longer. Therefore, if you have a large enough room for a bath, it is better to give preference to the second type. Making such a stove is not very difficult. It is enough to stock up on time, the necessary materials and tools.
In the literature or on the Internet you can find a huge number of row diagrams of a brick sauna stove with a closed heater. They will help you create a beautiful and easy-to-use sauna heating device.
Arrangement of the foundation
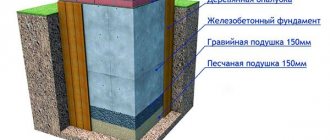
Laying brick stoves begins with laying out the foundation, which is the basis for any heating structure, ensuring its strength, reliability and durability.
According to the finished bathhouse design, markings are made at the construction site and a foundation pit up to 65 cm deep is dug. Its width should exceed the dimensions of the stove by 10 cm.
A layer of sand 18 cm thick is laid on the bottom of the pit and moistened with water, then covered with crushed stone, stones and broken bricks. All layers are thoroughly wetted and compacted. The pillow is kept for some time to shrink.
After complete shrinkage of the sand layer, removable formwork is installed, reinforced with an armored belt made of thin reinforcement.
Important! A technological gap of 12 cm must be left between the walls of the formwork and the earthen edges of the pit.
The formwork is filled with concrete mixture to the boundary level, which is 17 cm below the soil surface. The mixture is prepared in proportions - 1: 3 (three parts sand to one part cement) with the addition of the required amount of water.
After the concrete has completely hardened, the formwork is removed, and the existing voids are filled with fine gravel.
Folded roofing felt is used as a waterproofing layer for the foundation. The material is laid on a concrete base layer strictly according to the size of the site.
Laying the foundation
The foundation for a brick stove in a bathhouse must be built. The stove structure has an impressive mass and without a foundation can push through the floor or lead to its subsidence.
Ideally, the stove foundation will be made simultaneously with concreting the supporting structure of the bathhouse itself. But if you missed this point, having decided on the place where the stove will stand, dismantle the floor covering and cut out the logs.
The most popular type of stove foundation in a bathhouse is rubble or concrete with a cement base. Briefly, the foundation laying process looks like this:
- Digging a pit;
- Formwork;
- Reinforcement;
- Concreting;
- Waterproofing;
Mixing connecting masonry mortar
To ensure a reliable and durable brick stove for a bath, it is important to properly mix the masonry mortar. The accuracy of the proportions depends on the quality of the clay - its fat content.
To mix the solution, clay and sand are used in a ratio of 1: 2 (for one clay part, 2 sand parts). The clay is pre-soaked in a small amount of water.
To do this, the material is placed in a container, filled with water and mixed thoroughly. To simplify the kneading process, you can use a drill with an attachment. The clay is kneaded until it becomes sufficiently plastic.
Only after this is slightly damp sand introduced into it in parts and stirred. A well-prepared stove solution should be viscous.
One batch of mortar should not be too much or too little; it should be prepared just enough to be enough to complete 2-3 full brick rows.
Preparatory work
Selecting a water tank
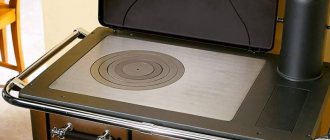
One of the main components of a heating device is a tank or container for water. The volume of the tank should be selected before all construction work begins.
It depends on the number of people and the visit to the bathhouse: the more people who want to take a steam bath, the larger the volume of the tank needs to be used. One liter of water is usually consumed per person.
It is best to use an open tank as a tank. It will be more convenient to fill such a container with water. During operation, scale may appear on the tank. It is easier to eliminate it if the container is open.
If you do not use the sauna in winter, it is better to remove all liquid from the container. This way you prevent the water from freezing and damaging or deforming the tank itself.
Foundation of the future furnace
One of the most important components of any furnace is its foundation. A brick stove with a closed heater for a Russian bath made by yourself must be on a high-quality foundation.
The foundation depth should be below the soil freezing level by an average of half a meter. The area of the foundation should be larger than the furnace by a few centimeters around the perimeter.
Stages of building a foundation:
- you need to dig a hole to install the formwork.
- Cover the bottom with sand (about 15 cm) and fill it with water to compact it. Small stones are placed on the surface, after which they are compacted.
- The formwork is made from boards. The internal size of the formwork must be identical to the size of the foundation. It is important to use a level to build.
- The formwork is fixed in the pit, and strong reinforcement is inserted inside.
- After this, all that remains is to concrete the area and leave it for several days. The wooden frame is removed, and the gaps between the ground and concrete are filled with sand or gravel. The structure is covered with film and left for about seven days.
What brick should I use?
It is appropriate to use ceramic refractory bricks in the bathhouse.
It is red in color and is durable and resistant to high temperatures. How to choose quality brick? Before purchasing a whole batch of bricks, check its quality. To do this, purchase several bricks and break them. If you have a few large pieces left over, this is a great material.
If it crumbles into small parts, it is a bad material. It is not the size of the brick itself that is important, but the identical parameters of each individual rectangle.
There is another type of brick that is used only in the fuel zone of the furnace. It is called fireclay. This material is resistant to heat. Fireclay has a larger size compared to others. But it can be easily filed and made to the desired size.
Preparation of the solution
A do-it-yourself sauna stove is made using two types of solution:
- for external masonry
- for the firebox and chimney.
The first one is quite easy to do. The main attention in this process should be paid to the components: sand and clay. Before cooking, the sand is sifted.
It should be small and uniform. And it is best to choose clay that has overwintered in open areas. It should also be ground through a sieve, after wetting it with water.
The proportions of the components may vary. It depends on how high quality clay is used. But usually this ratio is 1 to 2 (1 part clay and 2 sand), water should be approximately 1/4 of the amount of clay.
To strengthen the fireclay brick (for laying the firebox), use a solution of heat-resistant clay (it is white). When exposed to high temperatures, it compresses tightly and forms reliable protection against heat. All solutions must be mixed gradually until the consistency of liquid sour cream.
Tools
No special tools are required to build a heater. All you need is a level, a trowel, and a container for mixing the solution. Every owner has them, so you don’t have to spend money on work equipment. If the masonry you choose requires cutting the brick, use a grinder and a hammer.
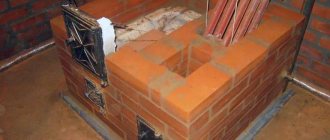
Step-by-step execution of brickwork of the furnace
The procedure for erecting brick walls for a bathhouse is determined by the construction scheme - the order. The proposed step-by-step instructions consider alternate brick laying.
Bricklaying from 1st to 7th row
Beginning craftsmen have a completely logical question: how to build a stove from the foundation (the first 7 rows)?
- The first row is laid out directly on the waterproofing layer of the foundation. The bricks are pre-wetted with water. Corner elements are made at a right angle, which is checked with a corner. The edges require careful measurement, which will prevent the appearance of unwanted gaps in the stove structure. In this case, the thickness of the finished joints between the bricks should not exceed 6 mm. To better stack the bricks, you need to properly mix the mortar.
- The second row of bricks is laid out in a similar way, with each subsequent element being located at the joints of bricks from the bottom row. Bricks for the third row should be laid according to the same pattern. A blower door should be installed here. It is fixed with thin wire and steel strips.
- Before proceeding with laying the next row, it is recommended to check the evenness of the walls being erected vertically and horizontally, as well as the accuracy of the angles. In this row, wells for ash and gratings for air ducts are installed. To do this, small holes of 1 cm are made in the elements with gaps for mounting the grate. Under the installed grille, the rear wall is made slightly rounded.
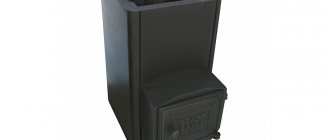
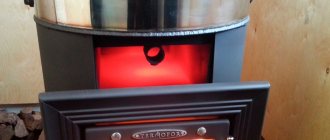
- In the sixth row, the installed blower door is fixed, and in the seventh row, the installation of the grate and firebox door is completed. To ensure safe heating of the steam room, the stove door must be made of cast iron. At the moment this is the most durable and heat-resistant material.
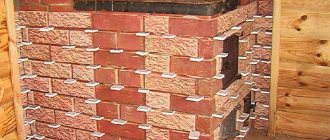
Bricklaying from the 8th to the 23rd row
- How to fold the stove from the 8th row until installing the chimney? When forming the eighth row, a partition is installed, which serves as the basis for arranging the chimney. Using a similar principle, brickwork is carried out up to the 14th row inclusive, on which metal channels will be installed. In this case, it is necessary to create a small opening in the front wall of the furnace for the vertical installation of the water tank so that it is in full contact with the channels.
- To lay out the fifteenth row, ½ bricks are used, which are placed at a slight angle among themselves. This will serve as the basis for the dividing partition. Up to the 18th row, the laying of bricks is carried out by analogy with the first rows of the structure.
- When laying the nineteenth row, a door is installed to allow steam to escape. Next, metal strips are installed, with further laying of the remaining rows. This is necessary for securely fixing the door frame for steam exhaust and installing a hot water tank, which is lined with bricks.
- From the 23rd row, a chimney pipe is installed, which determines the final height of the structure.
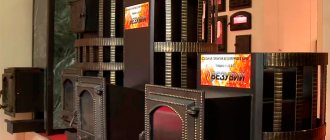
Kinds
When Kuznetsov's bell-type stoves for baths operate, a two-tier bell system is used. The operating principle of the Kuznetsov bell furnace is to maintain high temperatures in the lower bell (from 900ºС to 1200ºС) so that the combustion reaction is completed with further separation of the movement of cold and hot gases.
Kuznetsov’s brick stove for a bathhouse is capable of heating three bathhouses at once (steam room, washing room and rest room), while ensuring optimal temperature and humidity conditions of the air.
Kuznetsov’s brick stoves for baths have seventeen standard varieties, differing in size, location of the combustion chamber and water heating tank, the presence or absence of a fireplace, etc. You can find an overview of the types and characteristics of Kirasir sauna stoves here.
Advantages of using a Kuznetsov stove for a bath:
- high heating performance; economical fuel consumption, despite the fact that there are no fundamental requirements for fuel quality; heating water up to 150 liters (the stove is capable of maintaining water in a warm state for one to two days); formation of a minimum amount of soot during fuel combustion, due to which, a stove built according to the Kuznetsov system will need to be cleaned much less frequently than other sauna stoves; attractive appearance; long service life.
Installation of a chimney pipe
How to fold a stove with a chimney after completing the construction of brick walls? The furnace construction manual provides for the preliminary selection of a pipe, which in type and functional features must correspond to the design of the future furnace. For a lightweight design, it is recommended to choose a small pipe made of lightweight and heat-resistant material.
When choosing, you should take into account the appropriate wall thickness of the chimney pipe, which cannot be less than ½ the thickness of the brick. The diameter of the passages for the chimney pipe should be of a similar size.
The length of the upper part of the pipe, located above the roof, should not be less than 55 cm. To equip the smoke exhaust duct, a connecting mortar based on cement or lime is used. The clay-sand mixture is not suitable for such work, since under the influence of precipitation it will quickly wash out and form condensation on the inner walls of the pipe.
The chimney pipe with a minimum number of bends must have a total length of at least 5 meters. The finished design can be equipped with a special gate valve.
How to calculate the optimal stove size
To determine the requirements for the size of the furnace structure, it is necessary to know the heat loss of the room. For example, you can take the street temperature to be -30 degrees, and in the house you need to get +18 degrees. The amount of heat loss takes into account the external volume of the house, since it needs to be heated completely, and not just some rooms. Sometimes the structure is planned to heat only one part of the bathhouse. In this case, it is recommended to count the cubic capacity of only this part.
To warm up one cubic meter, 21 kcal is required. To determine the total energy, you need to multiply it by the volume of the room. If it is equal to 200 m³ (10 meters long, 10 meters wide and two meters high), then the total heat loss will be 200 × 21 = 4,200 kcal. From this it is clear that the installed structure must provide the room with heating of 4,200 kcal. If it is less, then the heat will not be enough.
After obtaining the amount of heat loss, the parameters of the furnace structure can be determined. The meaning of “mirror” is usually used for this. It is equal to the product of its perimeter and height without taking into account the chimney. Every 1 m² of fire gives off 300 kcal of heat. From this it turns out that a mirror for heating a room of 200 m³ should have an area equal to 4,200/300 or 14 square meters.
Next, determine the height, length and width of the stove. Typically, the active height is used as the height, which is equal to its normal height from the floor minus 30 centimeters. In this example, a value of 2.2 meters will be used. This means that the perimeter of the mirror is 14 / 2.2 or 6.36 meters. It is two widths and two lengths of the stove, so their sum is 6.36 / 2 = 3.18 meters. This is the size of the base of the future masonry. For example, if the length is 2 meters, then the width will have to be 1.18 meters. Further, everything is individual and depends on the room and the desired installation location.
If the bathhouse has a small area, then a stove measuring 3 by 4 blocks will be enough. Square shapes with dimensions of 4 × 4 and 6 × 6 bricks are also popular.
Brick heater stove: how to reduce heat loss
The most common way to reduce heat loss is based on laying trench channels in the lower part of the stove (at the same level as the ash pan). This must be done at the laying stage.
Trenches are blind channels, the purpose of which is to reduce the interaction of the bottom of the unit with the floor, foundation and basements. They contain an air layer inside, which acts as a thermal insulator.
In addition, trench channels can improve the convection of air masses in the most problematic place of the furnace - the lower part. The heat from the firebox falls down, and the channels distribute it throughout the room. This avoids heat accumulation in the lower part of the stove.
Heat transfer can be increased not only with trenches, but also with cast iron pipes that are laid inside the unit. Empty pipes will heat up and warm the air masses. The result will be a primitive heater.
Advantages and disadvantages of a heater for a brick bath
Most people use stone elements as a heating bath system, and this is for a reason. Such designs have a number of advantages:
- Energy independence. If there is no gas or electricity in the house, then a heater will be the optimal solution for heating a bathhouse.
- Comfort. The stove produces soft, warm steam that warms rather than burns.
- Heat capacity. Ability to retain heat for a long time.
- Economical. It does not require much fuel to heat the entire room. Can run on wood.
- Fire safety. A structure made in accordance with all fire safety standards almost never becomes a source of fire.
- Appearance. Each person can bring something different to the design or decoration.
There are also disadvantages. Among them:
- Requirement for care.
- Difficulty of construction.
- Dimensions.
- Time to kindle.
- High cost of the entire project.
Kamenka - a feature of the stove for a Russian bath
This type of structure is easier to erect than others, but before laying it is recommended to draw a diagram with the planned dimensions. Based on it, it will be clear how much materials are needed and where it is better to install the heating system.
This design consists of three zones. These are the most important elements of the system. The lower one is the firebox, then the heater, and above it there is a water tank, if it was originally planned. The peculiarity of the heater is that it is able to warm up even a large room, enriching it with warm and soft steam, as well as hot water when installing the tank.