The stove, no matter how cool and well-made it is, sooner or later fails. The safety margin of any materials is finite – especially when it comes to extreme temperatures. This also applies to a brick oven for the home.
A huge number of country houses have brick stoves and chimneys. And most often the stove is the first to fail.
Today, few people start laying a brick oven again. This is quite expensive and hassle-free compared to modern alternatives. And you still need to try to find a conscientious professional stove-maker.
Therefore, the happy owner of a country house is faced with a question that has already become a classic: “Is it possible to connect a new stove to an old brick chimney?” Adding to the confusion is the fact that all the neighbors around are getting cute sandwich chimneys. What if they are the only ones suitable for new stoves - and the old brick chimney is no longer good for anything?
Nothing like that - new stoves can be connected to a brick chimney. But to do everything correctly, you need to understand a few points.
We'll tell you which ones exactly.
Where to start: the preparatory stage of work
Work begins with a careful inspection of the structure in the ceiling area. In old houses, Russian stoves, as a rule, were built along with the house and used as additional ceiling supports. You can begin dismantling only after making sure that the roof does not rest on the chimney, and its structure will not be damaged after dismantling the ducts.
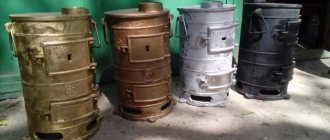
Outdated stove
Dismantling a stove is a dirty and dusty job. If you have to do it not at the stage of a major overhaul, you need to remove everything that is possible from the room and cover the remaining pieces of furniture with film. You can also build something like curtains from thick polyethylene, separating the desired area from the rest of the room.
The easiest ways to remove
The choice of the optimal method for removing whitewash from the ceiling depends, first of all, on the total area of the room in which the work will take place. If its square footage is small, the traditional dry method is quite suitable.
Dry
A spatula is the simplest and most effective tool in the fight against outdated whitewash
It requires the use of a wide metal spatula, thanks to which it will be possible to remove the whitewash from the ceiling layer by layer. In this case, any irregularities that arise can be smoothed out with sandpaper. The advantage of this method is its simplicity and the absence of the need to purchase additional means for removing the old coating. But the disadvantages are labor-intensive, time-consuming and a huge amount of dust.
However, you can get rid of them:
- placing a special box on the spatula. It can be purchased at a hardware store along with the spatula or scraper itself, or you can make it yourself. The uniqueness of this device is that it allows you to avoid dust settling on all surfaces. You can replace it with any container.
- using a grinding machine. It allows you to speed up the whitewash removal process without losing quality and is ideal for large areas.
- gradually applying water with a spray bottle or a wet sponge to the layers of whitewash. Once they are soaked, they can be easily removed with a spatula, thus avoiding the appearance of a cloud of dust. In this case, you can replace the spatula with a scraper.
When choosing this method, you should not soak the entire ceiling area at once. It is much wiser to divide it into several sections and process them in turn. As a rule, the process of wetting the whitewash layer takes 5-10 minutes.
This method is best used in small rooms or in rooms with a small layer of whitewash to avoid the appearance of a large amount of dirt. Meanwhile, its occurrence can also be prevented by simply wiping the swollen layer of whitewash with a damp cloth.
- “tapping” evenly with an ordinary hammer on the old whitewash, especially if it is calcareous and thick. Peeling pieces can be easily removed with a spatula.
Wet
For many years, a wet sponge has remained one of the most popular tools for removing whitewash.
Tools: necessary tools
The set of tools for dismantling brickwork depends on the composition used for the construction of the mortar. Here is a list of tools that will most likely be needed for the job:
- heavy hammer or sledgehammer,
- scrap,
- pick,
- chisel,
- hammer drill,
- steel wedges.
It is recommended to work in a respirator and use gloves to protect your hands. It’s better to choose clothes that you don’t mind throwing away. During disassembly, not only dust will fly, but also soot, and washing it off is very problematic.
Minor problems
Heating systems should be inspected regularly. This will allow you to detect minor defects in time and timely repair the stove in the house, without waiting for serious damage. There are several types of small problems. You can handle all of them yourself. To do this, you will need tools - a trowel, hammers, a plumb line, a tape measure, a level, a container for preparing repair mixtures.
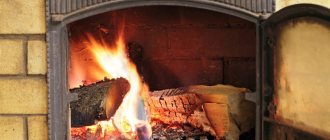
Lack of traction
Such a defect can occur for various reasons. Most often, traction is lost due to violation of operating rules. For example, the stove has not been used for a long time, and a plug of cold air has formed in the chimney.
Interesting video of restoring an old stove with your own hands:
Failure may also be caused by:
- Insufficient air flow. If there is a lack of oxygen, the wood will not burn.
- There is too much wind outside, causing reverse draft.
- The chimney is thoroughly clogged with soot.
If there is no draft, you can try to solve the problem using simple methods or clean the chimney.
Getting rid of an air lock is very simple. You just need to light the firewood not with paper, but with rubber or dry fuel. Until the defect is eliminated, it is prohibited to use special ignition fluids.
If the chimney is clogged, the firebox is first lit, and then a handful of coarse salt is thrown into it. It is important to remember to close the damper immediately. After this, lumps of soot will fly out into the chimney.
If this method is ineffective, you will have to clean the chimney manually using knockout bricks. They can be identified by their special location - they always protrude slightly from the general masonry.
Violation of seam tightness
Detecting a defect is as easy as shelling pears: smoke enters the room, and soot stains appear on the masonry. Stove repair begins with identifying the exact location of the defect. To do this, you need to thoroughly heat it and mark the places of damage.
If the room is filled with smoke, this may indicate cracks in the walls
Repair activities are carried out in the following order:
- The seams are soaked with ordinary water and cleared to a depth of several centimeters.
- The walls around the defect are thoroughly washed with a brush. The water needs to be changed several times during the cleaning process.
- A solution is prepared from sand, clay, salt and asbestos fiber. The resulting mass should have medium viscosity. You don’t have to make the solution, but purchase it ready-to-use.
- The seams are filled with the prepared mixture and sealed. It is important to fill in all existing voids.
After repair, the seams need to dry. The oven must not be used during this time. After drying, the walls of the structure can be plastered or tiled.
Laying fallen bricks yourself is not difficult
In old heating appliances, bricks often fall out or burn out. The damage appears severe, but repairing the brick kiln will not be difficult. The problem area is cleaned, moistened and covered with a clay cake. Then a new brick is prepared. It is also wetted and coated with the same solution as for repairing seams. The new block is placed in place of the old one and securely fixed.
.
Helpful information
The easiest way to work is with buildings made of clay, which becomes pliable after preliminary soaking. Depending on the strength of the masonry, a suitable tool is used in the work, for example, a chisel and a hammer. The point should be directed into the masonry joints - this will not only simplify the work, but also reduce the amount of debris, and also help preserve building materials for later use.
The most difficult thing to disassemble is cement masonry; in this case, soaking the seams will not help. For dismantling, steel wedges are driven into the horizontal seams with a sledgehammer, violating their integrity. After this, the masonry is dismantled row by row using a hammer drill, and if there is no such tool, then they use a crowbar.
Dirty cabin filter
A clogged cabin filter greatly affects the operation of the air conditioner in the summer, but can be the reason why the stove does not heat in the winter. It is good when the filter is located in an accessible place (for example, behind the passenger glove compartment) and is changed regularly. But sometimes it is hidden deep in the depths of the center console, and the car owner does not even know about its existence. As a result, instead of a filter, a “bed” of dust, leaves and insects is formed there.
Regularly replacing the cabin filter is important not only for the heater, but also for human health, because passengers breathe the air passing through it. Car manufacturers recommend changing the cabin filter every 10,000 km. And if you often drive on dusty dirt roads, then the replacement interval should be halved.
How to disassemble a chimney
Most often, in one-story houses, the pipe leaves the furnace and is led outside through the ceiling and roof. Less common are complex smoke circulation channels located in the walls of a building. Sometimes you can find an external chimney rising next to the wall.
Dismantling begins with the pipe
The easiest way is to dismantle the pipe coming out of the furnace. It will not be difficult to remove the metal pipe, after first loosening it in different directions.
If the pipe is made of brick, it is carefully disassembled brick by brick, moving from top to bottom and trying not to damage the ceilings and walls. Dismantling begins from the area rising above the roof. To lay the outer part of the pipe, cement is always added to the solution, so it will be more difficult to work here than with other areas. It is even more difficult to disassemble plastered bricks, but what should add strength is that further work will go faster and easier.
Having completed disassembling the outer pipe, they smoothly move into the attic. But first, they cover the resulting hole in the roof with a sheet of roofing iron or cover the roof with the same material that covers the entire roof. To prevent the plaster on the ceiling from collapsing, it is recommended to make grooves around the perimeter of the pipe from the side of the room. Seams made of sand-clay mortar can be easily broken with a chisel and hammer.
Part of a pipe in the attic
Requirements for facing materials
A furnace is a structure whose materials work under emergency conditions. Facing is no exception. There are certain requirements for the finishing material of the stove. He must:
- Withstand high temperatures.
- Possess the property of high heat transfer.
- Be resistant to mechanical damage.
- Have good adhesion to the fastening solution.
- Be attractive and have an aesthetic appearance.
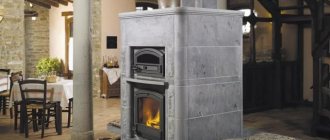
Experts recommend lining stoves with brick, ceramic tiles (terracotta or majolica), tiles or natural stone (marble, basalt, sandstone, slate and granite). More recently, the use of soapstone and artificial stone has become popular. Some resort to the simplest methods, such as plastering or painting.
Photo gallery: beautiful stoves
You can combine different types of cladding
Painting the stove and applying patterns can be an economical decoration option.
Brick finishing looks very aesthetically pleasing
Ceramic tile finishing is most often done
Covering the stove with tiles will make it unique
Natural stone in the finishing of the stove looks very status
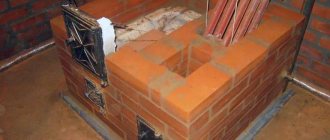
Features of dismantling the furnace walls
Having completed the work in the attic, they proceed to dismantling the stove in the house. There is no need to rush to remove the doors - it is better to close them tightly to prevent soot from entering the room. Some inexperienced craftsmen make a common mistake and try to speed up the process by breaking the masonry at the bottom of the structure - this cannot be done, since the heavy brick structure can collapse and damage the floor covering.
Another mistake that is also made by non-professionals who want to speed up the process is removing the stove from the room without dismantling the masonry. Indeed, if the hearth is on a foundation and the first row is made without mortar, this is possible. But a standard stove weighs several tons, so only a few people can lift it and carry it without dropping it. In this case, you need to carry the load correctly so that the structure does not fall apart along the way. Considering that during operation, the masonry weakens significantly, the risk that the stove will collapse and cause damage to the floor is very high.
It is better to act slowly, gradually dismantling the walls, moving in a circle. If the structure is tiled, you will first have to get rid of the cladding using a hammer drill. You don’t have to completely remove the plaster, but you will have to clean it at the seams. Naturally, the smaller the stove and the simpler the design of the heating center, the faster the process will go.
The structure is being dismantled row by row
When working with a Russian stove, difficulties arise when dismantling the vault - here it is recommended to place a sheet of iron and make supports so that the structure does not collapse prematurely. It is best to disassemble the vault from the rear wall.
If the furnace has a separate foundation, then it should also be dismantled. A brick or stone foundation can be easily destroyed with a crowbar, and a concrete slab can be broken with a jackhammer.
Before you begin dismantling the stove in your home yourself, it is recommended to weigh all the benefits and risks. Sometimes calling a professional with special equipment is cheaper than eliminating the consequences of trying on your own.
How to flush a stove radiator without removing it
Prepare everything you need
Almost everything you need for cleaning can be found in any garage, or purchased in addition at the nearest auto and household store.
- 150–200 g citric acid;
- bucket for 8–10 l;
- container for draining antifreeze;
- hose about 3 m long;
- clamps;
- wires;
- mesh, gauze or nylon;
- water;
- antifreeze for topping up;
- transfer pump;
- boiler or stove;
- spanners;
- screwdrivers.
Understand the essence of the process
The principle of flushing the stove radiator is as follows. The heater is disconnected from the cooling system and a pump with hoses is connected to it. The chemical is dissolved and heated in a separate container, and then the flushing liquid is circulated through the radiator using a pump. This allows you to dissolve and wash away all accumulated dirt.
To prevent garbage from getting inside again, it is collected and removed at the exit using an improvised filter made of gauze or old nylon tights. Then the radiator is washed with clean water and the standard cooling system hoses are installed in place.
Remove the terminals from the battery
When removing the radiator hoses, you may have to disconnect several wiring connectors. Therefore, in order to avoid errors in the control system, it is better to de-energize the on-board network by removing the terminals from the battery. First negative, then positive.
First make sure that the heater is set to maximum heat. If the control is carried out using a tap, then in the closed position it will block the flow of liquid and interfere with flushing.
Drain the coolant
The heater is filled with antifreeze. To prevent liquid from leaking onto the floor when you remove the pipes, you need to drain it into a previously prepared container through the plug on the main radiator.
Since the stove is not the lowest point of the system, you can drain not all the antifreeze, but only part of it. With due care, this can be done directly through the pipes during removal.
Remove the pipes from the heater radiator
Locate and disconnect the two thin pipes that go into the interior. They are located between the engine and the engine compartment bulkhead. Usually they are easy to detect, but if you can’t or are afraid to make a mistake, check the car’s documentation or search on the Internet.
Then simply loosen the clamps and remove the tubes by rotating from side to side. Be prepared for some more coolant to leak out of them.
Connect hoses and pump
Take any hoses of suitable diameter (usually 16 or 18 mm in diameter), put them on the heater pipes and secure with clamps. Connect the free end of one of the hoses to the pump, wrap the other with gauze and lower it into a container for rinsing. Also attach a small piece of hose to the pump to collect liquid.
You should end up with a pattern similar to the one in the photo. As a pump, it is most convenient to use an additional heater pump from the Gazelle, which is sold cheaply in any car store. Other options include a circulation pump from a boiler or a country pump for irrigation.
Prepare and heat the wash
To remove dirt and scale, specialized products, sewage cleaning reagents, caustic soda and regular citric acid are used. The latter is the safest and no less effective.
Take 5–6 liters of water and add 150–200 g of regular citric acid, stir well and heat the solution. You can heat it using a boiler, on an electric stove or from a gas burner. For maximum effect, the water temperature should be at least 75 °C, and preferably close to boiling.
Start the pump
Fill the pump intake hose with the solution, quickly dip the tube into the container and turn on the pump by applying power. After this, the flushing process will begin: the liquid will circulate, draining into the bucket and again flowing from it into the radiator.
If the heater is too clogged, water will flow out of it in a weak trickle at first. Then, as the solution is exposed, the pressure will increase.
A complete flush takes from one to several hours, depending on the condition of the radiator. If the contamination is strong, you may have to change the solution to a fresh one.
The main thing is to change the direction of circulation every 15–20 minutes, swapping the hoses on the pump. This will help remove as much dirt as possible.
When relatively clean water flows out of the radiator in a good flow, the flushing can be considered complete.
Flush the radiator with water
At the end of the process, you need to wash off the remaining citric acid so that it does not later mix with the coolant in the system.
To do this, it is enough to run several liters of distilled water through the radiator. Drain off the remaining solution, rinse the container, then fill it with water and start the pump as in the previous step.
Fill with antifreeze
After all manipulations with a stream of air, remove any remaining water from the radiator and disconnect the flushing hoses. Install the standard ones in their place and secure with clamps.
Check everything again and make sure the plugs are closed. Next, fill in the antifreeze that was drained earlier, and if necessary, add new one so that the level in the expansion tank corresponds to the norm.
Remove air pockets
When removing pipes and flushing, air pockets inevitably form in the cooling system. Over time, they will come out on their own, but because of them, the heater may work intermittently, so it is better to get rid of the air right away.
To do this, you need to drive onto an overpass or a steep hill to raise the car’s radiator as high as possible, and press the gas firmly several times. At this moment, a gurgling sound will be heard inside the heater, which will stop after the plugs come out.
Preparation
The job of dismantling the stove is dusty and dirty. Furniture and things from the room must be removed or covered with film. If repair work on the floor is not planned or it is new, it should also be covered.
Before disassembling a brick stove, you need to inspect its chimney. It can be iron or brick. The technology for dismantling it depends on the design of the furnace. If the stove is old, then there is a chance that its chimney is being used as a support for the ceiling. They did this before, building Russian stoves at the same time as the house. If this is the case, then you won’t be able to disassemble it yourself. A specialist is needed here.
Return to contents
Preparation
The job of dismantling the stove is dusty and dirty. Furniture and things from the room must be removed or covered with film. If repair work on the floor is not planned or it is new, it should also be covered.
Before disassembling a brick stove, you need to inspect its chimney. It can be iron or brick. The technology for dismantling it depends on the design of the furnace. If the stove is old, then there is a chance that its chimney is being used as a support for the ceiling. They did this before, building Russian stoves at the same time as the house. If this is the case, then you won’t be able to disassemble it yourself. A specialist is needed here.
Serious problems
Sometimes the damage to the brickwork is so serious that in order to restore the functionality of the heating system, individual parts will have to be completely replaced. Most often, craftsmen have to change the lining of the firebox, which consists of fireclay bricks.
If there are serious faults, you should entrust the repair to specialists
If the damage is not global in nature, then you can cope with the task directly through the firebox window. For restoration you need to use a fireproof mixture. All defective areas are carefully covered with it.
In case of serious damage, some of the bricks will have to be replaced. This must be done in the following sequence:
- Prepare the repair mixture in advance.
- Soak and remove the old mortar in the area where the brick will be replaced.
- Remove damaged lining elements.
- Thoroughly clean the vacated areas, moisten them with water and lubricate them with the repair mixture.
- Install new fireclay bricks and carefully seal the seams with refractory mortar.
When replacing individual lining elements, you need to ensure that the new brick is homogeneous with the old one. Otherwise, due to the difference in thermal expansion, the destruction of the furnace protection will continue.
It is possible to completely replace fireclay bricks in a firebox only by completely disassembling the wall. This is a difficult job that should not be performed without experience, as there is a risk of serious damage to the underlying masonry.
Serious repairs also include repairing the chimney and switching the brick stove to a different type of fuel. In the first case, you will have to go through the masonry and re-plaster it. In the second, you will need to completely redo the firebox.
Average defects
For more serious damage, more effort will have to be made to repair the stove. It may be necessary to strengthen individual structural elements.
Gaps around the firebox
This element is constantly exposed to physical stress and temperature changes. Over time, cracks appear around it, dangerous because carbon monoxide from the firebox can begin to penetrate into the room. To prevent trouble from happening, it is important to repair the brick oven in a timely manner. We are talking about compacting damaged areas.
The cracks must be sealed as quickly as possible to prevent carbon monoxide from entering the room.
You need to act in the following order:
- Thoroughly clean the surface around the door.
- Remove all old solution.
- Prime the cleaned surface with heat-resistant glue.
- Lay asbestos cord around the door. It will act as a thermal protector and prevent the destruction of the clay solution in the future.
- Seal the cracks with repair mortar.
After restoration, the stove cannot be used for 24 hours. After this, you need to heat it thoroughly and check that the door is securely fastened.
Using exactly the same principle, gaps around the hob are eliminated. The only difference is that the asbestos cord can be replaced with other fire-resistant materials.
Strengthening the frame and replacing the grate
If cracks appear around the entire perimeter of the oven, its walls will need to be strengthened. The most reliable way is to completely go through the masonry, but for many people this work is beyond their capabilities, so you can resort to tightening the frame with metal wire.
The screed is carried out as follows:
- Horizontal channels with a depth of no more than 20 mm are cut into the outer walls of the furnace.
- Wire is pulled along the grooves.
- The required quality of the screed is ensured by the beard. You need to act carefully so as not to damage the wire.
After the work is completed, the wall is plastered or improved in any other way.
After completion of the repair, the stove can be plastered or tiled to suit your taste.
When replacing the grate, you should pay attention to the fact that you need to leave a gap between it and the walls of the oven . The new element should not differ in size from the old one. After installing the grate, the gap between it and the brick walls must be filled with sand.