Despite global progress in the field of gasification, in some settlements there is no main fuel supply. As an alternative, you can build a brick stove with a water heating boiler with your own hands. This will reduce the cost of heating the building and solve the problem of lack of hot water supply.
A brick stove with a water heating boiler will reduce heating costs.
Features of a brick kiln with a water heating boiler
Since ancient times, people have heated their houses with wood. This is a cheap and effective way to organize a heating system, which is still in demand today. In cities and cottage villages where there is no central gas supply, stove systems are becoming quite popular. However, they are not capable of heating a large room with several floors, an attic and a basement.
To increase the efficiency of wood burning, you can connect a water circuit to the stove. It will ensure uniform distribution of heat throughout all parts of the building and provide access to hot liquid for domestic needs.
System characteristics
When choosing a stove system for your home, you need to clarify the following parameters:
- Power. The performance of the installation affects its dimensions and weight. If the stove is small, then it does not need to be equipped with a solid foundation. More massive units require a reliable foundation.
- Heated area. It determines the heating efficiency. For 50 cc m of room you need a 2 kW boiler.
Devices with a water circuit are used in cottages with an area of more than 180 square meters. m.
Principle of operation
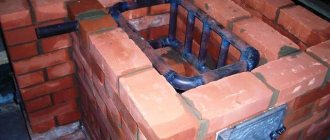
In addition to the fuel loading compartment, a heat exchanger is installed in the furnace. It is built into the chimney or firebox. The water passing through the register is heated and then sent to pipes and radiators, ensuring efficient heat transfer. Liquid circulation in the circuit is created by a temperature difference or a pump.
Construction of a brick stove with a water heating boiler.
During the heating process, water increases in volume, so an expansion tank is used to prevent the equipment from exploding. In models with a closed circuit, it is installed in any convenient place. When it comes to open systems, the container is at its maximum height.
The pressure is released using an automatic air vent.
Advantages
Water-cooled furnaces have several positive qualities:
- Energy efficiency and cost-effectiveness. The construction of the structure does not require large financial costs. At the same time, to purchase firewood for the entire winter season, you will have to spend no more than 5–10 thousand rubles.
- Design. Stoves complement the interior of any room and hide defective areas.
- Autonomy and independence from gas supply lines. The structure can be installed in any home, regardless of its location.
In addition to intense heat transfer, such a unit maintains a high water temperature in the circuit for a long time.
How to increase the efficiency of a solid fuel boiler, including one made by yourself
The disadvantage of all solid fuel boilers is that some of the heat is carried away into the chimney, reducing their efficiency - especially with a straight and high chimney. To reduce heat loss and increase the efficiency of solid fuel boilers, you can use the methods that I used in my home.
The first method is to use the energy of flue gases to additionally heat the room
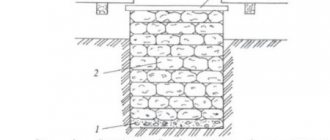
To do this, it is necessary that the solid fuel boiler is located in the basement or on the ground floor of the house and that the height difference between the bottom of the boiler firebox and the upper cut of the chimney is large enough - at least 7 m.
To use the heat that is carried away into the chimney, a heating stove or heating panel is erected in the room or between rooms. The solid fuel boiler is positioned so that it is under the stove or shield. The design of the heating furnace is carried out in such a way that flue gases from the boiler pass through its smoke circuits. At the exit from the firebox of the stove, a valve is installed, which closes when the boiler is fired and opens when it is necessary to heat the stove, for example in the off-season, when the boiler is not yet heated or in another case.
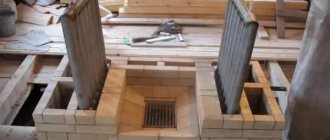
Rice. 7
Option for the location of a solid fuel boiler (horizontal) in the house: 1 - heat exchanger; 2 - boiler body; 3 - slab or 14 - brick vault (optional); 4 - return; 5 - circulation pump; 6 - shut-off valves; 7 - pipe with heated water (supply); 8 - stove firebox; 9 - oven; 10 - valves; 11 - floors; 12 — expansion tank of the heating system; 13- smoke channels of the furnace; 15 - combustion door; 16 — blower chamber.
If you build a heating panel instead of a stove, then there are no problems at all, since it consists only of smoke channels. The length of the smoke channels is calculated as when laying the stove.
With this option, the smoke channels of the stove or panel accumulate part of the heat of the flue gases from the boiler, and subsequently release them into the premises. Even when the heating radiators have already cooled down, the walls of the stove radiate heat for a long time, which would simply go outside.
The second method is to use gas energy to heat water.
In addition, you can install a homemade water heater on a solid fuel boiler, the water in which will be heated by hot gases coming out of the boiler through a metal chimney. The easiest way to make such a water heater is from two pieces of metal pipes with a diameter of 300-400 mm and 100-110 mm. The inner pipe serves both as a chimney pipe for a solid fuel boiler and as a heating element, transferring the energy of flue gases to water.
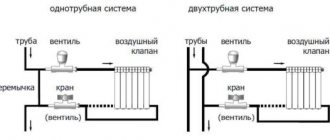
Types of systems
Furnaces with a water circuit differ in the features of coolant circulation. In some systems, fluid movement is ensured by a temperature difference, while in others it is achieved by a pump.
Natural
Liquid circulation is determined by physical processes and does not depend on power supply. At the same time, for the correct operation of the system, the installation of pipes with an increased diameter is required. The oven takes longer to heat up, but it cools down more slowly.
Natural circulation does not depend on power supply.
Forced circulation
The equipment has a pump that operates in continuous mode and is responsible for the constant movement of coolant between the radiators. Its disadvantage is its dependence on electricity supply. If your area often experiences power surges or other network failures, it is better to install an uninterruptible power supply with rechargeable batteries.
Masonry features you need to know about
- Maintaining order is a prerequisite for the construction of a brick oven with a water heating boiler. Otherwise, you may block certain channels poorly, etc.
- The thickness of the seams should be from 3 to 5 mm. It is important that this thickness is the same everywhere. In addition, make sure that the seams are located strictly in a horizontal straight line.
- Performing ligation of sutures is the same mandatory condition as strictly following the order.
- All metal furnace elements are installed simultaneously with brick laying. If you leave this for later, that is, try to do it after finishing laying the row, you may not be able to install certain parts.
- The door is secured to the masonry using metal wire. Having pulled it through the holes in the door itself, the ends are mounted directly into the seam of the brickwork. When the solution hardens, the connection will be as strong as possible.
- Having laid 2-3 rows, leave them for a day to dry. It’s better to take your time and do everything efficiently than to build a stove in a day and then discover a lot of flaws in it.
Preparatory activities
Organizing stove heating involves preparing drawings, choosing a suitable location for pipes and radiators, as well as competent calculation of power. Next, a register is made or purchased and the structure with a built-in heat exchanger is laid.
Calculation of power and dimensions
The efficiency of a heat exchanger is determined by the materials from which it is made. Cast iron products of the MS-110-300 and MS90-300 series have a power of 0.14–0.16 kW/sq. m for the rib. Taking into account such figures, it is possible to predict the number of sections for heating each circuit. For 10 sq. m of area you need at least 1 kW. For a building of 60 sq. m. requires a register with a power of 5.5 kW.
The efficiency of a heat exchanger is affected by the materials from which it is made.
The dimensions of the furnace system are 1020x1160x2380 mm. The heat exchanger has dimensions of 750x500x350 mm.
Required materials and tools
To assemble the stove you need to prepare:
- A sufficient amount of fireclay and solid bricks with fire-resistant properties.
- Furnace and blower doors.
- Grate.
- Steel corners and strips.
- Valves for ovens and cooking chambers.
- Pre-furnace sheet.
The tools you will need are a basic stove set and containers for mixing the solution.
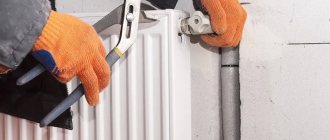
Radiator assembly
Assembling radiators is a simple process, because it completely repeats the process of disassembling them. The sections are connected by nipples that have left and right threads on both sides. This way, the sections at the top and bottom will be pulled tightly against each other when the nipple is turned. When the gap becomes 2 cm wide, you should wind the asbestos-impregnated cord and only then tighten the nipples completely.
When the entire structure is assembled, you should wait for the drying oil to dry, and then check the joints for leaks. that is, supply water under high pressure to the radiator. This will ensure the subsequent use of the radiator and there will be no leaks.
The return and coolant supply pipes must be connected diagonally to the radiators. Holes that remain open must be closed with plugs. It is better to take inch pipes. On one side of the radiator there will be a right-hand thread, so there will be no difficulties with connection. On the opposite side, use a coupling with a squeegee and a nipple.
Laying a brick stove with a water heating boiler
The manufacture of the system begins with the construction of the foundation and the preparation of the necessary materials. Initially, the first brick row is laid out, excluding any distortions. It is important to avoid vertical or horizontal deviations, since the future reliability and efficiency of the structure depend on this.
The reliability and efficiency of the structure depends on the bricklaying.
What dimensions should the chimney have?
Chimney placement options.
The draft in the chimney channel will occur due to differences in the height of the inlet and outlet, as well as due to temperature differences. To ensure continuous operation of any heating device, you will need to make a strong draft
Before starting masonry, it is important to decide what type of heating device will be used, what dimensions it has and how many channels it is planned to make
The number of channels can be determined taking into account the power of the heating device, fuel and the special requirements of the device manufacturer.
If the diameter of the chimney channel significantly exceeds the calculated value, the draft in such a channel will greatly decrease. As a result, there will be frequent interruptions in the functioning of a gas boiler or other heating device. If the channel diameter is smaller, this may impede the removal of combustion products. It is for this reason that in most cases the operation of boilers stops.
To make brick channels, you will need to use ceramic brick grade M50-75. You can also use concrete blocks that have channels with a square cross-section.
If you plan to use ceramic bricks to make a chimney, then you should know that its minimum cross-section is 14x14 cm. If you plan to purchase material with a round cross-section, then the permissible diameter is 15 cm or more.
In a brick chimney whose height is less than 5 m, the dimensions of the channels must be increased to 14x20 cm or 18 cm in diameter. Such structures should be made in the walls between rooms that are planned to be heated. In this way, it will be possible to create a certain protection of supporting structures from cooling, which in most cases leads to a weakening of traction.
It is necessary to try to group the chimney channels so that in the device that will be installed above the roof, their number is maximum. In this way, it will be possible to reduce the cost of manufacturing work and significantly improve the performance of the chimney device.
Heat exchanger placement options
The main element of the furnace unit has a complex structure. It can be installed both in the chimney and in the combustion chamber.
Down the chimney
With this method of installing the heat exchanger, the firebox will heat up evenly and to the maximum level. The heating intensity is adjusted by the length of the coil.
Due to the lack of direct contact with fire, the element retains its performance properties longer. In this case, installing a heat exchanger in the chimney leads to an increase in the dimensions of the candle.
The register can be integrated into an already finished structure only after dismantling the chimney. To avoid mistakes, you need to design the masonry order in advance.
Into the furnace
This option increases the efficiency of the furnace system, since under the influence of flue gases the pipe will heat up to the maximum. External and internal coils slightly cool the external surfaces and maintain the optimal degree of heating.
Under the influence of gases, the furnace pipe will become very hot.
The heat exchanger has 2 pipes. The top one is combined with the pipe and storage tank, and the bottom one is combined with the heating circuit.
Safety regulations
The main rule is not to close the oven view ahead of time. Kuznetsov’s boiler works on the principle of a gas view - cold gases do not mix with hot ones, so the stove does not cool down much. If you close the view ahead of time, carbon monoxide may enter the room, causing poisoning.
The boiler is especially afraid of overheating - the boiling coolant will rupture the heat exchanger. Therefore, in severe frosts, if the power is not enough, resort to additional heating of the room with electric heaters.
When installing a water pump in the heating system, operating efficiency increases.
When firing, some parts of the stove become very hot. Keep small children away from doors and do not let teenagers heat the house.
While burning, keep the door either closed or slightly open, as escaping embers can cause a fire.
An “apron” made of ceramic tiles or a sheet of iron is installed in front of the stove.
Soot is removed twice during the heating season. Its accumulation in the chimney can lead to a fire.
A brick stove is an excellent option for heating a home. The rules for safe use are simple and intuitive.
Algorithm of actions: step-by-step instructions
In order for a stove with a water heating boiler to provide maximum heat transfer, it is necessary to design it correctly: follow the order of the masonry and take into account stove construction technologies.
Foundation
The type and thickness of the base are determined by the dimensions of the heat generator. Classic Russian stoves require massive strip pedestals. For small systems, a concrete pad of 10-15 cm is suitable. In some cases, it can be fixed to a frame made of reinforcement.
Brick
Fire-resistant ceramic bricks are used for external walls. The foundation can be built from used material. In this case, it is better to line the internal coatings of the firebox with fireclay stone. The façade will be finished with facing bricks.
Brick is used to install external walls.
Solution
The masonry mixture is prepared according to the classical scheme: sand and clay are poured with water and mixed with cement until a homogeneous consistency is obtained. You can also purchase a ready-made solution with special additives.
Masonry
For a strong foundation, it is important to form high-quality seam binding. They should not coincide, as this will affect the strength of the structure.
It is better to place the seams of the bottom section in the center of the bricks of the next row.
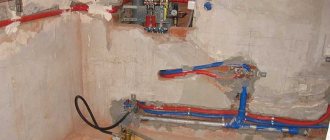
Circuit
The pipeline consists of a supply from the furnace and a return to it. In the room farthest from the stove, both branches are connected. In other rooms they run in two lines along the outer walls.
On a note! This option is cheaper than a system with radiators and is easier to install.
Negative aspects of designs
To assemble a stove yourself, you need experience in masonry and a set of professional tools. In addition, you should understand the installation of the heating system.
Other disadvantages of the units:
- Fire hazard. Since the stove has an open fire, it is necessary to take safety measures to prevent the ignition of flammable objects.
- Solidity. The structure takes up a lot of space, so its location should be considered at the design stage of the facility.
- Uneven heat distribution. It is always much warmer near the stove than in other rooms.
- Slow heating stop. When using closed circuit models with a circulation pump, the water may boil in the event of a power outage. To avoid such problems, it is better to choose devices with combined coolant circulation.
- The need to drain the liquid when the oven is rarely used. If you do not do this, it will freeze, destroying important elements of the structure.
- Possibility of carbon monoxide poisoning. To minimize possible harm, it is necessary to correctly form the chimney channels.
Helpful tips and general expert advice
In some rooms it is necessary to build stoves into a niche or install them on rectangular / square bases. To do this, you will need to mark and pour the foundation. After assembling the body, taking into account the order, secure the doors, combustion chamber, hob and other elements.
During the first heating, you need to heat the stove to maximum. This will allow you to evaluate its performance and effectiveness.
Drawings of the future stove can be created with your own hands or ordered from professionals. If you do not have experience in design, it is better to entrust the work to specialists. They will offer ready-made schemes tailored to your requirements.
Is it possible to line a metal stove with bricks?
Metal stoves work as convection heaters. The room is heated through natural air circulation. Heated air currents spread inside the building and warm it up.
An air-heating furnace lined with brick will not only maintain its thermal efficiency, but will also provide more uniform heating. After the wood burns out, the brickwork will retain heat for a long time.
Covering a metal stove with brick in a house is not only possible, but also necessary. When performing work, several conditions are observed:
- Preservation of hot air convection - the efficiency of the furnace depends on the unhindered entry of cold air into the firebox and the removal of heated air. When facing, the presence of convection channels is provided.
- An air gap between the brick and the furnace body - when facing, a mandatory gap is left. The condition under which the gap remains the same on all sides of the furnace is considered undeniable. Violation of the proportions leads to a decrease in the stability of the furnace and a decrease in heat transfer.
The technological process of lining an iron stove with bricks is simple; you can do it yourself. You can find many detailed serial masonry schemes.
In order for the stove cladding to be successful, you need to choose the right building material and installation mixture, as well as follow several recommendations from experienced stove makers.