Today, the construction of buildings can be made from various materials. New, cost-effective construction technologies from combined materials are gaining popularity, but despite all the new products, brick construction is considered the most reliable, and buildings are warmer and more durable.
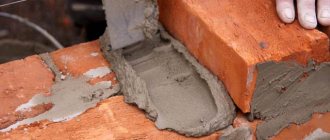
An important element of brickwork is the mortar, which is used to create a durable structure from individual elements.
Requirements for mortar for bricklaying
The main requirements for the solution are the requirements for strength and durability.
Based on strength, solutions are marked from M4 to M200. Frost resistance - from F10 to F200.
Important!
In terms of strength, the solution must meet the requirements of the project, and in terms of durability - the operating conditions of the structure.
It is interesting that the strength of brickwork on fresh, unhardened mortar is 3 times less than the strength of the same masonry on hardened M100 grade mortar.
In addition to strength and durability, an important requirement is sufficient mobility of the solution and its moisture-holding capacity.
The point is not only that a mobile solution that is not prone to delamination is more convenient to work with and saves time, but also that such a solution compacts and fills the seams better, as a result of which the strength of the masonry can increase by 1.5–2 times .
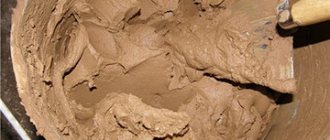
Methods for testing clay quality
There are ways by which you can check whether this building material is suitable for laying a stove. The most common is to form a ball from a clay solution and throw it onto the floor with all your might. If the result is that the ball falls apart, it means that the mixture contains a lot of sand and not enough clay. If cracks appear, we can say with confidence that there is a lot of sand. If the ball has completely retained its structure, then the solution is mixed perfectly. Here are the most popular methods for determining the quality of a clay mixture for laying a stove.
First way
Take 0.5 liters of clay, add a small amount of water to it and mix the mixture with your hands until the solution stops absorbing water . A ball with a diameter of 5 cm is made from the resulting mixture and dried for three days under normal conditions. If it cracks during this time, then sand should be added to the clay. But if there are no cracks and the ball does not fall apart when dropped from a height of 1 meter, then this clay is ideal for mortar.
Second way
Take 3 liters of clay, place it in any bowl , fill it with water and knead it with a paddle. If the clay sticks to it very strongly, it means it is greasy and sand should be added to it. If individual grains stick to the oar, then such a solution is normal and can be used for laying stoves. But if the oar is covered with a thin layer of clay, it means that it is thin and fattier clay should be added to the solution.
Third option
This is the most accurate way to determine the quality of clay that will be used to create a brick oven. You need to take 0.5 liters of clay and knead it with your hands until it becomes stiff. From the resulting solution, roll a ball with a diameter of 5 cm and place it between smooth boards, with which you must carefully squeeze the ball. This must be done until the ball cracks.
If such a ball is made of thin clay or loam, then with a slight push it will fall into pieces. A ball made from richer clay cracks 1/5 of the diameter during compression. Normal clay, when compressed, will crack only 1/3 of the diameter, but oily clay is covered with small cracks by half.
From the same solution you can also make flagella having the following dimensions:
- length 20 cm;
- thickness 10 – 15 mm.
After this, they are stretched or bent into a ring around a pin or a rolling pin with a diameter of no more than 5 cm. Now you need to monitor what will happen to the flagellum. If it is made of fatty clay, it begins to stretch smoothly and slowly, forming sharp ends at the break site, and when bent, cracks do not appear.
made from normal clay will stretch smoothly and evenly, and the thickness at the break points will differ slightly from the original, and cracks may appear when bent. If the flagellum is rolled out of thin clay, it will practically not stretch, and when bent, an uneven tear will occur with the formation of numerous cracks.
What are the types of masonry mortars?
The main component in masonry mortar is the binder. Solutions can be prepared on the basis of cement, lime, clay, gypsum. In low-rise construction, as well as in cases where there is no need to use high-grade mortars, local binders are used, widely available in the region, for example, lime-slag or lime-ash cement.
Since each binder has its own advantages and disadvantages, complex mortars are also prepared using several types of binders, for example, cement-lime, cement-clay mortars.
In addition to the binder, the composition of the masonry mortar includes:
- sand,
- water,
- additives of mineral or chemical nature.
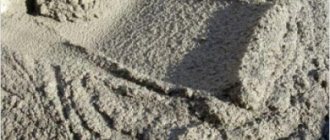
For brickwork, mortars mixed with sand with a maximum particle size of 2.5 mm are used.
Important!
The composition of the solution is selected depending on the following factors:
- bearing capacity of the structure,
- operating conditions of the product.
The solution recipe takes these factors into account and is selected depending on the selected type of binders and sands.
Main types of masonry mortars:
- cement;
- lime;
- cement-lime;
- cement-clay.
Cement masonry mortar
The cement mortar is prepared on the basis of cement (Portland cement), which is a water-hardening binder. Cement forms a strong material in the presence of water through hydration reactions.
Typically, cement mortars are used where the structure is exposed to aggressive environments (including humidity). Foundations and plinths are always made with cement mortar.
The advantages of cement masonry mortars are:
- strength;
- durability;
- water resistance, frost resistance;
- resistance to the development of fungus and mold;
- no restrictions on use (can be used, for example, for structures that will be used in conditions of high humidity, exposure to low temperatures or aggressive environments);
- rapid strength gain, which is especially important in multi-story construction.
Among the disadvantages of cement mortars are their high specific gravity, rigidity, and low mobility, which affects not only ease of use, but also how well the work will be carried out and, ultimately, how durable the structure will be.
To make the cement mortar more mobile and workable without adding excess water (which entails a loss of strength), plasticizing additives are used.
Important!
The depth of immersion of the cone in cement mortars for brickwork is from 9 to 13 cm.
The cheapest additives of this kind are slaked lime and clay. But their use is not always convenient. The lime must be slaked, that is, mixed with water and left for several days while the reaction occurs. Clay must have certain characteristics.
Special plasticizing additives are very convenient to use, for example, CemStone, which completely replaces clay and lime in cement masonry mortars. The supplement is laboratory tested and comes with clear instructions for dosing and use. It provides masonry mortars with all the necessary properties:
- increases the “lifetime” of the solution (up to 5 hours), thus allowing you to mix it in large quantities at once and save time or order it at a mortar unit;
- eliminates the delamination of the solution, as a result of which it does not require constant stirring;
- increases the efficiency of cement, allowing the use of even stale cement;
- does not cause corrosion of metal embedded parts and fittings;
- reduces the time for full strength gain (7 days instead of 28 days, which is required for a solution without additives);
- gives the solution increased characteristics of water resistance and frost resistance.
Hardening of the cement mortar occurs within 28 days, after which the mortar gains its design strength. The strength gain does not occur linearly: the fastest rate of hardening is observed immediately after laying the mortar, then it gradually slows down. Therefore, the more time has passed, the less adverse external influences affect the hardening process.
Adverse effects include too high or too low ambient temperatures and low air humidity. The optimal air temperature is +18–22° C and almost one hundred percent humidity.
Important!
The lower the ambient temperature, the slower the rate of strength gain, as can be seen in the table. At temperatures below +5°C, strength growth stops. Subsequently, when the air temperature rises, the solution gains strength, but is less durable than when cured under optimal conditions.
Obviously, it is impossible to avoid the work of laying bricks at low and subzero temperatures, because in this case it would be necessary to postpone construction for several months, which is not economically feasible.
In these conditions, masonry work can be carried out without compromising the strength of the structure if you use anti-frost additives, for example, CemFrio and HotIce from CEMMIX, which not only allow you to work at negative temperatures (down to –20°C), but also have plasticizer properties, as well as provide the following benefits:
- saving cement up to 10% without loss of strength;
- increasing the mobility of the solution;
- elimination of solution delamination during transportation and storage.
Additives CemFrio and HotIce are compatible with any type of cement and are safe for humans.
All about the material, its advantages and types
Thanks to the use of facing bricks, the external defects of the building are hidden. If facade brick is used for old buildings, then it perfectly hides the presence of cracks on the walls of the house that appear due to load. But not only old houses require finishing - the brick facade of a new house looks even more impressive. Previously, many buildings were erected using brick, but now it is customary to use facing bricks specifically as a finishing element for the facade.
Facade bricks are:
- Facial
- Clinker
Thanks to the use of facing bricks, external defects of the building are hidden
Both are used to decorate the exterior walls of the house and give it a beautiful appearance. The use of clinker is necessary for houses that are made using three-layer wall technology. Of course, the expenses for such a facade will be greater, but the benefits will also increase. A favorable microclimate is created inside houses with three-layer walls, and all thanks to the fact that the thermal insulation is distributed as evenly as possible between the load-bearing and outer walls.
The use of clinker bricks has a number of advantages:
- The material has high mechanical strength
- Frost-resistant and non-flammable, and also serves as a barrier to fire
- Not afraid of corrosion and pollution
- A huge selection of clinker facing material allows you to perform a variety of finishes, which allows you to make your house beautiful and attractive
Clinker brick facade
In addition to a large selection of shades, the facing material is also available in black and white. And if you take advantage of this and make the facade of your house from facing bricks of different colors, you can achieve incredible effects and show everyone that you have taste and imagination. The shapes of clinker bricks are varied; they can have rounded edges or chamfered edges. Clinker facing bricks can be perfectly combined with wood, stone and metal, so various combinations of clinker material and other facade elements will give an original appearance.
Nowadays it is customary to use facing bricks precisely as a finishing element for the facade.
Repairing the brick façade is a major challenge. The cause of cracks on the wall can be not only time, but also shrinkage of the house or improper design. Sometimes it is possible to use overlays and metal belts - they strengthen the wall of the house and prevent further destruction.
Lime mortar for masonry
Our distant ancestors used lime masonry mortars to erect magnificent buildings that have stood for centuries and are still standing.
The fact is that slaked lime, an air-curing binder, gains strength in air, and this process continues for a long time. Even after years, such a solution continues to gain strength.
But for construction work, such a slow increase in strength is rather a disadvantage, because we want to get a strong structure not in 100 years, but in a few weeks. The use of lime masonry mortars in multi-story construction is especially inconvenient, since you have to wait a long time before starting the construction of the next floor.
The advantages of lime mortars include their low thermal conductivity, good plasticity, and high hygienic properties (they “breathe”). However, they are quite fragile and unstable to high humidity.
They are used only for masonry that is located above ground level and is not in contact with the ground.
Air lime
Construction air lime is produced by burning calcium-magnesium carbonate rocks (limestones).
Construction aerial lime ensures hardening and preservation of the strength of mortars in air-dry conditions.
Lime is fired at a temperature of 1000-1200 ° C, without bringing the material to sintering. When calcining carbonate rocks, they undergo decarbonization, i.e., complete removal of carbon dioxide. Calcium carbonate and magnesium carbonate decompose into calcium oxide CaO, magnesium oxide MgO and carbon dioxide CO2, which is removed from the furnace along with air and other gaseous combustion products:
Cement-lime masonry mortars
Cement-lime mortars are prepared from cement, sand and lime paste with the addition of water.
As a result, we obtain a solution that is more plastic than cement (since lime works as a plasticizer) and more durable, waterproof, and resistant to fungus than lime. Cement-lime mortars are also frost-resistant.
The proportions of cement and lime in solutions may be different; Depending on the formulation, such solutions can be used for both above-ground and underground parts of buildings.
Important!
In cement-lime mortars, plasticizers are also used to reduce the consumption of cement and lime.
We recommend studying: Plasticizers
Color additives
The color of the seam has a great decorative effect. The masonry becomes more elegant, the seam lines are emphasized and make the wall surface more expressive.
To change the color of the solution and give it the desired color, special pigments are used, which are added to the mixture when mixing the solution. There are different shades that can be achieved using pigments.
The simplest and oldest way to color a solution is to add soot. The result is a deep black solution. Currently, oxides of various metals are used as pigments. They are sold in construction stores and are quite affordable for purchase.
Cement-clay masonry mortars
Cement-clay masonry mortars are stronger than cement-lime mortars and set faster. Typically, in such solutions, cement is mixed with finely ground clay in various proportions, and the solution also includes sand and water.
Due to the fact that clay retains water well, this solution can also be used at low temperatures.
Important!
Masonry mortars, depending on the composition, may have special properties, for example, they can be heat-insulating, heat-resistant or decorative, colored, allowing to achieve an aesthetic effect.
Watch the video: Laying bricks with Perel colored mortar
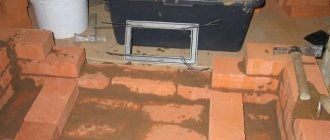
Preparing bricks for the construction of an outdoor wood-burning stove
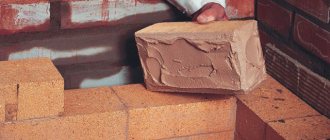
Bricks are available in full and incomplete sizes. When preparing an incomplete brick for the construction of a fireplace, measure the required distance on its spoon (long) side. Then, use the blade of a pick to mark the line and, having previously prepared a shallow groove along the chipping line, with a sharp blow, split the brick for the wood-burning stove into the necessary structural parts.
If you need to split a brick for an outdoor stove lengthwise and not across, then when performing the above steps, the groove along the chipping line should be hollowed out deeper, since it is more difficult to split along the brick, often forming crumbs and uneven parts.
To make it easier to prepare the brick, it is recommended to make notches on the handle of the pick that will correspond to the sizes of ½ part, 1/4 part, etc. In this case, you will not need to constantly use a tape measure.
The same pick is useful for trimming bricks. It must be trimmed with light blows, remembering that the softer the brick, the flatter the direction of impact should be.
Recipes for masonry mortars
The solution recipe is selected depending on the desired characteristics and is determined by the design documentation.
One of the most common cement mortars in construction, grade M100, for brickwork includes (per 1m3):
- cement – 250 kg;
- sand – 1580 kg;
- water – 140 l;
- CemStone additive – 1.25 l.
Solutions of different brands are used for different types of structures. Grades M150 and M200 are used for hydraulic structures.
A mixture of grades M125, 150 and 200
The masonry mixture for bricks M125 is suitable for the construction of walls made of stone and various blocks. The composition for laying gypsum tiles is often used. The fraction of sand used can vary from 0.5 to 1 mm. The M150 grade mixture is characterized by increased hardness. The material is suitable for masonry, and in domestic construction it is used for ceramics and finishing concrete structures. This mixture is good in that it is not sensitive to low temperatures, but requires adherence to a temperature range ranging from +5 to +35 °C during the work process. Heat-resistant masonry mixture M200 is characterized by its refractoriness and water-repellent characteristics. Use washed mountain sand without organic compounds for preparation. Among other things, shells and limestone fragments are used, the fraction of which is approximately 3 mm.
How to mix masonry mortar with your own hands
Unlike large-scale construction, for which masonry mortars are ordered from mortar units, in private construction they often prefer to mix the mortars themselves.
Construction mixers and concrete mixers are used to mix solutions. In this case, it is especially important to use plasticizers in order to achieve an ideal solution and, if possible, eliminate shortcomings.
The order in which the components are mixed may vary. Some craftsmen mix dry ingredients and add water to them, others first pour water into a concrete mixer, then add sand to the water and only then cement. Lime dough is mixed with water to obtain lime milk, then it is used instead of water.
One of the mistakes when mixing masonry mortars with your own hands is adding detergents to them instead of a plasticizer. Since the exact composition and recipe of liquid soap are not known to us, we, in fact, do not know what we are adding to the solution and how this will affect the strength of the future structure. Adding a plasticizer in this case is the right step, which leads to predictably good consequences.
How to dilute and with what to mix fireclay clay step by step diagram
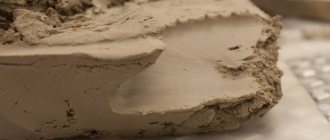
Step 1: Infuse the powder in water
To prepare a solution of fireclay clay for plaster, we will need a pack of fireclay powder. Pour the powder into the container, slowly adding water until the powder is completely covered with water. Before diluting the final solution, the fireclay clay must sit for at least three days.
Step 2: Making the final batch
After we have waited the required time, we will stir the resulting mixture again, if necessary, adding a little quartz and water, if necessary. If the solution comes out liquid, you can sprinkle in more powder; if it gets too saturated, add more water. In terms of its consistency, the solution, ready for use, should resemble sour cream - with such a thickness it will not flow from the surface and will adhere perfectly to the surface of the wall.
Of course, you can also buy a composition for instant mixing - it does not need to be left for three days, but it is also expensive. In any case, it is necessary to add repair PVA glue to the purchased composition; it will not be superfluous to strengthen a solution of this type with crushed fiberglass. To plaster with such a solution, you don’t need much knowledge - just prepare a large and small spatula in advance and apply the solution to the surface in the same way.
Step 3: Prepare the surface
Based on the reduced plastic parameters of fireclay, it is imperative that the surface that you want to plaster be provided with a mesh, and to correct the adhesion, it must be covered with an excellent primer mixture. Because we often talk about plastering fireplaces and stoves, the primer mixture should be heat-resistant and the mesh should be iron. In this case, you compensate for the flexibility of fireclay and achieve the highest fire resistance of the plaster.
How much solution will be needed
Before starting construction work, it is necessary to carefully calculate how much materials will be required. The consumption of mortar for brickwork is calculated per 1 m2 and also depends on the thickness of the brick and the thickness of the walls in the bricks. It can be viewed in the table.
Based on the required amount of solution, you can calculate the amount of necessary consumables.
We advise you to study: For plastering and masonry work
Step-by-step instruction
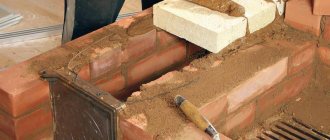
It is important to note that it is necessary to lay elements, regardless of the parameters of the structure being constructed, from the corners, following simple technology. Step 1
Take a couple of bricks and place them, maintaining a right angle, on the foundation base, checking the accuracy of the location with a building triangle
Step 1. Take a couple of bricks and place them, maintaining a right angle, on the foundation base, checking the accuracy of the location with a building triangle.
Step 2. Lay the next pair of elements, and then lay two more on top of the resulting group of four bricks, allowing the next row to overlap the previous row.
Half-brick facing masonry
Half-brick brickwork
Step 3. Having drawn the area into three elements, you need to carry out the same work on the other corner, using the order and pulling the moorings, which will allow the rows to be oriented strictly horizontally. The lacing should be located approximately every 5 m, without sagging.
Laying corners using single-row dressing
Single-row masonry involves building the beginning of the outer wall, and then the inner one, after which the backfill is laid. Multi-row masonry involves arranging blocks in a mixed or stepwise manner.