One of the publications on our website has already discussed various types of electric heated floors, as well as their advantages over similar water systems. Returning to this topic, we want to talk in more detail about infrared (hereinafter referred to as IR) heating, its structure, features, advantages and disadvantages, as well as methods of installation on the floor, walls and ceiling. The information collected will be useful to those who have decided to insulate a house or room with film electric heaters and want to do it themselves.
Choosing a decorative coating for an infrared ceiling
The most important thing when choosing a ceiling covering is to avoid creating a large air gap between the infrared film and the decorative material itself.
Difficulties arise if the floor slabs initially have a large angle of curvature and they have to be leveled using plasterboard structures. This is a very labor-intensive job and installation of metal profiles in the process can damage the film. Before laying a warm ceiling, differences in surface level must be eliminated. This problem can be solved by plastering.
For a spacious room, the ideal option is a suspended ceiling. To install it, narrow aluminum or plastic profiles are used, the installation of which is carried out only along the perimeter of the walls, without affecting the floor area. A high-quality stretch ceiling with micro-perforation allows warm infrared currents to pass through in the best possible way.
It is possible to install eurolining in a wooden house. This material is suitable for small rooms so that the installation of the lathing does not affect the floor area. The lining must be of good quality so that it does not lose its appearance and shape during use. Also, metal ceiling slabs will look original in a wooden house; in addition, they have optimal heat transfer.
Restrictions on the use of IR films
Limitations in choosing an infrared type of heating may include:
- maximum temperature of the film, laminated flooring, parquet boards, carpet can be laid on a heated floor using a low-temperature film that heats up to 27˚C. tiles, expanded clay coating require a higher temperature of the order of 45−50˚С;
- large rooms require high power and, therefore, amperage, which is not always possible in residential premises;
- high ceilings prevent the cost-effective use of infrared radiation;
- used as the main source of heating in areas with a mild climate, in other cases it can be used as local heating, additional to the main one.
Advantages and disadvantages of “film” heating
In search of an alternative way to heat rooms, scientists paid attention to the heat exchange in the environment that occurs due to the action of infrared rays. The interpretation of the natural process formed the basis for the creation of IR film
Film infrared heating systems transfer energy to the floor covering, which redirects it into the room. Installation of infrared heating film is much simpler, more convenient, and faster than installation of all currently known types of heated floors. Film floors do not require screeding, which greatly facilitates the installation process. After laying the waterproofing, you can immediately lay laminate on top of them. Infrared film floors are absolutely safe. They are used in the arrangement of not only residential premises, but also kindergartens and hospitals. When using IR systems for heating, convective air currents are not created, dust does not rise or spread. The specific operation of IR systems allows them to be used as an effective means for heating loggias, entrance lobbies, terraces, and open recreation areas. Film floors are suitable for use in wooden buildings. They can also be installed in attics, because do not load the ceiling. To control the infrared heating system, a thermostat is installed; to automate the process, sensors are placed on the floor that record the temperature and transmit a signal to the control device.
The use of infrared film for installing heated floors has become widespread due to a number of advantages:
Versatility. Almost any floor covering can be laid on top of the heating layer. Using film you can insulate walls and ceilings. Easy to install. To create a heated floor system, you do not need to dismantle the old base, and you can perform the procedure yourself. No specialized equipment is required. Heating temperature adjustment. A thermostat with a wide range of modes is connected to the heating system
Additional control settings are possible: timer function, dividing the room into different heating intensity zones, etc. Mobility of the heated floor. When moving to another place of residence, the structure can be easily removed and spread on another surface. Compactness of the system. The thickness of the IR coating (up to 0.5 mm) has virtually no effect on the height of the floor, which is especially important for rooms with low ceilings. Low inertia. The film “turns on” quickly and the effect becomes noticeable within a few minutes. Uniform heating. The entire room is heated; there are no “hot” or “cold” zones. Maintaining a healthy microclimate. IR rays do not dry out the air and do not burn oxygen. indicate the therapeutic effects of infrared radiation
The air is ionized and cleansed of bacteria.
Thanks to modularity, the breakdown of one section of the film does not lead to a malfunction of the entire system.
The heating film can withstand significant dynamic loads. It can be installed in public institutions with high traffic. The service life of the IR heating system is 15-20 years
Innovative technology also has negative qualities:
The electrostaticity of heated surfaces increases, and objects begin to attract more dust. After turning off the heating system, the room quickly cools down. When installing, it is important to consider the placement of furniture. Where bulky furniture and large appliances will be located, IR film is not installed
Failure to comply may result in system overheating. The operation of a heated floor leads to an increase in energy consumption. The coating is resistant to moisture and contact with sharp objects.
Installation of “film” heating must be done carefully and in compliance with safety standards.
Types of infrared films
From a design point of view, all IR films are similar and have a common operating principle. However, for various types of premises and operating conditions, it is customary to use certain options for film heated floors. The differences between ICs are primarily due to the fact that they are produced by different companies.
Let's consider the types of IR film based on maximum heating temperature and their compatibility with various floor coverings:
high-temperature infrared heated floors under tiles. The maximum heating temperature of such systems reaches 50°C. They are incompatible with floor coverings that are more susceptible to heat (linoleum, laminate);
In their structure and principle of operation, all infrared films are similar to each other, the main difference is the maximum heating temperature
- low-temperature infrared heated floors for linoleum and laminate. Such systems can heat up to 27°C;
- universal IR systems that are compatible with all types of floor coverings.
The second parameter by which IR films are classified is the type of heating element. Today, there are two main types of infrared floors, depending on the heating element:
- carbon;
- bimetallic.
The power density of the infrared floor is the last indicator, which is very important when choosing heating. Let's consider three main types of IR films, depending on this parameter:
with low power (130–160 W/m²) - used in cases where it is necessary to organize heating of a room with a small area. Compatible with “light” floor coverings;
Infrared films from different manufacturers may differ in appearance and technical parameters
- with average power (from 170 to 220 W/m²) - installed in more spacious rooms. Perfect for the following flooring options: porcelain stoneware, tiles;
- with high power (above 220 W/m²) – installed in industrial buildings. They are also used for floor heating in saunas and various workshops.
Features of carbon and bimetallic IR films
Carbon films used for underfloor heating are more expensive. The heating elements in such a system are made of a special carbon material, which has a fibrous structure. In some cases, they are equipped with a protective layer of graphite. Spraying of this material helps to increase the strength characteristics of the system and also affects the length of its service life.
The basis of the material is represented by lavsan film. Carbon infrared film flooring can be mounted on horizontal and vertical surfaces.
Scheme of bimetallic infrared film for heating
Bimetallic IR film differs from carbon film in that it has heating elements consisting of two metal layers (aluminum and copper). The material is based on double polyurethane film, which has good elasticity.
The installation of a bimetallic system is complicated by the fact that a ground electrode cannot be connected to the system. Also, the bimetallic structure is incompatible with ceramic flooring. It belongs to the low-temperature variety, so its recommended heating level does not exceed 27°C.
Famous brands and manufacturers
It is quite natural that the modern market represents a large number of different companies producing infrared film. Let's consider several well-known options:
Zebra
One of the best examples of a domestic manufacturer. The film-type heater is manufactured in Chelyabinsk. This is a convenient material for installation. One heater package contains 15 square meters of tape material, which can be easily cut into the required lengths. The cutting step is from 0.6 to 6 m. When performing independent installation, this is very convenient, since you can mark and cut the material to the required length at the work site. To independently install a heated floor with infrared film, the kit contains everything you need to complete the work.
Caleo
A company from South Korea is considered the second most popular in Russia. Infrared film for heated floors from this manufacturer combines good quality and low price. There is one significant drawback - increased fragility and tendency to deformation. For this reason, installation of the material should be done carefully. The company produces infrared heating film 0.4 cm thick, with a power of 180-220 W.
Rexva
This company is located in South Korea and produces infrared heating film with a power of up to 350 W, roll widths of 50, 80 and 100 meters. The manufacturer uses anti-spark mesh in the design; the material is reliable and resistant to breakage.
Heat Plus
The manufacturer produces reliable film for heated floors with a guarantee of up to 15 years. The width of the rolls is 0.5-0.8 m, the thickness of the material is 0.4 cm, the power is 150-220 W. There is a range of films for open terraces and loggias with energy consumption up to 400 W.
Monocrystal
Ultra-thin surface that emits infrared rays. The role of heating elements is performed by black strips of graphite, sealed in polyethylene material and receiving voltage from the copper conductor. The system is characterized by good efficiency and minimal energy consumption.
Coating IR film for ceiling outside
When choosing IR film for heating a room, you need to pay special attention to the quality of the system, which must meet a number of basic parameters:
- the base must be made of high quality film, the polymer used must be fireproof;
- the conductive strip must be undamaged and made of copper materials, the minimum permissible width must be 15 mm;
- the silver strip must have a clear outline, without gaps, and it must overlap the copper bus by 2 mm;
- the arrangement of carbon emitters should be striped or solid; geometric shapes do not have any effect on the operation of the ceiling heating system;
- the external lamination of the infrared film must be made of the same polymer as the base; it is not recommended to use materials with a smaller thickness;
- standard films must withstand temperatures up to +80 °C, high-temperature materials - up to +110 °C;
- if high quality materials were used in the production process, then there should be no deformation during operation;
- high-quality IR film should heat up evenly in a short period of time - about 5-10 seconds.
As practice shows, the wider the film, the lower the likelihood of it overheating during operation.
Important! If the polymer is transparent, then it deforms much faster during operation.
Calculation of IR heating power
It is also easy to perform equipment calculations. For 10 sq. m. area with a ceiling height of 2.5-3 m and good thermal insulation, ceiling infrared heaters should have a power of 1 kW. More accurate figures can be obtained based on the performance of a particular device and the recommendations specified in the operating instructions.
It should be understood that we are not talking about the constant use of electricity, since to maintain a given temperature, the system only needs to work for 20 minutes out of every hour. Thus, the effective energy consumption for a house with an area of 55 sq. m can be up to 2 kW. And this, you see, is not so much.
Where can heaters be located?
Infrared heating of rooms is organized by separate heaters or film surfaces, which are mounted in the floor, walls or ceiling. Ceiling heating (film on the ceiling) is popular due to its analogy with solar natural heating. Radiation directed from the ceiling is evenly distributed over the surface of the room and causes heat transfer from all objects in it. Furniture, dishes, walls, and baseboards become heating radiators.
Despite the ceiling location of the heating source, the warmest zone is located near the feet. Since the ceiling is free of any objects, it can be completely used for installing infrared film.
For floor and wall heating, the film is installed only where there is no furniture or household appliances. On the one hand, this reduces the cost of heating installations, on the other hand, it reduces the amount of emitted energy.
Types of infrared heaters
Based on mounting methods, these devices can be divided into:
- ceiling;
- wall;
- floor
Ceiling models are very popular. They only take up space on the ceiling, which is almost always uncritical. It is impossible to accidentally touch them and get burned or accidentally lean against a flammable object.
A correctly installed and directed device will evenly heat the entire area, the sleeping, dining or relaxation area located underneath it. And finally, modern models look so neat and aesthetically pleasing that they only decorate the interior. It should be noted that the ceiling height must be sufficient, at least 2.5 meters.
What are the advantages and disadvantages of infrared flooring?
Heating film has many advantages, thanks to which it is in demand everywhere and is used not only in apartments and private houses. The advantages include ease of installation, since there is no need to lay a concrete screed.
The advantages include the ability to combine a heated floor system with any type of flooring, for example, ceramic tiles and even carpeting, with a minimum film thickness that will not affect the floor level.
The main advantage of infrared flooring is that it is easy to install
There are also advantages:
- Low heating inertia, due to which rapid heating of both the film and the room occurs.
- Wear resistance to increased loads on the finish.
- Uniform heating of the room.
- Wear resistance to sudden temperature changes.
- Optimal cost.
- Opportunities to significantly reduce electricity consumption when heating a room by 30%.
- Possibility to install heating on the wall.
- Low intensity electromagnetic field.
Also relevant is the absence of a detrimental effect on human health, the ability to eliminate unpleasant odors from the room, and the elimination of dry air in the room, which allows you to create an optimal microclimate. Installation, connection and dismantling is easy, simple and quick, and therefore there is no need to contact qualified specialists.
Versatility, health benefits, safety
Nobody bothers you to combine infrared heating batteries with conventional radiators - they can complement each other. With minimal effort, you can create a “warm island” in your home by installing 2-3 simple heaters, which will be directed to the kitchen corner, for example, or to the sofa. They are often installed in gazebos on the streets or in verandas. This will allow you to sit outdoors even in relatively cold weather.
Installation of infrared heaters is extremely simple - they can be placed on a special leg, hung on a wall or attached to the ceiling. They plug into an outlet and are immediately ready to use.
It is believed that infrared heating systems are more beneficial for human health. The sun's rays, when they hit a person's skin, penetrate inside and heat the blood vessels, causing heat to quickly spread throughout the body. However, there are often disputes that infrared heaters are harmful to health, which is not true. According to research by Japanese scientists, these devices serve as a preventive measure against many diseases.
Installation
If such a system is planned as the only heating element, it is necessary to install mats on 70-80% of the surface.
If additional heating is provided, it is enough to cover 30% of the ceiling area. Before installing the heating film, you need to calculate the power of the total planned coverage area. This must be done to select the correct power thermostat. For example, a conventional thermostat consumes 4 kW, and 1 sq. m of film - about 0.2 kW. In this case, the area of the infrared ceiling should be no more than 20 sq.m.
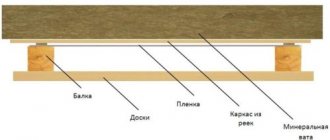
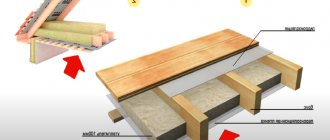
Next, you need to make high-quality thermal insulation. In concrete apartment buildings, this is necessary so that heat does not escape to the neighbors above. In a wooden house, it is also necessary to insulate the beams to prevent heat dissipation in the wood and its drying out.
Foamed polystyrene in a roll, covered on one or both sides with foil, is used as thermal insulation. The material is attached to the ceiling with plastic refractory dowels. The joints are sealed with foil tape. Next, you can install an electric warm ceiling.
Infrared sheets are mounted at a distance of 20 cm from the walls. In a wooden house, it is recommended to make an indent of 30-40 cm. There should be a distance of 5 cm between the strips. Refractory dowels are also used as fasteners. Thermal film is laid parallel to each other. Installation must be calculated in advance according to the diagram, avoiding laying canvases over sleeping places and over electrical appliances (TV, microwave oven, kitchen hood, etc.)
After securing the canvases, you need to connect the system. To do this, connect terminals to the copper busbars and clamp them tightly with pliers, and the connection points are insulated. To connect the infrared bands, an electric copper wire with a cross-section of 2.5 square meters is used. mm or more. Then you need to connect the entire system to the thermostat. It is placed at a distance of 1-1.5 m from the floor. To hide the wires in the wall, you need to make a groove using a drill or hammer drill. It will need to be hidden later with plaster. The installation is ready, all that remains is to check the heating. It is better to do a “test drive” of the ceiling before sealing the grooves.
Water IR Ceiling Panels
The main design feature of such ceiling heaters is a system of insulators and reflectors that direct heat to a specific area. “Water panels” got their name due to the use of radiant tubes through which the coolant liquid passes. In summer, coolant is passed through the tubes.
This design is completely safe and can be easily installed even in large rooms, such as end centers, workshops, etc.
Features of ceiling heating systems
Installing film heaters on the ceiling allows you to obtain the following operating scheme. When the device is turned on, it emits infrared waves aimed straight down. The radiation goes towards the floor and is most absorbed by it. The remaining waves affect furniture and other interior items. As a result, they all begin to work harmoniously and then give off heat. The maximum temperature in the room will be at floor level. At a height of 1.7 m it will be several degrees lower. This temperature distribution is ideal for human health and well-being.
If you want to combine a suspended ceiling and PLEN, then experts advise additionally installing a protective layer of plasterboard. It will absorb the remaining heat, and the stretched film will remain unchanged. Another advantage of installing film heaters on the ceiling is the minimal risk of their sudden deformation.
How does infrared film heating work?
electromagnetic background, radiation warms
A low-temperature film heater works in the same way, the maximum heating temperature of which is no more than 50˚C. Regardless of the manufacturer, any IP (infrared film) consists of three components:
- a heating element that converts electricity into heat;
- foil, thanks to which heat is distributed with equal force over the entire surface;
- double-sided lamination with PET film, which performs the functions of insulation and protection from mechanical influences.
Heating begins after current is applied to the heater. Passing through the heating components, the current is converted into thermal energy, which is transferred from the emitter to the double-sided PET film by contact method, and both sides of it begin to emit thermal waves. Thus, the source of radiation is the IP, and not the foil or heating elements.
What happens when film is used as ceiling heating when it is covered with plasterboard, for example? The primary radiation of the film will heat the drywall, and it will begin to emit infrared waves into the surrounding space, heating the objects located there, and then the air. The same thing will happen in a heated floor system, only there the radiation flow will go from bottom to top. Again, the primary radiation is IP, and the secondary radiation is the floor covering.
Procedure for installing a warm ceiling
The warm ceiling is installed in the following stages:
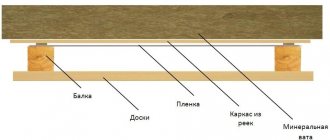
Laying thermal insulation
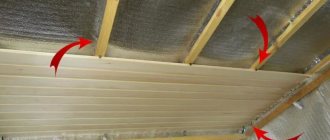
Thermal insulation is laid on the profiles in order to eliminate the possibility of heat radiation upward. To prevent the heat-insulating mats from sliding off the wings of the profiles, throughout all spans, at certain intervals, it is worth sticking safety pieces of technical tape, as shown in the following photo. In the spans the mats are laid end to end. There should be a gap between the end of the mat and the wall.
Almost the entire surface of the suspended ceiling is laid with mats.
Laying electrical wiring
The central span is laid last with heat-insulating mats. Before laying it, electrical wiring is thrown onto the thermal insulation, which will provide power to the entire warm ceiling.
There should be a “window” in the suspended ceiling in the middle of the room through which the wire of the lighting fixture hanging from the ceiling will pass. Because of this "window", the heating film laid in the central span consists of two separate sections. This must be taken into account when organizing their power supply. Therefore, the power cable with two sockets must fit into this window. The rest of it is laid along the wall.
To power the ceiling electrical wiring, the supply cable can be laid down the wall in a groove or in a cable channel. The photo shows that a hole is drilled in the wall, and the cable is pushed through it to the apartment meter.
Installation of heating film and electrical connections
During work, the heating film can be secured to the ceiling using double-sided tape. To do this, tape is pasted at certain intervals throughout the room across the profiles.
Then the protective film is removed from the double-sided tape as the work is completed and the heating film begins to be fixed. Moreover, they glue it strictly BETWEEN the profiles. If the film gets on the profile, it can easily be damaged by screws when attaching drywall, and the system will not work.
In the central span, as mentioned above, the heating film is installed in two separate panels. This allows you to create a lighting fixture for installation.
Through the formed “window”, two central panels are connected to the power supply system. All wires are laid on top of heat-insulating mats. A lighting lamp is also released into the created “window”.
Then all the power wires hanging from the wall are connected to the sockets of the electrical wiring laid on top. In this case, all wires must remain above the profiles.
Checking the integrity of the warm ceiling system
Having completed all the connections, we go into the next room where the supply wiring was terminated. Taking the wires coming from the warm ceiling, we measure the value of its resistance. If it is expressed by a specific number, we can conclude that there is no damage to the system. As you can see in the photo, the resistance is about 45 ohms. Therefore, the system is working properly.
Upon completion of work, this measurement should be repeated to once again ensure that there is no damage.
Installation of vapor barrier film
A vapor barrier film is necessary to protect the electrical system of a warm ceiling from condensing moisture. Its installation is again done using double-sided tape, which this time is glued directly to the profiles.
The film itself is attached with tape across the profiles. Moreover, all adjacent panels must overlap to ensure the necessary tightness and moisture protection.
Fixing plasterboard sheets
To lift and support drywall sheets, it is very convenient to use a sheet lifter.
The sheets held by the sheet lifter are fixed, as usual, with self-tapping screws screwed into the profile.
Having secured the drywall along the edges, it is necessary to mark the location of the remaining profiles. With additional fixation, this will prevent you from accidentally damaging the heating film with a self-tapping screw.
Connecting the thermostat and checking the integrity of the “Warm ceiling” system
The diagram for connecting the wires to the thermostat is shown on the back of the device.
The wires coming from the warm ceiling are connected to the side terminals. It is on them that the system resistance is re-measured. If there are no faults in the system, then its value should be equal to that previously measured.
The indicator part is attached to the thermostat with latches.
The indicator is a rather multifaceted device. It displays not only the current temperature, but also the time. With its help, the desired temperature is set or programmed.
Characteristics of film infrared heating on the ceiling
Infrared ceiling heating is a film sheet, inside of which heating elements are located. At the moment when electricity is supplied, this film will heat up to +45 ° C in a matter of minutes. Infrared waves are transmitted in the same way as sunlight. After the decorative ceiling covering is heated, the heat will be directed to the floor, from which it will subsequently be reflected.
Thanks to ceiling-mounted infrared film devices, not only the air in the room will be heated, but also the existing furniture. Thus, heat will constantly accumulate in the living room, which will subsequently be given off from the surface of objects.
In a room at a level of about 1-1.5 m, it is necessary to install a thermostat, thanks to which the operation of the infrared film heater system, which is mounted on the ceiling surface, will be adjusted.
As a rule, the owner of a residential premises independently sets the level of the desired temperature regime. The moment the set temperature level is reached, the infrared ceiling heater stops working. It should be taken into account that after the equipment stops operating, the process of maintaining the set temperature regime will be carried out. Thus, each time after switching on, the infrared film ceiling heater will operate from the electrical network for about 10 minutes.
Among the technical characteristics, it is worth highlighting the following points:
- the width of the film web can vary from 0.5 m to 1 m;
- maximum thickness is 1.2 mm;
- maximum temperature heating of installed elements – +50 °C;
- required voltage – 220 V;
- weight 1 sq. m of infrared film heater is 50 g.
Many people believe that by installing this type of heating, the floor surface will be constantly cold
It is important to understand that by heating objects, the lack of heat near the floor will be compensated
Ceiling heating PLEN
Warm ceiling PLEN has a number of significant advantages:
- since the device runs on heating electricity, energy costs are minimal;
- a distinctive feature is a high level of reliability and a long service life - the conductors are sealed in film, the design is completely free of wearing elements;
- PLEN can be installed under a coating of any material; its installation does not require much space;
- Thanks to the automated system, it is possible to set any temperature regime.
It is worth paying attention to the fact that the work is carried out silently, with no heat losses at all. The manufacturer provides a warranty of up to 25 years, the service life is 50 years. During operation, ceiling heating does not require maintenance.
