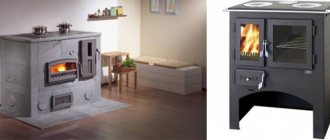
A small country house or cottage must be heated in the off-season and winter for people to stay comfortably in the premises. Due to limited space, the best option is a mini brick oven. Let's consider the advantages and common schemes of such a heater. We will also analyze the process of construction by professionals of one of the options for a small stove structure.
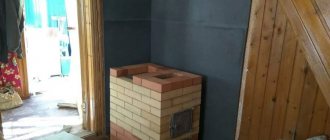
Construction of one of the options for a small brick stove Source na-dache.pro
Rules and nuances of operation
For a stove to be economical, it must be maintained in good condition. A crack only 2 mm wide in the valve area will provide heat loss of 10% due to the uncontrolled flow of air through it.
The stove also needs to be heated correctly. If the blower is very open, 15 to 20% of the heat can fly out into the chimney, and if the combustion door is open while the fuel is burning, then all 40%.
In order for the oven to heat up evenly, the thickness of the logs should be the same - about 8–10 cm.
Firewood is laid in rows or in a cage, so that there is a gap of 10 mm between them. There should be a distance of at least 20 mm from the top of the fuel fill to the top of the firebox; it’s even better if the firebox is 2/3 full.
The bulk of the fuel is ignited with a torch, paper, etc. It is prohibited to use acetone, kerosene or gasoline.
After kindling, you need to close the view so that the heat does not escape through the chimney.
When adjusting the draft during kindling, you need to be guided by the color of the flame. The optimal combustion mode is characterized by a yellow color of fire; if it turns white, the air is supplied in excess and a significant part of the heat is thrown into the chimney; The red color indicates a lack of air - the fuel does not burn completely, and a large amount of harmful substances is released into the atmosphere.
Cleaning (including soot removal)
Cleaning and repairing the stove is usually carried out in the summer, but in winter you will need to clean the chimney 2-3 times. Soot is an excellent heat insulator and if there is a large amount of it, the furnace will become less efficient.
Ash must be removed from the grate before each fire.
The draft in the furnace, and therefore its operating mode, is regulated by a viewer, a valve and a blower door. Therefore, the condition of these devices must be constantly monitored. Any faults or wear should be repaired or replaced immediately.
DIY FRIEND
Dear visitors to the “Homemade Friend” website, today we will look at how to make a mini camping stove with your own hands from a tin pipe with a diameter of 200 mm.. On a long hike or on an overnight fishing trip, you will have to be left alone with the wild nature and its unpredictable whims. To comfortably spend the night in a tent, you will definitely need a small and compact stove for heating. In the summer, of course, there is little need for it, but in the autumn or winter, such a stove must be in the equipment of a hunter, fisherman, tourist, SURVIVALIST
This stove can be easily made with your own hands, for which you will need a tin pipe with a diameter of 200 mm, 2 plugs, an 80-100 mm pipe for the chimney and ash pan. We cut off a piece of pipe 50 cm and make a hole for installing a chimney guide, where the flue is installed and riveted from the inside, the chimney pipe itself is secured with a clamp.
The furnace-blower is made of a sheet of tin rolled into a pipe; holes are drilled in 3 rows along its entire length; they are necessary for the formation of draft and natural air circulation to the combustion center. There is also a special plug-glass with which you can regulate the intensity of combustion, or stop it altogether.
So, let's look at the step-by-step instructions.
Materials
- tin pipe 200 mm length 50 cm
- chimney pipe 80-100 mm
- clamp
- folding fishing chair
- sheet metal 0.5-0.7 mm
Step-by-step instructions for creating a mini camping stove with your own hands.
You will need a 200 mm tin pipe, 2 plugs and clamps for a reliable tie.
Chimney pipe 80-100 mm.
A piece of pipe 50 cm long will serve as the furnace body.
You can immediately install a plug in the back.
A hole is cut for the chimney flue. It is riveted from the inside.
A strip is cut from sheet metal to make a blower.
Plug - glass.
Holes are drilled in 3 rows; they are needed to create better traction and natural air circulation.
Using a plug, you can regulate the draft and air supply to the combustion source, or completely block the holes to extinguish the fire in the stove.
The stove is installed on an unfolded fishing chair, like this.
The tests are already carried out directly in the tent. Such a stove will heat an army tent designed for a platoon in a short time; the stove consumes quite a bit of fuel in economy mode
You can throw firewood into the stove and install a plug on one hole, thereby maintaining low combustion and maximum heat transfer, which is very important in camping conditions.
We hope this material was useful to you
Thank you for your attention!. Tweet
Tweet
41 shared
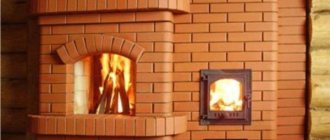
Schemes of brick mini-ovens
Small ovens occupy a small area; the dimensions of their bases range from 50 to 70 centimeters in width and up to 65–100 cm in length. The height of the heating structure is from 1.5 to 2.3 meters. A cooking floor, an oven, and a water heating tank are built into the oven. Stove makers have also developed devices intended only for heating a home.
Small heating structure
This is the simplest heating structure. We will analyze the model in the following sizes:
- base width - 51 cm;
- base length (depth) - 89 cm;
- height - 238 cm.
The mini-stove is installed in the middle of the kitchen or against the wall. The optimal heating area is 20-35 meters. Interior partitions are erected around the stove, which allows heating both the kitchen and the adjacent room.
Inside the device are:
- combustion chamber;
- blower;
- smoke channels leading into the chimney.
The combustion door of the mini-stove (cast iron or glass) is selected depending on the aesthetic preferences of the home owners. A door made of heat-resistant glass, through which you can see how the wood is burning, gives the structure a resemblance to a fireplace. Two smoke valves are installed in the middle and upper parts of the furnace. There is one door for cleaning the channels. To build this model of the device you will need:
- 260 pieces of ceramic bricks;
- 130 pieces of fireclay bricks;
- grate (40x23 cm);
- combustion (30x20 cm) and blower (20x14 cm) doors;
- 2 doors for cleaning holes (20x40 cm);
- metal pre-furnace sheet (50x70 cm);
- two sheets of roofing material measuring 60x100 mm;
- sand and clay (or ready-made clay-sand mixture for masonry), clay-fireclay mixture.
Reference. Masonry mortar increases the volume of the device by the thickness of the joints.
The base and top of the mini-oven are laid with ceramic bricks on a clay-sand mortar. The firebox is made of fireclay bricks on a clay-fireclay mixture.
Three and a half bricks fit on the long side of the base, and 2 standard bricks 25 cm long on the short side. The masonry consists of 35 rows in height.
Small heating and cooking stove
This is a mini-oven model for heating and cooking - a convenient and very compact structure. The optimal area for a heated room at sub-zero temperatures is 20-25 square meters.
The device has the following dimensions:
- base length (depth) - 64 cm;
- base width - 51 cm;
- height - 215 cm.
The structure is being erected in the kitchen. The device includes:
- blower;
- combustion chamber;
- smoke channels leading into the chimney;
- cooking floor;
- niche for the oven.
The cast iron cooking floor has a hole that is closed with a disk and a circle. Solid flooring is also available for sale. In the niche for the oven chamber there is a metal oven or a hot water tank with a tap. If the niche is left free, it is used for drying things. To build a stove you will need:
- 222 pieces of ceramic bricks;
- grate (40x25 cm);
- firebox door (20x20 cm);
- door for the blower (14x14 cm);
- cooking floor (35x38 cm);
- metal oven or hot water tank;
- iron pre-furnace sheet (50x70 cm);
- two doors for cleaning holes (20x14 cm);
- two valves;
- a piece of flat slate;
- steel corner;
- clay, sand or ready-made clay-sand mixture for masonry.
Preparation for ordering
While the foundation is drying, you can start preparing for the order. To lay the stove, you need to prepare a solution of clay and sand; cement will not work here; it will crack under the influence of high temperatures. There is time to search for clay and river sand. The ratio is: one part clay, four parts sand. A couple of days before the start of laying, you need to soak the clay. If you have heavy types of clay, then you need to soak it even earlier. Sift the sand. You can make a sieve with your own hands from boards and metal mesh. The size is arbitrary, 42x24 cm is suitable. It is imperative to sift the sand, because small pebbles, of which there are a lot in the sand, will not allow you to achieve a smooth surface. The following material is also required:
- solid construction and fireclay (fireproof) bricks,
- fittings (doors for the firebox and ash pan, for cleaning channels, grate, valve),
- asbestos cord,
- steel tape ≈2.5 cm wide,
- galvanized steel wire,
- perforated steel tape for reinforcement.
To lay a small stove with your own hands, you need special tools: a plumb line, a level, a trowel, a hammer with a pick, a rubber mallet, a trough or large pan, an angle grinder with a diamond blade.
Types of mini-ovens
Mini-ovens are divided into several main subgroups. Let us analyze the main classification in detail.
Material
Steel
The most affordable and popular material in the production of stoves. The main advantage is the low price and the ability to make it yourself. Homemade products will not be able to compare with industrial designs in appearance.
But in terms of performance, a home craftsman can make a design better than an industrial one. To do this, it is enough to weld several convection pipes and cover the surface of the walls with fireclay bricks.
The advantages include the low weight and mobility of steel appliances. They do not require a separate foundation, and in the summer you can equip a kitchen outside.
Cast iron
Cast iron units are the best option for small spaces. According to its properties, the material can accumulate and gradually release heat after fuel combustion.
Such devices can be easily taken out and set up as a summer kitchen in the warmer months, but you will need to find help. This design can weigh at least 25 kg.
An additionally installed container for heating water will add comfort to your small home. But cast iron is very sensitive to shocks and sudden loads.
Especially in a heated state, a slight impact can cause cracks to form. A massive and heavy structure will require an additional foundation, especially when installed on a floor made of fire-hazardous materials.
Brick
Brick mini-stoves are not very suitable for heating a dacha. Small premises in the country mean their use only in the warm season. Therefore, long breaks in operation and the stove being in an unheated, damp room are possible.
Such a stove becomes damp and begins to smoke. It will be necessary to carry out repair work and cover up all the cracks and seams between the bricks. But if there is enough space for construction and you plan to live permanently in a small garden house, there is no better option.
Such a unit can be retrofitted with a water heating tank, hob and oven. The stone accumulates heat well. The room will be heated for a long time after the firewood has burned out.
- Electric infrared stoves (quartz or halogen) allow you to quickly heat a room, but when turned off, the room instantly cools down.
- Gas burners built into metal or brick stoves are preferable to electric ones. But you will need to equip the system with automation and constantly refill gas cylinders.
- Solid fuel stoves are the best option. A homemade steel stove running on available fuel will not require large costs for the production and procurement of fuel. By spending a little more money on the purchase, you can purchase combined units that can operate on several types of fuel.
Advantages and disadvantages
Advantages of mini-ovens:
- small dimensions allow installation in small rooms, taking into account the recommended distances from the walls without loss of total area;
- quality and compliance with fire safety standards make them safe for installation in wooden garden houses;
- in winter, the stoves can be easily dismantled and stored in the pantry to prevent theft;
- the quality of the materials allows the devices to easily withstand long-term interruptions in operation and being in a damp and unheated room;
- stoves – small fireplaces cost significantly less than large models. Therefore, you can buy them and enjoy the sight of a burning fire;
- simplicity of design and a small amount of materials allow you to make such devices yourself;
- With a little imagination, you can make such a little thing into an interior decoration item for your home.
The only disadvantage that can be highlighted is that little firewood can be placed in a small firebox, therefore the burning time of the firebox is reduced. This can be inconvenient, especially if you need to add fuel at night. Otherwise, the advantages of small structures are undeniable.
Closing events
Three more rows of brickwork are made to connect to the pipe. Having removed the “knockout” bricks, the furnace channels are immediately cleared of construction debris. The perimeter of the structure is carefully covered with a plinth.
Whitewashing or lining of the stove is done after test firing.
Only after the whitewashed or tiled mini-oven is completely dry can it be used. In order for a mini stove for a summer house to please you for a long time, you should not rush to light it. Let it sit for a week or two with the doors open.
It is not recommended to use coal right away; you need to give the stove time for initial heating with the help of wood chips.
Mini-oven project with stove
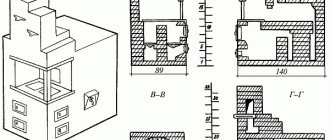
The Russian heating and cooking stove “Teplushka” with an additional combustion chamber has a power of 3.5 kW. The structure is designed for heating a small house or cottage with an area of 30-40 m², as well as cooking in winter and summer. The device of a small heater is shown in the drawing.
The mini-oven can operate in 3 modes:
- Summer move. We open valves 1, 2 and 3 (see the picture), load the firewood with firewood. The gases immediately escape through the main channel into the pipe, and the stove heats up. Damper No. 3 plays the role of a hood.
- Firebox for winter. We use the lower chamber again and close valve No. 1. Then the combustion products move through the furnace and flue ducts into the oven, exit through the channel to the front side and then into the main chimney. The entire body of the furnace is heated, from bottom to top.
- Firebox in Russian. We light firewood in the furnace, open the sealed mouth door and valve No. 3, valves 1 and 2 are closed. The smoke goes into the hailo and the main chimney, only the stove bench is heated. For full heating, close the door, open damper No. 2 - the gases will flow through the lower channels of the stove.
Thanks to its efficiency and relatively low cost of materials, a mini-stove can easily be called a housekeeper. One minus is the small size of the bed. The maximum height of the building is 2.1 m, in the area of the ceiling - 147 cm.
Building materials and stove fittings
To make a Russian mini-oven with your own hands, you need to buy components and materials:
- solid ceramic bricks – 670 pieces (the chimney is counted separately);
- fireclay bricks for the firebox – 25 pcs. (brand ША-8);
- fireclay block brand ШБ-94 or similar in size – 1 pc.;
- door of the main chamber mouth 25 x 28 cm, possible with fireproof glass;
- loading door 21 x 25 cm;
- ash pan door 14 x 25 cm;
- two grates measuring 300 x 250 and 220 x 325 mm;
- wooden template - circle - radius 460 mm, length - 65 cm;
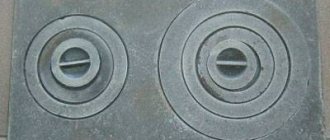
- cast iron hob with 2 burners 71 x 41 cm;
- 3 valves: 13 x 25 cm - 2 pcs., 260 x 240 x 455 mm - 1 pc. (brand ZV-5);
- equal angle corner 40 x 4 mm – 3 meters;
- steel sheet 1 mm thick for a shelf in a stove;
- galvanized mesh for reinforcement, cell 3 x 3 cm - 2.1 lm;
- kaolin wool, corrugated cardboard.
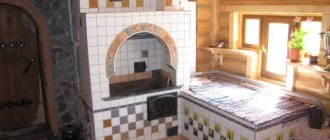
Appearance of a finished mini-stove for a country house
Red brick laying is done using sand-clay mortar. When constructing a chimney, it is allowed to add M400 cement. Fireproof stones are placed on another solution - fireclay clay, mortar and the like.
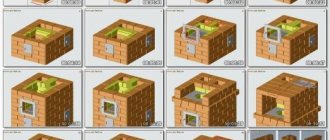
Laying progress - step-by-step instructions
A reinforced concrete or rubble concrete foundation is cast under the furnace, the dimensions of which are 10 cm greater than the dimensions of the structure. Start construction when the concrete reaches 75% strength; under normal conditions, the hardening process will take about 2 weeks. This assumes an average daily air temperature of +20 °C and proper care of the monolith.
Having installed waterproofing from 2 layers of roofing material, make the first row continuous (40 bricks will be needed). How to fold the stove according to the order, read on:
An ash chamber is formed on 2-3 tiers, a cleaning door is installed, and columns are built to support the bottom of the furnace. The 4th row continues the main walls of the stove; the ash chamber is covered with cut stones. Rows 5-6 form the main smoke channel and the bottom of the firebox made of refractory bricks. The grate is installed without mortar; a row of fireclay stones placed on edge is placed on top.
On the 7th tier a loading door and a vertical summer shutter are installed. Rows 7-9 are laid according to the pattern, at the end the fireclay brick is covered with kaolin wool (marked in green)
Please note: on the seventh tier the walls are reinforced with steel mesh.
Rows 10 and 11 partially cover the flues and the lower heating chamber; a grate for the furnace and a hob are installed. The 12th tier begins to form the main firebox, and on the 13th tier the door is attached to the mouth of the furnace.
Rows 14-17 are laid according to the diagram, corners are mounted to cover the cooking opening
On the 18th tier, steel profiles are covered, and an arched vault with a radius of 46 cm is built from wedge-shaped stones. Tiers 19, 20 are made according to the scheme, the cavity between the vault and the walls is filled with sand or filled with thick masonry mortar. When the filler dries, 21 rows are laid - the roof.
From 22 to 32 tiers the front part of the heater is built. On the 24th row, both smoke valves are placed, on the 25th - an iron shelf measuring 42 x 32 cm. Having laid the 29th tier, cover the stove with the same sheet.
To understand the construction down to the smallest detail, we suggest watching a video with a detailed demonstration of the masonry of each row and explanations from the master:
Calculation of basic parameters
The calculations are based on the boiler drawing and the order diagram. There is an easier way to determine the need for bricks. First, the volume of the body and one block is calculated, then the number of units is obtained. After this, a reduction factor of 0.8 is applied to heating structures or 0.65 to cooking structures.
If the chimney is also laid out, it takes 56 pieces per linear meter of height. Clay needs 30 kg, and cement 70 kg per 100 pieces.
Metal parts are purchased in accordance with the project in size and quantity.
Types of furnace designs
No matter how much time has passed since the appearance of the first stove designs and no matter how far home heating technologies have come, the stone stove still does not lose its relevance. Compared to other types of heating (electricity, gas), it is more economical. At the same time, thick stone walls allow you to retain heat for another day after the firewood burns out.
According to their purpose, furnaces are divided into the following types:
- heating;
- cooking;
- multifunctional;
- combined.
- The heating design is perhaps the simplest and most common. As the name implies, the function of such a stove is aimed only at heating.
Basically, such a stove is chosen for dachas where there is electricity and a stove is used for cooking. Or home owners want to create a special country coziness with the help of a fireplace stove. The design of such a furnace consists of:
- combustion chamber, which is purchased ready-made or lined with fireclay bricks;
- an ash pit where ashes are collected;
- chimney.
This type of design also includes a fireplace with an open or closed firebox. It is used not only for decorative purposes, but also allows you to effectively heat a room of 15-20 square meters. meters.
Depending on the selected material, wall thickness, masonry scheme, heating stoves may have different heat output.
The most popular type of stove is the one-brick design. This allows the walls to be heated to 60C. The famous Dutch ovens are laid out according to this pattern.
In terms of dimensions, the heating stove can be wide and flat, or it can have an elongated rectangular shape. It all depends on the area of the room, the style of the interior and the personal preferences of the owners.
For cladding such a stove, tiles, decorative plaster, and decorative stone are usually used.
Brick heating stoves in the form of a three-sided prism look very stylish and original, but a beginner cannot implement this option, since it requires a lot of experience. The greatest difficulty is in cutting the bricks and the requirements for maintaining an angle of strictly 60.
Round stoves, which are laid out according to the design of the famous Russian furnace engineer V.E. Grum-Grizhimailo, also look beautiful and unusual. The furnace operates on the principle of free movement of gases. To ensure tightness, the outside of the structure is covered with sheet metal. Such a stove can heat a large country mansion and will become a real decoration for any home.
- Cooking stove. It is advisable to choose this option for a dacha where the owners visit only in the summer. In this case, heating the house is not needed, and if you equip the structure with an additional water tank, it will serve not only for cooking, but will also create comfortable living conditions.
Often this option is installed in country cottages where gas and electric heating are provided, but in order to save resources, owners sometimes use a brick oven.
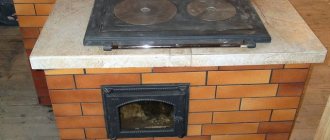
The design of the stove consists of a brick body, inside of which there is a combustion chamber, an ash pan, and a chimney. There is a metal plate on top (an oven can be built in).
- A heating and cooking stove is already a multifunctional design.
This is a more difficult project to implement, as it consists of:
- combustion chamber;
- chimney;
- ash pan;
- hob;
- oven.
The stove looks massive and is usually chosen for dachas where there is no other heating option.
In our country, heating and cooking stoves are the most popular, allowing you to heat the house and prepare a delicious dinner for the whole family.
It can be additionally equipped with a drying chamber, where you can make preparations for the summer: mushrooms, berries, fruits. In cold and damp weather, you can quickly and safely dry clothes and shoes in this chamber.
Oven with drying chamber
By the way, ovens with drying chambers were first invented in the countries of Northern Scandinavia, where hunters and fishermen needed to dry clothes and boots in one night.
Many schemes of heating and cooking stoves have additional devices in the form of a comfortable bench, drying for firewood, an oven, and a water-heating tank.
Making a potbelly stove
Long-burning potbelly stoves are good because they are made from any available materials - these are various barrels, old capacious cans, pieces of large-diameter pipes or simply sheet metal. We chose sheet steel as the starting material - it is a more convenient material to process. You can adapt a barrel for this, but doing work in its internal volume is not very convenient.
All sizes are presented rather as guidelines, a kind of averaged best option. You, in turn, can deviate from the dimensions of the parts to create a stove that satisfies your specific wishes.
The design of a long-burning furnace is quite clear from the drawing presented above. Here are its main components:
- Combustion chamber - wood burns in it with the formation of pyrolysis gas;
- Afterburner – combustion of pyrolysis products occurs in it;
- Doors of the combustion chamber and ash pan - they are purchased in the store, but you can make them yourself;
- Chimney - in most cases it is a pipe with a diameter of 100-150 mm.
You can deviate from the drawing in one direction or another. But remember that as the size decreases, the burning time decreases and the power of the long-burning stove decreases.
The lower the power, the smaller the heated area. Therefore, it is best to provide a small reserve.
To make a long-burning stove like a potbelly stove, we need sheet steel with a thickness of at least 3 mm - this will ensure a long service life of the heating equipment. If the steel is thin, it will begin to burn through - after a couple of seasons, holes will form in it
Therefore, special attention is paid to the thickness of the steel. The optimal thickness is 3-5 mm
For our example, we will take the classic scheme of a potbelly stove, modify it and get at our disposal an effective wood-burning stove for a home. At the initial stage, we prepare the side sheets - in our drawing they have dimensions of 450x450 mm. Next, we make the lower walls, front and rear walls - their dimensions are 200x450 mm. As a result, we should get a rectangular box. But don’t rush to weld it together - there is a lot of work ahead.
First you need to make a base - this is the bottom wall and two side ones. We weld them together, weld the grate at a height of 80 mm from the bottom. Now we need to prepare the front wall of the long-term heating oven - we weld both doors into it, and then weld it to our structure.
We prepare two metal sheets measuring 200x370 mm. We weld the first of them to the front and side walls at a height of 160 mm from the top. Next, we prepare the back wall - we weld small metal tubes into it, which should fit into the space between the two inner sheets that form the afterburning chamber - secondary air will be supplied through them. Then we weld the back wall and a second metal sheet at a height of 80 from the top (welded to the side and rear walls).
The damper is used to regulate air flow. It is this that improves the efficiency and quality of traction.
Our DIY long-burning stove is almost ready - all that remains is to figure out the top cover. We make a hole in it with a diameter of 100 mm and weld a piece of pipe for the future chimney. Now it remains to find out whether you need a hob or not - it is also welded into the top cover. At the last stage, we install the lid in place and weld it - the stove is ready, now it can be installed on a non-combustible base, attached to the chimney and started.
When starting the long-burning stove presented above, let it burn, then cover the ash pit so that the wood barely smolders and the generation of pyrolysis gas begins.
Another interesting long-burning pyrolysis furnace is shown in the following figure. It is made from a barrel or a piece of large diameter pipe and is equipped with a suitable lid. In the lower part, at a distance of 80-100 mm from the bottom, a metal disk with a hole in the middle is welded. A door is welded between the disk and the bottom, on the side wall. The resulting space forms our firebox. We weld a chimney with a diameter of 70-100 mm in the upper part.
In terms of low cost of use, such a stove is a real gift, since there is no shortage of sawdust in a private home.
The resulting long-burning furnace receives heat by burning pyrolysis gases generated when heating sawdust. The sawdust itself is poured into the main volume, and to prevent it from spilling into the firebox, it is compacted using a wooden cone. When the stove starts, a fire is lit in the firebox, the cone is removed - after a while the unit will begin to produce heat.
Device Features
The functioning of the structure is carried out according to the channel principle, when the distance of passage of heated gases is deliberately extended. For this reason, they give off more heat to the body of the structure. There are simply no special physicochemical and thermodynamic nuances, so it is almost impossible to disrupt anything in the system. (See also the article Heaters for the garden: features.)
Modern small-sized stoves for summer cottages of this type are the predecessors of medieval analogues that appeared on the territory of what is now the Netherlands. The small dimensions are explained by the cramped quarters of that time. It was necessary to create a relatively small but effective heating system.
The device of the oven measures 89×63.5 cm.
Initially, designs were made with a firebox that had a solid bottom, but over time a vent was added underneath. The individual chambers began to be separated by a grate. When arched vaults fell out of use, even low-skilled craftsmen began to build systems.
List of main advantages
The main advantage of a Dutch country stove is its simplicity of design, so you can build it yourself out of brick. In this regard, the final price of the structure is low. To make such a heating system yourself, it is enough to familiarize yourself with its features and laying methods.
List of other benefits
- High functionality implies the ability to use the structure not only for heating, but also for other activities, for example, cooking.
- The small dimensions allow the structures to fit into almost any building. If necessary, it is quite possible to increase the dimensions of the heating system to 50x50 cm.
- A small-sized brick stove for a summer cottage, made using Dutch technology, heats up quite quickly and cools down very slowly. For temporary residence this is an invaluable advantage.
- Good heat output makes it possible to heat rooms even with a large area. The total square footage of the heated object may well reach 60 square meters. m.
- During operation, there is no need to carry out regular combustion and preheat after inactivity. The structure can be used for its intended purpose immediately.
- The relatively low weight makes it possible to install such systems on many types of floors. The low weight is explained primarily by the low consumption of base material.
Finished construction in a log building.
Note! When using cheap fuel with increased ash emissions, a lot of soot remains in the chimney, so quite frequent cleaning is required during operation.
Place for the furnace
Choose the optimal location for the heating stove. For example, a stove installed in the center of the room will distribute heat as efficiently and evenly as possible. However, such placement of the stove is not always convenient.
Stove in the center of the room
If the stove structure is placed against the wall (this option is the most popular and frequently used), cold will flow across the floor of the house.
Select in advance the location of the combustion chamber door. Design the stove so that in the future you do not have to carry fuel throughout the room, spreading dirt around the room.
The heating stove is located against the wall
The best option is to install a firebox in a room that is rarely visited.
Recommendations regarding the foundation are standard - an individual concrete foundation is installed. It cannot be connected to the main foundation.
Calculate the design of the foundation in such a way that it is able to withstand the load not only of the furnace itself, but also of the smoke exhaust structure, which is also strongly recommended to be built of brick.
How can you paint a stove?
It is clear that a newly minted master will not be able to build a beautiful stove the first time due to lack of experience. But this is a fixable matter, because the outside of a brick wall can be covered with paint. Previously, they were plastered and covered with two layers of chalk or lime whitewash, but now there are simpler and more convenient means. In addition, lime is easily transferred to clothing by accidental touch and constantly needs to be renewed.
If we talk about how to paint a brick stove, here are the following options:
- organosilicon heat-resistant enamel of the KO brand, designed for high temperatures;
- silicate or acrylic paints;
- heat-resistant varnish (for example, PF-238) mixed with dye.
In any case, the coating is applied 2 times, the second layer is applied after the first has dried.
The tools used are a brush and a roller. It is advisable to pre-treat the surface with a special primer intended specifically for such purposes. Date: September 25, 2022
Required Tools
You need few tools; they can be easily purchased at any hardware store:
- trowel, or as it is also called, trowel;
- convenient hammer-pick;
- building level;
- roulette;
- plumb line
In addition, during the work you will need:
2 buckets (for water and solution), a construction sieve, a trough where to sift the sand.