Naturally, no one in their right mind would undertake the installation of heating equipment, especially one powered by gas, without having the required amount of knowledge and experience behind them. However, knowing everything about this matter is very useful. This will help you monitor the work of the hired personnel and understand how best to equip the heating system in your home so that it is as comfortable as possible for you. Today we will tell you how to install a heating boiler in a private house, using the example of gas wall-mounted and floor-mounted options.
Installing a heating boiler in a private house
Installation sequence
The industry produces several types of solid fuel boilers - pellet, direct combustion and pyrolysis.
However, installation of a solid fuel boiler of any type is carried out using the same method:
- First, determine the location where the boiler will be placed.
- Next, preliminary preparation of the room is performed.
- Equipped with supply and exhaust ventilation.
- Install the selected solid fuel boiler and lay out the chimney.
- Connect it to the general heating system and check its performance with a test run.
Please note that some models of wood or coal boilers require additional power from the mains. This possibility must be provided for at the preparation stage.
Proper completion of preparatory work before installing a solid fuel boiler in the house is of great importance. If you ignore one of the preparation stages, you will inevitably encounter difficulties during the operation of the boiler. Then all the shortcomings will have to be eliminated in the current mode right in the middle of the heating season. Let's consider each of the listed points in more detail.
Two big differences
The boilers mentioned above are the extremes of a huge variety of models of gas water heating devices. They are available for self-installation. Any other gas heating boiler requires professional work for installation. However, every cloud has a silver lining - specialized companies also take on the preparation of the premises and the preparation of documents. But why can you install only the “tips of scissors” yourself?
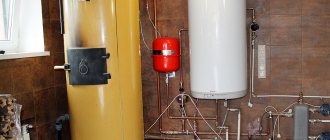
Simple water heater
The simplest boiler is really very simple: a gas burner, a heat exchanger - that's all. It is enough to connect water and gas to it, vent the exhaust into the chimney - and you can use it. If the papers have already been completed; otherwise - an inevitable large fine.
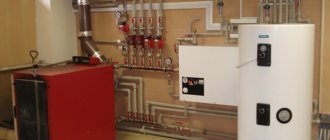
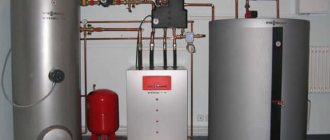
Home boiler room
A double-circuit boiler with a boiler and full automation is so “smart” that installing it is as easy as the simplest one. Automation is important not only for simplicity: a complete system with a double thermostat and a microprocessor monitors the temperature in the house and outside, according to a given program, reduces heating to a minimum according to sanitary standards when no one is at home (for example, when everyone is at work). The gas consumption of such a boiler is 30-70% less than with manual or semi-automatic adjustment, and the savings are greater the more severe the weather.
But such a home boiler room has a serious drawback: if you find yourself in a natural disaster zone and the power supply is disrupted, the automation “stalls” and the boiler goes into the mode of minimal heating of the room. Therefore, such a boiler requires additional costs for guaranteed power supply. It is not difficult to provide it yourself, see below.
Boiler location
The regulatory framework that would regulate the installation of a solid fuel boiler in a private home has not yet been developed. However, the basic requirements for the placement of such equipment can be found in SNiP “Heating and Ventilation” and SNiP 31-02-2001 “Single-apartment buildings” (for the Russian Federation), as well as a number of other individual acts.
It is worth noting that the SNiP “Boiler Installations”, which is often mentioned on the Internet, is not designed for low-power household appliances - its requirements apply to equipment with a power of more than 360 kW, and the rules for installing gas equipment are too strict.
Based on the analysis of the available regulatory framework, which relates to the procedure for placing heating devices on wood, the following tips can be highlighted on how to install a solid fuel boiler in a house:
- Any type of solid fuel, be it wood, coal or pellets, creates a large amount of dust. In addition, during operation of the boiler, varying amounts of smoke may enter the room. In this regard, it is not recommended to install a solid fuel boiler inside the living rooms of the house. Although the regulatory framework does not directly prohibit the installation of a solid fuel boiler in the kitchen, hallway or other rooms, with the exception of the bedroom.
- The best option for placing a solid fuel boiler would be an equipped separate boiler room or one attached to a common house. You can also focus on technical rooms in the house itself, a basement, garage or hallway with good ventilation.
- Heating equipment should be located as close as possible to the outer wall in order to facilitate the work of laying out the chimney, not to create too long a horizontal section or not to lead the pipe through the ceiling.
- Any solid fuel boiler requires periodic cleaning of the heat exchanger and maintenance. Therefore, it is necessary to ensure free access to it. To do this, leave at least 1 m of space in front, and approximately 60 cm in the back and sides, but not less than 25 cm.
- It is prohibited to connect the flue duct of a solid fuel boiler to brick ventilation ducts inside the walls.
Please note that before purchasing a solid fuel boiler, it is advisable to compare its dimensions with the dimensions of the technical room where it is planned to be installed. In addition, it is worth considering in advance the location of the heat accumulator, buffer tank and indirect heating boiler.
In small-sized boiler rooms, heating equipment can be placed quite close to the wall, but only on the unattended side. In this case, the gap can be at least 10 cm, and there must be a gap of at least 25 cm at the back.
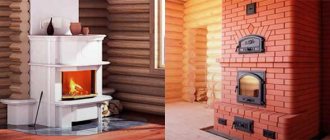
Boiler room arrangement
The first question that needs to be resolved by someone who wants to install a solid fuel boiler in their wooden house is the question of allocating a special room: a furnace room, a boiler room, a boiler room, or, as is more correct from the point of view of the compilers of regulatory documents, a mini-boiler room .
A properly assembled heating system is the key to comfort in your home. For solid fuel boilers, the requirements for room arrangement are not as stringent as for heat generators using liquid fuel or gas. However, there are restrictions and rules on which the efficient, long-term, uninterrupted operation of the equipment and your safety depend.
Separate room
The best option is to plan the location of the furnace at the design stage of the house. But this is not always possible: it happens that the heat generator is installed in a finished house or during the reconstruction of an old home. The room for installing the boiler must be non-residential. It is not recommended to install it adjacent to living rooms, or to place it under stairs or in attics. The furnace room cannot be used as a storage room, cluttering it with things and objects that are not related to the boiler room equipment.
Boiler room. Photo from the site klass.photolandiya.ru For units with a total power (for heating and hot water supply) of less than 150 kW, placement on any floor is possible. If the power of the heating equipment is from 150 to 500 kW, the boiler room can only be located on the first, semi-basement or basement floor, or even better - in a separate extension to the main building, especially if it is a wooden house. An extension for the boiler room is installed on the side of a blank wall, and the distance to window and door openings must be at least 1 m. For the construction and decoration of this auxiliary room, non-combustible materials are used - capable of withstanding fire for at least 45 minutes. The foundation of the boiler room should not be connected to the foundation of the main building. For installation of the boiler, it is possible (recommended) to pour an additional podium with a height of 150-200 mm. The podium area should be no more than 50 mm wider than the dimensions of the heat generator.
Separate mini-boiler room. Photo from econet.ru Think about the option of installing a free-standing boiler room. This may be beneficial from an aesthetic point of view, as well as being more effective for reasons of safety and ease of construction. Boiler rooms located separately from the house can be either full-fledged (accommodating all the equipment) or solely for housing the boiler, and boilers, pumps, automation, etc. are located in the house. Such designs are called modular mini-boiler rooms .
When size matters
The optimal size of the boiler room depends on the selected boiler and other equipment, taking into account convenient maintenance. But its area must be at least 7 m², and its cubic capacity must be 15 m³. This is for boilers with a power of up to 30 kW. If the equipment is more powerful, then add another 0.2 m³ for each kilowatt of power. The ceiling height in the furnace room is at least 2.5 m. How much space to allocate for installing the boiler itself depends on its type and model. If pellets are used as fuel, then it is necessary to take into account the size of the bunker, as well as the method of loading it.
Do not forget to take into account the dimensions of the fuel bunker. For a bunker designed for 400-600 liters, a reserve of space and height is required. To load, you will need to provide a small, stable ladder, since lifting heavy bags over your head is inconvenient. For boilers using sawdust or husks, the method of fuel supply is also important: a circulation or screw agitator takes up more space than a pneumatic supply. In addition, wood waste boilers have a high firebox, and the feed occurs from above. This means that the ceiling height should be higher than standard. There is no need to place the boiler close to the walls; there should be free space around it for service and repair - at least 500 mm. If 2 boilers are used, then the distance between them is at least 1 m. There must be 2 m of free space in front of the device. The manufacturer must indicate the installation requirements in the boiler passport. There may be special recommendations specific to your model, so be sure to read the instructions. In our market, where offers from large online stores are presented, you can choose heating equipment for your home. Go to the selection of solid fuel boilers. Solid fuel boiler Zota “Сarbon-26” RUB 51,990
Stoves here Solid fuel boiler Zota “Pellet”-40S
RUB 239,900
Stoves here Solid fuel boiler Zota “Pellet”-63S RUB
329,900
Stoves here Solid fuel boiler Zota “Topol-14M”
RUB 33,890
About windows, doors, ventilation, etc.
The boiler room must have an opening window for emergency ventilation and daylight. Its dimensions are also regulated. The window area is calculated as follows: for each cubic meter of boiler room volume there should be 0.03 m² of glazing.
How to prepare the room
Preparatory work before installing a solid fuel boiler with your own hands includes several areas:
- preparing a reliable foundation and pouring a concrete foundation, if necessary;
- making ventilation holes and a gap for the chimney in the wall;
- insulation of flammable floors and walls from fire using sheets of metal, mineralite, basalt cardboard or asbestos cement.
A power supply line must be installed in the boiler room. It will be needed to connect the circulation pump and, possibly, the automation of the boiler itself.
There is no need to get rid of wooden elements on the walls and floor. If the distance from the solid fuel boiler to the wooden wall is less than 38 cm, the casing is insulated with one of the above materials. The same sheet material must be placed on the floor below and in front of the boiler so that it protrudes 80 cm. This will protect the room from coals flying out of the open firebox door.
Recommendations for foundation construction will be as follows:
- Solid fuel boilers with low power and weight up to 200 kg can be installed on a cement screed. As a rule, it copes with such a load.
- With a weight of up to 300 kg, the installation of a solid fuel boiler is carried out on a reinforced concrete screed with a thickness of 10-12 cm. With a weight of more than 300 kg, a separate foundation slab will be required.
- Pellet-fired heat generators with a feed auger and an electric motor require a special type of foundation because they have a vibration load.
Please note that a small solid fuel boiler can even be installed on a wooden floor. However, its location will have to be reinforced with lags made of beams with a cross-section of 100x50 mm.
If the installation scheme for a solid fuel boiler in a private house requires the presence of a heat accumulator and other heavy elements, there is no need to pour a separate foundation under each of them. In this case, a single concrete screed 12 cm thick is made, reinforced with rods with a cross-section of 8-14 mm. A mesh with a cell of 20x20 cm is made from the reinforcement, which is placed on top of a bed of well-compacted gravel.
Useful tips
- Even if you have thought out the entire heating system perfectly and installed the coolest equipment, the system will still work intermittently if it is not cleaned in a timely manner.
- A safety valve must be installed in a heating system with a TT boiler; in this case, if it overheats, the valve will drain excess coolant into a special container or sewer.
- If you want to consume less fuel and wisely use the heat generated by the boiler, then you should definitely install a heat accumulator.
- If the power supply is often cut off in your region, then you should take care of installing an uninterruptible power supply. In this case, even after a power outage, the circulation pump will circulate the coolant for several hours, which means the system will not boil.
We hope that our article was useful and informative for you, now you know how to install a heating boiler in a private house. All the best!
How to properly install supply and exhaust ventilation
There are several objective reasons why ventilation in the boiler room is necessary:
- supplying a sufficient amount of oxygen to the boiler to maintain the combustion process;
- removal of carbon monoxide that accidentally entered the room from the furnace outside the premises;
- compensation of the amount of air used during the combustion process.
Please note that to burn 1 kg of firewood you will need 4.6 m3 of air, and burning coal requires about 8-9 m3, based on the quality of the fuel.
Here are some tips for arranging a ventilation system:
- Openings for air inflow and outflow should be located on different sides of the boiler room. The supply opening is made at the bottom of the wall as close as possible to the heat generator, and the exhaust opening is under the ceiling.
- If the boiler is equipped with a smoke exhauster or a blower fan, you should not place the hood next to it (read: “How to choose a smoke exhauster for a solid fuel boiler - types, differences”). Otherwise, the draft will reverse, and the exhaust hole will become a supply hole.
- If the door from a residential building opens into a furnace room, then it is advisable to install a grille for the inlet opening in the door leaf. Warm air entering the boiler will improve the combustion process.
- The size of the exhaust opening should be smaller than the supply opening, since most of the incoming air enters into a thermochemical reaction and exits through the chimney in the form of CO2.
You can calculate the required size of the hood if you multiply the boiler power by 8 - we get the hole area in cm2.
Installation of chimney and boiler
Actually, installing a solid fuel boiler in a house is not some kind of super complicated process. It is enough just to place the equipment on the prepared base and level it horizontally using adjustable legs or special pads. The chimney pipe can be aligned with the hole in the wall by turning the elbows.
It is worth noting that when installing a chimney for a solid fuel boiler, it is best to use insulated sandwich pipes - they will help to avoid the accumulation of condensation on the walls of the chimney. Alternatively, pipe insulation can be done independently using basalt wool.
The fastest and easiest way to assemble an attached external chimney. It consists of a vertical fixed pipe, which is connected to the boiler pipe via a tee. If the house is wooden, then the installation of the chimney where it passes through the wall or ceiling must be carried out in compliance with fire safety regulations.
The chimney installation method is as follows:
- A square hole is cut out in the partition, the size exceeding the cross-section of the chimney pipe by 38 cm on each side. So, with a pipe channel cross-section of 100 mm and a thickness of the insulating layer of 5 cm, the hole size will be 100 + 380 × 2 = 860 mm.
- A galvanized box is mounted in the opening - this will be a passage unit.
- A sandwich pipe is passed through the box, and the voids are filled with basalt wool.
- Fix the outer cover of the unit.
In houses made of brick and foam block, the chimney is mounted in a steel sleeve with a seal.
When installing a heating system with a solid fuel boiler, a number of requirements for chimney ducts must be observed:
- the minimum height of the chimney (from the grate to the canopy) is 5 meters, and there can be no more than three turns;
- the joining of individual sections of the pipe is carried out so that precipitation flows outside the pipe, and accumulated condensate flows inside;
- the horizontal section of the chimney should be installed with a slight slope towards the boiler;
- at the bottom of the chimney there must be a condensate collection tank and an inspection hatch;
- the roof cornice can be bypassed by installing two elbows on the chimney with a slope of 30º;
- the pipe must be secured with brackets so that they do not fall on the joints of the sections;
- A weather vane or cone-shaped cap is mounted on top of the chimney.
Please note that the chimney head must be higher than the wind support zone of the roof of this or a neighboring house in order for the draft to be stable.
Connecting a solid fuel boiler to the system
After the installation of the solid fuel boiler with your own hands is completed and the chimney is in its place, you can proceed directly to connecting the equipment to the general system. The main thing to remember is that cold water should not be supplied to a working boiler, especially if it has a cast iron heat exchanger. Otherwise, due to the temperature difference, sticky condensation will form on the walls of the firebox, which will mix with soot. It will reduce the efficiency of the boiler, and it is quite difficult to clean it.
In this regard, the requirements for installing a solid fuel boiler provide a standard piping scheme with a bypass and a three-way valve. It is set to a fixed temperature of 50-55º, so that the coolant will move in a small circle until its temperature reaches the required values, after which the valve will begin to gradually dilute it with a cold flow from the heating circuit.
It is worth noting that when piping pellet boilers, special attention should be paid to connecting the burner and automation. Often, products from European brands are equipped with automatic fire extinguishing systems connected to a central water supply. Therefore, in order to figure out how to properly install a solid fuel pellet boiler, you should consult with a representative of the manufacturer.
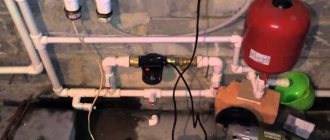
To connect the boiler, you will also need to install an expansion tank, shut-off valves and a circulation pump. After this, the circuit is filled with water and a pressure of 1 bar is pumped into it. Upon completion of work, a test run of the system is performed to check the functionality.
Heating schemes - one-pipe and two-pipe systems, which is better, and what determines the choice of scheme
Heating a private house can be done with your own hands using various schemes. There are two main methods of installation - one-pipe and two-pipe schemes.
The single-pipe heating system is very popular among individual developers for the following reasons:
- The relatively affordable cost of the device and its simplicity, allowing you to do everything yourself. It is enough to have the skills of an average welder.
- Hydraulic stability, in which the heat transfer of the wiring does not change when a separate heating element is turned off.
- Economical use of the main material - pipes.
- The system is characterized by low inertia and rapid heating of the circuit, which is explained by the reduced amount of coolant with this scheme.
- Aesthetic external design, especially when the main pipe is installed in the wall.
- The use of modern shut-off and control equipment (automatic and manual temperature regulators) allows for precise adjustment of the system and ensures its stability.
- Simplicity of design, which determines its reliability.
- Easy installation, maintenance and operation.
The use of automation tools allows you to include a single-pipe system in the Smart Home control scheme complex, which regulates its operation depending on weather conditions, time of day, season and other factors.
The main complaints about such a connection scheme for a private home are the uneven heating of individual elements - the greater the distance from the boiler, the slower the batteries heat up, since the coolant cools as it moves along the circuit.
This effect is partially offset by the use of a circular pump. You can also increase the number of sections in remote batteries, which will even out the heat transfer.
Such measures can significantly reduce the influence of negative factors. As a result, water heating made according to this scheme is considered the best for private houses with an area of up to 150 m3.
In a two-pipe heating system, all radiators are filled simultaneously. This ensures uniform heating of the entire pipeline.
Video - One-pipe / two-pipe circuit
Single-pipe/two-pipe heating system
At the same time, it becomes possible to adjust the amount of coolant passing through any of the system’s collectors.
Such a scheme, done correctly with your own hands, has a number of certain advantages:
- Possibility of automatic temperature control in each room.
- Each circuit operates independently; a failure in one of them does not affect the functioning of the others.
However, there are certain disadvantages:
- increased design complexity;
- high material consumption of wiring;
- increased complexity of execution.
The stability of operation of all systems depends on the choice of heating system scheme for a country house. So, for buildings with permanent residence, it is permissible to use a single-pipe connection scheme.
It is better to use a two-pipe system in houses with periodic visits, when it is possible to warm up the home with reduced fuel consumption.
The choice of connection option depends on the wishes of the developer and is entirely within his competence.