Finally overcame laziness and decided to write about soldering the radiator! While there was silence in the blog, to my surprise, the number of subscribers exceeded a hundred! This makes me very happy, so it’s worth continuing to write!
I stopped writing while soldering the radiator. Unfortunately, during this time almost nothing has changed. Work, then a session, periodic repairs of the second car, etc. They didn’t let me deal with the Volga.
Now to the point: the experimental necromancy of radiators bore fruit - I learned how to solder radiators quite well, plus I realized that not everything that can be soldered is worth soldering. Let me remind you that after flushing the radiator with citric acid, it began to leak quite a lot, and therefore, I decided to try to solder it myself. I think it will be more interesting and useful if it is not just a story, but some kind of soldering manual. Fortunately, I have accumulated a lot of experience, and on the Internet, I haven’t seen much description of how this is done.
Tools and materials:
The first and necessary thing is a soldering iron, even two - one - “a la hatchet”, for good heating of large areas, the second - thin, for sealing in hard-to-reach places. A gas blowtorch is also an indispensable thing. Pliers for picking out the “mesh” of the radiator. Well, brushes for the drill for cleaning. At first I tried to use alcohol-rosin flux for soldering; I had it left over from when I soldered a guitar pedal in my adolescence. I really liked it then, but it’s completely unsuitable here. In addition to the fact that it solders poorly, it also leaves layers in the solder through which coolant can leak. So I decided to use soldering acid - it works great. And of course, solder. I used more than 300 grams of it. From the factory, the radiator was sealed with POS 40 brand solder. At first, I also tried soldering with it, but it was very tedious, and the radiator quickly cooled down to a temperature that was not enough for this brand, so I switched to POS 61.
Process: First you need to determine where the leak is. In the worst case, we'll just see a huge hole. The next level, easy leakage, when filling the radiator with water. And finally, when there are no large holes left, the radiator is pressure checked. I did it like this:
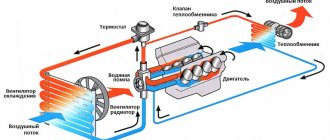
An automobile cooling radiator is designed to lower the temperature of the coolant (antifreeze or antifreeze) circulating inside the engine. Its design usually consists of two tanks and honeycombs located between them, which are a system of thin tubes equipped with thin lamellas. Reducing the refrigerant temperature is achieved through natural or forced air blowing of the cells.
Despite its simple design, the radiator sometimes fails. Its main malfunction is a violation of tightness. In other words, it begins to leak. A coolant leak while the power unit is running threatens the latter with critical breakdowns due to overheating.
Replacing a radiator is not so much a troublesome task as it is an expensive one. And the bill here runs into thousands and even tens of thousands of rubles. In this article we will talk about whether it is possible to solder a cooling radiator with your own hands and what tools you will need for this.
Why does a leak appear?
A leak in the device under consideration can occur only for two reasons: due to mechanical damage and due to corrosion processes occurring inside the tubes. In the first case, it may be the impact of a foreign object on the honeycombs or tanks. This usually happens as a result of traffic accidents, hitting a high curb, hitting a stone, etc. Everything is clear here. A visual inspection will allow you to accurately determine the location of the damage, as well as assess the possibility of repair. Corrosion is a little more complicated. In order not to make a mistake and solder the cooling radiator where needed, you will need to carry out a few simple steps to detect the problem area or even areas. The fact is that corrosion damage can occur in several places at the same time.
Causes of destruction of a car radiator
During operation, elements of the cooling system may receive various damage. There are the following causes of damage:
- mechanical;
- chemical;
- thermal.
Mechanical reasons are caused by the impact on the grille during an accident, road stones, and collisions with various obstacles.
Chemical malfunctions are caused by the effects of corrosive processes on the internal and external surfaces of the radiator.
Thermal malfunctions occur as a result of scale formation on the internal walls of the device.
As a result of leaks, partial or complete loss of coolant occurs. Reducing the amount of coolant leads to overheating of the units and a high probability of engine failure.
To prevent malfunctions in the operation of the cooling system, soldering of radiators is used.
Looking for a leak
A clear sign that the radiator is leaking is the presence of traces of coolant on the ground under the car, on the engine guard, or on the engine itself. Finding the location of the leak without dismantling the device is almost impossible. But before you remove it, you should make sure that the problem is in it, and not in the pipes or, for example, in the leaky plug of the upper tank. When this is done, you can safely drain the coolant and remove the radiator for diagnostics.
If a visual inspection of the device does not yield any results, check it by immersing it in water. To do this, take a container of a suitable size and fill it with water. Close all pipes with plugs and immerse the radiator in water. Now all that remains is to create air pressure in the device. This can be achieved by simply blowing into the filler neck of the upper tank or by coming up with another option with a compressor (pump). The escaping air bubbles will show you exactly where the damage is.
Soldering a car radiator - fixing the leak yourself!
In addition, repair interventions are considered one of the subtypes of mechanical causes, when inept actions of the car owner lead to damage to parts (especially when dismantling the radiator).
To repair automobile radiators by welding, special equipment designed for argon welding or gas-dynamic spraying is used. But what to do if you need to repair radiators yourself, without special equipment.
Despite its simple design, the radiator sometimes fails. Its main malfunction is a violation of tightness. In other words, it begins to leak. A coolant leak while the power unit is running threatens the latter with critical breakdowns due to overheating.
This option is temporary and is only suitable so as not to drain water from the riser or deprive the room of a heat source. After the heating season, the aluminum radiator must be removed in order to carry out high-quality repairs.
In the first case, this problem concerns drivers who in the summer do not use antifreeze or antifreeze, but distilled water, which contributes to the appearance of sediment that is tightly attached to the inner surface of the radiator.
A damaged element does not always need to be replaced with a new part. You can often solder the engine cooling radiator yourself. No complex equipment is required for this.
VAZ 2107 Replacing the heater radiator! In this video, I will show you how to change the heater radiator on a VAZ 2107 car... If it is determined that the leak occurred in the radiator, but the damage is not visible, you must remove the device from the car, after draining the coolant. After this, you need to close all the holes, leaving one, and supply air under slight pressure into it, lowering the radiator into a container of water. The location of the hole can be determined by the escaping air bubbles.
Copper or aluminum
In order to properly solder a cooling radiator, it is necessary to determine exactly what material it is made of. Most often, cooling devices are made from copper and aluminum. It is not difficult to determine the type of material. Copper honeycombs have a characteristic reddish-brown color, aluminum ones – gray.
If you have determined that you have a copper radiator, you can consider yourself lucky. This metal is easy to solder at home. If you get an aluminum device, then you will have to tinker with it, because this material is difficult to solder.
Repairing a copper radiator
To solder an engine cooling radiator made of copper, you will need the following tools and tools:
- powerful soldering iron or gas torch;
- solder;
- soldering flux;
- pliers;
- sandpaper.
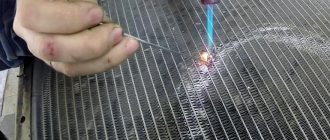
First, you need to dry the radiator, especially if you checked it by immersing it in water. Next, the damaged area should be thoroughly cleaned with sandpaper. If there are slats on it, they need to be removed locally. After this, the soldering area is treated with flux and dried again.
You can solder the cooling radiator using either a gas torch or a soldering iron. In the first case, solder is applied in place and heated with a torch until it melts and fills the crack. When using a soldering iron as a heating tool, make sure that it has sufficient power.
If the solder does not adhere to the surface or lags behind, it is necessary to repeat the stripping and fluxing process. You can check the repaired radiator using the method described above.
Advise! How to solder a radiator. Found where it's leaking from
Flux ZIL-2.
They wrote about sulfuric acid here, I would be afraid. Solder POS-40. Read here first. https://sovet.bos.ru/html/ideiie_e_niiniau_iaijieij_.html Quote. Impact strength (impact resistance) is of greatest importance for pure tin, but POS 40 and POS 30 solder differs little from tin in this regard. Therefore, POS 40 solder can be used in special cases where soldering points are subject to strong vibration. For normal operating conditions, with minor vibrations, POS 18 solder is used.
Next, the tool. You can solder with an electric soldering iron. Inconvenient, takes a long time to heat. A blowtorch is better. You can't solder the tubes, just watch the moment the seam melts. The flame is wide, but it’s okay, you can live. There are different attachments. A propane torch has a flame like a blowtorch, but I have seen propane torches with a narrow flame on sale. But tseeen. Creepy. Because they are imported. And the cylinders are small. I bought a propane-oxygen burner. More useful on the farm. It is much more convenient to work with a narrow flame.
Soldering. Apply flux (more) to the soldering area. You warm up. Look, the coat has spread well. Then again flux and solder. You warm it up again and watch the growth. If necessary, clean problem areas with a thin, sharpened screwdriver (blade width - one and a half to two mm). And again flux + solder + heating.
Attention. After you solder the leak, you will want to solder the entire radiator.