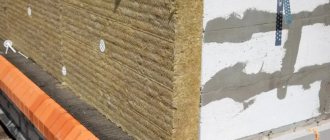
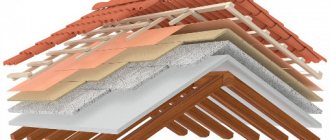
The Ceresit wet façade system is a multilayer structure, which structurally consists of insulating boards fixed to the wall surface, reinforcing elements and a painted plaster layer. The most popular way to insulate buildings and premises is external wall insulation. And the technology that has deservedly taken first place among the methods of external insulation of building facades is the Ceresit insulation system.
The insulation can be polystyrene foam or mineral wool board. The reinforcing element is a plastic mesh. And the last plaster layer is the Ceresit building mixture. For painting, you can use paints based on acrylic, silicone, and silicates.
The main task of such insulation is to retain at least 1/3 of the heat during the cold season, and also, importantly, to give the facade of the house a pleasant appearance. Using this technology, the dew point is moved outside the room. That is why, even with a large difference in temperature inside and outside the house, condensation does not form.
Experts agree that the Ceresit wet facade technology deservedly occupies a leading position when choosing methods for finishing external facades. It 100% copes with the assigned tasks at relatively low costs for materials and labor, and helps to improve the operational characteristics of premises.
Advantages of the Ceresit facade system
Ceresit facade systems make it possible to reduce the consumption of basic building materials during the construction of walls without increasing heat loss during the cold season. It gives the building a beautiful appearance for a long time and is much cheaper in cost than other structures.
The advantages of this design are:
- provide an attractive appearance of the building;
- low weight with high thermal efficiency
- absence of “cold bridges”;
- shift of the dew point into the thermal insulation layer, which eliminates the formation of wet condensation in the walls;
- complete absence of possible freezing of walls in the event of microcracks;
- providing additional sound insulation of walls.
At the same time, the relatively low cost of the necessary materials makes the plaster facade of the Ceresit system quite affordable for most developers. In addition, it should be noted that it is easy to install, significantly reducing construction time.
What is the difference between insulation materials
Polystyrene foam, which can be installed on the facade of a building, sells for approximately 2000 rubles per m, and mineral wool costs approximately 2-2.5 times more. This feature is one of the most significant arguments when choosing materials for insulation. Polystyrene foam has several distinctive features that can be considered advantages. This material can be cut any way you like and sanded very easily, which creates even corners and a perfectly smooth surface. Foam plastic is easy to process and with its help it is very easy to install various cornices and projections on the building, giving the structure an original appearance.
- Wet façade using mineral wool
- Wet facade using foam plastic
If this material is so good, then why is mineral wool used? The high elasticity index makes it possible to cover internal and external curves on surfaces. Mineral wool will always be in close contact with the wall. The high sound insulation rate makes it possible to install a wet façade with such insulation on a building located close to a noisy highway. Mineral wool allows more steam to pass through it than polystyrene foam.
When a wet facade is designed, the size of the insulating layer is selected in such a way that moisture does not collect in the walls and the house remains warm. All efforts will be in vain if water vapor penetrates the wall from inside the building. Wet structures will always freeze strongly and such finishing will not last long in the future. To make the correct calculation of the material when designing a wet facade, you need to contact specialists, and it is first recommended to obtain the necessary data yourself, using one of the online calculators.
Installation of the Ceresit “wet facade” system
Installation of a ceresit wet facade is carried out in several stages, which include:
- preparatory work;
- installation of insulation;
- securing the reinforcing mesh;
- applying a plaster layer;
- surface painting.
High-quality performance of work at each stage is important for all subsequent ones and affects the final result.
Ceresit plaster insulation system - device sequence
Preparing the wall surface
Work on the installation of a facade system begins with an inspection of the surface of the walls on which the mounted materials will be fixed. At the same time, the outer surface is thoroughly cleaned of any dirt and carefully inspected. Defects in the form of cracks, irregularities, potholes are detected and, if necessary, eliminated.
In some cases, to improve the load-bearing capacity of the walls, they are covered with a rough layer of plaster. After this, the entire bearing surface is primed.
Preparing the wall for the construction of the facade requires special attention - the surface must be smooth
To reliably ensure the stability of the system, a U-shaped metal profile is fixed at the bottom of the wall, which plays the role of a support bar. This element is installed along the entire perimeter of the building, as well as above windows and doors. It protects the lower edge of the structure from moisture and allows the weight of the entire multilayer structure to be properly distributed.
The support profile is installed at a height of 30−40 cm from the ground level or installed on a protruding plinth. A gap of 3-4 mm is left between the individual slats to compensate for possible thermal expansion. For fastening, plastic dowels and screws are used, which are driven in every 15-20 cm.
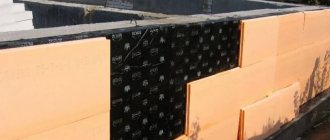
Installation of insulation
Installing insulation is not a complicated process, but it is responsible
After completing the preparatory work, they begin to install the insulation. First, mineral wool boards or polystyrene are glued to the prepared surface using Ceresit SM-15 or SM-11 wet facade adhesive. The glue is applied with a notched trowel in the form of a wide strip along the entire perimeter of the slab and a dotted area in the center. This allows for reliable fastening of the material while economical use of adhesive. To do it correctly, it is enough to cover 40% of the surface of each slab with glue.
The slabs are installed from the bottom up, starting from the bottom row, which is immediately installed along the entire perimeter. Installation of each row starts from the corner. Wherein:
- vertical joints between slabs in adjacent rows should not coincide;
- adjacent slabs are pressed tightly against each other to minimize the thickness of the seams;
- Excess glue protruding from the seams is immediately removed.
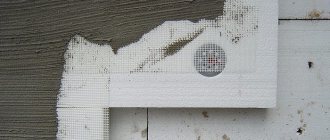
Scheme of fastening the insulation with a disc dowel
Three days later, after the glue has completely dried, fastening plastic dowels are installed, the design of which includes a wide disc-shaped head, a plastic nail and an expanding nail to be driven in.
The length of the dowels used depends on the thickness of the insulation and the wall material. The penetration of a nail into a wall made of porous materials should be at least 9 cm, and for hard materials, at least 5 cm. 6-10 pieces are driven into each slab.
Installation of the reinforcing layer
Reinforcement begins no earlier than one day after installing the insulation. The material used for the reinforcing layer is a façade mesh made of fiberglass with a special alkali-resistant coating. Adjacent mesh strips should overlap each other by 5-8 cm. If it is necessary to strengthen individual sections, the mesh is applied in two layers. A special corner with an edge mesh is installed at corners, doorways, windows and lintels.
The reinforcing layer is applied to the insulation in the plaster layer
The reinforcing material is covered with a layer of adhesive composition 2-3 mm thick, and the total layer thickness can reach up to 5 mm.
Finishing of the facade
The final stage of installing a “wet” Ceresit façade is finishing. It involves applying a layer of plaster to the surface and then painting it. You can begin this work only after the reinforcing layer has completely dried, which lasts 3-5 days.
Finishing of the facade
The material for the plaster layer must have high vapor permeability, good resistance to adverse weather conditions and high mechanical strength. For this purpose, special dry facade mixtures Ceresit are used. Plastering work can be carried out in dry weather at an outside temperature of +5°C to +30°C, while direct sunlight is not allowed on the fresh plaster layer.
The surface is painted with a roller or through a spray bottle with acrylic, silicate or silicone Ceresit paints.
A few words about application technology
The technology of applying the mixture using a trowel is considered a common cladding method. The solution applied to the wall surface is evenly distributed over the entire surface. The mixture is rubbed with a trowel in a circular motion. Depending on how you work with the tool, you will get a drawing of a certain shape. Do not put pressure on the trowel. The thickness of the masonry is determined by the fraction of pebbles.
The technology of applying the mixture using a trowel is considered a common cladding method. The solution applied to the wall surface is evenly distributed over the entire surface. The mixture is rubbed with a trowel in a circular motion. Depending on how you work with the tool, you will get a drawing of a certain shape. Do not put pressure on the trowel. The thickness of the masonry is determined by the fraction of pebbles.
If you want to use the ironing method, then after about 20 minutes of drying the first layer, apply the plaster a second time. In 10 minutes. It can be leveled and polished after 20 minutes.
If you have a roller, you can use it to create an unusual pattern by rolling the working mixture evenly over the wall after treating the surface with a trowel.
The technology of applying ceresit stone plaster using a spatula is a long and labor-intensive process. What is important here is the speed of applying the finished plaster solution over the entire surface of the wall before the mixture hardens. The mortar for plaster is prepared in such a way as to remove the entire workpiece before it hardens.
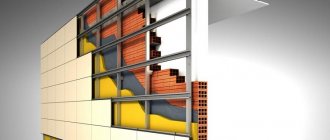
Two systems of “wet” insulating facade Ceresit
Today, two Ceresit warm facade systems have been developed and are successfully used - CWS and WM. Their difference lies in the type of insulation used: in the first case it is polystyrene foam, and in the second it is mineral wool boards. The remaining structural elements are the same in both cases.
Ceresit VWS system
In this system, polystyrene foam boards or polystyrene foam are used as insulation. These materials differ from mineral wool boards in their lower specific gravity and better thermal insulation properties. At the same time, foam materials have very low vapor permeability, which virtually eliminates the removal of water vapor from load-bearing walls and insulating structures.
Cerezit VWS System Components
Since, as a result of the completed insulation, the “dew point” will go beyond the walls into the insulation zone, moisture will accumulate between the moisture-proof insulation and the surface of the walls. This can lead to the formation of fungus and mold with subsequent destruction of the underlying wall materials. In order to avoid the accumulation of such moisture in the premises, it is necessary to organize general ventilation with increased air exchange, which may lead to an increase in heat losses. It is worth noting that this problem occurs mainly in rooms with excess humidity, for example in swimming pools, baths, showers. The vapor permeability of finishing materials is not important, because... expanded polystyrene can be lined with any materials
It should be noted that polystyrene foam is cheaper, lighter and stronger than mineral wool boards. Therefore, its use is justified for economic and technical reasons.
Cerezit VWS device diagram
- Glue
- Expanded polystyrene boards
- Mineral wool serif
- Dowel
- Base plaster layer
- Fiberglass mesh
- Primer for finishing
- Decorative plaster layer
- Waterproofing layer
- Glue
- Extruded polystyrene foam blocks
Video: example of a Ceresit façade with polystyrene foam boards
Ceresit WM system
Here, mineral wool slabs are used as insulation. Unlike expanded polystyrene, this insulation has good vapor permeability and the structure can “breathe”. Moreover, unlike the previous system, here the facing materials must have high vapor permeability, so mineral or polymer plasters are used as finishing. In addition, mineral wool is a non-flammable material, which is very important in the event of a fire.
Components of the Cerezit WM system
Among the disadvantages, it is worth noting that this wet facade system has a high specific gravity, which makes the structure heavier; it is more expensive than foam insulation and is not as durable as them. The price of installing a façade using the Ceresit WM system is relatively high.
Cerezit WM device diagram
- Glue
- Mineral wool slabs
- Dowel
- Basic plastering words
- Fiberglass mesh
- Primer for finishing
- Decorative plaster layer
- Waterproofing layer
- Glue
- Extruded polystyrene foam blocks
Installation instructions for the Ceresit facade system based on mineral wool
Comparative characteristics of Ceresit wet facade systems
| Cerezit VWS | Cerezit WM |
| Benefits | Benefits |
| 1. Does not lose thermal insulation properties when exposed to moisture | 1. Mineral wool slabs are made from natural rocks |
| 2. Environmentally friendly facade | 2. Resistant to very high temperatures, fire resistant |
| 3. Lightweight and durable | 3. High coefficient of vapor permeability |
| 4. More technologically advanced due to strength characteristics | 4. Resistant to most chemicals |
| Flaws | 5. Good sound insulation properties due to the fibrous structure of mineral wool |
| 1. Low coefficient of vapor permeability | 6. Suitable for any wall base |
| 2. Low sound insulation properties | Flaws |
| 3. Not resistant to most organic solvents | 1. Heavy material |
| 2. Relatively high cost |
House insulation schemes
There are three schemes for thermal insulation of facades: a wall with insulation from the inside, a uniform wall of sufficient thickness, a wall with insulation from the outside (SFTK). Each has its own pros and cons.
Wall with insulation from the inside:
+ high thermal protection indicators;
— the walls partially freeze, resulting in accelerated destruction;
- loss of usable area.
Homogeneous wall:
+ high-quality sound insulation;
— low thermal protection, in some regions (for example, in Siberia) it is necessary to build walls of great thickness;
— high material consumption;
— the walls partially freeze, resulting in accelerated destruction;
- loss of usable area.
Wall with external insulation (SFTK):
+ high thermal protection;
+ low material consumption;
+ increasing the service life of the building (if calculated correctly, the dew point is in the insulation, plus the facade system takes on all weather loads, protecting the load-bearing structures of the building);
+ additional sound insulation.
What's better?
When comparing thermal insulation schemes, it becomes obvious that insulating the facade from the outside is the most effective technology. It provides high energy efficiency, saving money on heating in winter and air conditioning in summer. With external insulation of facades, the wear of the structure as a result of atmospheric and climatic influences is reduced - the insulation layer partially takes over them. The technology of external insulation has low material consumption and allows you to build houses with walls that are 7 times lighter than traditional walls made of brick and concrete.
Flaws
Ceresite facade insulation has some disadvantages and limitations in application. So, PPP has the following restrictions:
- susceptible to the action of organic solvents;
- does not protect premises from extraneous sounds;
- has a low coefficient of vapor permeability;
- has limitations in use: applicable only for walls made of monolithic reinforced concrete and three-layer panels;
- It is unacceptable to use in buildings with increased fire safety requirements, for example, in hospitals.
Mineral wool boards have fewer disadvantages:
- the material is heavy (22-40 kg/m2);
- high cost of material;
- low impact resistance.
This method of thermal insulation has universal application and is suitable for all types of walls.
Ceresit building thermal insulation technology has shown good performance and thermal insulation qualities, which allows us to recommend this method. The ability to choose the finish and color to your liking removes restrictions on the personal preferences of the owner of the house or apartment.
“Wet” façade installation technology
is becoming more and more popular, because a small number of cold bridges remain.
But this is far from the last factor in the chosen technology. Thanks to this technology, you literally move dew points outside your living space. As a result, the internal parts of the walls will not suffer from condensation. In our article we will look at step-by-step instructions for this finishing.
Preparing the base
The so-called wet façade Ceresit before the device involves preliminary preparation of the surface:
- The previous facade cladding, if present, is assessed for stability and the degree of its adhesion to the walls and, if necessary, is removed.
- If necessary, the surfaces are leveled. For this purpose, façade putty Ceresit ST 29 is used, applied to walls pre-treated with the primer composition Ceresit ST 17.
- Next, on the border between the base and the main facade, a base profile is installed along the entire perimeter of the building.
Facade putty Ceresit for leveling facade walls
Choice of insulation
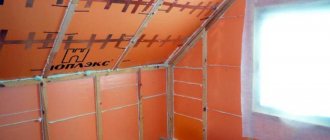
One of two options can be used as insulation for facades using the wet method:
- polystyrene foam (plate thickness 5-10 cm);
- high-density mineral wool (it is best to use basalt wool).
When choosing a material, you can be guided by four main criteria:
- Price. In this regard, polystyrene foam wins because it is a cheaper material.
- Vapor permeability. This property is inherent in mineral wool, which allows the walls of the house to “breathe”. Polystyrene foam does not have this quality.
- Complexity of work. It is easiest to work with foam plastic, due to the higher rigidity of the material.
- Fire hazard. Foam boards are flammable, so they need to be treated with fire retardants. Basalt wool does not burn and can withstand temperatures up to 1000 degrees.
Preparatory work before starting the installation of the system and strengthening the insulation
The installation of Ceresit facades involves the removal of the previous cladding if its stability is questionable and it has poor adhesion to the walls.
The wet facade system may require leveling before further work, during which you can use Ceresit ST 29 façade putty.
This composition must be applied to surfaces that are pre-treated; for this, a façade primer of the Ceresit ST 17 brand must be used.
Then, in the area of the border that connects the base and the facade, along the entire perimeter of the building, it is necessary to strengthen the base profile, which will determine the starting point for installing the insulation slabs.
Afterwards, a heat insulator must be strengthened onto the surface of the facades; they can be slabs of expanded polystyrene or mineral wool.
They are perfectly fixed on the walls with adhesive mixtures of the ST 85 or ST 190 brands, produced by the manufacturer Ceresit. You can also use ST 84 polyurethane glue, which is sold in cylinders.
The peculiarity of the technology at this stage is that an adhesive mixture should be applied to the surface of the polystyrene foam insulation board, and it is necessary to form a strip, the width of which should be 6 cm, while its height should be 2 cm.
The composition should be applied along the perimeter of the base, 2 cm away from the edges. The mixture should be applied in the central part of the slab like beacons, the diameter of each of which should be 10 cm and the height 2 cm.
The maximum number of such beacons should be 8 pieces.
If the insulation process is to be carried out using mineral wool slabs, then the adhesive mixture should be applied in a continuous layer. Once the glue has been applied and distributed, the slab can be applied to the wall and pressed. At the stage of strengthening the insulation, the Ceresit system should be built from the base profile; the material should be laid in order, moving upward.
Do not forget that during the installation of insulation, its position should be controlled using a level. Now you should wait until the glue hardens, only after, in order not to change the position of the plates occupied by them during the fastening process, you can grind the base using a polisher equipped with coarse sandpaper.
Then the insulation can be further strengthened, as described above.
Installation of the reinforcing layer
At the next stage of arranging Ceresit facades, a waterproofing mixture should be applied to the surface of the insulation; when using polystyrene foam heat insulator, the ST 85 mixture from Ceresit is used; when using mineral wool, the waterproofing mixture ST 190 is suitable. The mixture solution should be applied to the base in a layer of 3 mm.
The reinforcing mesh should be laid on the freshly applied mortar and recessed into it with a trowel. Arranging a wet facade requires laying a mesh with an overlap, which can vary from 5 to 10 cm.
During this process, the mesh does not need to be stretched too much and deepened all the way to the heat insulator. Then the façade system must be equipped with a layer of mortar, the thickness of which must be 2 mm.
The mixture should be applied so that the mesh is hidden underneath. And then the surface should be leveled using a metal grater.
Arrangement of the decorative layer
The process of insulating facades using the Ceresit system involves applying a finishing decorative layer at the last stage.
To ensure better adhesion of the reinforcing and decorative layers, priming should be done. As a primer solution, you can use ST 16 facade paint, the color of which is close to the color of the facade plaster. It should be applied as evenly as possible, using a brush; one layer will be enough.
When constructing a plaster facade using a silicone or silicate mixture, you should use a primer of the ST 15 silicon or ST 15 brand in tandem.
A thin-layer plaster mixture should be applied to the surface as evenly as possible, the thickness of the layer should be equal to the thickness of the grain, while using a trowel, the tool should be held at a slight angle, after which the surface must be further smoothed.
After the facade plaster stops sticking to the tool, it can be given the desired texture using a plastic trowel, which must be held in a horizontal position.
Installation of abutment elements on blocks of window and door openings
During insulation, the insulation must extend at least 15-20mm onto the window frame to prevent a cold bridge. The abutment element with the mesh is glued to the window frame on three sides, top, right and left.
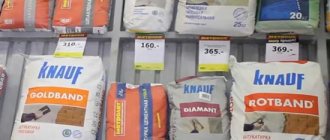
Technical characteristics of Ceresit plaster
Characteristics that are important for choosing when purchasing include the viability of the solution, the volume of water for mixing in liters, the mixture consumption per square meter with a layer thickness of 1 mm and the price in relation to packaging.
The viability of the solution depends on the composition and specialization of the solution, ranging from 60 to 120 minutes or more. This duration allows you to carry out finishing work without haste, apply an even layer and achieve the desired result that is pleasing to the eye.
The consumption of the mixture depends on the mixture and the grain size of the fraction. This aspect is better than many competitors. Thanks to the latest and favorable price-quality ratio, ceresite is one of the best solutions on the plaster market at the moment.
What types of Ceresit plaster exist?
Facade plaster from the company Ceresit ct is divided into different types depending on the composition.
- Silicone. They are most often used for finishing walls. The composition prevents fungus from appearing over time and helps eliminate small cracks. Belongs to the category of expensive material.
- Acrylic. Allows you to remove defects on the surface of the walls. They do not have sufficient vapor permeability, but are distinguished by their smooth texture and strength.
- Cement. Due to the content of a sufficiently large amount of cement in the composition of the material, they are very durable and allow air to pass through well. They are very easy to apply. Cement mixtures are very elastic, which greatly simplifies the processing of walls and the time required for repairs.
- Silicate. The main substance in the material is silicate resin. Ready-made mixtures are very elastic and durable. In most cases, this plaster is used to treat indoor walls. Can be used in rooms with high humidity. Silicate Ceresite is less commonly used for exterior work if there is a wet facade.
- Mineral. It is customary to use it exclusively for external coating of building facades.
Variety of options
Also on sale are compositions intended for further coloring and coating without coloring. The Ceresit company offers mixtures that can be worked with at low temperatures – “winter” and at high temperatures – “summer”.
Textures of Ceresit plaster
Mixtures of this type have only two textured patterns. A certain texture can be obtained if the ceresit mixture contains special granules and by using a special application - “bark beetle”. This texture is applied in an extremely thin layer. The plaster contains many small grains, which make it possible to obtain an interesting pattern. Can be used for both interior and exterior work.
Each texture is available in different colors. If necessary, you can paint it yourself. It is best to use paints from the same manufacturer for this. It is worth noting that Ceresit paints may contain components such as acrylic, silicone or silicate.
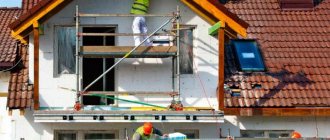
Step-by-step instruction
The Ceresit system is not complicated. However, its installation must strictly comply with the manufacturer’s established rules. Let's consider the stages of work.
Comprehensive base preparation
Insulation begins with an inspection of the facade itself, the roof structure and the base. The walls and basement area are checked for various damages, and any existing irregularities are eliminated.
Experts also study the general condition of the roof and cladding, including waterproofing coatings and the finishing façade layer. After the inspection, the nature and volume of contamination on the enclosing structures is determined. Any problems found should be fixed.
Installation of tile heat insulator
Installation of slabs begins from the corner of the structure. The first horizontal layer is placed on a perforated type profile element. The height of the belt around the perimeter is 25 cm, thickness is 4-8 cm. Products made of polystyrene foam are glued with Ceresit CT-85.
The slabs are installed three days after the building is prepared. Dowels equipped with cartridges and washers are used as fastening. Holes for doweling are drilled either with a hammer drill or a drill - the main thing is not to damage the surface of the previously installed slabs.
Waterproofing and reinforcement mesh
First, a waterproofing compound is applied, on top of which a reinforcing mesh is placed. The corners of the slabs are insulated with a perforated aluminum corner. The dimensions of the corners are 25*25*0.5 mm. In addition, it is necessary to strengthen the corners near windows, doors and convex ribs well. The profile is mounted in a fresh layer of composition, after which it is puttied with it.
Further work boils down to applying a reinforcing mesh to the adjacent wall to cover the profile, 10 cm in size. To glue the mesh, use “Ceresit CT-85” or “Ceresit CT-190”.
The thickness of the second waterproofing layer ranges from 1-1.5 mm. If the system involves underground insulation, then after creating this layer it is necessary to waterproof the underground areas using Ceresit materials of the CR, CP or BT group. As soon as they dry, the soil is filled back in.
Finishing work
The finishing layer, as well as additional fasteners, are applied three days after laying the insulation with waterproofing. First of all, it is necessary to prime the surface to be treated with Ceresit ST-16. After 3-6 hours, the structure is covered with one of the following decorative materials - Ceresite CT-35, CT-64, CT-36, CT-63, CT-137, CT-60.
Preparation of Ceresit CT-35 or CT-36 is carried out by mixing with water in a ratio of 1: 0.2-0.22. The ratio for Ceresit CT-137 is 1:0.17-0.22. The duration of action of Ceresit CT-35 or CT-36 is 1 hour, CT-137 – 1.5 hours.
When insulating with mineral wool, finishing materials must have good vapor permeability. Because of this, the finishing layer can only be made from polymer or mineral plasters. In the system they are represented by silicone compounds.
How to properly prepare the mixture
In order to properly prepare the mixture, you need to take a container, for example a bucket. It is worth noting that it is best to use a stainless steel product. The plaster is mixed using a special construction mixer or in a concrete mixer.
The almost finished mixture is left for a few minutes so that the granules have time to dissolve. Next, you need to thoroughly mix the solution again. Ready decorative plaster should be used within three hours. After this, it will gradually begin to dry out and will no longer be suitable for repair.
Installation of dowels
Dowels additionally secure the insulation sheets to the facade; they are installed either in accordance with the official recommendations of the system holders, two in the middle of the slab and the rest at the joints of the slab with adjacent slabs
or one “star” in the middle and four dowels in the insulation body closer to the edges
If the insulated wall is made of monolithic reinforced concrete, solid brick, expanded clay concrete, then the expansion zone of the dowel should be 50 mm, the total length of the dowel is approximately the thickness of the insulation + 50 mm.
If the insulated wall is made of foam concrete, aerated concrete, slotted brick, multi-slotted blocks, warm ceramics, then the spacer zone is 100 mm, the total length of the dowel is approximately the thickness of the insulation +100 mm.
The top of the dowels must be carefully covered with CeresitST 85 or ST 190 glue; the coating is done after the final sanding of the surfaces to the three-meter rule.