To this day, a significant share of the housing stock is occupied by Khrushchev buildings - houses that were built as a temporary solution to the problem of urban settlement. The quality of life in Khrushchev, taking into account the natural wear and tear of the building over the period of many years of operation, is not distinguished by comfort and coziness. At the same time, residents are forced to put up with other problems, including poor-quality heating during the cold season.
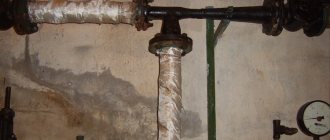
Most Khrushchev houses are heated by old heating devices that do not have proper heat transfer and do not perform their functions well in the heating system. Therefore, residents of such houses resort to various methods to improve the quality of heating of their apartments.
Choosing pipes
Modern design of heat supply systems is 95% based on the use of plastic, polyethylene, and corrugated stainless steel pipes.
Each of them has its own disadvantages and advantages. Metal and copper pipes also have the right to exist, but due to their tendency to corrosion, high cost, and complexity of installation, their use is declining. Preference is given to plastic products that are not inferior in characteristics. For detailed recommendations on choosing heating pipes, watch the video.
Video:
Metal-plastic, polypropylene pipes
Metal-plastic pipes are widely used when laying water supply, heating, and heated floors. They bend well, are easy to install, can withstand significant temperatures and pressure, and have a budget price.
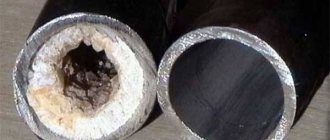
Metal-plastic consists of heterogeneous layers with different coefficients of thermal expansion. Application experience shows that when using metal-plastic for hot water supply, the layers separate, and the pipe fails after 5-7 years. This type of installation of heating pipes in the floor is not recommended.
Polypropylene pipes
Polypropylene has no layers and easily withstands the service life guaranteed by the manufacturer. The main disadvantage is the need to strictly observe the temperature and heating time with a soldering iron during installation. Polypropylene has low thermal conductivity and cannot be used for heated floors.
Corrugated stainless steel pipe
Corrugated stainless pipe, developed using innovative technologies, is recommended for laying heat supply networks. When using such a product, it is easy to install floor heating in a new building or replace old pipelines.
Corrugated stainless steel pipe
Here are some advantages of its use:
- bends easily;
- provides simple connection of fittings, facilitates and speeds up the installation process;
- the corrugated structure compensates for fluctuations in linear dimensions and hydraulic shocks;
- durability;
- does not corrode, there is no sediment on the walls.
PE-X pipes
PE-X – products made from cross-linked polyethylene. Cross-linking is the process of imparting strength to the connection of polyethylene molecules, obtaining a round-shaped product. The pipes are marked (GOST 52134-2003 for Russian manufacturers) indicating the stitching method:
- PE-Xa,
- PE-Xb,
- PE-Xc.
PE-Xa molecules are cross-linked by peroxides. This is an expensive, time-consuming process. PE-Xb – steam crosslinking. The process is simple, so these are the cheapest products in the PE line. PE-Xc - cross-linking with radioactive isotopes.
Polyethylene allows oxygen to pass through well, which allows bacteria to grow inside the heating elements. To prevent oxygen from passing to the coolant, the product is made multilayer. A layer of EVOH is inserted inside.
Innovative developments have led to the creation of polyethylene that is more resistant to high temperatures - PE-RT. In modern construction, heating pipes in an apartment are laid across the floor using PE-RT.
Important! It is recommended to choose a pipe marked PE-RT/EVOH/PE-RT; it is five-layer and does not allow oxygen molecules to pass through to the coolant
| Name. | Diameter, mm. | Wall thickness, mm. | Price, rub./meter |
| PE-Xb | 16.0 | 2 | 59 |
| PE-X/EVOH | 16.0 | 2 | 28 |
| Elsen PE-Xa | 25 | 3,5 | 208.6 |
| PexPenta PE-Xc | 16 | 2 | 50 |
| Stainless steel corrugated pipe S9 304 | 15 | 95 | |
| Casing, HDPE corrugated for polyethylene 16 mm | 25 | 12 |
How to replace an outdated heating unit
Let’s say that at a meeting of condominiums they came to the conclusion that the old elevator unit needs to be replaced. The question immediately arises: which ITP should I choose? How to “link” it to the existing hot water supply and heating distribution? That is, you need to choose an organization that will competently design, install and commission a modern heating unit
ITP in the basement of the house
We can give a specific example of solving such a situation. In Zaporozhye, at the address: st. 40 years of Soviet Ukraine, 78 in a five-story building there was an old and hopelessly outdated elevator unit that did not regulate anything, and the residents’ heating costs were simply “exorbitant” (a photograph of this house is at the beginning of the article).
At the meeting of the condominium associations it was decided: to replace the old elevator heating unit with a standardized individual heating unit for production. This decision to replace outdated components with new equipment made it possible to reduce coolant consumption, as a result, achieve an energy saving effect and reduce payments for heat consumed by residents by almost 30%.
Equipment options, how heat consumption is calculated and payment methods for services
In order to understand how much coolant you consume to heat a house with a large number of apartments, the best option would be to install a house meter. To calculate the payment for consumed heat, readings are taken from the meter. They are divided by the number of apartments in the building and their area. A house meter makes it possible to pay for heat only in the cold season and it is possible to reduce the amount of incoming energy into the heating systems of buildings.
House heat meter
This leads to you saving your finances when favorable living conditions arise. The cost of this type of heating is indicated by local authorities. To install a home meter, first of all, gather the residents for a meeting and decide whether everyone agrees to switch to a different heating method. It is also worth seeking help from specialists to assess the feasibility of a home heating system.
Such a heating system in a five-story building or in a house with fewer or more floors allows heating at certain times of the year and paying bills for actual energy consumption. Such a heating system for Khrushchev houses implies that a meter is installed to control the heat, from which monthly readings are taken. However, this is the most complex heating system for a five-story building for profitable heating. There are a lot of nuances that need to be observed, and there is no guarantee that local authorities will release your home from control.
Heating scheme for a multi-storey building
Features of heating an apartment in a multi-storey building
By carefully reading the instructions for the heating scheme of a multi-storey building, you can make sure that all norms and requirements must be observed.
The layout of the heating system of an apartment building provides for its proper installation, thanks to which it is possible to achieve such temperatures and humidity.
In the process of designing such a heating scheme, you should invite highly qualified specialists who will be able to accurately calculate all the necessary aspects for the work. They must ensure that uniform coolant pressure is maintained in the pipes. This pressure should be the same on both the first and last floors.
The main feature of a modern heating system for a multi-storey building is that it operates on superheated water. This coolant comes from the thermal power plant and has a very high temperature - 150C with a pressure of up to 10 atmospheres. Steam is generated in the pipes due to the fact that the pressure in them increases greatly, which also contributes to the transfer of heated water to the last houses of the high-rise building. Also, the heating scheme of a panel house assumes a considerable return temperature of 70C. During warm and cold seasons, water temperatures can vary greatly, so the exact values will depend solely on the characteristics of the environment.
As you know, the temperature of the coolant in pipes installed in a multi-story building reaches 130C. But such hot batteries simply do not exist in modern apartments, and all because there is a supply line through which heated water passes, and the line is connected to the return line using a special jumper called an “elevator unit.”
This scheme has many features, since such a node is designed to perform certain functions. The high-temperature coolant must enter the elevator unit, which performs the main function of heat exchange. The water reaches a high temperature and, using high pressure, passes through the elevator to inject coolant from the return. In parallel, water from the pipeline is also supplied to recirculation, which occurs in the heating system.
This heating scheme for a 5-storey building is the most effective, therefore it is actively installed in modern multi-storey buildings.
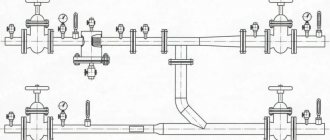
This is what heating looks like in an apartment building, the scheme of which provides for the presence of an elevator unit. On it you can see many valves, which play an important role in heating and uniform heat supply.
When installing heating in an apartment building, the scheme should also provide for the presence of such valves at all possible points so that in the event of an emergency it is possible to shut off the flow of hot water or reduce the pressure. This is also facilitated by various collectors and other equipment that operates automatically. Therefore, this technique provides greater heating performance and efficiency of its supply to the top floors.
Depending on these aspects, the coolant can be supplied either from top to bottom or from bottom to top. Some houses have special risers that act as a supplier of hot water up and cold water down. Therefore, in many apartments, cast iron batteries are installed, which are very resistant to temperature changes.
When designing large-scale heating systems (in particular, calculating the adjustment of the heating system of an apartment building and its full functioning), especially close attention is paid to the external and internal factors of equipment operation. Several heating schemes for central heating have been developed and are successfully used in practice, differing from each other in structure, parameters of the working fluid and pipe layouts in apartment buildings
Do-it-yourself installation of bimetallic heating radiators.
Even before installing heating radiators in an apartment with your own hands, you need to decide on the installation parameters. To install a radiator operating only on the convection principle, the following technological distances are required:
- from the floor to the radiator 10-15 cm. - providing a gap for air flow.
- similarly, from the radiator to the window sill 10-15 cm - providing a gap for air outflow.
- the distance from the back to the wall is 3-5 cm, excluding thermal insulation mounted on the wall before installation.
As mentioned earlier, bimetallic radiators will be installed (Italy). Before we are going to connect the heating radiators to the general network, it is necessary to drain the coolant from the central heating system. This operation in my case was closed by drawing up an agreement with the Housing Office for a certain date and paying the receipt.
A Housing Office employee appeared early in the morning and said that everything was ready and we could begin.
First of all, we install the battery body kit. For this we will need 3 pass-through plugs for connecting two American inputs and one for installation on the upper left side of the Mayevsky tap, which will help bleed air when starting the system. In the lower left part we will simply install a plug. A very important point, for me, is to use only tow and paste for threaded connections and in no case use fum tape, which I consider the weakest link when used. After the heating radiator kit (bimetallic) is assembled, we begin the actual work on the riser. As you can see in the photo below, we begin the work by cutting off the cast iron battery itself with a grinder (cuts 1 and 3), remove it and begin cutting the riser at point 2. Now we take two pipe wrenches, with one of which we hold the pipe going to the neighbor from above and unscrew the second that part of the pipe that we don’t need, on which the old (non-working tap) is located. Then it’s all a matter of technique; using a parallel tool, we cut threads at cutting points 2 and 3 and assemble a structure from a tee, extensions and ball valves, two of which are American (seen on the right side of the photo below). After we have everything assembled, we attach a bimetallic heating radiator and lightly attach the American ones by installing it, for example, on books or any other stand when using a building level. Now we can mark the radiator mounting points on the wall. We remove the radiator and use a hammer drill to make holes for dowels at the designated points, where we then screw in a standard 170 mm bracket. The distance from the wall can be adjusted by screwing/unscrewing the bracket. Additionally, you can use screens for heating radiators that are mounted on the wall before installing the battery and reflect heat back into the room, preventing the wall from heating.
Yes, before I forget, the inputs to the heating radiator have their own distance between the axes, which in my case is 50 cm. So, when assembling a heating system with a bypass and outgoing taps, it is necessary to take this parameter into account, and the distance between the axes of the American ones will similarly be 50 cm.
At this point, the installation of heating radiators in the apartment is completed and only cleaning of the heating pipes and subsequent painting is required. What happened in the end can be seen in the photo below.
Calculation of radiator sections. Heat transfer from radiators.
Before performing calculations, you need to be sure that other factors affecting heat savings, such as external insulation, replacement with new windows and slopes, have been completed.
To calculate the sections of the heating radiator, we need the initial data:
- power of one radiator section (heat transfer from radiators).
- area of the heated room.
- required thermal power per square meter of room.
For my case (sectional radiators), the power of one radiator section (heat transfer from radiators) is 180 W and the area of the heated room is 15 square meters. According to SNiP, 100 W of thermal power is required per square meter of room. We get the formula:
Number of radiator sections = 15 (room area) x 100 / 180 (section heat transfer)
We get the number of radiator sections equal to 8.3. We round this value up and get the value 9, and taking into account the fact that manufacturers actually slightly overestimate the power value of the section, I decided to add one more. Thus, for my rooms, the number of heating radiator sections turned out to be equal to 10. When calculating the radiator sections, I did not take into account the fact that there would be a heated floor in the kitchen, since it was made not for heating but for a comfortable temperature.
After drying the poured floors and replacing the heating radiators, I was able to begin laying laminate flooring in the rooms.
Bottom line
I hope that my experience will be useful to some of you. If the symptoms are similar, negotiate with the neighbors on the top floor and ventilate the riser before the onset of winter. Good luck, comrades!
Starting the renovation in September, and realizing that there is about one month left before the start of the heating season, a decision is made “first of all, the heating batteries in the apartment must be replaced,” and at the same time, preparations for the renovation of the Khrushchev building must begin. We will replace cast iron heating radiators, which after 50 years of use have become completely clogged and, as a result, have cold radiators, with bimetallic heating radiators. As always, we plan to install the heating ourselves. Replacing heating radiators in an apartment requires the presence of a certain tool:
- Grinder with cutting disc for metal.
- A hammer drill and concrete drill for making holes for attaching a heating radiator to the wall.
- Adjustable wrench.
- Building level.
- A tool or die for cutting threads on the riser pipes that will remain after dismantling the cast iron radiator.
Now let's try to do radiator heating at home with our own hands.
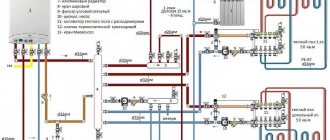
Autonomous heating systems in Khrushchev: choosing a boiler and correct pipe routing
Contrary to popular belief, it is possible to install individual heating in a Khrushchev-era building. To do this, it is necessary to select a boiler that complies with the standards and provide the management company with the developed project. Previously, it gives the technical conditions on the basis of which an autonomous heating system in Khrushchev-era buildings is drawn up.
What should you pay attention to when solving this problem? Let's consider the main components of autonomous heating in a Khrushchev building - a boiler, a piping system and radiators
Heating boiler for Khrushchev
The average area of a two-room apartment in Khrushchev-era buildings does not exceed 60 m2. Therefore, the optimal power of a gas boiler should be 7-8 kW. The next condition is the type of burner - it must be closed. Since the design of the heating system in the Khrushchev-era building does not include the installation of a boiler, normal air exchange must be ensured for its operation. This is necessary to take air from the street using a coaxial chimney. In some cases, it is possible to install carbon monoxide exhaust systems into the building's air ducts. But before this, it is necessary to obtain the approval of the fire service. Often this is precisely the obstacle to installing individual heating in a Khrushchev-era building.
Heating pipes and radiators
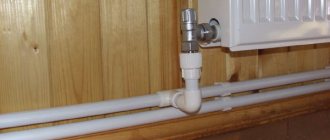
For laying the main line, it is best to use reinforced polypropylene pipes. They are characterized by simple installation and affordable cost. Their advantages include the possibility of hidden installation. It can only be performed on the floor, since gating of load-bearing walls is prohibited. The heating system in Khrushchev is designed in such a way that the installation location of radiators is most often located under the windows. When designing an autonomous heating system, it is possible to provide for the installation of additional batteries. Most often they are installed in the bathroom.
Project and heating schemes for Khrushchev
When developing a heating scheme for a Khrushchev building, you need to take into account all the nuances. In particular, provision of hot water supply. Therefore, it is best to purchase double-circuit heating boilers.
The requirements for the scheme are no different from the standard ones.
- Compliance of temperature conditions and pressure with the operational characteristics of pipes and radiators;
- Connection to the water supply system for heating replenishment;
- Installation of expansion tank and circulation pump.
In this case, it is possible to install a water heated floor. For this purpose, the heating scheme of the Khrushchev house provides for the installation of a collector. It will distribute the coolant through the underfloor heating pipelines; the built-in system for mixing hot and cold water flows (two-way valve) will automatically regulate the temperature.
In addition to upgrading the autonomous heating installation, you can perform a number of actions, the result of which will lead to a reduction in current operating costs and payment for housing and communal services. Considering the specific layout of the heating system in a Khrushchev building, installing heat meters in an apartment is impractical. This is due to the absence of a central riser, i.e. Even for a one-room apartment you will have to install at least three meters - in the bathroom, kitchen and living room.
The total cost of installing one device can range from 25 to 30 thousand rubles. The way out of this situation is to install a common house meter. It will take into account the amount of thermal energy consumed for the entire building. Fortunately, the centralized scheme characteristic of all types of heating in Khrushchev allows this to be done. As an additional function, a mode for adjusting the coolant supply depending on the outside temperature can be provided.
For the central heating scheme of a five-story Khrushchev building, you can install a balancing riser. It will perform the functions of uniform distribution of coolant throughout all floors of the house. However, which project is carried out only in agreement with the housing office, since it falls under the category of changing the principle of hot water supply.
Category: Water supply and heating
Additional measures
Even after installing new radiators for the apartment, the price of which depends on the type, Khrushchevites may notice the insufficient efficiency of central heating.
Single-pipe heating systems in Khrushchev. Heating circuit - bypass
The hot air distribution system must be adjusted so that the rooms are heated with enough air to the lowest possible temperature and exit the diffusers without causing a noticeable surge. Excessive air flow will be perceived as discomfort, aggravated by increased noise in the installation.
The chimney heating parameters - temperature and air flow - must be specified in the installation design, but during operation adjustments are required due to predicted changes in operating conditions. Even a very large fan will not provide this.
Autonomous heating in Khrushchev
To radically solve the problem with cold radiators and low air temperatures in the Khrushchev building, the apartment owner can implement an autonomous heating project.
The project involves installing a separate boiler in the apartment and having a well-developed project regulating the technical conditions under which the autonomous heating system will operate. If the heating of the firebox is insufficient, it is necessary to increase the temperature of the heating air or the intensity of its supply. Therefore, a house heated by a fireplace must have excellent thermal insulation - this will not only save fuel, but also provide greater comfort to heating users. This reduces the need for heat both during severe frosts and during the remaining periods of the heating season, which reduces the most important heating parameters, namely temperature and air flow.
Adjusting the heating power depends on the actual conditions we obtain, mainly by changing the burning intensity in the fireplace while maintaining a constant flow. However, sometimes it is necessary to adjust the amount of air, for example, set the initial supply or turn off the heating of some rooms.
The boiler for a Khrushchev apartment is selected based on the area of the apartment.
Often a device with a power of 7-8 kW is enough to heat a two-room apartment with an area of sixty square meters. According to the regulations, the boiler must have a closed combustion chamber, be equipped with a coaxial chimney and be installed in accordance with the manufacturer’s recommendations.
For this purpose, shock absorbers are installed on individual branches of the pipeline system. Rotary arms hidden in pipes in the ceiling or behind screens on the walls, combined with elastic straps, allow the airflow to be reduced or increased. Anemostats are used to precisely control flow, such as diffusers with an adjustable slot through which air flows.
Heating diagram with two pipes
Note. Excessive airflow suffocation increases airflow noise, which is undesirable, especially in the bedroom. A fireplace insert is usually chosen for its power and appearance. In theory, the rated power of a fireplace should correspond to the heat demand in a given building. However, a fireplace is not a gas boiler, and it is almost impossible to maintain rated power at all times.
Conversion of the circuit
In addition to the boiler, the existing circuit will have to be converted. You can connect used heating batteries and new radiators to it, which are connected via a pipeline according to the heating circuit. Depending on the required heating output, low radiators installed under the window sill, as well as standard radiators, can be used in the heating circuit.
Due to the fact that the operation of the fireplace requires work associated with igniting and maintaining the fire, we must also pay attention to the following characteristics of the cartridge, which affect ease of use. Combustion chamber dimensions. In a larger room it is unlikely that heat can be added and released longer than in a small room
The fixture in the chimney must ensure that the chimney is closed
In a larger room it is unlikely that heat can be added and released longer than in a small room. The fixture in the chimney must ensure that the chimney is closed.
In addition to the air that is distributed throughout the house after heating, the chimney must also be included in the combustion process. Through diffusers, air enters the room where the fireplace is located, and then under the fireplace through the hole under the fireplace door. Air is supplied directly from the house to the hearth... Regardless of aesthetic qualities, it is necessary to ensure good thermal insulation of the cartridge so that the body does not overheat.
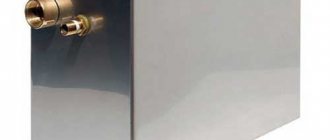
What is a standard mixing unit
A standard mixing unit, or SMS, is a standardized version of a technical solution for the reconstruction of thermal units of buildings. Its main function is to provide the required coolant parameters to maintain them at the required level without overheating or underheating.
Standard mixing unit
A standard mixing unit connects the heating systems of a residential building to the heating network, controls the supply of coolant to the building and creates the heat consumption regime required by the building. In addition to ensuring the efficient operation of the heating system and eliminating the shortcomings of elevator units, the SUS allows further modernization of internal heating systems (balancing risers, installing radiator thermostats on heating radiators), increasing the level of comfort for residents.
The standard mixing unit includes all the elements necessary to regulate and create the hydraulic mode of the heating system, is a completely finished product, and is easy to install and maintain.
Economic aspect
Reading about so many benefits, you involuntarily ask yourself a reasonable question: how much does it all cost, since free cheese is only available in one place? Of course, such systems are somewhat more expensive than traditional vertical distributions with natural circulation.
Specialists from leading construction companies in Russia answer this question in this way: the cost of installation and equipment of horizontal heating systems falls on the shoulders of the developer and amounts to about 20%.
But at the same time, thanks to subsequent heat savings due to adjustment, the consumer pays back the costs within two to three years. The number of accidents and leaks is also reduced, and dependence on the quality of housing and communal services is reduced.
The buyer receives an apartment with ready-made screed in all rooms, and this is high-quality, smooth work done to all standards.
It is also worth noting this nuance: transportation costs are significantly reduced and installation is simplified due to the low weight of polypropylene compared to steel.
Installation
It’s worth saying right away that installing such systems with your own hands is a risky business. The problem is that designing horizontal systems requires serious calculations. Only a competent engineer can make such calculations and correctly design the entire structure.
In addition, installation, debugging and launch of such a system will require the work of experienced specialists familiar with modern technology, plumbing standards and regulations, which are just beginning to be introduced in this country.
You can, of course, find a lot of tips and guidelines for installing horizontal heating systems, but there is no guarantee that such instructions will not lead to an ineffective configuration.
The fact that a particular scheme works for one person does not mean that the same scheme will work for you. This requires an individual approach.
Also, do not forget that the commissioning of accounting equipment requires the participation of government specialists who will confirm the compliance of this equipment with standards.
Advice! If you decide to install such heating yourself, we recommend that you watch the video on our website. You will also need a serious theoretical basis and experience working with plumbing.
It would also be a good idea to find someone who already has similar experience and ask about all the intricacies of the upcoming work.
Open
Principle of operation
Schematic diagram of an open type heating system
Open heating systems are independent, since the coolant circulates through the circuit as a result of natural pressure, without the use of a circulation pump. As a rule, solid fuel boilers, including gas generators, as well as stoves and fireplaces with a water jacket (a container for heating water) can be used as a heater in such situations.
In terms of the number of circuits, the circuit can be either one-pipe or two-pipe, but it is necessary to maintain a slope during installation of 0.01% from the starting point of coolant supply. Since such calculations are quite difficult to make, we can proceed from calculations of a slope of 8-10 mm per linear meter.
Open expansion tank made of steel
For the normal functioning of such a circuit, the expansion tank must be located above the horizontal coolant supply pipe in order to create columnar pressure. That is, hot water from the boiler expands into the circuit.
But when the pressure exceeds the norm, it is simply discharged into the expansion tank, and when the coolant cools, as a result of the column pressure, it returns back to the circuit. Such containers in private homes are usually installed in the attic.
The circulation of water in such systems occurs quite slowly, but this allows for uniform heating of the pipes, which in such cases must be at least 40 mm in diameter. For this reason, such circuits are most often made of steel, although they can also be made of polypropylene.
Circulation pump insert. Photo
But the instructions do not at all prevent you from installing an auxiliary pump in an independent open-type system to increase efficiency. As you can see in the top photo, there is a shut-off valve on the main pipe between the piping for the pump.
It is blocked, and the water begins to move through the circulation pump, and when an emergency shutdown occurs, the main pipe opens and the circuit is blocked. Increasing the coolant circulation rate significantly affects the efficiency of heating the room.
Advantages
- The main advantage of a single-pipe or two-pipe open-type system is its complete independence from third-party energy sources (power lines, diesel or carburetor electric generator).
- Installation of open systems does not require special knowledge, as well as a license or permit when installing and connecting a gas or electric boiler.
- Solid fuel boilers or stoves, as a rule, are unpretentious in the use of fuel - in addition to coal and firewood, it can be any organic material in a dry state.
Flaws
- The water in the expansion tank can freeze, so it needs to be insulated, but adding antifreeze to prevent the liquid from freezing is strictly prohibited.
- When air pockets form in these places, the pipes undergo corrosion, since natural pressure is not able to push air through. To eliminate blockages, you need to pump water into the circuit until all the air is released.
- Low efficiency.
Material selection
Sewage diagram of an apartment building.
Previously, cast iron pipes were used to construct the sewer system. However, at the moment they are being pushed out of the market by plastic products. There are three types of pipes: polypropylene, polyethylene and polyvinyl chloride. To install sewerage in a Khrushchev-era apartment, you can use any option: there is not much difference between them. The general characteristics of plastic pipes are as follows: they are light in weight, easy to install, and do not rust. Thanks to the smooth inner surface, waste water flows easily and quickly, and dirt does not stick to the pipes. The plastic drainage system is easy to assemble. Structural elements are inserted into one another.
The main disadvantage of the plastic system is poor sound insulation. To eliminate it, additional measures are taken and external sound insulation is made. There are PVC and polypropylene pipes with built-in sound insulation. However, their use is not always possible.
The size and parameters of the pipes depend on the task assigned to them. For drainage from a sink or bathtub, a diameter of 40-50 mm is sufficient. But the sewer pipe connecting the toilet and the riser must have at least 85 mm in diameter. Failure to comply with these requirements can lead to dire consequences, including complete system failure.
Battery in the wall: leave it or dismantle it?
There are many apartment buildings with an “in-wall” heating system scattered throughout the former Soviet Union. They can be found both in Moscow and in Murmansk, St. Petersburg, Chelyabinsk, as well as in many cities of Belarus and Ukraine. But what is this “battery in the wall” - a whim or stupidity of Soviet architects? Or an innovation that appeared too early? And what to do with it today: change it or leave it as is?
Reasons for the appearance of houses with in-wall batteries
In Khrushchev and Brezhnev times, when such housing was built, the main task of architects and builders was to provide the population with their own living space as quickly as possible. And the formation of a centralized heating system at the stage of pouring reinforced concrete structures was a completely logical step.
Plus, batteries inside walls are a truly innovative and practical solution. With proper pipe laying and high-quality reinforced concrete production with good insulation, it is not the street air that is heated, as many believe, but the slabs themselves.
And according to the technology, heat should be reflected inside the premises. As a result, much less energy is required for comfortable heating. And the air in the rooms is not as humid as with conventional wall-mounted radiators. Today, such a technological solution is increasingly used in European countries precisely because of its cost-effectiveness and practicality.
Read also: Kitchen zoning design. Examples, photos, features
In the Soviet years, the technology of placing batteries inside walls was quite widespread and covered many regions. Such houses were built from series 91, 121, 1-515, 464, 1605 and many others. Each research institute sought to “improve” the design. And in some, only the riser was laid inside the slabs, in others, the entire heating system was installed. In some projects, pipes were installed in the facade walls, while in others, on the contrary, they were installed exclusively in interior walls.
Battery in the wall: how to get rid of it and is it worth it?
The main problem with such batteries is the inability to shut them down when it gets hot. Plus, houses age and naturally the pipes in them do too. An outburst can happen at any moment. And if in a building with “open” heating pipes, they can be replaced with new ones without any noticeable problems. Then you will have to work hard with the “walled up” ones.
Moreover, in most cases, the first thing you will need to do is order a project for rebuilding the heating system, and go through many approvals. Design and estimate documentation can be done externally, but you will have to go to the Housing Office for approvals. It is best to entrust the work to them.
Replacing the sewer pipeline
Before changing the sewer pipes in the apartment, a plan for dismantling work is outlined.
Schematic sequence of repair work
Currently, the alternative piping for cast iron is PVC sewer piping. The phased replacement of sewer pipes and the sequence of repairs consists of the following types of work:
- Disconnecting sanitary fixtures from the existing sewer system. If you plan to reuse household plumbing fixtures, then in this case it is recommended that dismantling be carried out carefully and carefully in order to preserve the material. Old toilets were usually installed with a cement connection to the sewer pipe, so to remove it you have to break the connecting seam with a hammer and remove it piece by piece;
- Dismantling of existing horizontal sewer pipes made of cast iron;
- Old pipes can be dismantled using a heavy rubber hammer or wooden sledgehammer. In some cases, if the pipelines are in good condition during dismantling, a circular angle saw “grinder” with a diamond blade is used;
- Dismantling the existing sewer riser. At this stage, it is best for the owner of an apartment in a multi-storey building to ask the neighbors on the upper floors not to use the sewer. If the owners of the upper and lower apartments do not intend to replace the common sewer riser, then in this case there is only one way out - using a grinder saw, carefully cut the existing riser at the ceiling level at a distance of 100 mm from the ceiling and 80 mm from the floor level;
- The upper and lower uneven cut lines of the cast iron sewer riser are carefully cleaned using a grinding machine equipped with a removable cleaning disc.
Important! Sewerage repairs in an apartment are carried out with mandatory observance of safety regulations and the use of personal protective equipment: safety glasses and respirators.
Advantages and disadvantages
Distributing risers from below means that the pipes through which liquid circulates through heating devices are located at the lowest point of the room: at floor level, under the floor, in basements and basements.
The heating scheme with bottom wiring has several disadvantages. Firstly, the closed water flow does not allow you to turn off one radiator or adjust its operation separately - this is only possible by turning off all devices and the entire pipeline.
This also explains the difficulties when eliminating a leak or repairing a radiator - you have to drain all the coolant. All these problems are solved using bypasses or bypass spare lines.
Types of heating systems for apartment buildings
Depending on the structure, characteristics of the coolant and piping layouts, heating of an apartment building is divided into the following types:
By location of the heat source
- Apartment heating system, in which a gas boiler is installed in the kitchen or separate room. Some inconveniences and investments in equipment are more than compensated by the ability to turn on and regulate heating at your discretion, as well as low operating costs due to the absence of losses in heating mains. If you have your own boiler, there are practically no restrictions on system reconstruction. If, for example, the owners want to replace the batteries with warm water floors, there are no technical obstacles to this.
- Individual heating, in which one house or residential complex has its own boiler room. Such solutions are found both in the old housing stock (stokers) and in new luxury housing, where the community of residents decides for itself when to start the heating season.
- Central heating in an apartment building is most common in typical housing.
The installation of central heating in an apartment building, heat transfer from the thermal power plant is carried out through a local heating station.
According to coolant characteristics
- Water heating uses water as a coolant. In modern housing with apartment or individual heating, there are economical low-temperature (low-potential) systems where the coolant temperature does not exceed 65 ºС. But in most cases and in all typical houses, the coolant has a design temperature in the range of 85-105 ºС.
- Steam heating of an apartment in an apartment building (water vapor circulates in the system) has a number of significant disadvantages; it has not been used in new buildings for a long time; old housing stock is being transferred to water systems everywhere.
According to the wiring diagram
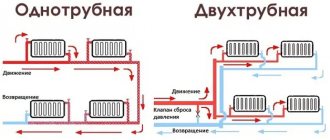
Basic heating schemes in apartment buildings:
- Single-pipe - both the supply and return of coolant to the heating devices are carried out through one line. Such a system is found in “Stalin” and “Khrushchev” buildings. It has a serious drawback: the radiators are located in series and, due to the cooling of the coolant in them, the heating temperature of the batteries drops as they move away from the heating station. In order to maintain heat transfer, the number of sections increases as the coolant moves. In a pure one-pipe circuit, it is impossible to install control devices. It is not recommended to change the configuration of the pipes or install radiators of a different type and size, otherwise the operation of the system may be seriously disrupted.
- “Leningradka” is an improved version of a single-pipe system, which, thanks to the connection of heating devices via a bypass, reduces their mutual influence. You can install regulating (not automatic) devices on radiators, or replace the radiator with a different type, but of similar capacity and power.
On the left is a standard one-pipe system to which we do not recommend making any changes. On the right is the Leningradka, it is possible to install manual control valves and correctly replace the radiator
The two-pipe heating scheme for an apartment building became widely used in Brezhnevkas and is still popular to this day. The supply and return lines are separated, so the coolant at the entrances to all apartments and radiators has almost the same temperature; replacing radiators with a different type and even volume does not have a significant effect on the operation of other devices. Control devices, including automatic ones, can be installed on batteries.
On the left is an improved version of the single-pipe circuit (analogous to the Leningrad circuit), on the right is the two-pipe version. The latter provides more comfortable conditions, precise regulation and gives greater opportunities for replacing the radiator
The beam scheme is used in modern atypical housing. The devices are connected in parallel, their mutual influence is minimal. The wiring is usually done in the floor, which allows you to free the walls from pipes. When installing control devices, including automatic ones, accurate dosing of the amount of heat throughout the rooms is ensured. It is technically possible to either partially or completely replace the heating system in an apartment building with a radial circuit within the apartment with a significant change in its configuration.
With a radial scheme, the supply and return lines enter the apartment, and the wiring is carried out in parallel with separate circuits through the collector. Pipes are usually placed in the floor, radiators are neatly and discreetly connected from below
Problem
The main problem that my relatives told me about was absolutely cold radiators in two adjacent rooms, while in other rooms the radiators became noticeably warmer with the start of the heating season.
For comparison:
- In rooms with warm radiators, the average daily temperature was +17C;
- In rooms with non-working heating +13C.
As they say, feel the difference...
For several days, calls from neighbors and relatives to the heating network ended in approximately the same way - nothing, because... the house is a cooperative one, and its maintenance is not their responsibility, except in emergency cases.
And for a cooperative of 60 apartments (4 entrances), where more than half of the residents are people of deep retirement age, it was expensive to maintain its permanent plumber out of pocket. The part-time specialist only made sure that there were no leaks during the startup of the system, and nothing more.
Searching of decisions
Having arrived at the place, the first thing I do is check the taps on the radiators and on the bypasses - everything is in the open position in both rooms. I open the Mayevsky taps on each radiator - a thin stream of water informs that there is pressure in the system and the radiator is not air-filled. But you need to find out whether there is any coolant in the system at all.
For this purpose I go to the basement of the house. From the elevator unit I determine the direction and find “my” supply and return pipes.
Having reached the location of the apartments at our entrance, I see two - supply and return. To the touch, both pipes differ quite noticeably, so it was not difficult to determine that the colder one was the return pipe.
I use my hands again - both risers are cold, although literally a meter before this section the temperature was more than comfortable. The reason is the airing of the system on the upper fifth floor, which is why the coolant does not circulate.
I leave the basement and go to get acquainted with the neighbors on the upper floor, simultaneously inquiring from other residents about the presence of shut-off valves and their condition. As you would expect, they all have cast iron radiators installed 30 years ago.
In Khrushchev-era houses there is no technical floor, so the coolant is supplied from below from the basement. To clarify the operation of the heating system, I propose to consider the diagram presented below.
We return to the fifth floor apartment. In two rooms of a family of pensioners, cast iron radiators with 12 and 7 sections were installed. They were the ones who had to be ventilated.
The only way available for this is using a nipple (a prototype of the Mayevsky tap) embedded in the radiator plug.
Armed with tools:
- Old galvanized bucket 12 liters;
- Pliers;
- Two flat blade screwdrivers;
- Several floor rags - splashes will be inevitable.
Since a lot of splashes are expected, I provide a place to work around the radiator - I clean it and move the furniture further away. Then I take a screwdriver and, carefully, so as not to lick the edges, unscrew the screw counterclockwise.
- The old system did not work on the first try, I had to use pliers - with their help I turned the screwdriver until the screw came off the stuck place;
- The hiss of air marked the beginning of the air lock coming out. Within 3-4 minutes, the air left the radiator, after which cold water flowed in a thin stream;
- Having adjusted the screw so that the water poured into the bucket, I gave it time - in about half an hour, when the bucket was half filled, the temperature of the water changed from ice to warm, after which I screwed the screw back.
I did the same operation with a cast iron battery in another room. A few hours later, the apartments became noticeably warmer - the thermometer showed an increase of a couple of degrees. Of course, there is no need to talk about a complete solution to the problem of cold in the apartment, because... The coolant temperature is far from 75C, but it’s not yet a bitter winter outside.
Expansion tank for closed heating system
The expansion tank is designed to compensate for changes in coolant volume depending on temperature. In closed heating systems, this is a sealed container divided into two parts by an elastic membrane. At the top there is air or inert gas (in expensive models). While the coolant temperature is low, the tank remains empty, the membrane is straightened (picture on the right).
Operating principle of a membrane expansion tank
When heated, the coolant increases in volume, its excess rises into the tank, pushing back the membrane and compressing the gas pumped into the upper part (in the picture on the left). This is displayed on the pressure gauge as an increase in pressure and can serve as a signal to reduce the combustion intensity. Some models have a safety valve that releases excess air/gas when a threshold pressure is reached.
As the coolant cools, the pressure in the upper part of the tank squeezes the coolant out of the container into the system, and the pressure gauge readings return to normal. That's the whole principle of operation of a membrane-type expansion tank. By the way, there are two types of membranes - disc-shaped and pear-shaped. The shape of the membrane does not affect the operating principle in any way.
Types of membranes for expansion tanks in closed systems
Volume calculation
According to generally accepted standards, the volume of the expansion tank should be 10% of the total coolant volume. This means that you must calculate how much water will fit in the pipes and radiators of your system (it is in the technical data for radiators, and the volume of the pipes can be calculated). 1/10 of this figure will be the volume of the required expansion tank. But this figure is only valid if the coolant is water. If non-freezing liquid is used, the tank size is increased by 50% of the calculated volume.
Here is an example of calculating the volume of a membrane tank for a closed heating system:
- the volume of the heating system is 28 liters;
- expansion tank size for a system filled with water 2.8 liters;
- the size of the membrane tank for a system with non-freezing liquid is 2.8 + 0.5 * 2.8 = 4.2 liters.
When purchasing, select the nearest larger volume. Don't take less - it's better to have a small supply.
What to look for when purchasing
There are red and blue cans in stores. Red tanks are suitable for heating. The blue ones are structurally the same, only they are designed for cold water and cannot tolerate high temperatures.
What else should you pay attention to? There are two types of tanks - with a replaceable membrane (they are also called flanged) and with a non-replaceable one. The second option is cheaper, and significantly, but if the membrane is damaged, you will have to buy the whole thing
For flanged models, only the membrane is purchased.
Device
The circuit includes the following components:
- the main element is the boiler (gas, solid fuel);
- radiators - cast iron or modern bimetallic;
- expansion tank to stabilize pressure and compensate for expansion. It eliminates excessive heating and water hammer;
- drain taps, pipe connections, shut-off valves - for organizing water supply;
- bypasses.