It is advantageous to install an autonomous heating system from plastic materials. This is what most individual developers do. Modern pipes and fittings made of polypropylene can withstand loads well; they can be inexpensively purchased and installed yourself.
However, in order for the work to be of high quality and the communications to work properly, it is necessary to choose the right material, as well as know how to solder heating pipes and follow the safety instructions.
Pipe soldering
In order for the pipeline connections to be reliable, installation work must not be carried out at room temperatures below 5 C. All components (pipes, fittings, valves) must be free of contamination and damage. Therefore, it is important to observe safety precautions when transporting and storing the material. It is important to keep open flames away from the material. Otherwise, the pipes and fittings will become deformed and will be unusable. If it is necessary to intersect pipes, you need to use special (triple, cross) fittings. Threaded fittings are installed where there should be a threaded connection. It is unacceptable to cut threads on polypropylene pipes with your own hands. To ensure the tightness and tightness of the threaded connection, use flax tow or FUM tape.
Soldering in hard-to-reach places and corners
The work of assembling a heat pipeline in hard-to-reach places is more difficult than in conditions of sufficient space. Such places usually include the ceiling area, corners of rooms and cramped conditions when it is not possible to install a soldering iron on a stand.
In such situations, they resort to secret tricks:
- the soldering iron is hung on a hook;
- special corner adapters are welded in the corners;
- if the pipe sections to be soldered are located too close to the wall, then the direct and mating sections of the joint are heated alternately. In this case, the first part is heated a little longer than it should be, and then the counter part is heated for a shorter time, but at a higher temperature on the nozzles (the thermostat is set to heat larger diameter pipes);
- In order not to keep the parts suspended when welding on the walls, it is more convenient to secure the pipe with clips and move them as needed.
Materials and tools
Polypropylene pipes PN 10 are intended for cold water supply, PN 20 - for hot water with temperatures up to 80o.
PN 25 pipes, reinforced with aluminum foil and withstanding temperatures of 95 degrees, have been developed especially for heating in a private house with polypropylene.
Polypropylene pipes PN 25 have the following characteristics:
- Melting point - 150 degrees
- Maximum operating pressure - 25 atm
- Density - 0.9 g/cu. cm
- Thermal expansion coefficient - 0.15 mm/mmC
- Thermal conductivity - 0.24 W/mS
- Outer diameter - 21.2 - 77.9 mm
- Inner diameter - 13.2 - 50 mm
- Wall thickness - 4 - 13.3 mm
The advantages of polypropylene pipes for heating are:
- Resistance to corrosion and scale deposits on internal walls
- Pipes do not burst when water freezes
- Low cost
- Light weight
- Plastic
- Resistance to temperature changes
- High level of sound insulation
- Long service life - up to 50 years
Disadvantages include low melting point and exposure to ultraviolet rays.
To install polypropylene heating, you will need the following special tools:
- Soldering iron with a set of nozzles for connecting pipes
- Plastic pipe shears or roller pipe cutter
- Deburring and chamfering cutter
- Shaver for removing foil
Every home must have heating. However, summer houses are an exception. For example, frame garden houses, which are designed for relaxation during the hot season. Therefore, it is not worth installing a heating boiler, because... The summer temperature itself will warm up such a house.
If you plan to relax only in the summer, then you can build such a garden house with your own hands. Read about how to build such a wonderful building here.
Work and analysis of possible errors
If, when connecting plumbing pipes to a fitting, it is not brought up to the technological stop, there will be a free gap between its end and the fitting. Then, on the installed pipeline at the connection point, a large internal diameter of the pipe and a thin wall thickness will be found. This pipeline zone will have a high accident rate with the shortest period of operation.
Sometimes the pipe is difficult and loose to fit onto the welding nozzle. In appearance, such a connection will look normal, but, by and large, such a fitting will become weak, and the force generated by thermal expansion can break it. In addition, a large influx is likely to appear in the area of such a connection, which will be additional hydraulic resistance, making it difficult for the smooth movement of liquid through the pipeline.
Pipe selection
Before making a selection, you should carefully analyze the specifics of the room, decide on the type of heating system, and also take into account the fact that certain skills and knowledge are required when installing this or that pipeline fittings, consider whether you can do everything yourself or will have to seek help from a specialist .
Types of polypropylene pipes: (1- with aluminum reinforcement, 2- with fiberglass reinforcement).
Manufacturers provide a wide range of products for heating installations made from various materials: metal, metal-plastic, polypropylene, each of which has its own positive and negative sides.
Today, both specialists and non-professionals recognize polypropylene pipes as the most popular and optimal option.
Metal pipeline products are the most expensive, susceptible to corrosion, which, accordingly, reduces their service life, and there are certain difficulties in assembly.
Metal-plastic pipes are well known for their low cost and easy installation process, but they are not strong and durable.
For heating and plumbing systems, the best option is polypropylene pipes, especially when doing the installation yourself. It should be noted that, depending on the purpose of use (heating, hot or cold water supply), pipeline fittings vary significantly in technical characteristics and in no case can be interchangeable.
The wide scope of use of polypropylene pipes is justified by a large number of advantages: reliability and durability (up to one hundred years of operation); corrosion resistance; resistance to chemical influence; protection from mineral deposits; easy installation and subsequent repairs.
And yet this material also has a drawback - low fire resistance.
To make a choice which polypropylene pipes are needed for the heating system, you should choose a diameter that does not affect the water pressure, but also not too wide, since then you will have to overpay unreasonably.
Kinds
Metal-plastic Polyethylene
Such communications are divided into subtypes:
- Polyethylene - used for laying wiring inside buildings and external routes. They can be used on high-pressure pipe connections and at low ambient temperatures.
- PVC is used to reduce the cost of repairs.
- Metal-plastic ones are the most practical products, with a useful life of more than 50 years. Ideal option for replacing hot water supply.
The widespread use of this material is due to a number of reasons. Positive properties of such structures, in contrast to metal ones:
- Long service life.
- Low corrosivity.
- Easy to install.
- Does not require special skills.
- Environmentally friendly material.
- Economical and easy to use.
- Lightweight and easy to transport.
- Resistant to the harmful effects of microorganisms.
Disadvantages and methods for eliminating them
- The main disadvantage of polypropylene pipes is their high expansion coefficient. At a coolant temperature of 100°C, 10 meters of pipe lengthens to 15 cm. This leads to deformation of the structure. In order to prevent destruction, flexible supports are installed and compensation loops are made. Later, foil-reinforced pipes began to be used, which significantly reduced the expansion coefficient. Nowadays, the most practical pipes are reinforced with glass fiber: under the same conditions they extend by only 1 cm.
- Polypropylene products, especially connecting elements, are inferior to metal pipes in strength. It is not even correct to compare them: when subjected to strong impacts with hard objects, polypropylene is deformed and may collapse.
Common mistakes
Plastic welding is associated with a high probability of errors, which can lead to a poor-quality connection. Among the most common errors are the following:
- poor quality training;
- too much or, conversely, too little pressure when joining products;
- cleaning of deposits during the cooling stage of parts;
- attempts to weld pipes of different diameters;
- insufficient deepening of the pipe into the socket of a larger diameter product.
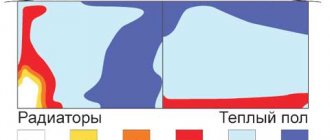
Heating system diagrams
Select the optimal pipe layout for self-installation of polypropylene heating. In the future, you will receive recommendations for connecting individual elements and place them in accordance with the chosen plan.
Single-pipe scheme
Single-pipe scheme
The simplest method of arranging a heating system. In accordance with this wiring method, each battery installed further from the heating unit will heat up to a lower temperature compared to the previously installed battery.
This method makes it possible to reduce the consumption of materials for the arrangement of the heating system. However, the heating efficiency will be low, because The temperature distribution with such pipe routing is uneven.
In view of this, you should try to refrain from a single-pipe pipe routing scheme.
Collector circuit
Collector circuit
To equip a heating system according to this scheme, you will have to spend more materials, however, the basic operational properties of such heating will be much higher.
Heat distribution throughout the rooms will be fairly uniform and high quality.
Two-pipe system
Two-pipe system
The most optimal method of arranging a heating system. The pipes are laid into the floor or into the walls of the house around the perimeter. Two-pipe heating is best suited for heating a home. Therefore, experts recommend giving preference to this particular pipe routing option.
How to solder polypropylene pipes correctly, step-by-step instructions
For those people who will perform electric welding of polypropylene for the first time, it is recommended to first practice and perform several training joint seams. It's easier to learn with straight couplings. In contrast to PP corners and other fittings of complex configuration, they can be easily and accurately diagnosed after soldering is completed, both from the outside and from the outside.
Rules for soldering PP pipes:
- Cut the required section of the pipe with special scissors
- Select the required fitting size. When cold, it should have an internal diameter slightly smaller than the outer diameter of the connecting element.
- The end of the pipeline is cleaned of dirt, treated with alcohol or a regular soap solution and the liquid is allowed to dry.
- The elements to be joined are placed on the appropriate attachment on the welding device.
- They maintain the technological heating time according to the table, which is applicable to the temperature in the welding area of +20 C. If it is lower, the heating period of the parts must be increased, and if it is higher, it must be reduced.
- After warming up, the elements are removed from the nozzles and attached to each other. The clamping must be performed without axial rotation and to the full depth of the fitting socket.
- If installed correctly, a uniform plastic bead will appear along the edge of the fitting.
- Allow time for self-cooling of elements. During this period, it is unacceptable to make any bends or axial turns along the axis of the pipes.
- If during the connection the alignment or degree of relative position is disturbed, then such a unit is cut out and reinstalled. Welding tees, angles and taps must be carried out with extreme caution and in accordance with the parameters indicated in the table.
How to solder PP pipes without a welding machine
Assessing potential options for soldering PP pipes without a welding machine, it can be noted that the most realistic option is a conventional gas burner. It has the ability to operate on various types of gas fuel. And this is of great importance when soldering, since each material has its own melting point. Gases with a higher flash point can be used for larger pipes.
Instructions for soldering pipes without a welding machine:
- Select pipes of equal size and clean them of dirt using the above method.
- When marking, it is necessary to leave 25 mm, which will be soldered into the fitting. This requirement relates to the connection of new parts. During restoration work on old structures, when a fistula has appeared in them and there is no need to use a fitting, such a reserve is not needed.
- The parts to be joined are heated using a torch to the melting temperature. It is important that this technological process occurs synchronously in the two areas being connected, otherwise the connection will be of poor quality.
- When the polypropylene reaches the melting temperature, the pipes are pressed against each other with the greatest force, while avoiding violation of the geometry of the joint.
- Allow the joint to cool to outside temperature and check the quality of the joint.
Connecting pipes by soldering with reinforcement
A reinforcing layer is specially introduced into the structure of PP pipes to strengthen its structure. But this creates a barrier to the strong connection of individual parts. The existing reinforcing insert counteracts the diffusion of the PP material. As a result, the joint becomes weak. The only option to ensure a strong connection when welding elements of PP pipes is to remove the reinforcing layer at the joint area. In practice, it is performed with a special device - a shaver.
Upon completion of cleaning the outer surface of the pipes, carefully remove burrs. After this, it is allowed to carry out soldering according to the method indicated above. The temperature regime for soldering reinforced polypropylene is similar to conventional PP pipes, since they have a similar internal structure of the material.
How to solder using the diffusion method correctly
The technology of such welding is based on melting the surface layer of the elements being joined to the calculated depth. In the case when, in this technical state, combine 2 parts and cool them, the material will return to its original quality and restore the original structure. During this period, the eutectic has the opportunity to combine, forming a monolithic material at the penetration depth. This process is considered diffusion welding.
This technology requires special attention to be paid to the timing of the heating process. To ensure high-quality synthesis, it is necessary that a solid base be preserved under the shell of melted plastic. This will enable the elements to connect coaxially. If the welding components are overheated, the PP material will be softened to its full thickness, then combining them will become impossible, they will simply flatten.
It is for this reason that the creators of welding instruments recommend clear technological time intervals for various standard sizes of connected units.
Connect a metal-plastic pipe with a polypropylene pipe
It is not possible to directly combine a PP pipe with metal-plastic pipes. To do this, you will need to purchase 2 fittings, one for a PP pipe, the other for a metal-plastic one. In addition, they should have equal threads, with only one difference - one has a “female” connection with an internal thread, and the other has a “male” connection with an external thread. In this option, the various pipes will be tightly fixed, and their subsequent separation in such an area will become difficult. To prevent this from happening, you need to install a compression fitting, which evens out the physical deformation of the pipe and ensures quick dismantling of the line.
Such connecting fittings are available straight or angled. There are also tees with threaded outlets. These threads are used for installation with metal-plastic pipes. Fum tape or tow is wound around the thread. There is also a connection method using collapsible American connections.
Advantages of polypropylene
Pipes and connectors
- the heating system made of polypropylene is not subject to corrosion;
- more reasonable price than metal analogues;
- there are no reactions from exposure to acidic or alkaline environments;
- there is no accumulation of deposits on internal surfaces;
- there are no significant changes in coolant temperature, depending on the microclimate of the room, due to the low thermal conductivity coefficient;
- the movement of the coolant is not accompanied by noise;
- due to the property of plasticity, it is possible to make bends in the required places;
- changes in coolant temperature do not affect the design in any way;
- durability and ease of installation.
Security measures
When working with a heating device, it is necessary to observe personal protective measures:
- The soldering iron must be installed on a horizontal surface in a place free from materials.
- The technician must wear protective gloves (for working with hot tools) and comfortable overalls.
- Avoid bending over melting plastic as this process releases harmful fumes.
- The room should be relatively clean. The working surface is free from dust and debris.
- The connection between the soldering iron plug and the network must be tight and the cord must be loose.
The welding tool is preheated for 20 minutes if it does not have a corresponding indicator.
The main advantages of polypropylene pipes
If we list all the advantages of polypropylene pipes, it is worth noting their high level of quality, as well as their affordable cost. Heating systems created from these elements will serve their owners well for decades. The use of unique technologies in the manufacture of polypropylene pipes allows us to speak with complete confidence about the high strength of the products.
Polypropylene pipes do not succumb to the negative effects of corrosion during operation, and also perfectly resist mechanical influences from the outside. Dirt and impurities will not accumulate on the pipe walls. Consequently, the water will be clean and transparent for a long period of time.
As for installation, this is another advantage inherent in polypropylene pipes. Installing polypropylene heating with your own hands is not difficult.
Selecting the diameter of a heating pipe using tables and online calculators
In Internet resources you can find tables of the dependence of the pipe diameter on the speed parameters of the medium V and the heat output Q. Usually the speed does not go beyond 0.2 - 0.7 m/s, and the power of boiler equipment is in the range of 3000 - 40000 W.
To approximately determine the size of PP pipes based on Q and V, one is guided by the following considerations:
- For an individual house, the power of a thermal boiler is calculated based on the consumption of 100 W of thermal power per 1 square meter of heated area. For example, if a house has a total heated area of 100 square meters, then a 10,000 W boiler will be needed for heating.
- The speed of the coolant in gravity systems is assumed to be minimum of about 2 - 3 m/s, with forced supply by a circular pump - 4 - 7 m/s.
As a result, according to the table in Fig. 10 we find that to supply heat with a power of 10,000 Watts at an average speed of movement of the medium along the pipeline line of 5 m/s, PP heating pipes with a circumference of 25 mm should be used.
It is worth noting that a more accurate result can be obtained from tables that take into account the temperature difference between supply and return, as well as their readings (80/60, 75/60).
When calculating pipe diameters using online calculators, the following information is usually entered:
- area of the heated room;
- ceiling height;
- maximum outdoor temperature;
- the number of walls facing the street, sometimes their orientation to the cardinal points and relative to the wind load;
- the degree of thermal insulation of external walls or its numerical coefficient;
- thermal parameters of the flooring;
- thermal characteristics of attic rooms;
- number of windows, their dimensional parameters in height and width;
- type of glazing (sheet or chamber), number of sheets in packages;
- the presence of doors to the street, balconies and loggias, the degree of thermal protection of the latter (cold, warm).
Rice. 11 Table of the relationship between heat flow and coolant pumping volume with its movement speed and pipe diameter
It may be useful to read about Connecting the boiler to the heating system
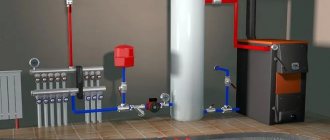
Heating system planning
The main components of the system under consideration include the boiler, the pipes themselves, radiators (batteries) and fasteners.
Heating planning scheme for a private house.
Heating elements (or boilers) vary in fuel types and characteristics. Their installation is recommended in a specially designated area (room, outbuilding) with good ventilation and a gas sensor. The boiler must be installed below or at the level of the lowest point of the heating system, in no case higher.
It is necessary to develop a pipe installation project that includes diagrams in all rooms where the heating installation will be organized. If you are going with your own hands, you should remember that you will need additional components, such as angles and angles of rotation, couplings and various adapters. These points must be reflected in the project at each site where these parts will be used according to the plan. In addition, the diagram should indicate the installation locations of radiators and indicate the length of pipes between them.
You should take care of the fasteners for attaching the pipes. Fastening elements are selected in accordance with the type and diameter of pipes, the weight of radiators (batteries).
There are several options for constructing a heating system made of polypropylene. First of all, there are systems with top and bottom spill.
The first method involves the principle of gravity movement of water. In this case, there is no need to install a circulation pump, since the water will flow through the pipes on its own. This type of heating system is effective in cases of frequent power outages, when the use of a pump is excluded.
Bottom-spout heating systems usually involve radial wiring and the use of a pump to increase water pressure. In this case, it becomes possible to use pipes with a smaller diameter, which, accordingly, allows you to save a little.
The next classification option is a division into one- and two-pipe systems with side and bottom connections to radiators (batteries).
How to solder an aluminum radiator at home
Before proceeding directly to soldering, you first need to remove the battery, drain all the liquid from it, then dry it well . After preparation, you can proceed to one of the soldering methods. These differ depending on whether you choose flux, flux or copper.
Method 1
For this method you will need the following materials and tools:
Materials and tools required for soldering the battery using the first method.
- fine iron filings;
- solder (it is better to use P300A or P250A);
- rosin;
- soldering iron with a power of 100 W or more;
- sandpaper;
- file;
- ceramic crucible.
You need to start work by preparing flux and solder. For this you will need;
- bismuth;
- tin;
- sodium sulfate;
- salt;
- lithium chloride;
- cryolite;
- potassium chloride.
First you need to make solder - mix bismuth with tin. They need to be melted in a crucible in a ratio of 95 (tin) to 5 (bismuth). Then you need to make flux: add table salt (6.5%), potassium chloride (56%), lithium chloride (23%), sodium sulfate (4%) and cryolite (10%). The container with the solution must be tightly sealed, because the mixture quickly absorbs moisture. Warm up the surface with a soldering iron, then apply the resulting melt to the work area. Next, you can apply solder to close the crack.
Soldering instructions:
- First of all, the area around the crack needs to be cleaned with sandpaper. But under no circumstances scratch the surface of the battery .
- Prepare a mixture of melted rosin and sawdust in a 2 to 1 ratio.
- Clean the soldering iron from deposits and plug it into the electrical network to heat it up.
- Treat the prepared surface of the radiator with a mixture of rosin. In this case, rosin must be applied to a heated surface, and not to a soldering iron, otherwise it may char and lose its properties. Only small cracks can be repaired with a mixture of rosin and sawdust, otherwise you will need flux.
- After treating with flux/flux, tin the surface, making circular movements, as if wiping it.
- Over time, the rosin will begin to spread, but you must continue to tin, and at the same time, start adding solder with sawdust, catching it with a soldering iron.
- Solder the crack completely with solder.
After completing all work, do not forget to check the quality of soldering. Fill the battery with water (it is advisable to tint it with potassium permanganate). Leave the radiator for a couple of hours. If no leak is found, then the work was done correctly.
Method 2
In order not to prepare the flux, the damaged area can be covered with a small layer of copper. To work you will need:
Materials and tools required for soldering an aluminum radiator using the second method.
- sandpaper;
- battery;
- soldering iron;
- solder;
- flux;
- copper wire with a diameter of about 1 mm;
- copper sulfate solution.
When all the materials and tools have been found, the preparatory activities have been completed, you can proceed directly to work. Soldering the radiator is carried out as follows:
- Sand the surface around the damaged area with sandpaper.
- Place a large drop of copper sulfate on the damaged area.
- Connect the negative from the battery to the radiator, and the positive to the copper wire.
- Connect the other end of the copper wire to the “drop” of vitriol so that the wire does not touch the battery .
- Wait a while until a thin layer of copper appears on the surface of the battery (the layer under the drop of copper sulfate).
- Now the surface needs to be washed and then dried. Only after this can you proceed to tinning with a soldering iron and soldering.
- Solder the crack with solder.
Existing types of polypropylene pipes and their characteristics
Today, manufacturers offer a wide range of polypropylene products. And before purchasing pipes, you should understand their markings and properties.
There are several categories of such products:
- PN-10 - available with an internal diameter of 16.2-90 mm, external diameter - 20-110 mm; For such pipes, thin-walled polypropylene is used (its thickness can be 1.9-10 mm), designed for operating pressure in the system up to 1 MPa and temperature up to 20 0C, therefore it is not used for heating systems.
- PN-20 - such products can have an external/internal diameter of 16-110 mm and 10.6-73.2 mm, respectively; the thickness of their walls is 1.6-18.4 mm; they are designed for operating pressures up to 2 MPa and temperatures up to 80 0C. Despite the fact that this category is considered universal, these pipes in the heating system can only be used in the return pipeline, provided that the coolant temperature does not exceed the previously specified value.
- PN-25 is the best option for heat supply, the distinctive feature of which is multi-layering (the cross-section of the pipe consists of two layers of plastic, between which a thin layer of aluminum treated with glue is laid). Manufactured reinforced products can have an internal/external diameter of 13.5-50 mm and 21.2-77.9 mm, respectively, and a wall thickness of 4.0-13.3 mm. Such polypropylene is capable of functioning in a system with a coolant temperature of up to 95 0C and operating pressure of up to 2.5 MPa.
- PN-16 - can be used for pipelines with coolant temperatures up to 80 0C, however, this variety is not common and therefore is practically not used.
There is another variety: pipes reinforced with fiberglass, which are similar in quality to products with a foil layer. However, the first type has a slightly higher coefficient of thermal expansion, but their installation is somewhat simpler (category PN-25 requires preliminary removal of the foil on the area to be welded if it is located close to the outer surface).
Figure 4 – Polypropylene pipes reinforced with fiberglass
Difficulties in repairing aluminum batteries
The structure of an aluminum heating battery.
The main problem in working with aluminum is its chemical properties. This metal is soft, but it is capable of oxidizing at the slightest exposure to the external environment. As a result of a chemical reaction with oxygen, a coating is formed, the so-called oxide film, which does not allow the surfaces of the product to be soldered together firmly enough . But this film also protects aluminum from corrosion and destruction, thereby making it a very practical industrial metal.
How to remove oxide film
Most often, fluxes are used to remove plaque. The latter are mixtures that contain inorganic and organic substances aimed at removing the oxide film, as well as protecting the metal surface from oxidation during soldering, improving the adhesion of the solder to the surface.
Flux can be made either independently or purchased in a special store. The latter may include: zinc, cadmium, bismuth. Homemade analogues are called fluxes.
Do-it-yourself installation
When installing heating from polypropylene pipes, it is initially necessary to calculate the laying diagrams. With this installation, it is necessary to maintain the slope level to the lowest point of the system, because a tap or valve for draining is installed in this place. The length of pipe sections must be calculated for each section of communication. If the pipeline is divided into sectors that can be shut off individually at any time, the operation of the communication system will become significantly safer. All tools and installation parts must be at room temperature, for which they must be brought into the room immediately before the installation process. This action is necessary to prevent the material from cracking during operation. Using a felt-tip pen, it is necessary to apply marks according to the calculations performed on the measured pipe sections.
You need to cut the polypropylene with your own hands evenly and perpendicular to the surface with special scissors or a pipe cutter, after which the cut edges of the pipe are treated with an alcohol solution, and the rest of the dirt is removed with a dry rag. A nozzle with the appropriate cross-sectional diameter is installed on the soldering apparatus, which must first be degreased, the apparatus is installed horizontally and heated to 260 °C. Pre-prepared parts (pipe and fitting) are placed in the heater holes in a horizontal position, then the time is determined from the table and the parts are heated.
http:
Then the parts are removed, the pipe is inserted into the fitting and a certain period of time is maintained for the elements to completely harden; twisting the parts during the hardening process is prohibited. This method of welding (soldering) parts is reliable and the most durable. Communication parts must be dry and clean when carrying out soldering work; if installation is carried out in a working (operating) system, then the water must be drained from the heating systems. To conduct trial tests of the heating system, you should not purchase water meters; instruments that show the deaeration of pipes are quite sufficient.
Welding machines for PP pipes
Due to the fact that all pipe connections made of PP material are made by welding, a specially designed welding machine is required to connect them.
Generally applicable options for such welding work:
- With a heater having a circular cross-section;
- a device equipped with a flat heating element.
The latest model is called an “iron” in everyday life due to a certain external resemblance to a popular home device. Various welding machines, in fact, have no fundamental differences, only external structural ones. In the first version, Teflon pipe nozzles are put on and secured to the heating element in the form of clamps, and in the second, they are screwed to the heating element on both sides.
The most important functional part of the welding machine, the heater, can be made in the form of various designs and is designed in such a way that it is possible to install from 2 to 3 pipe nozzles of small cross-section. This makes it possible to save enough time when performing welding work in networks with pipes up to 40 mm. For domestic purposes, experts recommend having an “iron” with a thermal power of up to 1 kW. A welding device with heating elements of more than 1 kW is classified as professional equipment and costs much more.
How to use welding
Before soldering polypropylene pipes, the soldering iron must be placed on a straight plane. Next, nozzles of the required cross-section are attached, which are tightened with special keys included in the delivery set. The nozzle must be placed close to the edge of the connection so that the structure can be welded directly on the walls. It will be more convenient to perform all the disparate parts of the pipe system on stationary welding equipment, which one person can do independently. And you will need an assistant to assemble the parts into a common pipeline line on the wall.
Professional soldering is performed only after the unit has completely warmed up to process temperature, approximately 15 minutes after connecting the device to the network. It is not recommended to unplug the soldering iron during the entire welding process. The two assembly elements are heated synchronously. The plastic that remains on the surfaces of the nozzles after removing the units is removed with tarpaulin material after each installation. Cleaning cold nozzles is not permitted.
Choosing a heating source
Before you begin installing a polypropylene pipeline, you should decide on the heating source. This will affect the overall design of the heating system and the selection of additional elements.
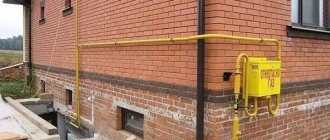
Gas
It is considered a very economical and environmentally friendly type of fuel. However, it is appropriate to talk about efficiency only if the house is already gasified or is at least located near the main gas pipeline. Otherwise, connecting to a remote network will cost the owner a tidy sum.
The best option for installing a heating system using gas fuel is a modern wall-mounted gas boiler, equipped with a set of necessary devices and protective mechanisms that ensure maximum automation of system control processes.
Another advantage of this solution is the ability to abandon the chimney that is so common in private households. Modern gas boilers are equipped with a closed combustion chamber, the supply of oxygen and the removal of exhaust air from which is carried out through a thin tube.
Electricity
Another environmentally friendly way to heat a room, although more expensive than gas. To ensure the operation of the heating system, you will need a special boiler equipped with safety equipment, a pump for circulating coolant (depending on the chosen scheme) and an expansion tank.
Solid fuel systems
They are characterized by a higher coolant temperature at the boiler outlet, which imposes increased requirements on the organization of the safety system.
Stages of connecting heating radiators
Installing batteries in a house and then connecting them requires, depending on the project, a number of auxiliary fittings and components. In this case, the shut-off valves, if they are installed not on a thread, but by soldering, must also be made of polypropylene. For ease of use, ball valves today are available in any modification, both straight and angular.
For reference:
You can use brass fittings, but they are more expensive, and over time, the joints between brass and propylene may lose the strength of the connection.
To make a quality connection, you will need the following tools and consumables: seals, a set of keys, thread paste, mounting tape, threads for making threads.
Standard set of tools for connecting heating radiators
Tying is performed in the following sequence:
connection fittings of the “multiflex” type are screwed into the radiators - couplings equipped with union nuts;
polypropylene pipes using fastening brackets are mounted on the wall according to pre-markings with a permissible gap between the pipeline and the wall of 20-30 mm;
with hidden installation (with laying in a groove), the pipe is brought to the surface only at the points of connection to the radiators;
radiators are attached to the wall using standard brackets or universal pins;
using the so-called soldering iron (optimal power 800 W, operating temperature 270 0 C), a connection is made between the pipeline mounted on the wall and the fixed radiators, not forgetting about installing, if provided for in the project, rod thermostatic regulators.
For reference:
the heating circuit pipes must have a slope corresponding to the design, but in the absence of pre-stressed sections, which over time will turn into a weak link in the heating circuit and can be destroyed by coolant pressure.
To make the installation of radiators more clear, we suggest you watch this video.
Reducing the risk of defects at pipe joints
Recommendations that will help improve the quality of soldering and prevent the formation of defects:
- in difficult areas with limited access it is necessary to work in pairs with an assistant: one master works with pipes, the second with tools;
- To install communications with a fitting, it is recommended to use a template; this will allow you to quickly determine the soldering depth without taking measurements every time;
- You should not turn off the soldering iron every time, the speed of work with it is high, and therefore 10-20 minutes are often enough to complete 1-2 joints;
- If possible, the chamfer is removed on all pipes; its size is 2mm x 45°, which means the length of the side and the angle of inclination;
- internal reinforcement avoids stripping, which distinguishes it favorably from surface reinforcement;
Last stage: cooling and checking the tightness of the connection
Polymer pipes must cool in a natural environment. A forced decrease in the temperature of the material will lead to disruption of a number of processes in the structure of the material. First of all, the strength of the joint will be reduced. To check the tightness the following methods are used:
- perform purging;
- let water through.
INTERESTING: Columnar foundation. Do-it-yourself filling.
Then the permeability of communications is assessed. When a gap appears, water droplets will appear on the outside of the pipeline.
Pipeline installation
Installation of a heating pipeline in a private house involves connecting individual elements into a single system. Perform the following operations:
- layout of elements according to the diagram;
- welding or soldering of pipes;
- connection using fittings;
- connection of heating devices.
Since plastic materials expand when heated, expansion joints are installed. This is a loop of pipe that is soldered into the pipeline on long straight sections. After completion of installation work, it is necessary to carry out a test under operating pressure.
How to solder a heating pipeline
We will describe below how to properly solder heating from propylene pipes. When polypropylene is heated to +260 degrees, it melts, which makes it possible to connect individual elements. This is ensured by the phenomenon of polyfusion - the interpenetration of atoms. We get the junction of two parts that are not separated by a border.
The soldering iron is selected depending on the type of soldering - butt, coupling or fitting. It has nozzles onto which sections of pipes to be connected or a pipe and fitting are put on. After heating, they are tightly connected and held for 4-6 seconds. The heating and cooling time of the connected polypropylene elements depends on their diameter. The data is given in the table, which can be found in the specialized literature.
Attaching the pipeline to the wall
The pipeline is secured to the wall using clips and clamps. Clips ensure that the pipe remains stationary along its axis.
They are attached to the wall with a clamp, placing the pipes no closer than 20 mm from it. Fasteners are placed at a distance of no more than one and a half meters from each other. In places where pipes turn or branch, additional fasteners are installed.
Radiator mounting
Radiators are hung on metal brackets included in the delivery kit and secured to the wall with dowels. Their thickness depends on the weight of the battery. Cast iron elements are additionally supported by legs.
Heating schemes made of polypropylene for a private house
- single-pipe or double-pipe;
- two-pipe with horizontal wiring;
- two-pipe with vertical wiring;
- collector
The single-pipe scheme provides for the passage of liquid in one direction. It is used when connecting radiators in series. The two-pipe model has a return line.
Two-pipe circuit with horizontal wiring
In this scheme, polypropylene pipes are located along the wall just above the floor level, which makes them inconspicuous and does not disturb the aesthetics of the room. This is a conventional two-pipe system with bottom wiring. Most often, heating radiators are installed around the perimeter of the room.
Vertical wiring diagram
The vertical layout is used for heating manor houses with 2 floors or more. The heated liquid is transported between floors via risers. The layout can be upper or lower in relation to the radiator. The upper model is more often used with natural circulation. On each floor you can make a horizontal heat distribution scheme. In this case, one riser is installed, through which the coolant will be transferred to each floor.
Using the distribution manifold
In a heating model with forced circulation, a collector is often installed. In it, a comb of pipes extends from the main riser; their number is equal to the number of heat consumers. Each polypropylene pipe has a separate valve that turns off a specific line. This system allows you to distribute heat evenly and, if necessary, reduce the temperature in a private home.
The disadvantage is the high cost of installation, as the length of the pipeline and the number of fittings increases. However, it is convenient to operate; it is possible to separately turn off the damaged area. Complex collectors are equipped with automatic devices that regulate the temperature of the coolant and turn off the system in an emergency.
One of the methods of heating a home is a water heated floor. Polypropylene pipes are widely used for its installation. The water floor heating system is connected to the main heating network.
Organizing the heating of a manor house is a complex process. To do it yourself, you need to study methods and models of pipe laying, select suitable materials and fittings. It would be a good idea to familiarize yourself with heating projects for residential buildings that are similar in design and size to your home.
Views: 1,370
Diagrams by type of coolant supply
The radiator will work effectively if the coolant is evenly distributed across all sections.
Warm and cold water have different densities. The heated coolant always tends upward. In the system it is replaced by cold, denser water. This feature is taken into account when supplying coolant to the batteries.
Coolant supply diagram
Upper eyeliner
Each radiator has vertical channels connecting the horizontal upper and lower manifold. The presence of these elements allows the coolant to circulate in the device.
With the top connection, mainly only the top of the battery heats up. To prevent such an effect, a jumper is installed after the first rib in the direction of flow of the coolant. Therefore, the heated water first falls into the lower collector.
Then it passes through all sections of the radiator and enters the return pipeline. As a result, the top connection turns into a diagonal way to connect the battery.
If there is no jumper in the radiator, the supply pipe is connected at the top, and the return pipe at the bottom from the opposite end of the battery. This option is called diagonal strapping.
Bottom eyeliner
This is the easiest way to tie. The scheme involves installing the boiler in the basement or on the ground floor. From the heat generating unit, the main pipeline is led to the attic, where the expansion tank is installed. A starting line is laid from the tank, but not lower than 1.5 m to the first radiator.
The supply and return are connected to the batteries at the lowest points on opposite sides. All radiators in the system are connected to pipelines in the same way and installed in series.
When installing a heating circuit with natural circulation, the pipes are laid at an angle. The last battery must be located above the boiler. The height difference between the final radiator and the heat generating unit should not exceed 3 m.
Connection in progress:
- circulation pump;
- bypasses;
- shut-off valves;
- Mayevsky cranes.
Pumping equipment runs on electricity. When it is turned off, circulation of the coolant is possible only in a natural way. Therefore, it is better to lay pipelines at a slope.