Insulating a home is the primary task of a homeowner who wants to use their home as efficiently as possible. Insulating both a wooden and a stone house from the outside will allow the developer to significantly reduce heating costs, save usable space inside the house and protect the house from the negative effects of atmospheric phenomena and precipitation.
One of the most popular and in demand methods of thermal insulation of housing is the technology of insulating the facade with mineral wool under plaster. You can familiarize yourself with the features, rules, tools and stages of installing mineral wool under plaster below.
What is mineral wool?
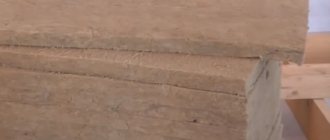
Unlike wool for interior work, façade mineral wool is denser and hydrophobic (repels water). Mineral wool for insulating the outside of a wooden, brick and other house is produced exclusively in the form of slabs with dimensions of 0.6x1.2 m and 0.5x1 m. The thickness of the material can be 5, 10, 15 cm. The most popular type is 10-centimeter mineral wool slabs .
Mineral wool is available in three varieties:
- basalt;
- fiberglass;
- slag.
At the same time, basalt glass wool, due to its record low thermal conductivity, is considered the best option for insulating the outside of a wooden house.
Selection of plaster composition
To apply plaster on stone wool, which is used more often than other types, it is allowed to use various plaster mixtures.
Only one condition is taken into account - the solution must fit well without causing difficulties during operation.
To form a reliable layer of three millimeter thickness, it is recommended to use the following solutions:
- silicone. Sold in finished form, it has special advantages. This plaster is not subject to mechanical damage, is resistant to moisture, and does not lose its properties under sunlight. The hardened surface perfectly allows vapor to pass through and cleans itself in rainy weather;
- mixture on white cement. An excellent vapor-permeable solution is prepared from the dry mixture, which is important when applying it over mineral wool insulation. There is a long operational period of the finished layer and an acceptable cost of the raw materials;
- silicate. An excellent option for application to mineral wool, sold in ready-to-use form.
Acrylic-based plaster composition is rarely used. The fact is that the level of its vapor permeability leaves much to be desired. At the same time, the material is resistant to damage and sunlight.
Many developers, in order to save money, apply cement plaster over stone wool. This composition has a grayish color and needs painting.
The plaster composition chosen for the job must meet certain requirements:
- have sufficient strength to reliably protect the insulating layer from external influences;
- be elastic - capable of changing shapes without accompanying destructive processes. As a rule, this refers to the period of shrinkage of the building and seasonal movements of the soil composition;
- good steam flow;
- resist exposure to damp environments.
Pros and cons of using mineral wool for external thermal insulation of a house
The popularity of insulation is primarily due to:
- low thermal conductivity of the material, and therefore high thermal insulation characteristics;
- excellent sound insulation;
- good level of fire safety (after all, mineral wool does not support combustion);
- vapor permeability (provides “breathing” of the house, which is especially important if the house is not wooden, but stone);
- resistance to fungi and rodents;
- relative environmental friendliness and safety of the material (harmful substances are released only when heated to more than 300 ° C);
- simplicity of installation technology.
Thermal insulation of the facade using mineral wool can be done independently.
As disadvantages, it is worth noting:
- change in the volume of insulation and the appearance of cracks in it (occurs only when there is no reinforcing layer);
- If mineral wool is not treated with a hydrophobic solution, all its thermal insulation characteristics will come to naught, because it almost instantly absorbs moisture.
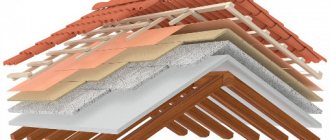
Other wall insulation technologies
Companies producing construction and finishing materials offer innovative methods of surface cladding. Plaster with insulation is inferior in performance to classical technology, but can be used in warmer latitudes. The most widespread type of finishing material is one in which foamed vermiculite is used as a filler.
Insulating plaster with granulated polystyrene foam is suitable for external and internal work. The main parts of such mixtures, in addition to the heat insulator of this composition, are binding components: gypsum, cement or lime and fillers made from sifted and washed sand or other minerals.
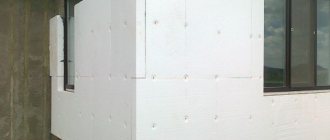
Facade surface preparation
Before starting to work with insulation and plaster, it is necessary to clean the surface of the walls from oil stains and dirt and level them. According to technology, all metal elements that may rust must be removed from the walls outside. If these are strategically important metal elements, then it is necessary to ensure the flow of oxygen under the plaster, i.e. this immediately excludes the use of acrylic-based plaster.
The insulation material must have low thermal conductivity. Therefore, mineral wool, namely its variety with a density of 140 kg/m², is ideal.
If there are remnants of the old coating on the walls, be it paint, plaster or anything else, then insulation cannot be placed under the plaster.
Before starting insulation, it is worth using sags to mark the boundaries of the zones. Sags are strong nylon cords pulled between the reinforcement pins (these pins must then be removed, so do not drive them in too tightly), fixed at a designated point in a vertical, horizontal position and diagonally.
Sags are installed to assess the geometry of the wall
Once the sags are in place, it becomes much easier to evaluate the wall geometry. The sags must be attached so that they retreat at least 1 cm from the mineral wool. After the wall is marked, you can begin installing the guide profiles.
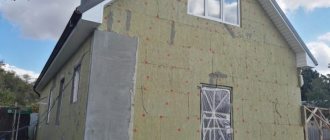
Technology of applying decorative finishing to insulation
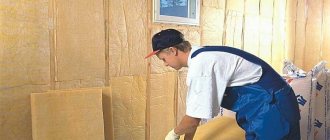
Work on thermal insulation of the facade begins with priming the walls and installing guides. The insulation boards are fixed simultaneously with glue and umbrella dowels. After completing the installation of all the thermal insulation material, finishing begins.
The technology for applying decorative coating provides for certain temperature conditions from +5º to +30ºC. Work should not begin in rain or windy weather.
The solution is applied with a metal spatula, and to level the plaster you will need a rubber tool and a trowel.
The process includes several stages:
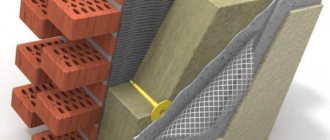
- The surface of the insulation is covered with glue used to fix it to the wall.
- The fiberglass reinforcing mesh is pressed into the adhesive layer and remains until it dries.
- The surface is treated with a primer, the composition is applied with a roller or brush.
- Apply decorative plaster with a wide spatula or metal float.
- The size of the layer depends on the size of the filler fraction.
Drying of the composition takes 48-72 hours, but the exact time depends on weather conditions.
Plastering process
When façade mineral wool for plaster has been selected, you can begin exterior finishing work.
First, you will need to prepare hand tools for plastering work, as well as a knife for cutting insulation, which will also most likely come in handy.
Having chosen basalt insulation or another type of mineral wool, you need a competent and effective approach to finishing.
A prerequisite is surface preparation. To do this, you need to clean it of dirt, remove the old finish, if any, and also treat it with a primer.
Several main stages can be distinguished. Separately about each of them.
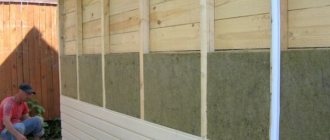
Reinforcement
Typically, mineral wool for facades under plaster requires reinforcement.
Once again, we won’t talk about how the cotton wool itself is attached. Everything is standard here. The sheathing is made, slabs are laid in the cells, a protective film is attached, and so on.
When the thickness of the plaster layer is more than 20 mm, reinforcement is required.
And for this, a façade reinforcing mesh is used, which is attached in two ways:
- First, a layer of adhesive solution is applied, and the mesh is pressed into it, and then leveled;
- The mesh is fixed with an overlap using self-tapping screws and washers.
In this case, the overlap should be about 10 cm. Otherwise, at the points of contact of the mesh, if it is attached end-to-end, cracks may begin to appear.
Advantages and disadvantages
First, let’s talk about the pros and cons of plaster over insulation. In general, you could already learn about the construction of a wet facade from previous materials.
Now I want to separately touch on the topic of strengths and weaknesses.
The technology has the following advantages:
- used on houses and structures made of any building material;
- saves heating and air conditioning costs;
- no need to additionally insulate internal walls;
- relatively fast and simple technology;
- there are no joints between the panels, and tightness is ensured;
- the service life of the building increases;
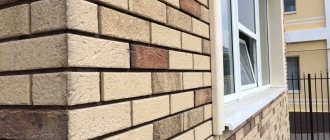
- the appearance of the house improves;
- low price;
- the steam removal effect is improved;
- additional soundproofing protection;
- vibration protection increases;
- wide selection of plaster mixtures.
But there are also certain disadvantages. For starters, these are increased requirements for compliance with technology. It is very important to consider the dew point.
If the technology is violated, the walls may become deformed, a crack will appear, and the plaster will completely fall off over time.
Plastering involves leveling the walls. Other work can only be carried out in warm weather.
An additional disadvantage will be not the highest mechanical strength.
Cost per square meter of work
Installation specialists can offer professional execution of wet finishing of the building facade. Labor costs are calculated as follows:
- Preparing the base of the walls;
- Installation of slabs;
- Application of a reinforcing layer;
- Formation of plaster texture;
- Finishing window slopes;
- Installation and dismantling of scaffolding, etc.
For example, Stroy-Continent has a cost of 1 sq. m of facade insulation starts at 350 rubles, and the group’s price for installing slabs is slightly higher - from 390 rubles per 1 sq. m. m. "LuxElitStroy" for such work puts forward a price of 380 rubles, and the "Brigade of Private Craftsmen" set a price of 300 rubles per square.
Note! It must be taken into account that the cost of facade insulation does not include the remaining stages of work.
High-quality work will provide housing with savings on heating costs, and will also protect it from climate “surprises” for many decades. After all, with proper installation of insulation, the service life of the building increases by 30 years.