Installing a floor or underfloor heating convector is a profitable alternative to using radiators. Devices that use the principle of air mixing (convection) are characterized by a number of advantages compared to more conservative solutions. Their use makes it possible to compensate for heat loss and create comfortable climatic conditions in rooms where the classic radiator circuit does not provide the full heating effect and high-quality maintenance of the set temperature.
In what rooms are water convectors used?
The installation of floor convectors or in-floor devices has significant differences. These operations must be performed professionally, taking into account the characteristics of the heating system, the technical requirements of the devices and the design of the room. The most effective use of this type of heating is recognized in rooms with the following characteristic features:
- French glazing - high, floor-to-ceiling windows, quickly cool in winter, cold air blows from them, and this effect can be compensated for by the rising flow of warm air;
- panoramic and stained glass window designs of a large area - like French windows, they serve as a source of cold flow, which can be intercepted by warm air in order to evenly distribute heat throughout the room;
- exits to loggias with single-chamber double-glazed windows, terraces, winter gardens - a convector device creates the effect of a thermal curtain in the zone of cold penetration;
- rooms of a non-standard configuration, with high ceilings, where the phenomenon of a thermal plug occurs near the ceiling, which causes a significant difference in temperature vertically.
The thermal performance of convectors corresponds to that of radiators, but due to air mixing, heat spreads quickly and evenly. This helps to quickly warm up the room and reduce the cost of heating large spaces with spacious windows.
What is the difference between a convector and a radiator?
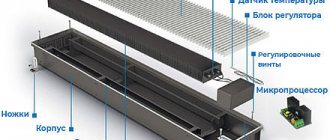
To answer this question, let us explain the principle of operation of a convector heating device, consisting of the following elements:
- copper tube, bent in the form of a coil, with connecting threads at the ends;
- heat exchange plates made of aluminum are rigidly attached to the tube;
- the resulting copper-aluminum heat exchanger is closed from the outside with a decorative metal casing with a grille on the top panel;
- Water heating pipelines are connected to the threads.
In the photo on the right is a copper-aluminum water convector, on the left is a heater with a copper heat exchanger
Note. The connection diagrams for convectors and traditional batteries are identical. The simplest option is shut-off valves on the supply lines. With automatic temperature control, a valve with a thermal head is installed at the inlet and a balancing valve at the outlet.
The operating principle of any convector is as follows:
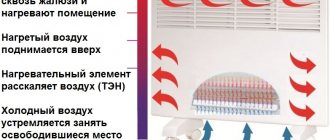
- Coolant from the heating system circulates through the coil with an initial temperature of 40...80 °C. The aluminum plates get hot.
- The heater casing is open at the bottom. From there, cold air flows over the floor of the room to the heat exchanger.
- After passing between the hot plates, the air heats up, becomes lighter and exits back into the room through the upper grille. The convection movement of air masses begins in the room - the heated ones rise to the ceiling, cool, fall to the floor and again pass through the heater.
The structural difference between a convector and a radiator is clear: the first contains a copper-aluminum (or steel) heat exchanger, the second consists of sections or heating panels. The principle of operation also varies - the battery gives off approximately 50% of the heat via infrared radiation, the remaining 50% goes to direct heating of the air. In convectors of any type, this ratio is 10% and 90%, respectively.
Floor-standing (left) and wall-mounted units work the same way - cold air enters from below, heated air exits through the top grille
How to externally distinguish a convection heater:
- along a casing with an upper grille for air passage;
- you can see the fins of the heat exchanger from above, from below it is completely open;
- the surface of the case never heats up to a high temperature, maximum - 40...45 degrees.
A convection heater and a battery are different heating devices. Users sometimes confuse these terms because convectors look like low floor radiators.
Difference between floor and in-floor installation
The type of installation of the convector depends on the design of the device - the floor-standing version assumes that the device will be located above floor level. Floor installation is complicated by the need to prepare a recess into which the device is placed. The pipes are laid depending on the level at which the convector input connections are located.
Installation of a floor-mounted convector
To install a floor-standing device, the surfaces must be prepared - the convector must be installed firmly and reliably to prevent it from moving relative to the coolant supply pipes. KZTO Elegant models are equipped with special stands secured to the floor. Devices should be placed in one horizontal plane, the distance from the wall should be approximately 5 cm.
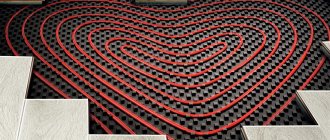
Installation of an in-floor convector
The convector is installed in the floor in pre-prepared recesses, the dimensions of which depend on the selected model. For example, a KZTO device model Breeze B (with forced convection) is installed in a recess of at least 125 mm in body height and 265 mm in width, taking into account a small installation gap. There is space on the body for mounting a protective and decorative grille. In-floor devices are located along the walls at a distance of 5 cm; along glazed surfaces, it is recommended to maintain a distance of 10 to 25 cm in order to create space for air flow upward and effective mixing of the masses.
Decorative frame
Many manufacturers offer convector framing , this is necessary primarily in order to close the joints; often tilers do not perfectly fit the tiles to the convector and gaps and cracks remain, and in such cases the framing is installed. It comes in two types: U-shaped and F-shaped. The U-shaped one is less noticeable because it does not lie on the floor covering. The F-shaped one lies on top and is 1-2 mm wide, thereby completely hiding the joint between the convector and the floor, but in this case the grille is slightly higher than the floor, that is, a slight rise is formed. If without a frame, then the floor, convector and grille are on the same level.
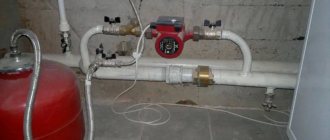
Standard connection to heating pipes
The underfloor convector is connected to standard heating pipes using the supplied parts. Pipes can be located in specially prepared recesses to hide communications. It is technically possible to connect several devices in series, but if the sections are long, it is recommended to separate them for parallel supply of coolant. Convectors with index B (built-in fan) will require electrical wiring.
Installation work and connection should be carried out strictly according to the instructions for the device, observing the requirements of the standards. The technical characteristics and design of KZTO convection water heaters comply with the standards for heating systems of private and apartment buildings.
How to choose a heating device by power
Step one is to determine the heat energy requirement for each room. Calculated according to SNiP or a simplified method - 0.1 kW per 1 m² of area. The choice of electric convectors is simple; the thermal power of each modification is indicated in the passport.
Table from the instructions for the electric convector from the Ballu brand
Choosing and buying a water floor heater is more difficult. The technical characteristics of the device indicate heat transfer under certain conditions, for example:
- t (temperature) of water in the supply pipeline – 75 degrees;
- return t – 65 °C;
- air t in the room – 20 °C.
If you send a coolant with a temperature of 60 °C into the convector, its power will decrease; you need to take the device with a certain reserve. To accurately determine the heat transfer value of a specific model, you should use the manufacturer’s data; there are no other options.
Reference. The Verano company publishes in the equipment data sheets a table of the power of each heating device under various operating conditions. Let us give an example of such a table for a convector with a height of 300 mm and a width of 284 mm.
The heat transfer of a convector of a specific size depends on 3 temperatures: water in the supply/return line and room air.
Since the range of convection-type heaters is quite wide, it is unrealistic to lay out the technical parameters of all devices here. Therefore, to select the size of the convector, it is better to contact an online store consultant or visit the manufacturer’s official website.
Gas supply: main stages
The installation of the gas convector has been completed, now we need to get started with the gas supply. This stage is quite complex and responsible at the same time. To supply gas, do the following:
- According to regulatory documents, the pipe leading to the convector must go along the street. There are two options here: the first is that the pipe has a pre-installed threaded connection, the second is that there is no such connection. If there is a thread, then you can screw on the gas valve yourself, which will shut off the gas supply to the convector. If there is no withdrawal, one must be made. To do this, call professional gas welders from your local Gorgaz or similar office.
- After installing the gas tap, it is necessary to run a metal-plastic pipe to the convector itself. Using a tape measure, calculate the length of the pipe, simultaneously determining the presence of fittings.
- You need to buy pipe and fittings. The principle of purchase is that the seller must clarify the availability of a certificate of conformity of these pipes and fittings for this type of work.
- Lay the pipe, secure it with clips every m. To install the clips, you need to drill holes in the wall.
- When installing the necessary fittings, carefully lubricate the pipe and the fitting itself with silicone, which will provide additional sealing. Silicone will also serve as a lubricant and will make pipe installation easier.
As a result of the work, you should receive a convector mounted on the wall with a gas pipe connected to it.
Now the last stage of installation remains. A test run is required.
Before starting, open the gas tap and go over all fitting joints and threaded connections with a brush moistened with a water solution of soap or shampoo. This way you will be able to notice inflated bubbles (if any), which indicate gas leaks. If this happens, immediately turn off the gas supply valve. After checking the joints, start the convector. To do this, hold down the gas button for one minute. This way the gas will have time to pass through the pipes and enter the combustion chamber. Press the piezo igniter, a spark should ignite the gas. A blue flame will flare up in the firebox.
Adjust the operation of the convector by setting a comfortable temperature. During the first few hours of operation, you may smell an unpleasant odor of burning oil. This is normal, since the convector is new and the combustion chamber burns out. If the smell lingers for a long time, then you should turn off the gas and check all joints and threaded connections again.
It is advisable that all work on the installation of gas convectors be carried out by a professional who has sufficient experience in performing such work. This is also due to the fact that installing a convector yourself may void your warranty on the device. The gas convector must be accepted into the balance sheet by Gorgaz.
You must have a documented permit for the tie-in. In addition, all installation decisions, as well as the conclusions of the commission for acceptance of the device into operation, must be documented and signed in the appropriate manner.
D. Sytov
From a technical point of view, a gas convector is a fairly simple device. Accordingly, its installation may seem like a simple matter. However, there are a number of rules and nuances, neglect of which can lead to incorrect operation of the device or even an accident. Let's consider the basic rules for installing a gas convector
Installation of a gas convector is regulated by the following documents: DBN V.2.5-20-2001 “Gas Supply”; DNAOP 0.00-1.20-98 “Safety rules for gas supply systems of Ukraine”; NAPB A. 01.001-2004 “Fire Safety Rules of Ukraine.”
Adaptations
Manual or automatic cutting methods provide results in various classes of accuracy and roughness. Thus, the main tool remains a tap, which is a rod with cutting edges.
- manual, for metric (M1-M68), inch - ¼-2 ʺ, pipe - 1/8-2 ʺ;
- machine-manual - attachments for drilling and other machines, used for the same sizes as manual ones;
- nuts, which allow you to cut a through version for thin parts, with nominal sizes of 2-33 mm.
- For cutting metric threads, use a set of rods - taps:
- rough, having an elongated intake part, consisting of 6-8 turns, and marked with one mark at the base of the shank;
- medium - with a fence of average length of 3.5-5 turns, and markings in the form of two marks;
- the finishing part has a fence of only 2-3 turns, without marks.
Tolerance control of metric thread placement
When cutting manually, if the pitch exceeds 3 mm, then use 3 taps. If the product pitch is less than 3 mm, two are enough: roughing and finishing.
Taps used for small metric threads (M1-M6) have 3 grooves that carry chips and a reinforced shank. The design of the others has 4 grooves, and the shank is through.
The diameters of all three rods for metric threads increase from rough to finish. The last threaded rod must have a diameter equal to its nominal diameter.
The taps are attached to special devices - a tool holder (if it is small) or a crank. They are used to screw the cutting rod into the hole.
Preparing holes for cutting is carried out using drills, countersinks and lathes. It is formed by drilling, and by countersinking and boring it is increased in width and improves the quality of the surface. The fixtures are used for cylindrical and conical shapes.
A drill is a metal rod consisting of a cylindrical shank and a helical cutting edge. Their main geometric parameters include:
- the helical lift angle is usually 27°;
- point angle, which can be 118° or 135°.
Countersinks for cylindrical shapes are called counterbores. They are metal rods with two cutters twisted into a spiral and a fixed guide pin to insert the countersink into the cavity.
Test run
Before testing the device, open the gas valve and go over all important areas with a brush. Wet it with soapy water. The important areas are where the fittings and threaded contacts meet.
After this, the unit can be turned on: the gas button is pressed for a minute. Fuel follows all pipes to the combustion compartment.
Next, start the piezo ignition - press the corresponding igniter. The spark ignites the gas and a blue flame appears in the firebox.
At this stage it is necessary to configure the operation of the device. During the initial hours of operation, it may smell like flaming oil. This is a common situation. The unit is new. The combustion department in it burns out.
If this smell persists for a long time, turn off the gas and look at the area where the exhaust pipe and the convector outlet connect.
Results
Convector heating is a very good option for heating rooms. Convectors can be recommended for installation both in small apartments and in large country houses. They have good performance and efficiency. published
Homemade - this word means that the product is made with your own hands, but sometimes it is used with some kind of disparaging connotation. Yet this is far from the case. The most expensive hand-built cars in the world are created according to individual projects. What should we call them? Homemade? Everything that ensures the life of mankind is created by human hands.
Most often, craftsmen begin creating a heating system by determining the type of boiler, creating drawings and then constructing the boiler. This work is not easy, therefore, without good knowledge of the structure and operating principle of the selected type of boiler, experience, availability of the necessary tools and materials for its installation, it is difficult to complete it.
Most often, the following types of boilers are manufactured independently:
Gas boilers are difficult to make on your own, since this is high-risk equipment and is subject to special technical requirements. Attempts to make a homemade one are limited by the need to obtain a quality certificate and permits from supervisory authorities. It is problematic to pass all the required checks for compliance with quality parameters. But repairing a convector with your own hands is acceptable. Most often, the central pipe of the coaxial output burns out and it can and should be replaced.
Expert advice
Convectors belong to the category of simple, promising heating devices. For those who want to purchase and install it correctly in a house, apartment, or office, a few tips from experts will be useful:
- Convectors are potentially dangerous electrical appliances. If you are not confident in your skills as an electrician, contact a professional. This especially applies to laying a dedicated power line to the device and installing in-floor models.
- Electricity can compete with gas. Plus - simplicity, freedom of installation of the convector - incomparably greater than when installing a gas boiler. You can reduce costs with a two-tariff meter (the night tariff is cheaper).
- You need to know exactly the required thermal power. You can install convectors at several points in the room.