Naturally, all people try to make their homes more convenient and comfortable. Warmth in the house is one of the important criteria for comfort.
It is not always possible to make do with just a reliable heating system; many houses, especially in regions with cold winters, have to be additionally insulated. There are a lot of materials on the modern market that solve this problem.
But foam remains one of the most popular. The density of polystyrene foam for wall insulation varies and affects its thermal insulation properties.
Pros and cons of using polystyrene foam
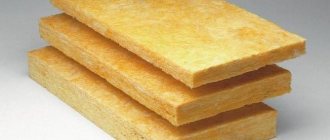
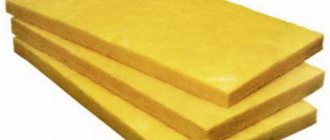
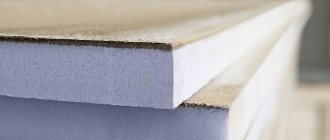
Polyfoam sheet
Polystyrene foam is a synthetic material with a rigid structure and white color.
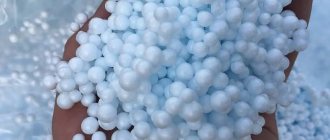
It is made by foaming the raw material (polystyrene granules).
Then steam treatment takes place. This operation is repeated several times.
The mass is dried in special containers. Granule sizes are 5-15 mm.
Next, pressing occurs, which gives the material the shape of slabs with a thickness of 20-1000 mm.
The result is a building material with good heat and sound insulation properties.
Polystyrene foam is used to insulate buildings outside and inside.
Advantages of polystyrene foam as insulation:
- harmless to humans, does not emit dust, unpleasant odor, toxic substances, does not irritate the skin
- durable
- cellular structure provides good windproof and sound insulation properties
- has low thermal conductivity
- almost does not absorb moisture
- unsuitable environment for the development of microorganisms
- simple and convenient for installation, cutting, processing, use
- does not change size due to temperature changes
- fireproof, since modern production technologies provide for the addition of a fire retardant. This substance does not support combustion - for the foam to ignite, the temperature is twice as high as for wood to ignite
- is light in weight
- inexpensive
- Easily adheres to other building materials
Disadvantages of polystyrene foam:
- does not allow air to pass through
- cannot withstand heavy mechanical loads
- nitro paints or paints and varnishes can destroy foam
- can be chewed by mice, so a layer of plaster is required
- When using polystyrene foam, it is difficult to ensure a tight fit of the boards due to their rigid structure
Foam quality
When all other parameters have been determined, the required material must be assessed for quality. First, you need to ask for quality certificates : responsible manufacturers and sellers always provide the product with the necessary documentation confirming its quality. Secondly, you need to make sure that the product is stored in proper conditions , and that its packaging contains the necessary markings indicating the basic properties of this material.
Polystyrene foam should not be stored in direct sunlight: in this case, it loses some of its performance properties and may begin to emit an unpleasant odor. It is also important that the material is stored in a well-ventilated area and that the humidity is no more than 60%. Attention should also be paid to the foam granules. They must be the same size and spaced evenly throughout the entire volume. If there are voids in some places and the granules fall off easily, then such a product can hardly be called high-quality. In addition, it would not be amiss to compare individual sheets of material with each other: they should be absolutely identical in thickness, density, with smooth edges, and snow-white color.
How to choose high-quality insulation in a large assortment on the market
- Ask the seller for a product certificate. The quality of the purchase must be confirmed not only visually, but also documented. Reliable manufacturers of building materials who value their reputation are always ready to provide the necessary quality certificates.
- Assess the storage conditions of the material where it is sold. For example, under the influence of the sun's rays, polystyrene foam may acquire a foreign odor, turn yellow, and its properties deteriorate.
- Examine the packaging. A quality product is marked; if the packaging material does not have the appropriate markings, then it is better to buy polystyrene foam elsewhere.
- Inspect the material granules. They should be uniform, approximately the same size, and evenly distributed across the sheet. If voids or peeling of granules are noticeable, then this is a sign of a low-quality product.
- Rate the sheets. Visually, they should be without bumps or deformations, and to the touch - soft and elastic. The rigidity of the sheets indicates that the production technology has not been followed.
- Don't chase the cheap. Polystyrene foam, purchased at a low price and initially pleasing with this fact, may later turn out to be worthless. Cheap material absorbs water, freezing and thawing between the granules, it destroys the foam.
There are more advantages to using polystyrene foam than disadvantages: it is inexpensive, easy to install and operate, and non-toxic. To enjoy the quality of your new insulation for longer than one season, you should carefully consider purchasing the material.
Thickness calculation
Before purchasing a material, you need to not only select its strength and dimensions, but also calculate the required thickness of insulation for walls or other structures. When designing a building, specialists perform a special thermotechnical calculation manually or using programs, after which they assign the dimensions of the heat insulator.
The thickness for a private building can be selected without making calculations. But it is necessary to take into account the climatic features of the area and the operating conditions of the facility. In the vast majority of cases, the following sizes can be recommended:
- wall thermal insulation thickness - 100 mm;
- thickness for the attic floor - 150 mm;
- thickness for the floor of the 1st floor and roof - 200 mm.
But in any case, it is better to assign dimensions accurately. You can calculate the required amount of insulation using fairly simple programs. For example, the calculation can be done in the Teremok program. It is freely available on the Internet. There are two versions: online and desktop application.
Insulation thickness depending on the wall design
To perform the calculation in the program, you will need to know the composition of the enclosing structure and the thermal conductivity of the materials used. Some types are in the program database, but it is better to check the thermal conductivity with the manufacturer of a particular product. Calculating a thermal insulator using this application is quite simple.
Insulation of housing with foam plastic inside and outside
Upholstering the inside of a house with insulating material is a tempting prospect, especially for owners of city apartments. You don’t need permission from several authorities, there is no need to hire industrial mountaineering specialists, you can do it yourself.
But for independent repairs, you need to determine the density of the foam for insulating the walls from the inside, its volume and price. In addition, such an event has some undesirable nuances.
The density of the foam determines the ratio of the weight of the material to its volume. This value affects weight, thermal conductivity, water resistance, strength, and resistance to various substances. The higher the density, the less air - namely, it provides thermal insulation properties, and not the raw materials from which the foam is made.
Foam grades by density:
- 10 kg / cubic meter (the least dense, used in insulating non-residential premises - for example, construction trailers, as well as in thermal insulation of water pipes);
- 15 kg/cu.m. meter (quite fragile, cannot withstand mechanical loads, suitable for insulating internal walls of residential premises, thermal insulation of balconies, other structures not subject to large mechanical loads, thermal insulation of water pipes);
- 20 kg/cu.m. meter (used in the production of decorative materials, thermal insulation of building facades);
- 25 kg/cu.m. meter (very wide scope of use: insulation of facades of residential premises, walls, ceilings, floors, foundations, attics, attics, loggias; heat and waterproofing of sewer and water supply lines, protection of the ground from freezing, insulation of parking lots, strengthening of slopes of sports grounds, lawns, swimming pools);
- 35 kg/cu.m. meter (same application as foam plastic with a density of 25 kg / cubic meter, as well as for maintaining cold in refrigerators, underground, in the construction of highways and railways, airplane runways, for strengthening soil and embankments during the construction of bridges) ;
- 50 kg/cu.m. meter (the densest and most expensive of all brands - used for insulating floors of industrial premises).
Application area
Foam insulation can be found in various sectors of the national economy. They are used, for example, for thermal insulation of freezers, refrigerators, isothermal vans, etc. In construction they use for insulation:
- facades, which allows you to solve several problems at the same time: create effective thermal insulation of the building; protect walls from rain, wind, sunlight and temperature changes; remove the “dew point” from the thickness of the wall, preventing it from freezing (very important for brick and ceramics);
- floors - used for insulation using the “floating screed” method;
- roofs (roofs) - laid on the back side of the roof (“Ventilated roof”) and on top (“Non-ventilated roof”);
- foundations;
- ceiling (interfloor ceiling);
- walls from the inside of the premises, balconies, loggias, garages, workshops and other utility or utility rooms;
- pipelines.
Foam plastic is also increasingly used in the installation of permanent formwork during the construction of monolithic buildings.
How to insulate a home inside
Insulation with foam plastic from the inside
If the work is carried out indoors, this is undoubtedly more convenient, but it is considered a last resort if it is impossible to “dress” the house from the outside.
One of the main problems is the shift in the “dew point”. What it is?
There is always water vapor in the air space, subject to a certain pressure.
The higher the air temperature, the higher this value.
Steam, according to physical laws, moves to the area of lowest pressure, and, cooling, falls out as water condensate.
The temperature at which this phenomenon occurs is called the “dew point”.
When insulating a room from the inside, condensation accumulates between the insulation and the outer wall. It slowly and surely collapses, as freezing water changes the heat exchange process.
The humidity in the house increases. Therefore, when insulating a room with foam plastic from the inside, special attention should be paid to organizing ventilation.
Stages of work:
- thoroughly clean the walls with sandpaper and level them, destroy the fungus
- Apply an antifungal and moisture-proof composition to the prepared walls with a roller. It will dry within a day
- prepare the adhesive solution
- cut the sheet to the desired size, trying it on the wall, and then cutting it off with a knife
- Start laying from the bottom, applying glue to the wall under each sheet. Glue the foam panels, fitting them tightly to the wall and placing the joints in the rows in a checkerboard pattern.
- After finishing the work, close the room for one or two days - during this time the glue will completely dry
- strengthen the sheets additionally: drill two holes in the center and four corner holes on each; drive in dowels and plastic nails into them
- seal the joints between the insulation sheets with polyurethane foam
- For finishing work, putty and primer can be used, on which wallpaper is glued, or a frame for cladding panels. To ensure better adhesion, the foam is treated with sandpaper
The optimal density of insulation for interior work is from 15 to 25 kg / cubic meter. meter.
Which is better - polystyrene foam or polystyrene foam?
Among specialists and home craftsmen, disputes often arise about what is better to use for insulation: polystyrene foam or expanded polystyrene. Advanced portal visitors will say that these are one and the same. And they will be right. Indeed, from the point of view of a chemist, expanded polystyrene (aka styrofoam) is not only a classic representative of foam plastics, but also the founder of the class of foamed plastics.
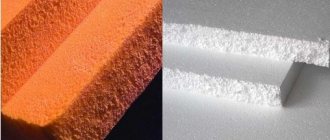
At the household level, not everything is so simple, since expanded polystyrene is associated with materials such as Penoplex, TechnoNIKOL, Styrofoam, URSA, which in structure are almost indistinguishable from polystyrene foam, but are made from extruded polystyrene foam. It’s easy to figure out where the foam insulation is and where the extruded polystyrene foam is: the first is always white, the second is colored (painted). Moreover, each manufacturer uses its own color scheme: TechnoNIKOL (yellow), Penoplex (orange), Styrofoam (blue), etc.
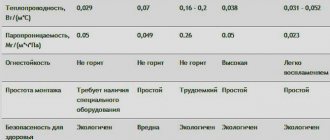
When it comes to their performance characteristics, there are differences, but they are minor:
- Polystyrene foam has a higher thermal conductivity, which requires a thicker layer of thermal insulation. And this is the loss of usable area of the room when insulating from the inside;
- extruded polystyrene foam has higher strength and rigidity;
- polystyrene foam costs much less (approximately 2,000 rubles/m3 versus 4,500 rubles/m3).
How to insulate a home from the outside
Insulating your home from the outside is the best option for a country house. However, this is not always acceptable in urban environments.
This can be done independently only on the first and second floors. Above that, you will have to hire specialists with special skills and equipment.
In addition, before insulating a city apartment in this way, you need to obtain permission from the relevant authorities. You may have to present the repair technology.
If all these problems can be solved, then you can get an excellent insulation option that will not reduce the area of the rooms. The dew point will be neither inside the wall nor inside the room.
Sheets of foam plastic can be attached only to the wall or also to the area of the foundation and plinth (if we are talking about a private house). It is necessary to carefully inspect and remove dirt, patch damage, and cure fungus.
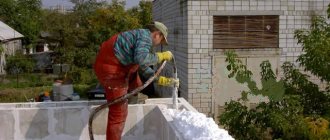
Installation of polystyrene foam outside
Provide waterproofing - bitumen mastic or deep penetration primer are suitable.
Level the surface.
The foam is attached to the wall using adhesive and dowels.
The joints of the slabs are sealed with polyurethane foam, putty, and construction tape.
For external wall insulation, polystyrene foam with a density of 25 kg / cubic meter is suitable. meter.
The design is reliable, heat-saving indicators are high.
In addition, it is necessary to ensure the facade rigidity necessary for plastering.
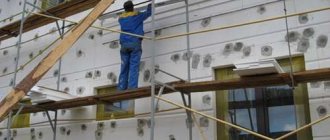
Installation of polystyrene foam in 29 steps
It is better to place polystyrene foam in dry weather so that it does not get wet.
For those who decide to do the insulation with their own hands, these visual instructions will help:
| Illustration | Sequencing |
| Step 1. Preparing the wall . The surface should be prepared - remove all mortar deposits, sweep away dust, and remove old plaster. | |
| Step 2. Set up the scaffolding . The distance to the wall is approximately half a meter. | |
| Step 3. Check the scaffolding level . Be sure to align the structure strictly horizontally using a building level. | |
| Step 4. Set up the racks . We check the vertical posts of the scaffolding with a level. Safety and ease of work will depend on the quality of scaffolding installation. | |
| Step 5. Primer . For porous substrates such as aerated concrete, foam concrete, as well as brick and plaster, we use a deep penetration primer. | |
| Step 6. We dilute the soil . Add 30 to 50% water to the primer and mix. | |
| Step 7. Apply primer . Using a construction brush (paint brush) we apply primer to the wall. Foundations such as foam concrete require double application of primer. | |
| Step 8. Prepare the glue . Take a bag of polystyrene foam glue. Tile adhesive or other types will not work. | |
| Step 9. Pour water . Pour about a third to half the volume of water into a clean plastic bucket. Be sure to have water first! | |
| Step 10. Pour in the dry mixture . Pour the glue in powder form into water. It should be equal to the water level. | |
| Step 11. Mix the glue . We insert the mixer into the drill chuck and mix the glue at low speed. When it reaches a homogeneous mass, pause for 5 minutes, and then stir again until the consistency of thick sour cream. | |
| Step 12. Apply glue around the perimeter . Rub the glue around the perimeter to increase adhesion using a spatula. | |
| Step 13. Apply glue in the center . Now we apply three “cakes” along the center line of the slab. | |
| Step 14. Glue the first sheet . We take a slab coated with glue and press it against the wall. The lace is needed for convenience, so as not to check the rule every time. | |
| Step 15. Checking the vertical . Using a level, check that the slab is installed vertically. | |
| Step 16. Checking the horizontal . Similarly, we check the compliance of the installation with a horizontal plane using a building level. | |
| Step 17. Second slab . Around the corner we place the second slab close to the protruding part of the first. | |
| Step 18. Cut off the excess piece . Using a hacksaw, cut off the excess piece of the slab. | |
| Step 19. We reached the corner . We measure the remaining piece, taking into account the part that will protrude beyond the corner. | |
| Step 20. Finished the first row . The last slab can be trimmed on site when the slab is joined to it from around the corner. | |
| Step 21. Check the first row . The smoother and better the first row is laid, the easier it will be to lay the remaining rows later. | |
| Step 22. Continue checking . It is necessary to make sure that the row is laid out evenly in all planes. | |
| Step 23. Continue with installation . We lay the next rows with ligation of the seams, moving the vertical joints by at least 150 mm. | |
| Step 24. Inner corner . We make internal corners with gearing. | |
| Step 25. Glue part . At the corners, the part that sticks to the wall should be 3-4 times larger than the part that protrudes. | |
| Step 26: Checking the plane . When the wall is laid out, it is important to carefully check the plane with a long rule and determine the places that protrude. | |
| Step 27. Sanding . We polish protruding places and irregularities with a grater. | |
| Step 28. Fiberglass mesh . Using glue, a fiberglass mesh is applied to the surface of the foam, which plays the role of a reinforcing element and, in addition, helps to adhere to the plaster that will be applied afterwards. | |
| Step 29. Plaster . When the glue with the mesh dries, decorative facade plaster is applied to the surface. It can be colored, or it can be painted with acrylic paint in the color you like. |
Extruded polystyrene foam is considered to be of higher quality, but its price is significantly higher. There is no definitive answer in favor of any of these foams, since cost sometimes plays a decisive role.
Insulation of balconies and loggias
A warm balcony or loggia can give your home several additional living square meters, which can be converted into a room or office. And the thermal insulation of this area of the room will additionally retain heat in the apartment. Foam plastic is also suitable for insulation.
The density of foam plastic for insulating balcony walls is from 15 to 25 kg/sq.m. see. This is the case if putty is intended. The density may be lower if you plan to cover the foam with plasterboard or carriage board.
Stages of insulating a balcony:
- Preparing the wall surface. Everything is thoroughly cleaned of its former finish. To avoid the appearance of fungus, the walls are treated with an antiseptic in two layers.
- Checking for leaks. It is necessary to determine whether there are any cracks with drafts; if there are, remove them using polyurethane foam or sealant.
- Installing the sheathing and inserting foam into it. The material is cut and tightly installed into the sheathing. If there are any gaps, they need to be sealed with foam.
- Waterproofing. To do this, you can use foil penofol. It reflects heat and prevents condensation.
It is advisable to start insulating the house in the spring, after 3-4 days of the end of the heating season. It is necessary that the housing is already in thermodynamic equilibrium (there are no large temperature differences between inside and outside).
If you cover a wall that has not yet been warmed up with polystyrene foam, it will subsequently change size and the adhesive joints of the insulation will turn out to be fragile. In addition, in the spring there is a seasonal decline in prices for insulation materials, and foam boards can be purchased cheaper.
If the moment is missed in the spring, then it is better to postpone the work until the fall, and carry it out shortly before turning on the heating. You need to start gluing the foam on the north side so that the glue sets well in the shade. This way the initial slabs will become a strong support for the entire structure.
Insulating a house with polystyrene foam from the outside is preferable than from the inside. However, this is not always an acceptable option - especially for owners of city apartments.
Therefore, upholstering walls with foam plastic in the room itself does not lose popularity. In this case, the necessary conditions must be met - good ventilation and correctly selected density and thickness of the insulation.
Insulation technology
Once it has been decided what material is required to complete the work, it is important to familiarize yourself with the nuances of the technology for carrying out the work. When fastening, it is necessary to take into account such thermal insulation features as:
- low strength;
- destruction when exposed to moisture and cold (high-quality waterproofing and vapor barrier will be required);
- instability to fire;
- low vapor permeability, creating a greenhouse effect in the house (a forced ventilation device is required).
The material can be attached from the cold air side or from the inside. Insulation with foam plastic from the outside will be more effective. Insulation of walls with foam plastic from the inside can only be done if there is justification (it is not possible to disassemble the finishing of a house, insulation of one apartment in an apartment building).
We also recommend that you read the instructions for insulating floors with foam. Insulating ceilings with this material also has its own nuances. To ensure reliable protection from the cold, it is better to place the heat insulator on the cold air side.
Fastening to the wall is carried out using glue, and after the solution has dried, the material is additionally fixed with mushroom dowels. It is better to wait about 3 days before you start fixing with dowels. If the thermal engineering calculation was carried out correctly, and the technology was not violated during installation, the foam plastic will be durable and reliable.
Classification of façade foam plastic by production method
Conventional foam for wet plaster for facades
Foam or expanded polystyrene (EPS) is a rigid insulating material produced in the form of slabs of various densities and thicknesses. The raw materials for its production are polystyrene granules, and the foaming agents are low-boiling hydrocarbons and gas-forming agents. When heated, the granules increase in volume by 10-30 times. Carbon dioxide, isopentane or other reagents foam polystyrene. As a result, in the finished product the polymer occupies only 2% of the volume, and the rest is occupied by gas.
According to the production method, PPP is divided into two types:
- Produced by the sintering method, when, when heated, the granules are sintered together with the simultaneous formation of the product.
- Obtained by foaming from a granular mass to which a gas-forming agent is added.
Various production methods make it possible to obtain a material similar in composition, but differing in structure (open or closed) and cell density.
Manufacturers and prices
Construction foam is produced in all regions of Russia, since it is very expensive to deliver outside the region or region. Therefore, there is no point in talking about specific supplier companies. Prices for 1 m3 vary within 1790 rubles. for PSB-S-15 insulation up to 3900 rubles. for PSB-S-50.
A number of foreign enterprises also supply their products to Russian markets. Some from their factories outside the Russian Federation, some from production facilities located in Russia. Among them:
- BASF is a German company with branches in Russia;
- Polimeri Europa (Dunastyr) (Italy);
- "Styrochem" (Finland), etc.
Prices for products from foreign companies are 10-85% higher with the same performance characteristics, with the exception of flammability. Imported polystyrene foam does not burn and goes out, but Russian foam does not burn.
Description, advantages and disadvantages
Expanded polystyrene is a type of polystyrene foam obtained by foaming polystyrene.
Penoplex is made from the same material, but using a different technology. Read about wall insulation with penoplex here. It comes in different colors, but most often white. The main composition is polystyrene with additives in the amount of 2% and gas - 98%. Structure includes:
- the main component is polystyrene;
- foaming agent;
- dye;
- plasticizer and additional additives that improve thermal insulation properties.
Advantages of insulation:
- Wide range of uses. The material is suitable for insulating walls, ceilings, basements, and basements.
- Long service life. If installed correctly, polystyrene foam will last about 30 years.
- High level of thermal insulation properties due to the low thermal conductivity of the structure.
- Ease. One sheet has a weight of 10 kg/m3.
- It is not a source of the appearance and proliferation of harmful microorganisms, due to its artificial origin.
- Does not rot or destroy.
- Low price, even compared to mineral wool insulation.
Flaws:
- Not recommended for indoor insulation. The material is highly flammable and emits toxic substances that are hazardous to humans and the environment.
- After a long period of operation, the insulation begins to release hazardous compounds into the atmosphere.
- Destroyed under the influence of ultraviolet rays.
- Afraid of mechanical stress due to its fragile structure.
- Becomes a vapor barrier that prevents water vapor from leaving the room. This does not happen when insulating a house with stone wool.
If damaged sheets are promptly dismantled and replaced with new ones, then only one advantage can be observed.
Structure and composition of the finished material
Polystyrene foam is made from polystyrene foam balls that are filled with air.
Each thermal insulation material necessarily contains air located in the pores. The improved thermal conductivity index directly depends on the size of the atmospheric air masses contained in the material. The more there are, the smaller the thermal conductivity component will be. The foam manufacturing process comes from polystyrene foam beads that retain air.
In connection with the above, we can conclude that the concentration of polystyrene foam affects its thermal conductivity. If this value changes, then changes in thermal conductivity indicators occur within the boundaries of percentages. One hundred percent retention of air in the insulation is associated with its exceptional heat-saving ability, since air has the lowest thermal conductivity coefficient.
Due to the low thermal conductivity of the insulation, a high percentage of energy saving is ensured. If we compare brick with polystyrene foam, their ability to save energy will be noticeably different, because 12 cm of thermal insulation thickness is equivalent to 210 cm of thickness of a brick or 45 cm of log wall.
Types of foam plastic by type of marking
Decorative façade foam plastic performs two functions - insulating and aesthetic.
Foam is produced by pressing and non-pressing methods, has different densities and additives. All information is reflected in the product labeling:
- PS - pressed polystyrene foam has high strength, but due to its high cost it is rarely used for insulating houses.
- PSB - suspension pressless - is the most common type of material used for thermal insulation.
- PSB-S is a suspension, pressless, self-extinguishing foam plastic with fire retardants added during production to reduce the flammability of the boards.
- EPS - extruded polystyrene foam - a material obtained by extrusion - forcing a viscous solution through a molding machine. EPS has improved characteristics and a long service life.
The PSB-S marking in other countries has been replaced by the abbreviation EPS, EPS, respectively - XPS. On the building materials market there are slabs with a foreign designation, so it is worth remembering it.
Preparing the wall for insulation
The first work that is performed during external insulation is preparing the walls.
Preparing block or brick walls
The task of the work is to clean the surface and ensure its maximum smoothness . Depressions and grooves should be eliminated, otherwise they may cause deformation of the insulation.
A previously painted wall should be cleaned of any loose pieces of paint. If sand spills from areas of the wall, these areas should be cleaned with a brush. Sometimes such a place needs to be plastered to stop crumbling.
After leveling the surface, it is advisable to coat it with a primer. The maximum differences and irregularities that are allowed in the wall under the foam are no more than two centimeters.
If the wall is slightly crumbling, it is recommended to prime it using a sprayer.
In other cases, a brush is used.
Preparation of wooden walls
If it is necessary to insulate a wall made of wood (beams or logs), then such a surface should be prepared differently.
In order to prevent the formation of blows, the timber walls should be lined with caulk . If the walls are made of boards, then the cracks can be sealed with special sealants or other fibrous materials. Before insulation, the walls should be treated with antiseptic agents.
Sealing cracks with caulk