But, despite the fact that it has enormous advantages, it is a cold material because it has a high thermal conductivity coefficient.
For this reason, heat from a hotter source - the internal wall of the house, quickly goes to a less heated source - the external wall.
To maintain the thermal balance in such a house with an internal temperature of +20 C, significant financial costs will be required for the heating system to ensure such significant heat losses through the walls.
The only possible way to maintain the optimal internal temperature in the house of +20 C is to insulate the wall structures. It can be carried out both outside the walls and inside the rooms. Depending on the climate zone, the characteristics of the wall and insulation, it can be complex, that is, it can have additional layers in the form of noise protection, hydro- and vapor barriers.
Why is it necessary to insulate?
According to modern requirements, single-layer insulation is practically not performed. The composition of the heat-protective cake is determined by:
- installation location: outdoor/external;
- characteristics of the wall;
- the type of insulation chosen.
If you ask a professional how it is preferable to insulate the walls of a residential building, from the outside or from the inside, the answer will be unequivocal - from the outside.
Internal thermal insulation is installed only as a last resort, when there is no other possibility, for example, the building is an architectural monument or the small distance between adjacent walls does not technologically allow the installation of insulation.
The installation of internal insulation must be treated with great care, this is primarily due to the occurrence of a dew point at which condensation begins to flow along the wall, and in addition, the insulated wall is no longer protected by heat from the in-house heating system, since the heat barrier will not be able to transmit heat to it .
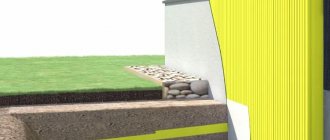
External insulation protects at cold temperatures, and to prevent household moisture from getting on the thermal insulation material , waterproofing is installed, in this case the dew point moves much further from the room to the street.
To prevent water from collecting between the wall and the heat insulator, a vapor barrier will need to be installed. Innovative heat-protective building materials are produced with a pre-installed vapor barrier layer.
In cases where the heat insulator is applied to the outside of wall structures, a wind barrier made of a vapor-proof membrane must be installed on top. It fences off the heat insulator from cold air masses hitting it.
Many novice craftsmen believe that there is no such thing as excess thermal insulation; this is not entirely correct. In thermal protection of buildings, the term used is excessive or excessive insulation.
A thick layer of insulation can disrupt the ventilation system of building structures . In connection with this, condensation will begin to accumulate, increasing the humidity in the room, which contributes to the occurrence of rotting processes and the formation of mold.
Option for insulating a balcony from the inside
In the case of a loggia and a balcony, the situation is often completely different. If the authorities do not allow the installation of a wall, they require that the existing reinforced concrete screen be left; it is cut off from the warm air by careful thermal insulation made of extruded polystyrene foam (EPS).
Insulation of the balcony from the inside
In this case, it is better to make the insulation excessive than at least slightly insufficient. The total thickness is divided into two layers. They are laid without a gap (preferably with locks), and so that the seams of the first layer overlap the sheet of the second. There should be no through access of warm air to the screen.
It is necessary to approach very carefully the issue of insulating the floor and ceiling of the loggia/balcony, ensuring tightness at the junction of them with the walls
Also pay attention to how the glazing will be installed: there may also be problem areas: the joint with the screen, walls, insulation of the part above the frames. All of them must be well finished, excluding the possibility of contact of warm/cold air
In this case there will be no problems. Even if the balcony is combined with the room.
Consequences of the lack of protective layers
Thin insulation that does not have important protective layers or excessively thick insulation cause equal damage to a home. In this case, a distinction is made between mechanical and chemical destruction of concrete structures.
The absence of a heat insulator leads to the following mechanical damage:
- temperature changes, freezing/thawing cycles of building structures;
- frequent cycles of drying/wetting walls;
- destruction of concrete under the influence of wind and water.
Chemical damage includes bimetallic corrosion, the action of acid and alkaline vapors in the air, as well as corrosion from stray currents, as a result of which the carbonization process occurs on concrete, when alkalinity around steel embedded parts and reinforcement units is lost.
Thus, the reasons for the destruction of concrete partitions are complex with a number of factors, but most of all they are associated with the appearance of humidity, which contributes to the appearance of dampness in the room and black mold, which is extremely harmful to people, which is one of the strongest allergens.
Some tips for insulating walls yourself
Schemes of the walls of a house with and without insulation from the inside.
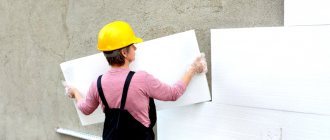
Carefully treat the walls with an antiseptic: the durability of the installed thermal insulation depends on this. The insulation must be installed so that there is a small gap between it and the wall. Before starting work, all communications and electrical wires running along the wall must be carefully secured. After installing thermal insulation, this will be impossible to do. Do not try to insulate the walls in any particular room: it will be a waste of money. If there are heating system radiators in the room, then it is very difficult to install anything behind them. But there is a way out - foil plastic.
It is insulation consisting of a thin sheet of heat-insulating material, covered on one side with aluminum foil. This layer should be facing towards the inside of the room. In this case, the foil serves to reflect heat into the room.
Work order
In order to correctly determine the composition of the cake and the size of its layers, you need to start with a laboratory study of the wall for heat loss.
Energy audits of houses and buildings today are carried out by many licensed companies in Moscow and the region, and their services will help in the future to reduce heating costs by up to 30-50%, as they help to correctly calculate thermal insulation. Thus, the costs of insulation, including an energy audit of the house, will pay off in the first 2-3 years.
Waterproofing is a set of building materials laid on a concrete wall according to the manufacturer’s technology, which will ensure the waterproofness of the heat insulator and wall structures. You need to understand that today there is no universal waterproofing. This technology is individual, just as the house and the brand of insulation that will be used are individual.
There are several technological solutions for waterproofing:
- cast;
- penetrating;
- impregnating;
- coating;
- based on polymers with anti-corrosion and anti-filtration effects.
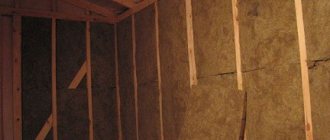
After waterproofing comes a layer of insulation. The most popular are mineral wool and polystyrene foam. Since their characteristics differ significantly from each other, they require the installation of different fixing systems and protective layers.
Materials for work
Among building materials, concrete stands out as the worst thermal insulator, and therefore, to reduce heat loss in a house, reinforced concrete walls are insulated both inside and outside the house. In the first option, in the room, most often, a layer of Penoplex is placed under the drywall, and on the outside, “warm plaster” is installed with a ventilated structure on the facade.
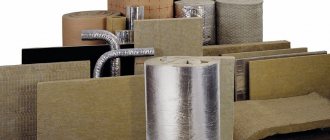
The construction trade market has a wide range of insulating materials:
Minvata . Its main advantages are low price, high heat-protective and noise-protective characteristics; users attribute high moisture absorption to its biggest disadvantage, which complicates the technology of creating a protective cake.- Expanded polystyrene , an inexpensive insulation material with high protective characteristics, is susceptible to direct sunlight and is damaged by rodents.
- Sandwich panels , a modern heat-insulating material with high assembly speed.
- Polyurethane foam is the most effective insulation with a high application rate, but the cost of the work is very expensive, and special equipment is also required to perform insulation.
- Extruded polystyrene foam - Penoplex.
- Liquid types of heat insulators - Akterm Beton TM 20 l.
Outside
AKTERM Concrete TM 20l is a modern liquid heat-insulating material prepared for concrete walls. This is a complex thermal insulator that protects walls not only from condensation of water vapor from the air, preventing them from freezing, but also includes inhibitors to remove biocontaminants.
The product is absolutely safe for others , since it does not have organic thinners or volatile toxic substances, and can be used both outside and inside buildings.
Indoors
Penoplex is extruded polystyrene foam, also one of the newest types of thermal insulation, it is environmentally friendly, therefore it can be used both outside and inside the building.
This insulation is durable, does not absorb moisture and has a low heat transfer coefficient . The service life of such plates is more than 50 years. Penoplex can be easily cut with the most ordinary knife, so its slabs can be easily installed in any weather.
How can you glue insulation to concrete?
To install thermal protection from foam boards, you will need waterproofing compounds and polyurethane adhesive. In addition, you will have to purchase an antiseptic, a primer with deep penetration into the concrete and finishing plaster.
Among the tools, the master should have at hand:
- roulette;
- construction level;
- reinforced mesh;
- dowel nails;
- knife and spatulas;
- containers for diluting and carrying adhesives.
To apply Akterm liquid insulator you do not need complex tools. First, when preparing the surface for applying a protective layer, you will need ordinary construction tools:
- Master OK;
- putty knife;
- hammer;
- brush and drill with an attachment for preparing solutions.
To treat surfaces with insulation, you will need a roller or sprayer and Akterm Beton TM itself.
Step-by-step instructions for creating thermal insulation
The technology for creating a heat-protective layer depends on the selected material. As a rule, a manufacturer, when selling its product, is obliged to provide the buyer with complete information about the technology of its use.
Liquid material "Akterm Concrete"
For thermal insulation with Akterm Beton liquid composition, a spray thickness of 1.0 mm to 2.5 mm is allowed. With a layer of 1 mm, the material consumption will be equal to 1 liter per 1 m2 of wall.
Instructions for use "Akterm Beton":
- Clean the surface from dirt and repair chips and cracks so that it becomes even and smooth.
- After the repaired wall has dried, treat the surface with an acrylic primer.
- Next, apply the first layer of Akterm Concrete using a roller or sprayer.
- 1 mm, which should dry at 20 C during the day.
- Next, apply a second layer and also allow it to dry.
- Decorative plaster is applied or wallpaper is pasted during internal heat-insulation work.
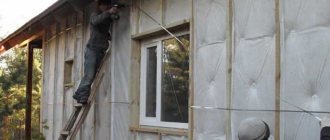
Sheet materials
It is much easier and more economical to install foam plastic indoors, however, it should be taken into account that the wall will remain cold, since warm air from the heating system will not flow to it, and therefore, at low atmospheric temperatures in winter, it will cool further more.
Algorithm for internal installation of foam plastic:
Preparing walls for installation involves cleaning them from dirt and any biological contaminants; it is advisable to rinse them thoroughly with water. If cracks and other irregularities are found, they are carefully repaired.- Lay the waterproofing layer with mastic materials or treat the surface with a deep penetration primer.
- Wait until the waterproofing is completely dry.
- Vertical sags are secured in order to control the vertical installation of slabs.
- The laying of slabs begins from the bottom up, the first row lies on a strictly horizontal mounting angle.
- The installation is controlled in the horizontal direction using measuring instruments.
- The slabs are fixed to the wall surface with glue, stacked tightly against each other, with the next row offset in a checkerboard pattern.
- Carefully seal the seams: with foam, tape or putty.
- After the adhesive solution has hardened, the slabs are additionally fixed with dowels, for which a hole is made in the wall.
- Install the fiberglass mesh with the same installation solution for the insulation.
- After the solution has dried, a protective plaster layer is applied, followed by painting, or the insulation is covered with plasterboard.
Installation
There are different methods for installing insulation. When choosing a suitable option, you need to take into account the complexity of its implementation and financial capabilities.
Insulation
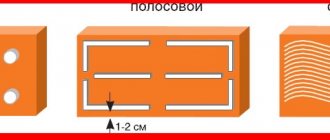
To attach the polystyrene foam sheet, an adhesive mixture of Ceresit and dowels are used. First of all, you need to dilute the adhesive base with water to obtain a uniform consistency. The quality of this mixture determines the reliability of fixation of the material.
Having completed the preparation of the glue, you can begin to apply it evenly to each sheet of polystyrene foam or PSB foam. 10-20 cm are left between portions, and 5-10 cm between the edges of the material. Particular attention should be paid to the central part of the insulation.
After applying the glue, proceed to fixing the material. The sheets are glued from the bottom corners. It may take 2 to 4 days for the mixture to dry. To improve the strength properties of the structure, dowels are driven into the wall. The formed joints are treated with plaster or construction foam.
Mesh and rough finish
After making sure that the adhesive base has completely dried, you can proceed to the next stage - fixing the reinforced mesh using the same Ceresit glue.
The base must be evenly distributed over the slab, pressing the mesh with reinforcement on top, moving from the upper parts to the lower ones. After this, another layer of glue, putty and primer are applied. At the last stage, siding panels are installed.
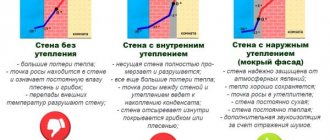
Features and differences of thermal insulation from the outside of the building and from the inside
Each option for installing thermal protection for a building - external or internal - has its own nuances in execution.
The main differences are in the environment:
- when installed externally, this is a strong influence of the atmosphere with sudden temperature changes and wind loads;
- with internal protection it is a more uniform air environment with average annual temperatures of 18-25 C.
The next difference between the two options is the thickness of the protective layer:
- for outdoor work it is higher than 100 mm;
- for internal ones - does not exceed 50 mm.
And the last significant difference is the formation of the dew point:
- With external insulation, it is brought out onto the outer surface of the wall.
- If it’s internal, it’s on a surface that opens into the room, which is very dangerous, since condensation can accumulate on the wall. It will not only spoil the external decoration of the house, but also penetrate into the structure of the base and foundation, causing their destruction.
Insulation by spraying polymer
The most effective, but much more difficult, is to insulate walls by spraying polyurethane foam. To do this, the wall surface is prepared similarly to other insulation methods. For spraying, a special two-component mixture is used. Polyurethane foam is applied to the surface using a spray gun. The liquid solution, falling on the surface of the wall, hardens within a few seconds. As a result, a dense layer is formed with good thermal and waterproofing properties. Spraying is carried out evenly over the entire surface of the wall.
Return to contents
Cost of work
Table with approximate prices:
| Thermal insulation grade | Size | Material price, rub. | Cost of work, rub. Moscow | Cost of work, rub. Yaroslavl | Cost of work, rub. Voronezh |
| Akterm Concrete | 20 l | 7000 | 350 m2 | 200 m2 | 230 m2 |
| Polyurethane foam spraying method | Packaging, 4 m3 | 5300 | 900 m3 | 790 m3 | 800 m3 |
| Basalt mineral wool GREENGUARG | 0.288 m3 | 510 | 300 m2 | 250 m2 | 270 m2 |
| Insulation: Expanded polystyrene boards. extrusion TECHNONICOL | 0.273 m3 | 1356 | 500 m2 | 350 m2 | 300 m2 |
| Penoplex Facade, glue, doweling | 1185 mm x 585 mm x 50 mm, pack of 4 pieces | 1370 | 600 m2 | 450 m2 | 430 m2 |
Content
Freezing of the walls of a house or the formation of condensation on them is a very unpleasant moment, so in such cases it is necessary to insulate the facade in a timely manner, and it is advisable to do this from the outside.
Thermal insulation of concrete buildings is carried out only on the street side. Internal insulation leads to condensation forming between the surface of the walls and the insulation. Subsequently, it will contribute to the formation of mold. This will negatively affect decorative finishing (wallpaper, plaster), and can also cause serious illnesses.
Possible mistakes
High-quality insulation of external and internal concrete walls requires a professional approach, since the process is multi-stage and requires careful implementation of each stage.
Most mistakes are made when performing internal insulation, since the brand of insulation and its thickness are chosen incorrectly.
Therefore, the wall will be completely cut off from the heat of the heating system and will freeze, absorbing moisture.
The insulation pie from the inside must be carefully calculated by specialists, determining the actual heat loss through the wall. After which a heat insulator with a low level of moisture absorption and vapor permeability is selected.
The main mistakes in external insulation are: poor preparation of walls, violation of layer laying technology, lack of waterproofing, incorrect placement of slabs without seam displacement, loose fit of slabs to the walls, incorrect type and thickness of insulation.
Despite the fact that concrete is considered the most practical and reliable building material, it has a significant drawback - the highest heat transfer coefficient, which leads to the rapid removal of thermal energy from a warm room to the environment.
Therefore, everyone knows that concrete houses are the coldest. In Soviet times, this problem was solved by increasing the specific heat supply standards for such houses, that is, they simply overheated them.
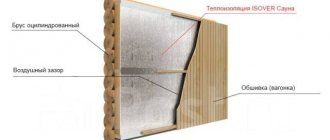
Insulating an apartment with mineral wool
With this technique, the walls do not require special preparation; they do not even need to be plastered. Wooden or metal slats are immediately attached to the surface. The height of the slats must correspond to the thickness of the heat insulator; the distance between them is taken as the width of the roll (mat) minus 2 cm to ensure that the material fits tightly into the frame.
A vapor barrier film is laid on top of the slats; it can be attached to the wall using “liquid nails.” Next, mineral wool is laid, on top of which another layer of vapor barrier is made. After which the entire structure is covered with plasterboard, the sheets of which are attached directly to the slats. - a matter of taste of the owners.
Types of adhesives
To fix the insulation, adhesive compositions on various bases are used. This determines their possible area of use and the order of installation. If you use a composition for interior work to insulate the walls outside the house, the assembled structure will not last long. To avoid this, it is worth understanding the distinctive features of each type and listening to the opinions of experts.
Polyurethane
It is supplied ready-made in pistols and aerosol cans, simplifying the application process. For the composition to set, 0.5 - 1 minute is enough after pressing the foam board to the base. Because of this, the foam board must be leveled immediately after being placed on the base.
Can be used to fix thermal insulation material on different surfaces. Allows you to fix the slabs on a wooden base and on brickwork. Features increased adhesion.
The adhesive is easy to apply - like polyurethane foam. Source banyabest.ru
Mineral
Effective and inexpensive foam adhesive for outdoor use. Can be used for attaching insulation to a concrete base, walls, and aerated concrete and sandstone.
Supplied in the form of a dry mixture, packaged in paper bags of various capacities. Before use, a certain amount of water is added to the composition according to the manufacturer’s instructions until a solution with a homogeneous structure is obtained. A notched grater is used for application.
Mineral glue is characterized by:
- increased adhesive characteristics, allowing the slabs to be securely fixed to the base surface;
- plastic;
- frost resistance, making it possible to use the composition outdoors;
- moisture resistance;
- versatility: ready-made glue can be applied to different substrates.
Before application, the composition is diluted with water. Source regkom77.ru
Polymeric
Polymer composition - adhesive for penoplex for interior work. Allows you to fix foam boards on any surface. They have a limited service life. They are sold in special cylinders, from which the adhesive composition is supplied under pressure.
Application is carried out using a special gun. The adhesive composition sets quickly enough, which makes it difficult to use when doing work on your own. Adjustment of the position of the heat-insulating mat is possible in the first half a minute.
Waterproofing
The composition of the adhesive may vary significantly. To maintain the integrity of the thermal insulation material, for attaching the slabs you should choose a waterproofing adhesive that does not contain aggressive components. These include solvents, petroleum products and a number of others.
Bituminous
The most common material. It is easy to use and accessible. Bitumen mastics are able to retain their properties at sub-zero temperatures. Sold ready-made. It is used for thermal insulation of plinths of various buildings operated in unfavorable conditions.
Bitumen mastics allow you to protect the baseSource kraski-net.ru
Used for fastening penoplex and sealing joints between heat-insulating boards. The packaging contains instructions that describe how to attach penoplex using bitumen mastic. The composition is applied around the perimeter of the insulating board and in the center. For application, use a spatula or brush. The mastic is distributed in a thick layer. When installing the second and subsequent elements, the space between the slabs is filled with bitumen mastic. For reliable fixation, the insulation is pressed for some time, having previously ensured the required spatial position.
Liquid Nails
An expensive option compared to other formulations. Supplied in convenient packaging - in special tubes. The composition is applied to the sheets in strips in the form of snakes. It takes 10 - 20 seconds for liquid nails to dry.
Differs in increased adhesive properties. Allows you to attach heat-insulating boards to any base. If liquid nails will be used as fasteners for penoplex mounted outside, an adhesive composition that can withstand negative temperatures is selected. Due to the high cost, they are used only for small areas.
Liquid nails are an expensive but high-quality optionSource remontkit.ru
Acrylic
A universal option. Allows you to fix heat-insulating sheets on surfaces made of metal, wood, concrete, brick. Used when performing work outside and inside the house. The composition of the acrylic adhesive allows you to form a layer with waterproofing properties. It has low consumption.
Causes of moisture
The first thing you need to figure out is why moisture began to appear on the walls of your home. There may be several reasons for this phenomenon and each of them requires its own solution. Most often, the walls begin to sweat in the following cases:
- There is poor or no ventilation in the room.
- The structures are freezing.
- The waterproofing is broken.
- The room was recently renovated.
The only scenario in which you should not worry and take radical measures would be the case of repairs. When performing various finishing works, mixtures are used that contain water and it actively evaporates. After a certain time this passes and everything becomes normal. If the water appeared for another reason, you will need to urgently take some action.
Even if the reason for the appearance of water is a recent renovation, it is better not to aggravate the situation and ventilate more often. Of course, you should take into account the recommendations of manufacturers of finishing materials and in some cases it is better to avoid ventilation. Then you should ensure the best possible air distribution throughout the entire area of the house - open all doors wide.
Application of ceramic-isol
In the modern market, new promising technologies are replacing traditional building materials; production produces universal products that have increased efficiency when used. Keramo-izol is an environmentally friendly composition and does not pose any danger to human health, which is an important aspect in its application. Installation does not require complex preparatory processes, application is simple with a long service life. Liquid thermal insulation suspension successfully protects against cold, creating coziness and comfort in the rooms.
Keramo-izol is used for everything that can be painted. Application is carried out with a brush, spray gun, or foam roller. The suspension has good adhesion and is easily applied to the surfaces of monolithic structures. The environmentally friendly product has advantages that are appreciated in the construction industry.
• good thermal insulation properties – reduction of heat loss by 1/3;
• easy to use, application can be done independently;
• can be applied to structures of different shapes;
• the range of shades for painting is varied;
• resistance to ultraviolet radiation;
• has anti-corrosion properties.
Keramo-izol is a universal means for creating an atmosphere of warmth in your home.
What materials and tools need to be purchased?
Tools for installing thermal insulation.
- Thermal insulation in the form of sheets, slabs or liquid.
- Deep penetration primer composition.
- Antiseptic.
- Sealant or mastic.
- Special plaster mixture for bathrooms or swimming pools.
- Metal construction mesh.
- Wooden slats.
- Brick or plasterboard sheets.
- Waterproofing materials.
- Vapor-proof film.
- Metal profile for installing drywall.
- Drill with mixer attachment.
- Needle roller.
- Rule.
- Plastic beacons.
- Spatula-comb.
- Building level.
- Screws, dowels, plates for suspension.
To insulate concrete walls, you can use different materials and methods of installation. It all depends on the financial capabilities of the apartment owner. Desire alone is not enough in this matter. It is best to insulate walls in summer, when it is hot. Then you won’t need to dry them using heaters. When work is completed, the owner of the premises must be prepared for the fact that the area of his apartment will decrease somewhat, but in winter the desired temperature will be maintained in it.
At the same time, our floors are quite warm; there is no cold coming from below. So it's the walls?
Tell me, maybe there are other ways to insulate concrete walls. Tired of freezing and paying large sums for heating. It's better to spend this money on repairs.
I will be very grateful for the answer. Irina.
Your problem is quite clear and can be explained simply: you did almost everything wrong. Namely: they insulated from the wrong side, choosing the wrong thermal insulation material. Let me explain.
Peno-izol insulation
Peno-isol has several names, scientifically it is urea-formaldehyde foam (UFP). The insulation is also called liquid or poured, due to the consistency when used. Peno-izol, according to technological estimates, reduces the time of construction and installation work, has a number of its own advantages and features, as well as disadvantages that you need to be aware of.
- density from 5 to 35 kg/m3;
- thermal conductivity coefficient 0.028-0.047 W/m*K;
- flammability group G2 – moderately flammable, does not support independent combustion;
- decline does not exceed 5%;
- vapor permeability – 0.21-0.24 g/m*h*Pa;
- temperature range – from -50 to +90°С;
- water absorption – 6-8% in 24 hours.
In its liquid state, peno-isol resembles an airy soufflé or shaving foam; after hardening, it has a fine-cellular structure.
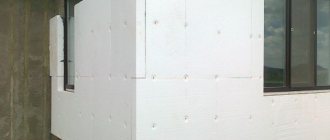
Use of polystyrene foam
Insulating a concrete wall from the outside with polystyrene foam is economical and practical; reducing heat loss will reduce financial costs, regardless of the type of heating. The use of the material has a beneficial effect on optimizing the microclimate in the house. It feels warm in winter, pleasantly cool in summer. How to insulate a cold loggia wall, the answer is obvious - this material is perfect for arranging thermal insulation for a small space. The advantages of slabs are multifaceted:
- the functional area remains dry, without the appearance of fungus and mold;
- the product has soundproofing properties;
- the material is moisture-resistant and does not lose its characteristics when wet;
- due to its minimal weight, massive metal fastenings are not needed;
- minimal load on the foundation;
- external installation of thermal insulation does not reduce space;
- After installation, the sheets can be painted in the desired color, transforming the facade.
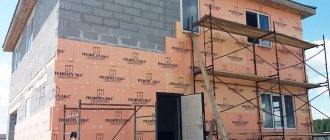
The fastening technology is suitable for cottages and apartments in high-rise buildings. To install sheets at height, it is better to involve industrial climbers, this will help avoid investing in special equipment or installing façade formwork.