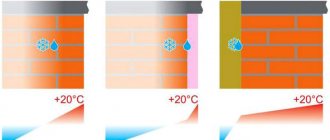
Thermal insulation of any basement is one of the most important points, since it allows you not only to maintain the temperature, but also to avoid the formation of condensation, which leads to the destruction of the structure. Insulating a basement with penoplex or polystyrene foam has many advantages, which is why it is becoming increasingly popular compared to other methods of thermal insulation. But it is worth considering that these materials have their own characteristics, which are very important to take into account. It is necessary to carefully read the instructions, since insulating the basement with polystyrene foam, and doing it correctly, can only be done in compliance with the technology.
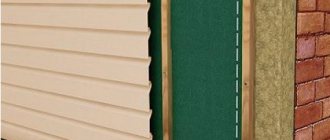
wall insulation
Good reasons why it is necessary to insulate a used basement:
- vegetables freeze at sub-zero temperatures;
- storing garden equipment in an uninsulated basement is no different from storing it outside;
- installing a boiler room in such a basement will entail large heat losses and, consequently, additional fuel costs.
The simplest and most inexpensive way to solve this problem is to insulate the basement from the inside with polystyrene foam.
Thermal insulation of the base and foundation
The basement part of the building is insulated with expanded polystyrene and then plastered over the mesh. The surface of the slabs is usually embossed, which promotes good adhesion of the plaster. In the case of insulating a foundation slab, the material is laid on a clean leveling surface and covered with a polyethylene film with sufficient overlap at the edges, which are then reinforced. If particularly high demands are placed on compressive strength, it is recommended to select appropriate brands of thermal insulation boards. When hydraulic concrete is used, it is possible to lay insulation directly into the formwork.
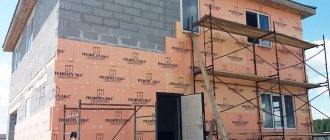
Stages and rules of external insulation
It is important to know these points, as they directly affect the quality and durability of the basement finish. This:
- Work should only be carried out in dry weather. Since the work on insulating and waterproofing a cellar can take several days (everything will depend on the number of workers and the pace of work), it is best to carry out such activities in the summer or early autumn.
- You will need to insulate the entire wall - from the foundation to the ceiling (floor). If you only insulate part of the base, it will do nothing.
Preparation for the process:
- Remove the blind area.
- Dig a trench around the entire perimeter of the house. Its depth should be at the level of the basement floor. The width is such that it will allow you to carry out work easily.
- Clean the walls from remnants of building materials and old finishing. It is also important to remove dirt from it.
- Inspect the wall surface for cracks and chips. If such are found, they should be sealed with a solution of cement and sand. After the solution has hardened, you can continue further work.
- If the surface of the basement walls is finished with foam plastic, then you will also need to level the base so that the sheets lie flat.
- After preparation, the surface should be finished with a primer. There should be several layers. Only after it has been completely absorbed into the base can work continue.
- The waterproofing material can be fused to the walls after applying a primer.
- Next, you can work with the insulation.
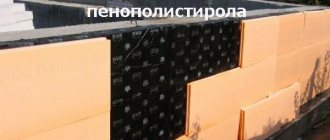
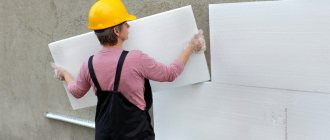
Polystyrene foam or extruded polystyrene foam
Work on insulating an external wall using these materials can be carried out on your own. This type of work does not require any special skills or knowledge. These materials are the most common today, which are used as insulation.
The basement walls are insulated with extruded polystyrene foam slabs
Process:
- Calculate the area of the wall and determine how many insulation boards will be required for the job.
- It is important to add about 10% to the result obtained for the battle.
- Prepare the solution.
- Apply glue evenly to the foam board and glue it to the base. Such work must begin from below. Each row is attached to the base with an offset relative to the previous one.
- After finishing, you need to coat the seams between the sheets. This should be done using cement mortar. Also, if necessary, you can cover the entire surface of the slabs with this solution.
Expanded clay
This material is free-flowing, and therefore installation work can also be carried out on your own. The disadvantage of such insulation is that it is necessary to make too large a layer, since its thermal conductivity is lower than that of foam plastic. The recommended layer is 10-20 centimeters.
Scheme for insulating basement walls with expanded clay
Work order:
- Another wall is erected at a distance of 20-30 cm from the basement wall. It can be made from brick.
- Gravel spills along the bottom.
- Drainage is laid and diverted away from the building.
- Expanded clay is poured into the gap between the walls.
- The second additional wall from the outside must also be waterproofed.
After this, the expanded clay is compacted and a concrete screed is placed on top of it. It is also important to put waterproofing underneath. You can refuse to install insulation.
Important! For the interior decoration of the basement walls, you can use the same material as for the exterior. Only the use of expanded clay in this case will not be effective, since it will take up the usable area of the room. Typically, insulation from the inside is carried out using polyurethane foam.
Floor and its insulation
Not only the basement walls should be waterproofed and insulated. Such work should also be carried out on the floor. They are made using the same material that was used for the walls. Expanded clay should be poured or polystyrene foam should be placed between the joists, first covering the floor with waterproofing material. You can also put a film on top under the main floor to prevent moisture from entering the room.
Scheme of floor insulation in the basement on the ground
If there is no log system on the floor, then you can make it yourself using timber. It is also recommended to first waterproof them with a solution that will prevent the appearance of mold and mildew. The beams must be placed at a distance of 50 centimeters from each other, connecting them together with planks. If necessary, insulation can be placed on top of the first layer of waterproofing. After such work, the main floor is installed and finished.
How to properly insulate a cellar
Thermal insulation of the cellar is best done during its construction. This will avoid labor-intensive work in the future when the need arises. It is advisable to do this from top to bottom, performing one step after another.
Base
Floor insulation scheme
Floor production is carried out in the following sequence:
- A shock-absorbing and insulating cushion is poured into the pit. The mixture is made from sand, crushed stone and expanded clay.
- Thick cellophane or roofing material is placed on top of the pillow. The edges of the insulation are rigidly fixed in the ground with stakes.
- A layer of foam plastic or penoplex is laid. The edges of the slabs are glued with tape.
- A frame is assembled from reinforcement. It rises above the insulation by 15-20 mm.
- The concrete solution is mixed and poured into the mold. It takes at least a week for it to harden.
- When the base is completely strengthened, it is treated with a primer and antiseptic.
The final stage is laying the finishing coating. The best option is wooden boards impregnated with drying oil.
Walls
Waterproofing the cellar from the inside from groundwater.
The walls have the largest area of contact with the ground and bear the main load for the thermal insulation of the cellar.
Their arrangement is carried out as follows:
- Removing unstable fragments, widening cracks, sealing them with sealant or cement mortar.
- Surface treatment with deep penetration primer.
- Installation of insulation boards. It can be polystyrene foam, penoplex or polyurethane foam. The last option is good because no additional finishing is required.
- Applying a layer of waterproofing. Roofing material, which is characterized by strength and durability, is best suited for this.
For interior decoration it is better to use materials of small thickness. A good solution is foil foam. Thin insulation effectively protects the room from moisture and temperature changes.
Preparing for basement insulation work
Before insulating the basement, it is necessary to find out the characteristics of the soil at the building site. If its water saturation is higher than normal, it is recommended to carry out drainage work in order to drain groundwater from the underground part of the house. The drainage system consists of drainage pipes with holes. They need to be laid alternately on a gravel bed made with a slope of 3-5% below the base of the foundation. After installation, the pipes must be covered with washed crushed stone. When the drainage system operates, groundwater, seeping through the crushed stone, penetrates the laid pipeline, through which it is then discharged to the sewer or to a separate well. To prevent pipes from silting, the crushed stone bedding must be protected with geotextile - a filter material. It allows water to pass through perfectly, retaining small soil particles. Thanks to this filtration, the drainage system will not become clogged for a long time. In addition to draining groundwater from the basement, before insulating it, it is necessary to examine the condition of the buried part of the walls. First, they need to be cleaned of dirt or old insulation. If after this, cracks and chips are found on the basement walls, they should be sealed with sealing mastic. All identified surface irregularities must be smoothed using a cement mixture. Otherwise, the fit of the insulation boards to the basement walls will not be tight.
Preparatory work
Installing wool on the ceiling
Before starting insulation work, you should inspect the surface of the ceiling, clean it of dust and identify irregularities, cracks and other defects. In addition, you will need to check for height differences in different areas of the floor. If there are significant discrepancies, it is advisable to choose the frame method for installing thermal insulation.
After cleaning the ceiling from dust and dirt, repair any detected damage using wood putty or cement-based leveling mixtures. After drying, the surface is sanded and treated with special compounds to protect against fungus and mold. Preparatory work is carried out especially carefully when using the adhesive method of fixing the insulation.
Advantages of basement insulation with polystyrene foam and its disadvantages
The experience of thermal insulation of basements with polystyrene foam indicates that even at a foundation depth of more than 7 m, it is reliable, regardless of the brand of this material and the duration of exposure to groundwater under pressure. When deciding to insulate a basement with extruded polystyrene foam, you need to know about its advantages and disadvantages in order to use this insulation as efficiently as possible. The advantages include the following:
- Basement insulation with polystyrene foam creates an excellent coating with low thermal conductivity.
- The weight of the insulation is so small that it does not exert any serious load on the basement walls.
- Compared to other methods of thermal insulation, protecting the basement from dampness and cold with polystyrene foam will cost much less, especially since a lot of material will be required to insulate its walls.
- Thermal insulation 100 mm thick is comparable in thermal conductivity to brickwork one meter thick.
- After installation, the finished coating is slightly susceptible to aging and is stable in shape and size.
The disadvantages of expanded polystyrene include, as mentioned above, its flammability and the release of toxic fumes when the material is heated.
Types of polystyrene
As already mentioned, penoplex and polystyrene foam are types of polystyrene, which differ slightly in characteristics and production technology. Very often you can find the terms foamed and extruded polystyrene foam, where the first means foam plastic, and the second penoplex.
Foamed polystyrene foam is produced without forced pressure injection. The resulting material is quite fragile and is able to absorb moisture. In addition, when using it in basements, there is a possibility of encountering vermin such as rats and mice. However, the material has a wide range of applications due to its low cost.
To create penoplex it is necessary to use high pressure and temperature. This material has low vapor permeability, but is characterized by high density, which allows it to be used as insulation in structures that are subject to high mechanical loads. Despite its density, penoplex is very easy to process, which greatly simplifies the installation process.
Options for basement insulation with polystyrene foam and penoplex are considered the most acceptable and common; the choice will depend solely on the customer’s budget.
polystyrene type
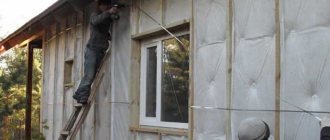
Insulation of basement walls from the outside with extruded polystyrene foam
When it is possible to perform external insulation, they are often limited to it. In this case, labor costs are higher, because excavation work is added: the base from the outside must first be dug out.
In addition to EPS, to treat the outer part of the foundation you will need bitumen mastic or other bitumen adhesive, as well as asbestos cement slabs.
During the preparation process you need:
- level the wall;
- waterproof the wall with bitumen mastic. Wait until it hardens;
- treat with an antifungal compound (slaked lime, copper sulfate).
Approximately 5 days after waterproofing, you can begin insulation:
1. Glue the EPS onto the waterproofed surface with bitumen mastic. Only cold mastics that do not contain a solvent are suitable for this purpose. The mastic is evenly distributed over the entire slab, the slab is pressed against the wall and fixed for half a minute.
2. The slabs are installed from bottom to top, end-to-end, tightly fitting each other. Their thickness should be the same. The height of the masonry above the ground is about half a meter.
3. Foam the seams.
4. Cover the outside of the masonry with asbestos-cement slabs.
5. Fill the ditch with soil.
Procedure for installing PPS
1. Seal cracks and voids in the walls with sealant or foam.
2. Plaster over any irregularities that may interfere with the fastening of the slabs.
3. Treat the walls with waterproofing material: bitumen mastic, liquid rubber, roll material.
4. PPS boards are glued to the surface from bottom to top, end to end. The next row is placed on the previous one with the seams staggered.
5. Additionally, fix the material with dowels at the rate of 5 pieces per workpiece: in the corners and in the middle.
6. The seams are foamed.
7. Treat the outside of the slabs with plaster. It is recommended to use fiberglass reinforcing mesh in the process.
8. Apply penetrating waterproofing (Penetron, etc.) to the ceiling of the cellar.
9. Glue polystyrene foam boards and secure them with dowel nails.
10. Fiberglass mesh is glued and plastered.
With reinforced concrete slab base
If there are reinforced concrete slabs at the base of the basement floor:
- waterproofing is carried out with a double layer of roofing material with bitumen mastic applied between the layers;
- lay extruded polystyrene foam or polystyrene foam with high density;
- pour the screed.
If the basement floor is earthen
If the floor is earthen (for example, with strip foundations):
- remove the turf and level the surface;
- lay waterproofing material;
- pour a gravel-sand cushion and compact it. You can also use expanded clay or sawdust-clay mixture;
- put insulation;
The basement is ready for finishing. In this capacity, you can use porcelain tiles, plaster, and paint.
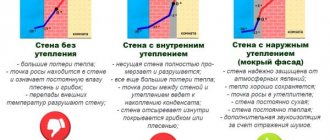
Insulate inside or outside?
The basement can be insulated from the outside and from the inside, but external thermal insulation will have a much stronger effect than internal insulation. Insulating cellar walls from the inside is appropriate in cases where it is not possible to do it from the outside. The outer layer of insulation will protect the wall and moisture-proof coating from temperature and mechanical influences. In turn, internal thermal insulation can contribute to the appearance of water at the point of contact of the insulation with the basement wall.
External thermal insulation has many advantages over internal insulation.
External insulation of a cellar or basement has many advantages:
- The overall microclimate in the basement will be improved.
- The surface of the walls of the basement or cellar will become warmer.
- Condensation will stop forming on the walls.
- The dimensions of the basement will remain the same after all work has been completed.
- A more profitable solution from an economic point of view.
- In a properly made thermal insulation layer, cold bridges will not form.
- External waterproofing will be protected from mechanical stress.
What to insulate in the basement?
Partial waterproofing of the walls and floor of the basement will not completely solve the problem. The floor and ceiling should also be protected from dampness. At the same time, experts note that ceiling insulation can be done only if necessary. In this way, you can achieve better heat retention in the basement.
In the basement, the walls and floor are primarily insulated. Ceiling - in some cases.
Few people know that basement insulation should be carried out not only from the outside, but also from the inside. This article will tell you how to insulate a basement from the outside. This method of insulation will help create a barrier not only from moisture, but also from cold. If you only insulate the cellar from the inside, this will not guarantee that moisture and cold will not penetrate inside. Also in this case, mold and mildew may appear on the walls between the insulator and the concrete.
The inside of the cellar will need to be insulated only when absolutely necessary. If you properly insulate the basement walls from the outside, then you don’t have to do any internal work.
Preliminary waterproofing of the room
Before insulation, horizontal waterproofing of the room is performed (if it has not already been done). You can choose any insulating materials (the market offers a wide range). Only after the waterproofing is done can you begin to insulate the walls of the basement or cellar from the outside.
It is recommended to additionally treat the surface of the heat-insulating material, which will be located below ground level, with waterproof mastic. In addition, before insulating the basement walls from the outside, these walls need to be leveled. It will not be superfluous to apply antifungal agents.
It is recommended to begin work on external thermal insulation of the basement 5-7 days after you have completed all measures to protect against moisture.
The process of laying foam plastic indoors
Insulation procedures are often carried out after the construction of the structure. Therefore, insulation from the outside is problematic due to increased budget costs and time. The best option is to insulate from the inside.
- Use sheets with maximum thickness. For example, when calculating 200 mm of foam, it is necessary to purchase not four 50 mm tiles, but 2 100 mm each. This will reduce the number of seams. Accordingly, the surface will be insulated from moisture and freezing.
- Installation of expanded polystyrene is carried out at intervals at the seams and is at least 100 mm. The shift is carried out both vertically and horizontally. Multilayer installation involves overlapping the seams with a subsequent layer.
- Preparing the surface for insulation is a mandatory procedure. For this purpose, antiseptics and primers are used. After 100% drying of the products, waterproofing work is carried out. The materials must be continuous and laid tightly to the surface.
- The foam boards should be installed against the frame. Frame slats are mounted with a pitch equivalent to the finishing panels. Two sheets are installed on one rail.
- The joints of the sheets and the junction points with the frame are sealed with foam for installation. This is an additional waterproofing measure.
When calculating the thermal indicators of the thickness of the material, the dew point should not be recessed into the body of the wall. Due to this, condensation will not form, which means that the insulation will not be destroyed.
The procedure for insulation work
To insulate outside walls, special slab insulation materials are usually used, which are easy to install. The slabs are fixed to the waterproofing layer using adhesive mixtures or mastics. Treating the entire surface of the insulation board with mastic reduces the risk of the insulation shifting when the ground moves.
Related article: How to stick photo wallpaper on a wall with wallpaper
It is recommended to carry out insulation immediately during the construction of the house.
Cold mastic must be applied to the surface of the slab, then pressed against the wall and held until the adhesive hardens (usually 30-40 seconds).
The laying of thermal insulation slabs should begin from the bottom (strictly along the perimeter); the slabs can protrude 30-40 cm above the ground.
It is important that the insulation boards are of the same thickness. In addition, it is necessary to ensure that they are tightly adjacent to each other. It is recommended to immediately seal all resulting voids with construction foam. In the future, the slabs will be securely supported by a layer of soil. The main thing is that they do not move apart or move.
Insulation of basement walls, as noted above, should be carried out during the construction phase of the building. If for some reason this was not done, then it is better to insulate the basement yourself only from the inside. External insulation in a built house can only be done efficiently by professionals. It is not recommended to do such work yourself without the appropriate skills due to the high risk of weakening the foundation and walls of the building.
Insulation of the foundation of multi-storey buildings
Polyurethane foam is used to insulate not only private households, but also apartment buildings. This material is sprayed onto any type of foundation of high-rise buildings - slab, pile, strip, combined. Nowadays this is done already at the construction stage. For such work, only high-density closed-cell polyurethane foam is used.
But buildings built many years ago do not have such insulation, so it has to be carried out separately. Insulation is applied to the outside of the house wall and inside the basement. Dried and hardened polyurethane foam is covered with facade plaster or other finishing materials.
Work is carried out at a temperature of at least 5 degrees in dry, windless weather. Since the spraying speed is quite high, in one or two days you can insulate the entire foundation of even a large house.
DIY basement insulation technology
Let's look at how complex basement insulation is carried out using penoplex (the technology will be similar for polystyrene foam and expanded polystyrene). Note that comprehensive thermal insulation includes external and internal insulation (in particular walls, floors, ceilings).
In addition to insulation for work you will need:
- material for interior decoration;
- polyurethane foam;
- reinforced polymer mesh;
- waterproofing material (bitumen mastic);
- adhesive solution;
- concrete or external plaster;
- tool.
Insulating the basement from freezing from the inside
In order for the internal space of the object to be protected from freezing, the cellar should be insulated - the ceiling, walls, floor and all other structural elements through which heat usually leaks. To do this, use roofing felt, expanded clay or rigid thermal insulation materials. The process of insulating various internal surfaces of a building has its own characteristics.
In the cellar it will be necessary to insulate:
- floor;
- ceiling plane;
- walls;
- door.
Internal insulation
Any type of expanded polystyrene is most often used precisely to insulate the basement from the inside. Here there are some features for each of the available surfaces: ceiling, floor and walls.
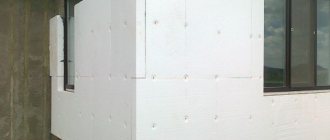
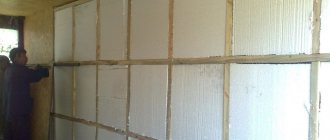
Wall insulation
Insulating the basement walls from the inside helps maintain the temperature in the room. In addition, to avoid condensation accumulation in the basement, it is very important to use high-quality waterproofing materials. This will ensure long service life of the thermal insulation and prevent the destruction of the structure as a whole.
Next, polystyrene foam boards are attached on top of the material chosen for waterproofing. Glue is usually used for fastening. After all the walls are covered with slabs and the glue has dried, additional work is carried out on the surface of the basement walls.
A concrete screed is used to strengthen the structure. To create it, it is recommended to purchase M100 cement and use additional reinforcement. Do not be too zealous; the screed layer should not be too thick.
Since any basement has high humidity, an additional layer of waterproofing material will not be superfluous, but this item is optional. After insulation with polystyrene foam materials, the surface can be covered. For this, you can use various materials, it all depends on the budget and wishes of the owner.
Important! Not a single joint of the thermal insulation material should protrude, since these are the places that are most vulnerable to the formation of condensation.
wall insulation
Floor thermal insulation
In practice, bulk elements are used as thermal insulation components for the floor in basements and cellars. Peat or sawdust are great for this. To prevent moisture from penetrating from below, you first need to lay everything with an insulating film, then make uniform mounds, and also, if necessary, apply a coating so that the material does not spread, but remains in place.
Thermal insulation of the floor with sand
To insulate a bulk or traditional cellar, it is recommended to choose sand as insulation for the floor. It has a relatively low cost, but at the same time it has excellent heat retention qualities. To achieve the best performance, the composition is distributed evenly and covered with finishing or film on top.
Thermal insulation of the basement entrance
Previously, we looked at how you can insulate the ceiling in the cellar, as well as other structural elements. However, the job will not be completed unless the input is properly insulated. Here you have to face the following nuances:
- Structures cannot be insulated with polystyrene, as the exit may subsequently be blocked.
- It is recommended to cover the entrance with insulating protection both from the inside and outside of the basement structure.
- Immediately before starting thermal insulation work, it is necessary to free the input element from all unnecessary things.
- It is recommended to insulate the door or hatch from the cold with mineral wool, which is attached from the inside of the cellar.
- On the outside, a more compact heat-resistant element (insulating film) needs to be glued to the entrance.
- It is recommended to use a material that is larger than the input.
- A film must be sewn on top of the thermal insulation material, followed by finishing elements.
- The door frame should be secured with foam to cover the gaps.
The nuances of installing insulation for a garage space from the outside
Insulation of the ceiling from the outside is carried out according to the following requirements:
- the walls and ceiling are free of icing;
- the dew point is located outside the structure;
- useful area is not taken away;
- When burning, smoke will escape through the vent.
Before installing foam boards, the foundation should be waterproofed. For this purpose, coating or weld-on waterproofing is used. This will prevent the penetration of low temperatures and humidity. However, moisture insulation materials must fit tightly to the base of the walls. Simple sealing with polyurethane foam will not cope with this procedure.
After installation, the insulation is protected from deformation. To achieve this, steel racks are installed around the perimeter of the walls, on which galvanized sheets are seated. The entire structure is treated with anti-corrosion compounds.
This technology is inconvenient due to the need to increase excavation work and increase the cost of materials. At the same time, the period of insulation increases, because fencing needs to be installed. However, it is with this approach that you can be sure of high-quality insulation.
For external ground work, incl. on the base, extruded foam is used. It has the best tensile and compression characteristics, and the sheets are easy to process and do not break during installation.
Advantages and disadvantages of the material
What can be distinguished from the advantages and disadvantages of foam plastic boards for insulation?
The material is afraid of high temperatures, which, however, is practically not relevant for the cellar.
The advantages of the material include:
- Good thermal insulation properties.
- Polystyrene foam weighs little, so it does not put stress on the walls and foundation.
- When compared with traditional and modern analogues, polystyrene foam is a very affordable thermal insulation material.
- The material has a high level of moisture resistance.
As for the disadvantages:
- If we consider the option with external insulation, then polystyrene foam is unlikely to be suitable here, because when heated (for example, from sunlight) it begins to release vapors.
- When exposed to fire, polystyrene foam will begin to melt and burn, releasing toxic substances. However, in the case of a cellar, this problem, as a rule, is practically irrelevant.
- Foam plastic is subject to mechanical stress, so before installing the insulation, it is necessary to check the integrity of the installed slabs, because some of them may be cracked.
Experts recommend purchasing foam plastic with a density of 25 for insulating cellar walls.
All work on insulating the basement can be done with your own hands, so there is no need to involve specialists in this process. If the cellar needs to be insulated in an already built house, then it is recommended to insulate the room from the inside, because in the process of carrying out external insulation work, certain problems with the foundation may arise.
Which material to choose
Thermal conductivity coefficient of various insulation materials
The basement level is constantly exposed to lateral and vertical pressure, dampness, acids, insects and rodents. These factors must be taken into account when choosing insulation. There is a wide range of materials on sale, differing in price, performance characteristics and installation features. When making a choice, you should evaluate each product property.
Expanded clay
Expanded clay is balls or sharp porous granules obtained by vulcanization of natural clay. The material is more often used when constructing roofs in residential buildings and outbuildings.
Floor insulation scheme with expanded clay
The product has the following advantages:
- affordable price;
- low density;
- ease of use;
- environmental Safety;
- low thermal conductivity.
Expanded clay is used less and less, as it has a limited service life due to shrinkage and hygroscopicity.
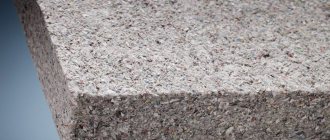
Styrofoam
Foam plastic is easy to process and is highly waterproof.
Foam plastic is a time-tested material that is used in private and industrial construction, in preparing country houses and garages for winter.
Expanded polystyrene has the following advantages:
- excellent insulating properties;
- waterproof;
- low specific gravity;
- ease of processing and installation;
- small price.
Disadvantages include fragility and toxicity when burning.
Penoplex
Thanks to the spongy structure of penoplex, it is easy to cut.
The decision to insulate the basement from the inside with penoplex will create high-quality and reliable protection of the room from dampness, temperature changes, insects and rodents.
Polymer material has the following advantages:
- dense structure, eliminating crumbling and breaking during installation;
- low thermal conductivity;
- almost zero hygroscopicity;
- long service life;
- environmental cleanliness;
- repellent effect on living beings;
- wide temperature range;
- resistance to alkalis and acids.
The disadvantage of penoplex is its high price, which corresponds to a high quality insulator. But the investment is fully justified by the comfortable conditions in the cellar.
Minvata
Mineral wool is a good heat insulator.
The industry produces mineral wool from broken glass, steel slag and natural stone. The finished products are fibers randomly bonded in space. Mineral wool is produced in the form of mats and rolls, the thickness of which is 100-400 mm.
Advantages of the material:
- ease;
- low thermal conductivity;
- elasticity;
- flexibility;
- durability.
The disadvantage is its hygroscopicity and the release of many volatile particles harmful to health during installation.
Useful tips
If you decide on external thermal insulation of the basement, a few tips will be useful for you that will help increase the efficiency of the measures taken:
- It is better to carry out insulation in dry and clear weather. Especially if instead of EPS you use regular foam, which is less resistant to moisture.
- Never neglect waterproofing. This operation not only prevents damage to the insulating material, but also protects the foundation and walls of the basement from destruction.
- When choosing a mastic with which you are going to glue foam or EPS, pay special attention to its hydrophobic properties. And do not apply it pointwise (as I described for interior work), but in a continuous layer. Then it will play the role of another waterproofing agent.
- The edge of the glued insulation material must rise above the ground level (after backfilling) by at least 50 cm.
A basement like this is everyone’s dream.
Thermal insulation of basements
When building a house on damp soil, depending on the magnitude of the expected loads, thermal insulation of the floor of heated rooms in the basement or cellar should be carried out according to the scheme adopted for load-bearing floors on the first floors of buildings. With the pressure created by groundwater and depending on the loads created by columns and walls, thermal insulation material made of extruded polystyrene foam can be laid both under and above reinforced concrete slabs laid on crushed stone.
Diagram of a wall insulated with foam plastic.
The technology of using this material under foundation slabs and for the walls of basements and cellars creates durable and reliable thermal insulation, in which there are no heat-conducting bridges, and ensures the use of the thermal capacity of all load-bearing structures. You can lay out the underlying layer of gravel with polystyrene foam, since this material completely lacks capillary water absorption, which will allow you to save a lot on the construction of the base.
The waterproofing membrane on a concrete base can be placed both above and below the expanded polystyrene. With both solutions, the insulation and waterproofing of the basement or cellar will have the same performance. When the membrane is traditionally laid on a concrete base, the heat-insulating layer will protect it from mechanical damage during construction work, and will also create a sufficiently reliable surface for laying the foundation slab.
If you plan to install heated floors on the ground floor, then care should be taken to ensure that the floor insulation is sufficiently thick to minimize possible heat loss. The fastening and location of heating pipes to some extent depends on the placement of the waterproofing layer. If the membrane is under a layer of insulation, then the pipes can be mounted on heat-insulating boards using flexible heating pipes, the fasteners of which do not damage the high-strength insulation.
Between the screed and the thermal insulation layer, it is necessary to place a thin polyethylene film, which will serve as a vapor barrier layer and gasket. If a vapor barrier or hydromembrane is placed on top of polystyrene foam insulation boards laid on a base of coarse crushed stone, then it is impossible to attach the pipes directly to the insulation boards, since this will disrupt the provision of complete waterproofing.
To solve this problem, it is possible to use an additional layer of wire mesh. With heated floors, it is worth paying attention to the high-quality execution of expansion joints. We also must not forget about taking measures that will help avoid the formation of heat-conducting bridges in the joint spaces of the slabs.
Pros and cons of EPS
Expanded polystyrene insulation at the lower level of the building confidently competes with the more familiar mineral wool. The latter loses its effectiveness when wet, so it is not advisable to use it underground. Expanded polystyrene will absorb less than 1% of its total volume during a whole month of direct contact with water (for example, with groundwater that becomes active in the spring). In addition, this material does not rot, is not susceptible to chemical influences and can withstand up to a thousand freezes without deforming or losing its properties.
The main positive quality of extruded polystyrene foam, which is extremely important for thermal insulation of foundations - low thermal conductivity - is explained by its unique closed-porous structure. Expanded polystyrene is, in fact, a cluster of closed cells filled with gas. Together they form a kind of air cushion that does not release heat from the inside and does not let in cold from the outside. That is, EPS ideally meets the requirements that high-quality insulation must meet.
The density of expanded polystyrene significantly exceeds the “ceiling” required to insulate the basement and basement (up to 35 kilograms per cubic meter).
Finally, the clear benefits for consumers are:
- light weight of the material;
- ease of cutting;
- ease of installation, ensured by connecting tenons and grooves along the edges of the slabs;
- resulting from the previous point, the ideal joining of the plates, so that the cold will not penetrate between them.
Expanded polystyrene also has its negative sides. The main one is the flammability of the material. Treatment with a protective compound will help solve this problem.