To keep your home warm, it is important to properly develop a heating scheme. One of the components of its effectiveness is the connection of heating radiators. It doesn’t matter whether you are going to install cast iron, aluminum, bimetallic or steel radiators, it is important to choose the right way to connect them.
The way the radiator is connected affects its heat transfer
Tying polypropylene pipes instructions
Radiator piping can be done using a variety of pipes, but experts recommend using polypropylene pipes. Ball valves for piping are also purchased in polypropylene; they can be straight or angular; this option is the simplest and most inexpensive. Brass fittings are more expensive, and their installation is more difficult.
Polypropylene strapping is done as follows:
- the coupling with a union nut is inserted into the multiflex, which easily connects to any outlet;
- The pipes themselves are attached to the walls at a convenient height; they should not fit tightly to the surface; it is better to leave a gap of 2-3 cm. The pipes are secured using special brackets, which are fixed to the wall with nails or self-tapping screws.
Polypropylene piping to radiators can also be carried out when laying pipes in the wall, in which case they come to the surface only at the connection points.
Radiator piping can be done using a variety of pipes, but experts recommend using polypropylene pipes.
Battery fasteners can be very different, most often it is a pin connection that is fixed to the wall surface. Corner brackets can also be used, which also allow radiators to be suspended at the required height. For panel batteries, fasteners are supplied included; for sectional batteries, they must be purchased separately. Typically, two brackets or pins are sufficient for one section.
The taps are connected as follows:
- the tap is disassembled, the fitting and union nut are screwed into the radiator;
- Use a special wrench to tighten the nut tightly.
As you can see, this process is extremely simple. To perform such work, you only need to purchase a special plumbing wrench for American women, without which it is unlikely that you will be able to simply install a faucet.
To install batteries and tie them, the following materials and tools are required:
- a set of special keys;
- seals for threaded connections;
- tow and thread paste;
- threads for carving.
Features of connecting radiators
Heating installation has some features:
- It is necessary to maintain a distance of 100 mm from the radiator to the window sill. If the gap between the batteries and the bottom of the window sill is different, then the heat flow is disrupted and the effect of the heating system will be low.
- The distance from the floor surface to the battery should be 120-150 mm, otherwise a sharp temperature change will occur.
- In order for the heat transfer of the equipment to be correct, the distance from the wall must be at least 20 mm.
At the same time, we take into account that the installation and efficiency of heating radiators is greatly influenced by the installation method: under an open window sill the efficiency of the heating system is maximum - 96-97%, in an open niche - up to 93%, in a partially closed form - 88-93 %, completely closed - 75-80%.
The heating radiator can be installed using a variety of methods; its piping is done with metal, polyethylene, polypropylene pipes
During installation, it is important to correctly position not only the pipes, but also the batteries themselves, and make the connection in accordance with all recommendations and standards. In this case, the heating system will work very efficiently and will not require repair work.
Share a useful article:
Share a useful article:
What to do if the batteries are clogged
A clogged heating radiator is a common problem when operating batteries, which leads to various troubles. Dirt accumulates inside the devices due to poor quality coolant and the presence of air. This is especially true at the beginning of the heating season. When heating starts and stops, look here.
In self-contained circuits that do not rely on central heating, dirt and debris can enter through an open hydraulic tank. Particles and batteries settle at the bottom and in the nooks and crannies of the battery, resulting in disruption of coolant circulation. The batteries begin to heat up worse. A severe blockage leads to the fact that the radiators become completely or half cold.
Clogging also occurs due to the accumulation of excess air and the formation of an air lock. Modern bimetallic batteries are easy to maintain. In this case, you can remove excess air by opening a special tap. If the problem is an air lock, a hiss will follow from the hole. If the problem is different, coolant will flow from the tap. In this case, immediately close the tap.
For old cast iron batteries such a faucet is not provided. If there is an air lock, you will have to look for the coupling, which is located at the connection of the pipe with the approach to the radiator. Turn the coupling and dirty coolant will flow out of the tap. Drain a little and twist back. To avoid staining the floor, place a container under the coupling first. Do not unscrew the coupling completely, otherwise there is a risk of flooding!
Where to put radiators
Traditionally, heating radiators are placed under windows, and this is no accident. The rising flow of warm air cuts off the cold air that comes from the windows. In addition, warm air heats the glass, preventing condensation from forming on it. Only for this it is necessary that the radiator occupies at least 70% of the width of the window opening. This is the only way the window will not fog up. Therefore, when choosing the power of radiators, select it so that the width of the entire heating battery is not less than the specified value.
How to place a radiator under a window
In addition, it is necessary to correctly select the height of the radiator and the location for its placement under the window. It must be placed so that the distance to the floor is around 8-12 cm. If you lower it lower, it will be inconvenient to clean, if you raise it higher, your feet will be cold. The distance to the window sill is also regulated - it should be 10-12 cm. In this case, warm air will freely go around the obstacle - the window sill - and rise along the window glass.
And the last distance that must be maintained when connecting heating radiators is the distance to the wall. It should be 3-5 cm. In this case, rising currents of warm air will rise along the back wall of the radiator, and the rate of heating the room will improve.
What to do if the batteries are clogged
A clogged heating radiator is a common problem when operating batteries, which leads to various troubles. Dirt accumulates inside the devices due to poor quality coolant and the presence of air. This is especially true at the beginning of the heating season. When heating starts and stops, look here.
In self-contained circuits that do not rely on central heating, dirt and debris can enter through an open hydraulic tank. Particles and batteries settle at the bottom and in the nooks and crannies of the battery, resulting in disruption of coolant circulation. The batteries begin to heat up worse. A severe blockage leads to the fact that the radiators become completely or half cold.
Clogging also occurs due to the accumulation of excess air and the formation of an air lock. Modern bimetallic batteries are easy to maintain. In this case, you can remove excess air by opening a special tap. If the problem is an air lock, a hiss will follow from the hole. If the problem is different, coolant will flow from the tap. In this case, immediately close the tap.
For old cast iron batteries such a faucet is not provided. If there is an air lock, you will have to look for the coupling, which is located at the connection of the pipe with the approach to the radiator. Turn the coupling and dirty coolant will flow out of the tap. Drain a little and twist back. To avoid staining the floor, place a container under the coupling first. Do not unscrew the coupling completely, otherwise there is a risk of flooding!
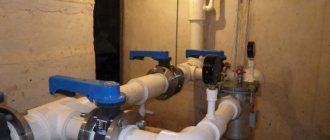
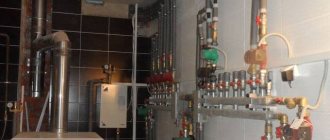
Why is it better to install the circulation pump on the return side and not on the supply side?
The age-old question - where is it better to install a circulation pump, on the supply or return, worries many who have decided to install the heating system themselves. There is a lot of conflicting information about this on the Internet. Some experts argue that there is no difference, while others claim that it is better to install the circulation pump in heating on the return line, confirming this with several facts.
Is there a difference where to install the circulation pump, return or supply?
So, those craftsmen who are in favor of installing a pump on the return line argue that the pump will overheat less. The return temperature of the coolant is much lower than the supply. As a result, the circulation pump can last much longer than if it is installed on the supply side.
In fact, this is true, especially in the case of solid fuel boilers. If for some reason the boiler safety group does not work, the heating system will “boil” and steam will enter the circulation pump and ruin it if it is installed on the supply side. In this case, it is best to install the heating pump on the return line.
The second point is related to cleaning the “return” near the heating boiler. If the circulation pump is installed precisely on the return line, then in front of it there must necessarily be a dirt filter in which all the dirt from the pipes will accumulate. And since the coolant in the return flows into the boiler, it is in this section of the line that the largest amount of dirt accumulates.
If the pump is on the return line, cleaning dirt in the heating pipes will not be difficult. It is not possible to do this on the supply side, and this is the next argument in favor of installing a circulation pump on the return side. And yet, it is always worth remembering that it is necessary to install a heating pump only in front of consumers, but not between them.
What are the rules for installing a circulation pump?
The circulation pump must be installed strictly in a horizontal position; this is exactly how the wet rotor should be placed. This will prevent the pump from airing, which will significantly extend the service life of this equipment.
The pump head should face up or to the side. It is necessary to exclude bottom placement, since this is fraught with short circuiting of the pump and its failure.
A filter must be installed in front of the circulation pump. Those who say that a mud filter is not needed are very mistaken. Before any similar equipment, such as a circulation pump, there is always a filter installed to catch small particles that can damage the impeller and other internal elements of the pump.
Vertical and horizontal wiring
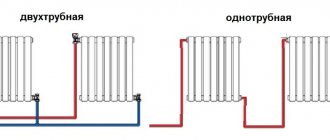
Everything is simple here: with horizontal wiring, the pipeline departs from the supply main horizontally, and with vertical wiring, vertically.
For private houses with one heat consumer, vertical and horizontal wiring are equivalent.
Apartment buildings are another matter. In them, horizontal wiring, in which all heating devices in one apartment are located “on one pipe,” allows you to install and successfully operate heat meters, which means you can consume heat at your own discretion and pay for its consumption in accordance with your own metering data.
With vertical wiring, one apartment may have several risers, each of which combines heating devices located on all floors of a multi-story building. With such a wiring, heat consumption can only be taken into account on the riser, which is simply useless for apartment owners.
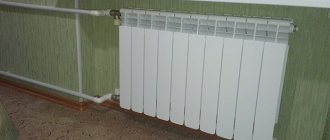
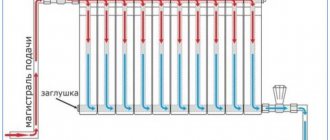
Radiator connection diagrams
How well the radiators will heat depends on how the coolant is supplied to them. There are more and less effective options.
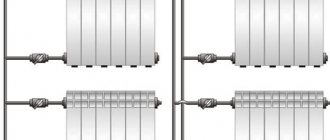
Radiators with bottom connection
All heating radiators have two types of connection - side and bottom. There can be no discrepancies with the bottom connection. There are only two pipes - inlet and outlet. Accordingly, coolant is supplied to the radiator on one side and removed from the other.
Bottom connection of heating radiators for single-pipe and two-pipe heating systems
Specifically, where to connect the supply and where the return is connected is written in the installation instructions, which must be available.
Heating radiators with side connection
With a lateral connection, there are many more options: here the supply and return pipelines can be connected into two pipes, respectively, there are four options.
Option #1. Diagonal connection
This connection of heating radiators is considered the most effective, it is taken as a standard and this is how manufacturers test their heating devices and the data in the thermal power passport for such a connection. All other connection types transfer heat less efficiently.
How the water supply works in a high-rise building - Good-natured Plumber
Let’s imagine an ordinary morning in one of the high-rise buildings in a residential area of our beloved city: toilet, shower, shave, tea, brush your teeth, water for the cat (or in any other order) - and off to work... Everything is automatic and without thinking. As long as cold water flows from the cold water tap, and hot water flows from the hot water tap. And sometimes you open a cold one, and from there comes boiling water!!11#^*¿>.
Let's figure it out.
Cold water supply or cold water supply
The local pumping station supplies water to the main line from the water supply network. A large supply pipe enters the house and ends with a valve, after which there is a water metering unit.
In short, the water metering unit consists of two valves, a strainer and a meter.
Some have an additional check valve
and water meter circuit.
The water meter bypass is an additional meter with valves that can feed the system if the main water meter is being serviced. After the meters, water is supplied to the house mains
where it is distributed over risers that lead water to apartments on floors.
What is the pressure in the system?
9 floors
Houses up to 9 floors high have bottom filling from bottom to top. Those. From the water meter, water flows through a large pipe through risers to the 9th floor. If the water utility is in a good mood, then at the input of the lower zone there should be approximately 4 kg/cm2. Taking into account a pressure drop of one kilogram for every 10 meters of water column, residents of the 9th floor will receive approximately 1 kg of pressure, which is considered normal. In practice, in old houses the inlet pressure is only 3.6 kg. And residents of the 9th floor are content with even less pressure than 1 kg/cm2
12-20 floors
If the house is higher than 9 floors, for example 16 floors, then such a system is divided into 2 zones. Top and bottom. Where the same conditions are maintained for the lower zone, and for the upper zone the pressure is raised to approximately 6 kg. In order to raise the water to the very top into the supply main, and with it the water goes in risers to the 10th floor. In buildings above 20 floors, the water supply can be divided into 3 zones. With this supply scheme, water does not circulate in the system, it stands on a backwater. In a high-rise apartment, on average we get pressure from 1 to 4 kg. There are other meanings, but we will not consider them now.
Hot water supply or DHW
In some low-rise buildings, hot water is connected in the same way, standing on a backwater without circulation, this explains the fact that when you open a hot water tap, cold, cooled water flows for some time. If we take the same house with 16 floors, then in such a house the hot water system is arranged differently. Hot water, like cold water, is also supplied to the house through a large pipe, and after the meter it goes into the house mains
which lifts the water into the attic where it is distributed along the risers and goes down to the very bottom into the return line. By the way, hot water meters count not only the volume of lost (consumed) water in the house. These counters also count temperature losses (gigocolors)
Temperature is lost when water passes through apartment heated towel rails, which act as risers.
With this scheme, hot water always circulates. As soon as you open the tap, the hot water is already there. The pressure in such a system is approximately 6-7 kg. on the supply and slightly lower on the return to ensure circulation.
Due to circulation, we get pressure in the riser in the apartment of 5-6 kg. and immediately we see the difference in pressure between cold and hot water, from 2 kg. This is precisely the essence of pressing hot water into cold water when plumbing fixtures malfunction. If you notice that you still have higher pressure on hot water than on cold water, then be sure to install a check valve at the cold water inlet, and at the hot water inlet you can include control valves in the system, which will help equalize the pressure to approximately the same figure as the cold one. An example of installing a pressure regulator can be seen here
dretun.ru
The shut-off valve is broken
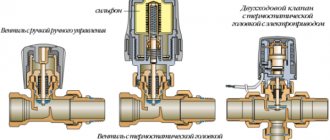
Shut-off type fittings are intended to completely or partially shut off the supply of coolant to the heating network. The main components of such fittings are presented:
- valves;
- ball valves;
- thermal heads with mechanical or automatic adjustment.
The lower part of the battery does not warm up, but the upper part becomes hot due to malfunctions inside the faucet. As a rule, problems are caused by a broken valve or any other disturbance that prevents the correct functioning of the element, as well as the unimpeded circulation of heated liquid.
Self-installation of fittings in the form of a valve requires increased attention. The manufacturer must indicate the direction of movement of the coolant directly on the housing. It is in accordance with this marking that this element should be installed. Any violation of installation rules is the main reason for the lack of trouble-free movement of water.