An integral part of arranging an autonomous heating system for a private home is the installation of batteries. However, in order for their operation to be durable, trouble-free and provide comfortable living, it is necessary to take into account several important nuances. Let's look at what SNiP requirements the installation of heating radiators must comply with, what are the main criteria for choosing devices, how to correctly determine the location for their installation and the method of connection, what are their main varieties and what are their features, as well as what stages the installation procedure consists of.
Heating radiator under the window Source srubdacha.ru
Required tools and materials
Not a single construction or installation process can be carried out without a certain set of tools and devices. In this case, you need to know what is needed to install a heating radiator. Most often the same set is used, with some exceptions.
For example, aluminum and bimetallic radiators are installed in the same way, but cast iron batteries are installed according to a different pattern. They require the use of larger plugs, and the Mayevsky valve is replaced with an automatic air vent, installing it at the highest point of the system. Steel panel-type radiators have metal arms and are equipped with brackets for hanging.
Advantages of cast iron batteries
Considering such a heating device as a cast-iron heating radiator, the characteristics of this unit largely correspond to, and sometimes even exceed, the characteristics of more modern products used for heating residential premises. Among the obvious advantages of this type of radiator are the following:
- the minimum service life is 50 years, which is due to the high resistance of the equipment to corrosion plaque;
- cast iron batteries are reliable;
- the ability to accumulate a very large amount of heat due to the presence of thick walls;
- installing a cast iron heating battery is not an expensive undertaking, since the price of these devices is not high. Despite this, cast iron radiators are resistant to contaminants in the water (about
Air release devices
Air always accumulates in heating radiators, which must be released periodically. Mayevsky taps are installed on aluminum and bimetallic radiators for this purpose. Most often it is located on the free upper manifold. This device is slightly smaller in size than the outlet, so an additional adapter is installed, which comes complete with the tap. When choosing a Mayevsky tap, you should focus on the diameter of the collector.
In addition to this device, automatic air vents are used, which are also suitable for installation on radiators. However, automatic devices are large in size, and their housing can only be brass or nickel-plated. Therefore, such a device does not look very attractive on white enameled radiators. This greatly reduces the demand for automatic air vents.
Locking elements
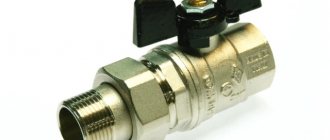
When installing batteries in an apartment, you will definitely need taps. They can be ball or shut-off; the second option allows you to regulate heat transfer. The taps are located at the pipeline inlet to the radiator and at its outlet. Ball valves allow you to disconnect the battery from the general system in case of emergency repairs or replacement during the heating season. In this case, the supply of coolant to the battery is stopped without affecting the operation of the entire system. Ball valves have a relatively low price, which gives them a great advantage over similar devices. However, with their help it is impossible to regulate the heat transfer of the heating device, which is a negative characteristic of the device.
Shut-off control valves shut off the water supply to the radiator in emergency cases, and at the same time allow you to change the intensity of the coolant flow. In addition, such devices look more attractive and have two configurations, straight and angular. This makes it possible to make the binding more accurate. But it is worth considering that the cost of shut-off control valves is several points higher than the price of ball valves.
In some cases, when using ball valves, thermostats are installed. They can be electronic, automatic and mechanical. Using this device you can change the heat dissipation of the battery. But it should be remembered that these devices can only reduce the flow, therefore, there is no need to install such a device on poorly heating radiators.
Selecting the necessary components
For the upcoming work, you need to prepare tools. We purchase taps, valves, valves, and thermostats from shut-off and connecting valves. For installation, you need adapters that allow you to connect parts of different diameters: couplings, bends. Brackets and corners are purchased to secure devices to the wall. Bypasses (jumpers in the form of pipe sections) are also required, which are installed between two pipeline lines. It is necessary to check in advance the presence of all elements in the composition so that during installation you do not have to search for missing parts.
Polypropylene pipes for heating
When installing batteries, the possibility of hiding the heating system pipes under wall coverings is also taken into account. If there is cladding with decorative plastic or plasterboard, then packaging the load-bearing parts of the heating system in them will increase the aesthetic appearance of the room. The ends of the pipes with the existing threads are brought out. This is done so that during subsequent installations of radiators there is no need to damage the wall covering. The necessary parts for installation are selected taking into account the thread diameter.
Hiding heating system pipes under wall coverings
Modern methods of connecting pipes include both welding and threaded assembly. Both options do not affect the battery life or the level of their warming up, but they differ in several respects. For example, welding seams are more reliable, while threads are susceptible to mechanical stress and vibration. In addition, in older houses it is often impossible to thread pipes. The way out is welding.
Welding pipes for heating
But in new houses they install pipes made of modern materials, such as polypropylene and metal-plastic. Welding is no longer used to connect them.
Additional tools and materials
For wall-type radiator models, you should purchase hooks or brackets, the number of which is selected depending on the number of sections of the heating device:
- If the number of sections does not exceed 8, and the length is less than 1.2 meters, then the device is attached at three points, two at the top and one at the bottom.
- Each next 5-6 sections require additional fastening.
In addition, in the process of deciding how to install a heating radiator yourself, you will need linen winding and plumbing paste, with the help of which the tightness of the connections is ensured. You should also take care of the presence of a drill, drill bits and level. Dowels may come in handy. In addition, it is necessary to purchase or rent equipment for connecting pipes and fittings.
Installation instructions
To hang and connect the battery to the heating pipes, prepare the following components and materials:
- hooks with plastic dowels for attaching the radiator to the wall - at least 3 pcs.;
- 2 fittings (side plugs) with right-hand pipe threads, marked with the Latin letter D;
- 2 fittings with left-hand thread, marking – S;
- 1 manual air vent (Maevsky valve) with a key;
- 1 plug;
- sealing silicone thread or flax;
- faucet, balancing valve, thermostatic valve, fittings - according to the diagram;
- polypropylene, metal-plastic or polyethylene pipes with an internal diameter of 10-15 mm for connections.
The number of fasteners depends on the size of the heating device. An aluminum battery of up to 10 sections must be mounted on 3 hooks or special brackets - 2 on top, 1 on bottom. In other cases, 4 fastenings are used.
Steel panels are sold assembled, hanging brackets are included. Heavy cast iron radiators for floor mounting are equipped with legs.
Types of wall and floor brackets used for mounting batteries
Tools you will need:
- electric drill and drill corresponding to the hardness of the wall;
- screwdriver or screwdriver;
- construction level;
- gas key;
- tape measure, pencil.
Pre-assembly
The radiator sections are pulled together by nipples - metal clamps on which left and right threads are cut (half the length). To connect, you need a long wrench with a nipple attachment; this is not available in the household. Hence the advice: ask to twist the sections right in the store.
Assemble the sectional battery in this order:
- Clean the areas around the side holes.
- Screw in 4 fittings from the ends and carefully tighten them with a gas wrench. Please note: plugs with regular threads must be screwed into the right ends of the radiator, with left-hand threads - into the left ones (if you look at the front side of the product).
- Close the unused lower outlet with the plug included in the kit.
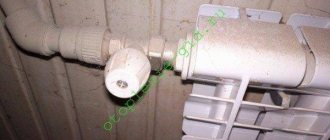
- Using sealing material, pack and screw the Mayevsky tap into the upper channel.
- In the remaining 2 holes, install the mating part of the American females, disconnected from the taps.
Important point. The American element with a union nut does not need to be screwed into the fitting until it stops. Otherwise, the nut will not move away from the edge and will not allow you to attach the valve itself. To screw it in, you will need a special internal key, but if you wish, you can get by with powerful pliers.
After installing the American ones, screw on the valves and tighten (by hand for now). Panel heaters do not require assembly, except that you will have to install an air vent. Do not remove the film from the case - it will protect the coating from accidental damage.
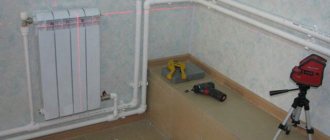
Choosing an installation location
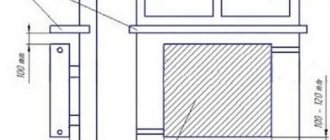
Before installing a heating radiator in an apartment, it is important to correctly determine its location. In most cases, heating devices are placed under the window so that the warm flow prevents cold from entering the room from the window opening. The width of the heating radiator should be 70-75 percent of the width of the window, in this case the glass will fog up less.
There are certain rules for installing heating batteries in an apartment under a window:
- The device must be located exactly in the middle with an error of no more than 2 cm.
- The distance from the floor to the heating device can be from 8 to 12 cm.
- A clearance of 10-12 cm is required between the window sill and the radiator.
- A gap of 2-5 cm should be left between the wall and the back of the device.
Compliance with these rules will allow warm air to circulate normally in the room, providing effective heating.
Rules for installing heating radiators
Installation of heating radiators under a window must be carried out in compliance with certain rules:
- Before starting installation work, it is necessary to level the wall, this will make the installation process much easier.
- Then mark the middle of the window opening on the wall.
- Then measure 10-12 cm from the window sill and draw a horizontal line; it will serve as a guide for aligning the top edge of the radiator.
- The installation of brackets is carried out in different ways, so you should learn how to install radiators correctly. If the heating system has a circulation pump, then the radiator should be positioned strictly horizontally. For radiators in a system with natural coolant movement, it is necessary to make a slope of 1% along the flow of water. A higher level of slope can cause stagnation.
Decorative screen
If radiators look unaesthetic, violate symmetry, or interfere with the intended composition, decorative grilles come to the rescue.
It is better, of course, that it is not a cheap screen cover from a store, but a box made according to individual parameters in accordance with the features of a particular interior. By “juggling” sizes and colors, you can achieve the best result: create symmetry, balance an area, veil a structure or, conversely, make it a focal point.
For example, here we created symmetry using the screen. The decorative box turned into an element of the TV wall.
If you independently determine the design of the structure, it will best suit the interior. You can make it classic or modern-minimalist, give it industrial style features or endow it with some ethnic motifs. In general, the screen can be very successfully integrated into the interior - so that it looks not like a necessary measure, but like a carefully selected part of the decor.
Wall mounting methods
The above rules are important to take into account when installing fasteners. To fix the hook in the wall, you need to drill a hole, insert a plastic dowel into it and screw the fastener into it. This device allows you to easily adjust the distance from the radiator to the wall; you just need to screw in or unscrew the hook.
When installing heating radiators in an apartment with your own hands, it is important to understand how the load from the radiator is distributed on the hooks. The weight of the device is mainly supported by the upper fasteners, the lower hook only fixes the device in the desired position. To ensure that nothing interferes with hanging the radiator, the lower fasteners are placed at a distance of 1-1.5 cm from the level of the lower outlet of the heating device.
The radiator bracket is installed according to a different scheme. Before installing the heating radiator, it is applied to the wall. Then mark the places where the brackets are planned to be installed. Putting the radiator aside, attach the bracket to the wall and mark its attachment points. Holes are made in the marked places, dowels are inserted into them, and the bracket is fixed to the wall using screws. After installing all the fasteners, the radiator is installed in place.
Installation process
The installation process is nothing overly complicated if it is carried out according to plan step by step and without errors.
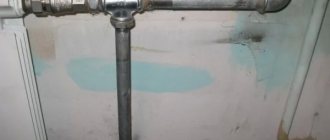
- First, you need to turn off the heating system and drain the water from it. In a private house, this can be done using a pump; in an apartment building, you will have to contact the housing office. Then you need to dismantle the used radiators.
- Mark the wall for mounting new heating devices. In this case, it is advisable to use a level to install the battery as level as possible, eliminating distortions. It is important that the battery is installed strictly horizontally or with minimal deviation towards the pipe. This will allow the water to drain completely by the end of the heating season.
- Install the brackets, check their strength by pressing on them with all your weight. If they can stand it, hang up the battery. For cast iron and aluminum batteries, two fasteners are usually sufficient; for plastic pipes, a larger number is required. Before installing the fasteners, the walls should first be cleaned, leveled and plastered.
- Install shut-off valves, paying special attention to the reliability and water tightness of threaded connections. Connect the pipeline.
Important! To prevent the battery from leaking, it is advisable to use appropriate torque wrenches. Especially if you are installing an aluminum radiator, you will inevitably need to install an air valve with it, through which air will be released
The force of the torque wrench used during installation should not exceed 12 kg.
Installation of underfloor heating devices
Despite the light weight of aluminum radiators, sometimes it is not possible to hang them on the wall. For example, it is not recommended to hang any structures on walls covered with plasterboard sheets or made of lightweight concrete without additional support. Some models of cast iron and steel heating appliances are equipped with legs, but their appearance is not always aesthetically pleasing.
Bimetallic and aluminum radiators can be installed on the floor using special brackets. They are fixed on the floor, a radiator is installed and, using a special device, the lower outlet of the battery is fixed to the bracket. Floor mounts can have a fixed or adjustable height. Such fasteners are fixed on the floor using nails or dowels.
Peculiarities
The devices are simple. At the core is a section created using casting. Differ by:
- channel profile;
- number of channels.
The sections are connected, you can assemble a structure of any size.
Pros:
- Versatility. Resistant to:
- aggressive environment, unlike structures made of steel and aluminum;
- corrosion;
- damage by the smallest fractions present in the coolant;
- pressure surges in the system.
- Long-term operation.
- Maintainability. It is impossible to build up steel structures or replace faulty parts. With cast iron, adding/removing sections is quick and easy.
- Availability. Resistant to damage, repairable, purchase is compensated.
- A large assortment. There is no need to confuse old cast iron structures with modern ones. They are made of better quality and do not require frequent painting. Powder coating is used for exterior decoration. So that they do not spoil the overall appearance of the room, it is rational to use:
- decorative fencing;
- designs with “artistic casting”.
Flaws:
- Inertia. The phenomenon is caused by a low heat transfer coefficient. Opponents of cast iron radiators claim that they “swing” for a long time before normal operation. They take longer to cool down if the boiler turns off.
- Low heat transfer.
- Heavy weight. Complicates transportation and installation. The cast iron battery must be mounted on a solid base. If the wall is made of cellular concrete, then it is more rational to replace traditional hooks with a load-bearing metal frame.
Connecting heating devices
To solve the question of how to install a heating battery and connect it to the pipeline of the general system, use the following methods:
- Saddle connection.
- One-way connection of heating batteries.
- Diagonal connection.
If radiators with bottom connections are selected for installation, then the issue is resolved simply. The manufacturer himself determines the location of the supply and return pipes and requires unquestioning implementation of the recommendations. Otherwise, heating efficiency is not guaranteed.
When solving the problem of how to add a heating battery in an apartment, you should know that radiators with side connections can be installed using the above methods.
Bottom line
Assembling and installing cast iron batteries is not difficult. No special skills, tools, or knowledge are needed. Installation affects the durability and efficiency of the system.
Having pre-thought out the assembly down to the smallest detail, you will make the atmosphere in the room comfortable. If you doubt your abilities, it’s better not to take risks and turn to a specialist. Of course, this will require additional costs, but the result will be of high quality, and you will not worry that the heating system may fail.
Average score of ratings is more than 0
Share link
Comments There are no comments yet, but you could be the first...
One way connection
This type of connection can be used in single-pipe or two-pipe systems. Since in most apartments the system is made of metal pipes, you should consider piping for this option. To work you will need the following elements:
- Ball valves in the amount of 2 pieces.
- 2 tees.
- 2 drives, these parts have external threads on both ends.
The connection of elements is carried out according to a certain scheme. For a single-pipe system, the mandatory installation of a bypass jumper is required, which will allow you to shut off the coolant supply to the radiator in unforeseen situations. Installing a tap on the bypass is strictly prohibited, as it blocks the movement of coolant along the riser.
If you have welding equipment and the skills to work with it, the bypass jumper can be welded. A two-pipe system can be assembled without a bypass. In this case, the supply pipe is connected to the upper manifold, the return pipe to the lower outlet. Cranes are installed in any case.
The tightness of the connections is achieved through the use of linen winding and plumbing paste applied on top of it. The amount of winding must be controlled, since its excess can lead to the formation of microcracks on the body of the connected elements, which threatens subsequent destruction. Such caution should be observed when connecting elements made of all materials except cast iron products.
Pipe layout diagrams
Single-pipe and two-pipe wiring is typical for private houses. What is their difference?
Single-pipe wiring
It is the most economical option. Thanks to the diagram, you should get the following:
- A pipe runs along the bottom of the floor from the heating boiler, passing through the entire room and returning back to the boiler.
- Radiators are installed on top of the pipe, and the connection is made through the lower pipes. At the same time, hot water flows from the pipe into the heating device, which completely fills it. The part of the coolant that has given up heat begins to fall down and exits through the second pipe, again entering the pipe.
As a result, there is a step-by-step connection of radiators with the bottom connection of batteries
In this case, it is worth paying attention to one negative point that affects the efficiency of heat transfer. As a result of this sequential connection of single-pipe wiring, a gradual decrease in the temperature of the coolant occurs in each subsequent heating element. Because of this, the last room will be the coldest
Because of this, the last room will be the coldest.
This problem can be solved in two ways:
- a circulation pump is connected to the system, which evenly distributes hot water to all heating devices;
- in the last room you can increase the radiators, as a result the heat output area will increase.
This scheme has the following advantages:
- ease of connection;
- high hydrodynamic stability;
- low costs for equipment and materials;
- You can use different types of coolant.
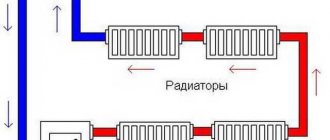
Two-pipe wiring
For a private home, this heating scheme is considered the most effective. However, it is worth considering the fact that the costs will be considerable at first, because you will need to install two pipes to supply and remove hot water. But still, such a scheme has certain advantages over a single-pipe one:
- the coolant is evenly distributed throughout the room;
- you can control and regulate a certain temperature mode in each room;
- repair of any element of the heating system is possible without turning it off;
- very little fuel is consumed.
Diagonal connection
By diagonally connecting heating devices, you can obtain the most efficient heat transfer. With lower wiring, the connection process looks quite simple: coolant is supplied to the upper inlet on one side, which comes out on the other side at the bottom.
This design looks more aesthetically pleasing, which cannot be said about a single-pipe system with a vertical riser. However, knowing how to properly install a heating radiator, you can achieve high heating efficiency with this option.
When deciding how to install heating radiators correctly, you should know that when connecting a radiator to a single-pipe system, installing a bypass is required.
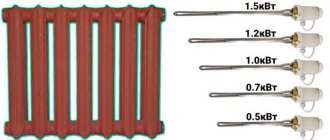
Calculation of required power
The rated power of one section is based on the standard values of coolant temperatures at the inlet and outlet of the heating device, and the air temperature in the room.
In a private home, these values differ from the standard ones. Therefore, when calculating, the passport value is reduced by 15%.
An exact calculation is carried out in any online calculator, taking into account all heat losses through the elements of the house structure.
Roughly we can assume that:
- for a room with one external wall and a window, 100 V / m² is required;
- for a room with two external walls and one window, 120 V / m² is required;
- for a room with two external walls and two windows, 130 V/m² is required.
Saddle connection
This option for connecting radiators to the heating system is more suitable for lower pipe distribution or when they are hidden.
Installation on a single pipe system can be done with or without a bypass jumper. If there is no bypass, installation of taps is necessary. Their presence will allow you to remove the radiator in the event of an accident and replace it with a drain.
The use of saddle connections for radiators with vertical wiring is considered ineffective, since heat loss in this case can reach 15%.
Useful tips
Many people believe that the radiator connection option is not that important when it comes to heat dissipation. After all, much will depend on the type of heat source chosen. For example, bimetallic heating radiators have higher heat transfer than cast iron ones. But imagine that cast iron devices are installed according to the diagonal principle of coolant movement, and bimetallic ones are installed along the bottom. In the first case, heat loss is 2%, and in the second - 12%. The difference in losses is as much as 10%. For a heating system, this is a fairly high indicator, which will affect not only the indoor temperature, but also the amount of fuel consumed
This is very important for private houses
Today, experts give recommendations regarding increasing the heat transfer of devices. To do this, you can install a reflective panel on the wall behind the radiator, for example, a regular piece of fiberboard trimmed with aluminum foil. But keep in mind that the distance from the wall to the radiator in this case should be at least 1.5 cm.