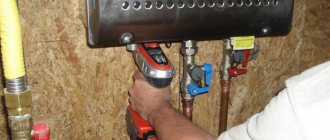
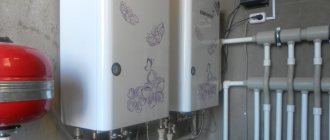
The main advantage of instantaneous water heaters is their compactness. But at the same time, these household appliances consume a large amount of electricity. This consumption is due to the high power, sometimes reaching up to 15 kW. Instantaneous water heaters belong to the class of reliable and durable devices; breakdowns rarely occur (sometimes due to manufacturing defects). You should know that you can repair a instantaneous water heater with your own hands; you just need to know the search algorithm and purchase the necessary tools.
DIY water heater repair
Main types of faults
During operation of water heaters, several types of malfunctions can occur:
- The heating element has burned out, the water does not heat up;
- The thermostat has deteriorated;
- the magnesium anode has used up its resource;
- a large layer of scale on the heating element and the inner surface of the boiler.
All of these faults, except for replacing the thermostat, require disassembling the water heater. Considering that there is no fundamental difference in connecting Ariston storage water heaters with different capacities and modifications, the disassembly process will be the same.
It can be divided into several stages:
- disconnecting the electrical power cable;
- draining water from the boiler tank;
- dismantling the flange and directly opening the boiler.
Reasons for disassembling the boiler
In what cases will you have to disassemble the equipment yourself? There may be several reasons. First, we will give signs by which you can recognize the problem:
- The water has an unpleasant odor and a cloudy color.
- Flakes of scale are noticeable.
- The body is electrocuted.
- The RCD often trips. Why a water heater knocks out an RCD, read in a separate article.
- The water takes a long time to heat up or does not heat up at all.
- The set is slow, the flow is weak.
- Housing leak.
These signs indicate problems with the boiler. What could have caused the problem:
- Late tank maintenance . If the region has hard water, magnesium and potassium salts settle on the walls of the housing and parts when heated. As a result, an unpleasant odor and turbidity appear. The water takes a long time to heat up because the thermal conductivity of the heating element decreases. Once every six months it is recommended to look into the tank and check its condition, replace the magnesium anode and clean the parts.
- Wear of gaskets . If the tank is leaking, the gaskets are inspected first. If the housing becomes corroded, replacement will be required.
- The heating element burned out . In such cases, you need to install a new element.
- Thermostat failure.
In what cases is it necessary to dismantle an indirect heating water heater?
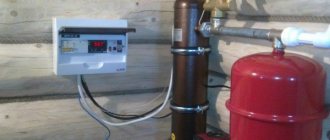
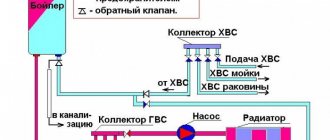
Gas boiler piping diagram. The magnesium anode in the storage water heater, used for the catalyst in order to protect the tank walls from rust and aggressive influences on the heating device, needs to be changed sometimes.
The service life of the anode is determined by the quality properties of the water used in the storage water heater (it is recommended to place it on the cold supply
specialized water filter), operating temperature of the water, degree of intensity of operation of the water heater.
The usual period of use of a magnesium anode, indicated in the operating instructions for an electric storage water heater, will not exceed 6 months. When operating an electric storage water heater in light mode, the magnesium anode will most likely last 1-1.5 years without replacement.
Along with changing the anode, to prevent water heating, you should carefully clean the space inside the tank from scale and wash the walls.
The heating element also needs to be cleaned using special chemicals or an ordinary iron dish sponge.
An additional need to disassemble the water heater appears as a result of an accident, malfunction or reaction of the electric storage water heater to original operating conditions.
Basically, the heating element fails.
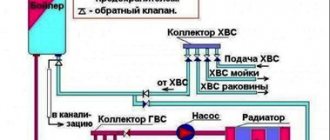
Diagram for connecting an electric storage water heater to the network. If the water from an electric storage water heater has a bad odor, a yellow or brownish tint, this indicates corrosion and clogging of the tank. The same is evidenced by the fact that the water takes too long to heat up and the occurrence of loud foreign sounds during the working period of TENA.
It is necessary to quickly disassemble the indirect heating water heater, identify the breakdown and eliminate it. In any case, it is necessary to very carefully wash the indirect heating water heater and make sure that both the walls of the storage tank and the tubular type heating element are clean.
If there is a leak in the storage water heater, you need to make sure that the rubber waterproofing gasket is reliable. If necessary, the gasket should be changed.
If the leak appears as a result of depressurization of the storage tank itself, it is impossible to eliminate this malfunction with your own hands. This may be a manufacturing defect - then the indirect heating water heater must be replaced due to warranty agreements.
Sometimes, as a result of poor operation of an electric storage water heater, the walls of the storage tank may rust. In this option, replacing the storage tank may cost more than a new water heater.
Basic rules for servicing the device
For long-term and trouble-free operation of the water heater, it is important to follow the rules of its operation and maintenance. Otherwise, breakdowns are inevitable.
The fact that problems have arisen in the operation of the device may be indicated by some changes in its operating mode:
- increasing the time for heating water to a given temperature;
- the appearance of unusual sounds accompanying the operation of the device;
- the appearance of foreign impurities in tap water, changes in its color, smell or taste.
How to disassemble a water heater with a heating element
Diagram of an electric flow heater.
This is a relatively inexpensive type of boiler that has a heating element attached to nuts. This device, as a rule, does not have external adjustment. Its distinctive feature is the presence of a hexagonal flange, which can be unscrewed with a 55 wrench or a regular gas wrench.
Algorithm for disassembling a water heater with a heating element:
the device is disconnected from the network, the water is drained and the check valve is dismantled, which will only complicate the work; the boiler cover is removed, which is screwed closer to the pipes; The thermostat is being dismantled; place a container under the water heater into which the remaining dirt, water and scale will be drained; unscrew the flange counterclockwise (existing dirt and scale can complicate the work, so they are carefully cleaned off with a wooden or plastic knife; as soon as the thread ends, the flange is carefully removed); in order to remove the heating element, remove the scale from the bends of the heating element and, carefully swinging it left and right, pull out the lower part of the element.
How to disassemble an economy class water heater (boiler) Economy class water heaters are distinguished by an oval flange shape, therefore the principle of their disassembly has some peculiarities.
Stages of disassembling an economy class boiler:
- the device is disconnected from the power supply, the water is drained and, if necessary, the check valve is unscrewed;
- There are two screws near the drain and fill pipes that should be unscrewed and the water heater cover removed;
- with a sharp downward movement, the thermostat is removed and access to the flange is opened, which is attached with a nut to the body using a strip; After the nut is unscrewed, you can remove the flange.
How to disassemble a medium-class water heater Medium-class water heaters have an average price category. The device comes with flanges that are attached directly to the neck using 6 bolts.
The disassembly process for this water heater is as follows:
- the power supply to the device is turned off, the water is drained and the check valve is removed;
- to remove the cover, find the screws and unscrew them (the location of the screws may vary);
- after this, it is necessary to remove or remove the thermostat (depending on whether it is connected to the heating element with a wire or inserted into it);
- all necessary screws or nuts are unscrewed.
Common breakdowns and repair methods
Next, we will consider the most common problems with a water heater and provide repair methods for each of the breakdowns.
Problem #1 - heating element malfunction
Failure of the heating element is a typical problem for both instantaneous and storage water heaters. This element works under high load and therefore wears out quickly. If the power supply is connected, but the water in the tank does not heat up, most likely the problem has arisen with the heating element.
The heating element should be removed from the tank carefully, especially if a significant amount of scale has accumulated on its surface. Sudden movements can lead to deformation and breakage of some elements
First, you should check whether electricity is flowing to the heating element and thermostat. At the cable connection points, check the presence of voltage with a tester.
If there is no power, you may need to replace the cable itself or check to see if there is a power outage throughout the house.
Regardless of the model type, each thermostat has a power button. When you press it, the device turns on, and when you turn it off, the button returns to its original position.
If there is electricity and the cable is working properly, then problems have arisen with the heating element, which will have to be replaced, or with the thermostat. To figure out what exactly is broken, you need to remove the thermostat and check it with a tester.
Testing the serviceability of the heating element is carried out as follows. First, the measuring scale of the device is set to 220-250 V. Then the resistance is measured at the terminals connecting the heating element to the electrical network.
If there is voltage, you should disconnect the heating element from the network and check the potential at the terminals of the heating element. The lack of response from the tester will indicate that the device is faulty. If there is a reaction, you need to continue the diagnosis.
First, disconnect the water heater from the power supply. Then the heating element is disconnected from the thermostat so that the contacts of the heating element remain uninsulated.
The contacts of the tester are applied to them and the reaction is observed. If it is, the heating element is working, but if not, the heating element needs to be replaced. In this case, it does not matter what numbers the tester produces, only the presence or absence of a reaction is important.
These fault detection methods are suitable for both storage electric water heaters and instantaneous models.
To determine the serviceability of the heating element and thermal relay, an electrical tester is used. Typically, the presence of voltage on the contacts indicates the serviceability of the element, and its absence indicates the need for repair
Problem #2 - thermostat failure
To check the serviceability of the thermostat removed from the water heater, you need to set the adjustment knob to maximum and take measurements at the inlet and outlet of the device. If the tester's needle remains calm, i.e. its position does not change, which means the thermostat is faulty and needs to be replaced.
If the arrow deviates, then you need to continue testing. Now you should set the thermostat to the minimum position and apply the tester's measuring probes to the contacts. It will not be easy to continue the diagnosis alone; you will have to fix the probes or ask someone to hold them for some time in the correct position.
After this, you need to take a lighter and heat the tip of the temperature sensor. If the thermal relay works, the circuit opens, and the resistance on the tester scale goes down sharply, then the thermal relay can also be considered working. If the system does not respond to heating, then this element is damaged and needs to be completely replaced.
Sometimes a water heater may stop working due to the safety valve tripping, causing the unit to dangerously overheat. It is enough to correctly adjust the operation of the device so that it starts working as usual.
First you need to unfasten the fasteners of the heating elements and the thermostat (red arrows), then unscrew the screw (green arrow) and nuts (blue arrows. The thermostat is circled with a yellow line
Problem #3 - control board malfunction
If the check shows that both the heating element and the thermostat are working, most likely the problem has arisen with the control board. It is almost impossible to repair such an element at home.
You will have to replace it with a new one, and you will have to use the help of a specialist who will help you set up the electronic equipment. Most often, you just need to contact a service center, where the required element will be selected and installed correctly.
Typically, the heating element is secured with six bolts and nuts (marked with red indicators). When reassembling, it is recommended to tighten them evenly
Problem #4 - tank leaking
A tank leak is a serious problem that you can’t always fix on your own. In some models, either the tank or the entire heater will have to be replaced.
Sometimes the leak can be sealed, but care must be taken to restore the integrity of the outer casing and the thermal insulation layer. Usually such measures are insufficient and short-lived, and soon the leak will occur again.
If water leaks from places marked with black indicators, it is likely that the gasket or heating element needs to be replaced; red indicators mark places of leaks if the internal tank is damaged
A water heater tank is most likely to leak if:
- damage to the internal tank has occurred;
- the heating element has deteriorated;
- the gasket has leaked.
If water flows at the place where the heating element is attached, it may not be necessary to repair the tank itself. A special gasket is installed in this place; a leak may be caused by its damage. The gasket is replaced and this solves the problem.
A leaking water heater tank is usually caused by neglect or late maintenance, which also includes replacing the magnesium anode. Another common problem is lack of grounding. This can also lead to the development of corrosion processes and leakage.
If it is necessary to replace the gasket, you should select a new one of exactly the same size and shape and made of suitable materials
If you need to replace a gasket or heating element, it is best to first dismantle the faulty element in order to take it with you and select an exact analogue. Purchasing parts by eye can lead to unnecessary expenses. Making such a replacement is relatively easy.
But if problems arise with the tank, you will have to at least contact a service center. You must immediately find documents for the water heater and clarify the warranty periods and service conditions.
Before repairing or cleaning the water heater, you must remove the protective cover, which can be located at the bottom, center or side
Do-it-yourself instantaneous water heater repair
Place a deep container under the tank; residual liquid may spill out. Using a wrench, unscrew the nut counterclockwise. For convenience, the housing can be removed from the wall and installed upside down. Now you can remove the heating element
Remove it from the housing - proceed carefully so as not to damage the element. If the part does not come out due to scale, clean the hole a little using a plastic knife
Economy class This is a more modern technology. To remove the cover, you need to unscrew two bolts. They are located near the inlet and drain hoses. You can remove the thermometer by pulling it down, but the movement must be quick and precise.
A special nut secures the flange strip. Unscrew it and remove the flange.
How the boiler works
Before removing the part, spin it. Remove the cover. Remove the temperature sensor. First disconnect the contacts from the heater. Remove the flange bolts using a socket wrench.
Unscrew the cap nut. Remove the plastic shields. Where can I find or what do the instructions for this Ariston boiler look like?
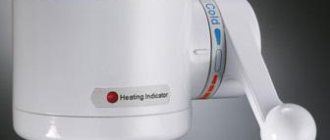
An electric instantaneous water heater can function fully in your home
Great article, but you just can’t copy it. Yes, that's understandable. The article was not prepared by people - aliens. And they are rednecks.
Tell me what the problem might be: the water heater heats up, draws water, but hot water does not flow from the tap. I took everything apart, cleaned the boiler and filters - still no leaks. Cleaning didn't help. How to find out the reason for the breakdown of the heating element or relay?
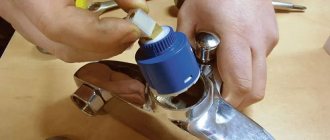
How to repair a shower switch?
Bathroom taps have a separate bath-shower switch. If the breakdown of this element is not repaired in a timely manner, the entire mixer may fail.
Based on their design features, the following types of switches are distinguished:
- Spool type. Such switches are produced complete with valve taps.
- Cartridge. This type of switch usually comes with Russian-made mixers.
- Cork type. This design is almost never produced by modern manufacturers of plumbing equipment.
- A push-button switch allows you to mix water from a hot and cold pipe.
The most common cause of a leaking pushbutton switch is a damaged gasket. In this case, you can remove and thoroughly clean the old rubber ring, but it will be most effective to replace it with a new one.
Repairs are carried out as follows:
- First of all, you need to remove the button. To do this you will need an adjustable wrench. All manipulations must be done with great care so as not to damage other parts.
- Use a wrench to unscrew the entire switch.
- There should be rubber gaskets on the retractable switch rod. Worn rings must be replaced with new ones.
If for some reason it is not possible to replace the gasket with new material, the old ring can be softened. First, the rubber must be thoroughly washed with soapy water, then soaked in gasoline or solvent for several minutes. However, it is worth remembering that such manipulation will only achieve a temporary effect. After some time, the switch will start to drip again, and even then replacing the gasket will be inevitable.
The procedure will be as follows:
- First you need to remove the plug;
- Using a screwdriver, you need to unscrew the screw that secures the lever;
- Next, you need to remove the lever itself;
- then the nut that secures the cartridge is unscrewed and removed;
- the old cartridge must be removed and a new one installed in its place;
- The repair work is completed at this point, the last stage will be the assembly of the device.
The spring, like the switch cartridge, cannot be repaired. Therefore, if this element breaks, it must be replaced with a new one.
Replacement occurs as follows:
- at the first stage, the faucet gooseneck and shower hose are removed; for this you will need an adjustable wrench;
- next you need to remove the adapter;
- the next step is to unscrew the fastening screw and the plug;
- then remove the rod where the spring is located;
- the damaged spring is removed and a new one is installed in its place;
- After you have replaced the broken part, the device must be put back together.
One of the most common failures of a spool switch is a leak at the location of the water switch handle.
The reasons for this problem may be the following:
- the rubber seal, which is located at the rotating rod of the crank, has deteriorated;
- the seal on the axle box is worn out;
- The screw that secures the crank or axle box is not screwed on properly.
To begin repairing the switch, you need to identify the source of the problem. To do this, you need to unscrew and remove the switch handle and run the water. This way, you will be able to see the exact place where the water is oozing from.
If there is a leak in the area of the valve-axlebox, rotary rod or mounting screw, the rubber O-ring must be replaced. If the crank fixation is weak, you need to tighten the screw more firmly.
What you might need
- Adjustable wrench - for disconnecting pipes.
- Wrench – for unscrewing the bolts securing the unit to the wall (not required if the mounting is on hooks).
- A hose to the return valve or to the water inlet - for draining (not required if you use containers to collect water).
- Phillips screwdriver for unscrewing the protective cap.
- Two flathead screwdrivers: needed to lift a protective cap that is too tight.
- Gas wrench number two or hub wrench 55. Sometimes a socket wrench is preferable for tightening nuts.
- A thin screwdriver for unscrewing and removing power cables.
The dismantling of boilers is preceded by the following preparatory stages:
- de-energizing the installation;
- draining;
- removal from the wall.
First, the device is disconnected from the outlet. Then you need to lighten it as much as possible by removing the water. An eighty-liter heater weighs about twenty kilograms. With water its weight approaches a hundredweight.
Disconnecting from the electrical network
Start of disassembling the Ariston water heater
Before any work involving electrical appliances, you must first de-energize them.
If the water heater is powered by a separate cable from the electric meter, then it is connected through a two-pole circuit breaker and must be turned off.
If the water heater is connected to a regular outlet, you simply need to remove the plug from the outlet.
After this, you can safely begin disassembling the Ariston water heater:
- First, the lid is unscrewed; it is secured with several screws.
- Further, if there is a danger that something could be mixed up during subsequent assembly, it is advisable to photograph the existing position of the parts from several angles.
- The next stage: disconnecting 3 electrical cables, 1 – phase, 2 – neutral, 3 – ground. This is easy to do with a screwdriver. Since we disconnected the first two wires from the thermostat and freed it, we can now pull it out of the tube with a little effort.
- This completes all electrical procedures. You can start draining the water.
Removing the Housing Cover
Inexpensive heaters without adjustment devices usually have two screws on the bottom cover of the housing. They need to be twisted with a Phillips screwdriver and the cover removed. If the cover is too tight, you can pry it off with flat-head screwdrivers.
A special place is occupied by models with oval flanges. They are dismantled directly on the wall; it is not advisable to turn them upside down with the fittings. Near the fittings (they are marked in blue and red) there are two bolts, unscrewing which you can remove the cover.
On some models it is not immediately possible to immediately find the screws to remove the cover. They are hidden under stickers. After removing the stickers, you can unscrew the housing cover. Sometimes, before removing the cover, you need to remove the plastic shields and plugs from the screws.
Disassembling the Termex boiler
Disassembling a Termex boiler is not difficult if you follow the established instructions. The same sequence of actions is typical for the procedure for dismantling similar devices. Of course, first the device is completely isolated from the flow of electricity. Next, you need to get rid of the presence of water in the tank using a special valve. When this work is completed, you need to unscrew the cap nut.
The following steps are aimed at dismantling the shields made of plastic, as well as removing the fastening screw, which should be located in the center. Sometimes a screw is hidden behind a sticker, so don’t be afraid of its absence; such security seals can also be found when you try to disassemble a Gorenje boiler.
After removing this screw, the bottom cover can be easily removed. Don't be afraid of the internal structure. It is really very complex due to the abundance of all kinds of electrical elements. It is recommended to photograph or otherwise record such a complex interior of the boiler. Do not neglect this advice, since disassembling a water heater is much easier than assembling it, and this close-up photograph or sketched diagram will help complete this time-consuming task.
The following steps involve disabling the control board and thermal protection element. This can be done by unscrewing the fastening screws. In addition, the bracket must be removed. Do not forget about the harmful factors of water, so it is recommended to put these elements in a safe, dry place. Be sure to disconnect the connector connecting the internal control board to the external one.
Both heating elements are attached to the flange using 6 nuts that must be unscrewed. It is recommended to handle electronic storage devices very carefully and dismantle them carefully and slowly. Often they are completely covered with scale. After the entire procedure has been completed, you can proceed to cleaning the device.
Many people try to dismantle the external control panel, but this process is not easy. The offending sticker is heated with a hair dryer and then peeled off. Under the sticker there is a protective strip secured with 5 screws.
By unscrewing these parts, you can remove the panel behind which the external control board is hidden. Assembling this device is not an easy procedure; disassembling it is much easier
It is important not to forget to use the recorded diagram of the assembled structure and carefully carry out installation work
Prevention of boiler breakdowns
A complete cleaning of the boiler should be carried out every 3-5 years.
In order for the device to work for a long time, you need to follow the following recommendations.
- If the boiler is not used in an unheated room , the water from it must be drained in winter. Otherwise, the liquid will freeze and damage the housing.
- Water heaters need to be cleaned periodically . The frequency of the procedure depends on the hardness of the water and the intensity of use of the device. With some means you can clean the boiler without disassembling it. For example, a tank is filled with a weak solution of oxalic and citric acid and after an hour it is drained and washed with water. The procedure is repeated at least once a season.
- Once every few years, it is necessary to completely dismantle the tank and clean each element separately.
- You should pay attention to uncharacteristic noises and unusual changes . If the body of the water heater suddenly began to heat up, depressurization most likely occurred and the heated water ended up in the thermal insulation layer. You cannot deal with such damage on your own.
- It is recommended at least a coarse filter at the entrance to the apartment Removing particles of rust, scale, and sand prevents mechanical wear of parts.
If the elements of the water heater are damaged, repair or replacement must be carried out immediately.
What's under the lid
When the cover is removed, the wiring of the heating element is visible, which needs to be disconnected. Before doing this, you need to sketch or photograph the original position of the wires. This will come in handy during the reverse assembly stage. After photographing, you can unscrew the bolts of the wires.
Wires under the removed housing cover
Many models have a thermostat under the cover. To remove the device, you need to grab it firmly and pull it down. It is better to do this with a sharp but precise movement. You can watch the video in detail:
Some Ariston models have a thermometer on the body. To remove it, after disassembling the electrical circuit, the device is pryed off from both sides with flat screwdrivers. This allows it to pop out of the nest with a click. Next, carefully pull out the wires disconnected from the thermostat.
Some boilers are designed in such a way that a non-return valve may prevent the removal of the lid. Then you need to unscrew it. A temperature sensor is sometimes attached to the back of the cover. It must be removed by disconnecting the contacts from the heating element.
In Termex boilers, an electronic control board (power unit) is located under the lid. It is secured with self-tapping screws and is also easy to remove. The control board and the external sensor board are connected by connectors that need to be unscrewed. The grounding attached to the nuts is also disconnected.
The main causes of leaks and methods for eliminating them
When a boiler leaks, the first thing you need to do is determine the cause of the leak. There may be several reasons - we tried to list only some of the most common ones.
Hull deformation
Deformation of the outer shell of the boiler - this problem may appear the very next day after installation. The fault here is not the manufacturer’s, but yours, because, as a rule, this situation arises when, when installing a boiler, they forget to connect the safety valve. Install it on the water supply line to the product between the shut-off valve and the entrance to the container. It is this small device that protects the tank from overfilling, which leads to deformation: as soon as the tank is completely filled with water, the valve is activated and shuts off the water supply. As a result, the boiler leaks in less than 24 hours.
If the valve has been installed, but water flows through the supply pipe, then the valve is simply dismantled and a new one installed - any home craftsman can handle this type of repair, even one who has never undergone special training.
Deformation could also occur due to the fact that low-quality pipes were used during installation of the device. In this case, hydraulic shocks due to pressure changes will be transmitted to the internal container, slowly destroying it.
Manufacturing defects
If the source of leakage is located somewhere in the upper part of the boiler, but visual deformation of the container is not observed, the magnesium rod was installed during connection, as required by the rules, and it was replaced during operation, then there may be a manufacturing defect. If the product is under warranty, then you need to return it to the organization that sold it before you flood your neighbors below.
Modern water heaters are designed in such a way that the tank cannot be repaired and cannot be welded: when welding is used, the enamel layer around the hole is damaged, and corrosion will form, corroding the tank in another place. The cost of repairs in this case is almost equal to the price of a new boiler, and modifications made to the appearance of the repaired product will not decorate the interior of your bathroom.
Spent heating element
If water leaks from under the lid of the storage tank of the product, most likely, too much scale has accumulated on the heating element and needs to be replaced. First of all, you need to purchase a similar heating element from a store with spare parts for water heaters, dismantle the old one, clean the inner surface with ordinary vinegar and soda - this mixture corrodes any scale well.
Poor installation of the device
Liquid may leak from under the heating element's O-ring - try tightening the nuts more tightly to eliminate the leak. Sometimes a leak forms along the mounting bolts of the heating element; if this develops negatively, you will have to buy a new heater - welding cannot be used, because the thin walls of the internal container will warp.
A common cause of leaks on cold water inlet and hot water outlet pipes is a loose connection. This often happens with DIY installations if the wrong sealing materials or low-quality fittings are used.
Gasket wear
When water flows through the inspection hole in the plastic cover at the bottom of the water heater, most likely, the rubber gasket on the flange has lost its elasticity. To determine this for sure, you need to turn off the device, remove the bottom cover and visually determine the cause of the leak.
If the gasket is faulty, you just need to replace it. In the store we purchase a strictly similar one - when purchasing, tell the seller the model number of your boiler so that the new product fits perfectly.
In what cases is it necessary to disassemble the boiler?
Gas boiler wiring diagram.
The magnesium anode in the boiler, used as a catalyst to protect against corrosion of the tank walls and aggressive effects on the heating device, must be changed periodically.
The service life of the anode depends on the quality of the water used in the boiler (it is recommended to install a special filter on the cold water supply pipe), the operating temperature of the water, and the intensity of operation of the water heater.
The standard period of use of a magnesium anode, indicated in the boiler operating instructions, does not exceed 6 months. When using the boiler in a gentle mode, the magnesium anode can last 1-1.5 years without replacement.
Along with replacing the anode, as a preventative measure for the water heater, it is necessary to thoroughly clean the inside of the tank from scale and wash the walls.
The heating element must also be cleaned using special chemicals or a regular metal dish sponge.
As a rule, the heating element fails.
Diagram of connecting the boiler to the network.
If the water from the boiler has an unpleasant odor, yellow or brownish tint, this indicates corrosion and clogging of the tank. The same is evidenced by the fact that the water takes too long to heat up and the appearance of loud extraneous sounds during operation of the heating element.
It is necessary to immediately disassemble the boiler, determine the malfunction and eliminate it. In any case, you should thoroughly rinse the boiler and make sure that both the walls of the storage tank and the heating element are clean.
If there is a leak in the boiler, you need to make sure that the rubber waterproofing gasket is reliable. If necessary, the gasket should be changed.
If the leak occurred as a result of depressurization of the storage tank itself, it is not possible to repair such a breakdown with your own hands. This may be a manufacturing defect - then the boiler must be replaced in accordance with the warranty agreements.
Sometimes, as a result of improper operation of the boiler, the walls of the storage tank may rust. In this case, the procedure for replacing the storage tank may cost more than a new water heater.
Troubleshooting algorithm
Before you can fix a problem, you must first find it. Troubleshooting involves supplying electricity to some parts of the circuit, so all work must be carried out carefully, wearing appropriate protective equipment (gloves, safety glasses).
Troubleshooting algorithm and eliminating the cause:
- Make sure that internal damage is not mechanical in nature. For example, a common problem is low fluid outlet pressure. This can happen due to a simple clogging of the watering can, which is installed on the water tap. Fluid inlet and outlet pipes may also become clogged. They must be cleaned with a special solution at least once every six months.
- If the mechanical part is working properly, then you should start with the input voltage. To do this, you need to purchase a multimeter - a device that allows you to make electrical measurements. Having set the appropriate value on the device (alternating voltage), one probe must be placed on a phase in the terminal box, the second - on zero. A value of 220 V should appear on the multimeter screen. The tolerance is a value greater or less than 10 V.
Inexpensive multimeter for repairing household appliances
In this way, you can check the incoming voltage on any component of the device.
- To check the temperature sensor, it is necessary to measure the voltage at the output of the device and simultaneously monitor the temperature of the liquid. If the temperature rises above the set value and the sensor does not break the circuit, then the element is faulty. If voltage comes to the input of the sensor, but does not come out of it (even when the water has not yet warmed up), this also means that the element is faulty.
- The next element in the circuit is a relay that switches the power supply from one heating element to another. It is enough to forcefully apply operating voltage to its input, and the relay will pass it through itself. If there is no voltage at the output of the element, this means the relay is faulty.
- The last and most important element of the water heater electrical circuit is the heating element. The heating element is a curved tube with a metal spiral inside, on top of a ceramic body. An electric current flows through the spiral, it heats up and transfers some of the heat to the liquid. To check the heating element, it must be removed and checked for resistance. Too much resistance means breakdown of the element and, accordingly, its replacement.
1500 W heating element
Sometimes the best and most reliable way to determine a malfunction is a visual inspection of a household appliance. For example, the cause of a drop in pressure may be a simple tank leak caused by a long service life and poor quality water.
Tools required for the operation
All water heaters are similar to each other, so they have the same drainage system and to carry out this procedure you will need an adjustable wrench, a rubber hose and access to the bathtub into which the water will flow. If the water does not drain into the bathtub, then you need to prepare several large containers so as not to flood your neighbors and simply avoid any tricky situations.
Emptying the boiler
In the case of an Ariston water heater, you will need various screwdrivers, a hexagon and adjustable wrenches of different sizes.
A person who reads the instructions and adheres to a clear algorithm will not have any difficulty emptying the boiler correctly.
A heating element
The accumulation of scale in the heating element often causes boiler leaks. To fix this problem, you need to install a new water heating element.
Not all models of water heaters are equipped with a channel for draining water, which helps with leakage of the tubular heating element—the heating element.
When choosing a water heater, it is best to give preference to models that have a special channel for draining liquid.
There may be several reasons for leakage caused by the heating element:
- Space under bolts;
- Leaking from under the seal.
If a gap has formed under the bolts, then it is necessary to change the heating element; in the second case, you need to tighten the nuts that hold it.
We repair an instantaneous water heater yourself
And are there any analogues to these dividers? Or just look for the original? All sections Instructions About the site Contacts Earn money. Reviews and comments. Prevention as a way to avoid problems Not only home owners provide themselves with autonomous hot water. Drain Since high-quality drainage is the key to a successful outcome of the entire operation, let us dwell on it in more detail. You will have to unscrew it with an adjustable wrench and drain all the water.
Reviews and comments Add yours. Drain the water through the check valve.
If there is no valve, you will have to unscrew the cold water supply hose. Be sure to disconnect the boiler from the power supply before you start draining. Next, remove the bottom cover, unscrew the screws, take out the heating element and magnesium anode. If it burns out, change it and clean the heating element from scale. You can boil it in vinegar or citric acid for this purpose. Clean the inside of the water heater from scale and reassemble it in the reverse order.
In a word, the procedure for disassembling the SGHP 80 ve is 1. After cleaning the boiler, the pin broke.
To repair equipment, you need to know its design and the operating principle of its various elements. Water heaters are no exception. Despite the variety of models, the design of electric boilers is similar.
Is it possible to change it somehow? Maybe the problem is in the outlet tap on the boiler itself. It may also be that the check valve is not working - it creates the pressure necessary for the hot water to come out.
There are situations when the check valve becomes dirty, it also needs to be cleaned. In general, in my opinion, there are 2 necessary actions - replace the faucet on the water heater with a new one and replace the valve on the return line. Add a comment or review Cancel reply. Site headings.
DIY dismantling
Popular on the site:. Making a moonshine still with your own hands Rectification column for a moonshine still with your own hands Rating of the best moonshine stills according to users. Latest comments:. The pump started whistling.
I was disassembling the pump, the button recently burned out
Tips for extending service life
For the longest service life of the water heater without breakdowns, it is important to follow the manufacturer’s recommendations for its installation and use. This applies to any equipment that provides heating or water heating
When installing a boiler, it is important to provide grounding, a magnesium anode, and a safety valve.
Before installing the device, be sure to check what pressure is in the system. Normal value: up to two atmospheres
If the value is exceeded by more than 3 atmospheres, this pressure must be reduced, for which a reducer is installed in front of the device, which will prevent the temperature from rising. The optimal temperature for the boiler is up to 50 °C; it is not recommended to set it above this value. Clean it periodically (2-3 times a year); it is important to monitor the condition of the rod. It is recommended to connect the device to the water supply system through a special magnesium filter, which is best purchased at the same time as purchasing a water heating device. This will reduce water hardness levels if they are very high or there are a large number of impurities in the water.
If the boiler is leaking, you need to try to determine the cause of this unpleasant phenomenon as quickly as possible and eliminate it. And in order to avoid breakdowns of this kind, you need to follow the operating rules of the water heater, periodically clean it, and replace worn out elements.
Let's say you notice that water is oozing or dripping from the body of the water heater. This is a fairly common situation. Most often, a water heater “dies” this way. Therefore, if it just leaked, and did not literally flood the floor and the neighbors below, you just need to be glad that the water heater “only” failed and did not cause big trouble. Especially if it has previously worked for at least 5 years (this is exactly how long, according to our own observations, the average “life” of a storage electric water heater (not flat models) lasts). Due to negative factors (presence of extraneous currents on the body, lack of grounding, improper grounding, characteristics of the water composition and other factors), the external tank corrodes, and this can happen very quickly, within a few months, and begins to leak. It is almost impossible to eliminate such a defect. The water heater tank needs to be replaced, which is the same as buying a new water heater.
So, you have noticed that water is dripping or oozing from the body of the water heater (from the body itself, not from the check valve). It is worth noting right away that this is an emergency situation, and it is simply dangerous to continue to operate such a water heater. What to do? First of all, disconnect the water heater from the network to avoid a short circuit. Next, you need to call a technician (if the water heater is under warranty).
You can clarify the situation with the water heater for yourself. There are two types of water heater leaks: from under the bottom cover and leaks from the surface of the outer casing. If it leaks from any place on the body (this could be a temperature sensor on top of the tank, a squeezed out top cover, a seam or any hole outside the bottom cover) outside the bottom cover, the internal tank has definitely depressurized - a fatal defect for a storage electric water heater.
If it drips from under the plastic cover itself through special control holes, then there are two possible scenarios. To find out these options, you need to remove the outer bottom cover, having first turned off the power to the water heater. I’ll give you an example with an Ariston water heater (pictured). Other water heaters may have a different design, but the general principle is the same.
So, after removing the cover, we will see the following picture. Now let's look carefully at where it's dripping from. If from under the flange (the hatch inside the water heater), which is indicated in the photo with BLACK arrows, it means that the flange has depressurized - the hatch inside the tank. With a high degree of probability this can be eliminated. The cause of flange depressurization is incorrect alignment (at the manufacturer (this sometimes happens with completely new water heaters) or during cleaning), or a defect in the rubber flange gasket.
If it flows from under various holes and not from under the flange (this is indicated by RED arrows), then depressurization of the internal tank has definitely occurred. Leaks can occur not only from any holes, but also along the seams at the bottom of the water heater. This means purchasing a new water heater. You can buy a new water heater by checking out the range of advertisers on our website.
Draining water from the boiler
Boiler piping with drain valve
Since we need to get to the internal parts of the boiler, the next step is to drain the water from it.
If the installation of the boiler was carried out strictly in accordance with the instructions supplied with the water heater, then a tee with a ½-inch tap must be cut into the cold water supply system between the safety valve and the tank.
If a prudent installer has screwed in a fitting on the outside of the faucet, then all we have to do is connect the hose to this fitting. The second end of the hose is lowered into the bathtub or toilet and you can open the drain valve.
Only first you need to open the hot water tap on the mixer to balance the pressure outside and inside the boiler. Depending on the capacity of the boiler, the process of draining the water can take from several minutes to half an hour.
If you are unlucky and there is neither a tee nor a drain valve, you need to disconnect the cold water supply pipe along with the safety valve. Then put the hose directly onto the pipe in the boiler. After all the water has drained, you can begin to dismantle the flange.
You may also be interested in the article about Ariston gas water heaters.
Read a useful article about the features of repairing Ariston water heaters with your own hands here.
What to do if the new faucet is dripping?
Sometimes even a faucet that was purchased and installed relatively recently begins to leak. In such situations, the reason, as a rule, is simple to the point of banality - the device has a manufacturing defect, which is difficult to identify during external inspection.
New mixer
Finally, we note that a faucet in a kitchen or bathroom can start dripping at any moment. To solve this kind of problem, you can go one of two possible ways - to involve a qualified specialist in the work or to try to do everything yourself. However, if you know the exact cause of the leak and how to properly eliminate it, then no difficulties should arise.
Tools for disassembling and assembling water heaters
To disassemble the device, you will need a small number of tools; in most cases, every person has them at home, so no additional costs will be required.
Before you start disassembling the water heater, you need to prepare all the tools in advance and lay them out in front of you, so that if something happens you won’t be distracted by searching for a particular screwdriver.
List of required tools:
- Indicator screwdriver.
- Phillips and flat-head screwdrivers (depending on the screws with which the parts are fastened).
- Adjustable wrench.
- Set of spanners.
- Knife and scissors.
- Tow.
- Microfiber cloth to wipe down the insides and parts.
Required Tools
Preparing everything you need
Before starting work, we prepare everything that may be required. Mandatory equipment includes:
an adjustable wrench (it is important that it is larger than the largest nut in the water heater); knife; electrical tester; screwdriver; tubular wrenches (full set if possible); socket wrenches; a rubber hose with which we will drain the remaining water from the tank.
If any of the items are missing, be sure to buy this, because this tool will definitely be useful to you in the future. There is an opinion among some “masters” that, supposedly, with minimal knowledge about the operating principle of a water heater, they can easily install the device or, even worse, carry out repairs. In reality this is not the case, since minimal knowledge is clearly not enough; therefore, full-fledged repair work should be carried out exclusively by professionals. But such a trivial problem as a boiler leak can be fixed on your own. Let's look at how to do this.
Ariston boiler analysis
Disassembly of Ariston boilers must be carried out according to a special algorithm, taking into account some features of the device, primarily the oval flange. Thus, the preparatory stage includes the well-known power outage, as well as the draining of water necessary for further analysis. It is also possible to remove the check valve if dismantling requires it. (See also: How to make a boiler with your own hands)
The subsequent actions are similar to the established algorithm for disassembling water heaters. That is, you need to unscrew the bolts located below and remove the cover. The thermostatic device is released with a slight downward movement. Removing this equipment allows access to the flange. Ariston boilers secure the flange with a nut and a strip, so its removal will only be possible after removing these fasteners
It is important to remember that the removal of the heating element and flange is carried out by first turning the heating element down. The same algorithm of actions must be performed to assemble a disassembled boiler
The device is cleaned using all known methods, including chemical action of special agents, or mechanical action with a stiff brush.
It is very important to take into account the asymmetrical flange shape when reassembling the unit. In order to avoid problems with reassembly, it is best to remember the location of the flange in the neck
You can choose the terminal as a reference, since its position is much easier to remember. It often happens that after disassembling the unit begins to leak, in this case it is recommended to change the rubber gasket in advance.
What to do: Thermex water heater is leaking
It all depends, of course, on the boiler model. One or the other has typical causes of leakage. If, for example, one Termex heating element is dry, then a common cause of leakage in this case is damage to the bulb covering the heating element. Usually, in this situation, the flange with the flask is removed, and it is checked for the presence of fistulas. The fistulas can be soldered or sealed with cold welding. But one that can withstand the temperature of the water.
There may also be a problem with the gasket on the flange:
- If the rubber gasket is destroyed, water will drip from below;
- To replace the gasket, you need to disconnect the device from the network, drain the water, remove the protective cover, and disconnect all wires;
- Then the nuts are unscrewed around the circumference and the flange itself is removed;
- It is not difficult to see the gasket - if it is deformed or torn, you will have to buy a new one (when purchasing, take with you the old one that has failed);
- After replacement, you need to fill the tank with water and check for fistulas.
If one of the pipe connections begins to leak, it will become noticeable by smudges on the pipes. The connection should be untwisted, the old fum tape is removed, and a new one is wound. Then open the water and check the unit again. But if a leaking tank is a problem, the repair is not so simple. Fistulas are more difficult to deal with.
How does an indirect heating water heater work?
For our part, so that the process of preventive disassembly and installation of an electric storage water heater proceeds without unnecessary situations and does not harm the device, it is useful to have an idea of how the boiler works.
A storage water heater is a simple storage tank, enameled or made of stainless steel (different manufacturers may use different materials).
Two threaded tubes are cut into the tank: for supplying cold water and extracting hot water. The tube for collecting hot water is led under the upper wall of the tank. Cold supply tube
water protrudes slightly above the bottom wall.
This is done so that water heated to operating temperature is selected from the electric storage water heater, which rises when heated.
Water heating in a storage water heater is carried out using a tubular water heating component - a tubular type heating element connected to a thermostatic valve that regulates the heating temperature. To reduce aggressive influences on the heating element, a specialized catalyst is used - a magnesium anode.
Working diagram of an electric storage solar water heater. A tubular heater with a thermostat and a magnesium anode are installed on one panel, fixed to the bottom surface of the tank with bolts. For this purpose, a technological hole is provided in the tank.
Terminals are prepared at the bottom of the panel: for grounding, for connecting electrical contacts to the TEN and a light indicator for the operation of a tubular-type heating element.
The panel is isolated from water in the tank with a rubber gasket.
The terminal panel is covered with a casing with a protective function or a cover.
The storage tank is placed in a metal housing equipped with non-standard fastenings - brackets for mounting an electric storage water heater to the surface of a wall or ceiling.
The free space between the storage tank and the iron body is filled with thermal insulation material: polystyrene foam, mineral wool, polyurethane and other insulation materials.
All water heaters are equipped with a built-in thermometer and a cold water supply ball valve with a 6 bar pressure fuse.
The storage tank of the electric water heater is designed for a pressure of 7 to 10 bar. The design system pressure of the city water supply will not exceed 4 bar.
Incorrect installation
One of the reasons for a boiler leak is poor installation. You should be wary of inexpensive water heater installation services and carefully study the installation instructions if the installation will be carried out on your own.
A leak can occur due to the following factors:
- Connecting the unit in violation of the pipe insulation rules;
- Connection without expansion tank;
- Lack of leakage prevention valve. If the device is working properly, the water does not overheat, and if it malfunctions, the valve will prevent overheating of the water and, as a consequence, leakage.
- Incorrect installation of the check valve. Such an error has negative consequences that are associated with adding hot water to cold water. Hot water enters the cold water riser, which leads to huge energy consumption.
How to remove a water heater from the wall
At the back of the boiler there is a plate with holes for mounting to the wall. At the same time, anchors with hooks are fixed in the wall, on which the unit is suspended through these holes. The heater, freed from water, is disconnected from the pipes (using an adjustable wrench) and raised so that it can be easily removed from the hooks.
Fastening the boiler to the wall with hooks
Sometimes a device suspended from a wall is additionally secured with bolts. In this case, you will first have to unscrew the bolts with a wrench and then remove the installation from the wall. The removed boiler is turned over and placed on the floor with the pipes facing up - this will make it easier to dismantle it.
Safety valve disassembly
The safety valve is an important thing in the operation of a water heater. This valve helps the water heater not to explode. It regulates the pressure inside, so it needs to be installed correctly so that when turned on, the boiler does not explode and starts working correctly, that is, heat the water, and not just drive it through itself.
Each boiler has its own individual valve, so it must be selected by a specialist.
A safety valve looks like a simple piece of pipe with a small handle, which will be used to regulate the pressure inside the boiler. The valve can be easily removed and reinstalled, but this must be done correctly to avoid breakage and other unpleasant situations.