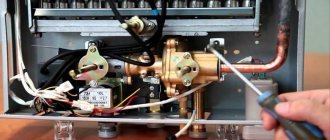
In winter, during the heating season, depressurization of the system occurs extremely rarely. Most often this happens during hydraulic tests, when the pressure of the working medium increases. Loose or worn connections begin to leak, sometimes causing cracks to form in pipes or sections. When water starts dripping from a plumbing fixture, this is an alarming signal. The main thing is to know what to do if the heating battery leaks. But many are lost and don’t understand where to call or what measures to take. If you don’t want to flood your neighbors, you need to act consistently and quickly.
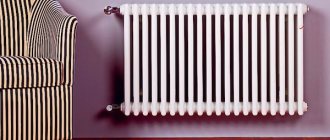
Types of leaks
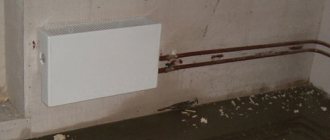
Heat supply to the premises is carried out using pipes and heat removal devices. The working medium is supplied through risers, from which distribution is made to apartments. Depending on the current situation, each module may leak.
Main causes of malfunction:
- fistula in the section of the heat-transfer device;
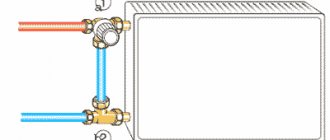
- leakage at the junction of the radiator and the pipe;
- intersectional leakage;
- depressurization of a pipe seam;
- valve leaked;
- leakage in the area where the branch connects to the riser.
Each malfunction requires an individual approach and its own repair method.
Application review period
Your appeal about the accident must be considered on the day it is received, and the management company is obliged to eliminate the problem within 24 hours. In cases where the necessary equipment is not available or other obstacles arise, the applicant must be informed immediately. This rule also applies to applications received by telephone. Requests to the emergency service related to residential safety are resolved as a matter of urgency.
Form of an apartment flood report
General rules for eliminating leaks
If an accident occurs during the heating season, the management company (MC) must fix the leak in the heating battery, since such a situation is considered an emergency. Therefore, the very first action that the person who discovers the accident must perform is to make a call to the management company. To localize the spread of water, you need to place a container under the stream. When a stream sprays, a blanket or thick cloth is thrown over the leak site, redirecting the liquid into a substitute basin or bucket. The highway is blocked.
If the apartment has a shut-off valve, it is not difficult to close it. But it also happens differently: the flywheel does not rotate due to souring of the threads of the valve axle box, or the product does not hold pressure, and the coolant continues to flow into the system. Then you will have to shut off the riser in the basement, the key to which is usually located with the plumber of the housing office (housing maintenance office). Sometimes this cannot be done due to a faulty shut-off valve.
Then they use a valve on the inlet main, but this situation is exceptional, because the entire house is left without heat.
Fixing a leak by an emergency crew does not completely solve the problem, so it must be returned to at the end of the heating season. Then repairmen will be able to drain the water from the riser and inspect the equipment in more detail. If you need to change the radiator, this work is performed at the expense of the management company only in one case: when the plumbing fixture belongs to the common property of the house. To do this, there should not be a shut-off valve or ball valve on the outlet going from the riser to the battery. If there is one, replacement of the heat removal device is carried out at the expense of residents both in privatized housing and in municipally owned apartments.
Who is right: the residents or the housing office?
Due to frequent appeals to the court and the Housing and Communal Services Department, in 2007 the Ministry of Regional Development of the Russian Federation clarified the situation and reported that heating elements located in private apartments are part of the common property of the house.
It follows from this that if, due to a high degree of wear and tear or as a result of an accident, the battery leaks, it must be replaced by an organization that receives monthly money from residents in the form of contributions for major repairs and is responsible for the maintenance and servicing of home property.
USEFUL INFORMATION: The heating was on, but the radiators remained cold: what to do
Management organizations are not interested in bringing this information to the attention of apartment owners, so residents are still forced to pay for the dismantling and installation of a new heating device, which, among other things, must be purchased independently.
What to use to seal a leak
Depending on the nature of the damage, a radiator leak can be eliminated in different ways.
All of them are available to the home master:
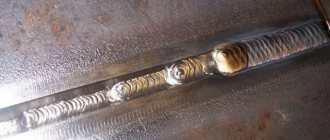
- restoring the tightness of the system by welding;
- use of a cement-plaster cast;
- wrapping the problem area with FUM tape (fluoroplastic sealing material);
- use of moisture-resistant glue;
- squeezing the fistula with a gasket and a clamp;
- making a cold-welded seal or sealant to eliminate a leak.
With minor damage, it is quite possible to cope with the problem yourself. To do this you will need certain materials, tools and some free time.
Prices for sealant to fix leaks
sealant for sealing leaks
Who should be responsible for replacing heating equipment?
The apartment owner can choose one of three options.
- Independent replacement of radiators (everywhere batteries are changed by hand, but membership in an SRO is required by law).
- Contacting third-party specialists (must be members of the SRO).
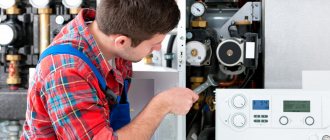
- Call a technician from a service organization.
USEFUL INFORMATION: How to install a temperature controller on a battery
Despite the fact that employees of a private company can perform better installation of new equipment, knowledgeable people recommend calling a local specialist. This is so that in case of possible problems in the future, you will know who to contact. If an accident occurs, you will not be held responsible for poor installation of equipment that caused damage to the property of other residents.
DIY repair
Not all cases require the help of an emergency team. Sometimes even a home handyman can cope with the situation. In order to seal the resulting leak, use known methods.
How to fix a leak between two sections
It can sometimes be very difficult to determine where exactly the moisture is oozing from, since the water floods a large area. You have to wipe away the liquid, trying to find a fistula or crack. Once this has been done, the shut-off valves are closed. But residual pressure still remains. To bleed it, open the Mayevsky valve located at the end of the heating device.
After making sure that the water has stopped leaking, proceed with the repair:
- The surface of the damaged area is thoroughly cleaned with a wire brush or coarse sandpaper to remove dirt, rust, and paint.
- After this, epoxy mastic is applied, consisting of two components: a hardener and a thinner, which are mixed immediately before use. You can use “cold welding”. It comes in the form of a “sausage” or in a set of two tubes, the contents of which are thoroughly mixed before application. The “sausage” must be kneaded thoroughly, since it consists of two parts: the hardener is located inside the filler. When kneading, the two components are mixed together, forming a homogeneous mass. To prevent the composition from sticking to your hands, it is pre-wetted under the tap.
- After installing the seal, it should dry well. Only then is it possible to open the shut-off valves to restore the flow of coolant. Do not cover a crack under pressure.
There is another way - the “old-fashioned” one. If the leakage is dripping, pour a couple of pinches of ordinary table salt onto a rag. A rag is wrapped around the damaged area. Salt must come into contact with it. After a few days the rag will be dry.
Cold welding prices
cold welding
Battery crack
This malfunction is rare, but a hairline crack in one of the sections can cause the heating radiator to leak.
The problem is solved in the same way as when eliminating a leak between adjacent battery cells:
- The highway is blocked.
- The pressure is released.
- The damaged area is cleaned and covered with a repair compound. Epoxy for metal is preferable as it dries in 3-5 minutes. Before application, take the required amount of epoxy resin. A few drops of hardener are added to it. The composition is thoroughly mixed and applied to the crack or fistula. “Cold welding” will take 2-3 hours to set.
If a fistula is found on the section, plug it in the following way:
- After the supply of the working medium is stopped, the fistula is drilled out with a drill with a diameter of 2-3 mm.
- A wooden wedge plug is made and driven into the hole. Moisture causes the plug to swell and seal the fistula.
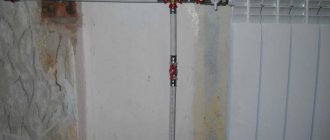
Leak at the connection between the radiator and the pipe
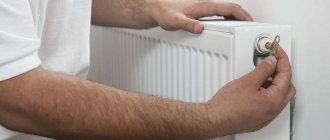
The cause of this malfunction lies in a rusted thread or a leak in the seal. In any case, the nut or coupling will have to be unscrewed using an open-end (gas) wrench. But before this, it is necessary to shut off the supply of the working medium and relieve the pressure using the Mayevsky tap.
Then proceed like this:
- After disassembling the connection, clean the thread from the sealing material and inspect it carefully. If necessary, correct the threads with a die. It is better to take a new nut or coupling. Use flax, preferably tarred, as a sealing material. If it is without resin, you will need Unipak paste or FUM tape made from fluoroplastic. The thickness of the material, which stretches well, is only a few microns, so it perfectly fills all leaks in threaded connections.
- Wrap several turns of flax tightly around the thread, spread the paste on top of it, and screw it into place. You can wind several turns of FUM on flax. Then the flax will not be cut off by the thread when twisted. The seal will be reliable and durable.
- Restore the coolant supply and make sure the connection is tight.
Pipe is leaking
In this case, the cause of the leak is either a fistula or a broken weld. In both situations, the most common way to fix the problem is to install a clamp with a rubber gasket, which is cut from an old bicycle inner tube or other available materials.
It is better to use automotive clamps. They are very comfortable.
Rubber is wrapped around the damaged area and compressed with one or more clamps, depending on the size of the damage.
Instead of rubber, a cement-plaster cast is successfully used. Cement is mixed with gypsum (for faster drying of the solution) in equal proportions. Water is added to the mixture. The solution is thoroughly mixed until a homogeneous mass is obtained. The consistency should be like thick sour cream.
The bandage is soaked, then soaked in the prepared solution and wrapped in several layers over the damaged area. The bandage should be allowed to dry, and only then open the tap on the supply pipe.
Instead of cement-gypsum mortar, it is allowed to use moisture-resistant glue with which the bandage is impregnated. The well-known “Moment” or another adhesive composition on a moisture-resistant basis will do.
Limits of responsibility of the management company
Note! To establish the limits of liability of the management company, you should refer to Article No. 36 of the Housing Code and Government Decree No. 491 of August 13, 2006 (as amended on March 26, 2014). It follows from them that the management company’s responsibility for emergencies arising from a breakdown in communications of heating, water supply and sanitation systems extends to networks located up to the point of connection of intra-apartment pipelines with a common riser.
What should the owner or tenant repair at their own expense? Let's be clear on this point. According to the above law, the management company is not obliged to repair this equipment:
- Electric stove, gas stove;
- Plumbing equipment;
- Gas, water, electricity consumption meters;
- Intercom;
- Heating radiators;
- Electrical fittings, cables.
If we are talking about water supply, sewerage, and heating networks, then the boundary of responsibility of the management company passes through these areas:
- Gas supply system - the area up to the shut-off element for connecting to the gas stove;
- Drainage system - the section up to the point of insertion of the drainage pipelines into the common riser, leading to the sink or other drainage points;
- Water supply system - up to the threaded connection with the metering meter outlet pipeline from the riser;
- Heating system - up to the threaded connection of pipelines with heating radiators.
Thus, it can be emphasized that your management company is obliged to maintain free of charge the common risers of communications, as well as sections of the branch and discharge of pipelines from them to the above boundaries.
Note! Telephone numbers of specialists and services involved in emergency response are usually recorded in the house telephone book. If there is not one, you should go downstairs to the front door and find a notice board there. Usually there are telephone numbers of specialists involved in servicing your home.
Prevention and care of radiators in summer
After the completion of the heating season, the pipeline must be tested (pressured) with increased hydraulic pressure. This is done in order to identify weak points and repair areas where ruptures or coolant leaks have occurred. The house main is subject to periodic internal flushing by utility services. Water is supplied to the system along with compressed air under pressure. A temporary break is made on the return line (unwinding of one of the connections) to drain dirty water through a hose or hose.
Dust and dirt accumulate on the outer surface of the batteries and on their ribs, which must be washed off in the summer with a cloth moistened with soapy water. Once warm, the cleaned surfaces can be coated with fresh paint. This will make them dry faster. Make the paint layer thin, otherwise it will crack later.
To avoid damage, do not use the equipment as supports or tie clotheslines to the risers. Read about warm floors on a wooden floor on our website.
Who should I complain to about the inaction of utility companies?
It is no secret that employees of DUKs or DEZs do not always respond to residents’ complaints in a timely manner. Meanwhile, their main responsibility is to create a comfortable living environment for residents in the entrusted territory. It is their work that citizens pay for on a monthly basis using housing and communal services receipts. Since utility companies are service providers, Rospotrebnadzor is responsible for monitoring the quality of their provision. The owner of the property also monitors the work of the DUK. If the company does not fulfill its obligations, he has the right to refuse its services.
What to do if the batteries in a country house are leaking
If you live in a country house, the situation is somewhat simplified by the fact that the system can always be drained and a thorough battery repair can begin. This, of course, is also troublesome, so if the situation is not so catastrophic, you can save yourself using the methods listed above and, after waiting for the end of the heating season, replace the worn-out elements of the heating system.
Let's look at which methods are suitable in a given situation, since in hard-to-reach places it is not possible to use some of them.
If the pipe connection is leaking
:
- a homemade or factory-made clamp is suitable as an ambulance; how to apply and secure it is described above;
- If it leaks from a threaded joint, you need to pour a little alcohol onto the tow and spread the butyral with phenolic glue (BF glue, sold in the store). The glue dissolves in alcohol, flows onto the thread, the alcohol evaporates, the glue stops the leak;
- try to repack the connection: if there is a shut-off valve, disconnect the battery, then slowly twist the nut in different directions, without making any effort, so as not to break the thread; then remove the remaining sealant, old tow, degrease the surface of the pipe; then reel in fresh winding and coat everything with sealant; After this, carefully tighten the nut with a wrench until it stops.
If there is a leak between the battery sections
:
- To ensure that the battery no longer leaks, it is better, of course, to disassemble it. This is possible if there is a shut-off valve and the battery can be disconnected. It would be good to replace several sections, but you can clean the inside and change the gaskets, which over time are corroded by water and corrosion;
- if it is not possible to disassemble, use available means: “cold welding” (how to make repairs is described above) or epoxy glue. The method of applying it is the same as for the gypsum-cement mixture, but the strips of fabric need to be made a little narrower. For greater reliability, you can put a clamp on top.
Checking the side walls of aluminum radiator sections
Now comes the hardest part...
The problem is that 95% of leaks occur only when water or coolant is under pressure in the radiator. It won't work to remove a section, fill it with water and see where it comes out from.
Unfortunately, at this stage you will have to work hard. To find out exactly where the aluminum radiator is leaking, you will have to dismantle the sections.
If your radiator is installed and connected correctly, then there are taps on the lower and upper pipes, and they are connected to each other via a bypass. You need to do the following:
- Close the valves on the supply and return pipes;
- Open the bypass;
- Drain the radiator.
To drain the water from the battery, first unscrew the top plug, then the bottom one. When the water has completely drained, you can begin dismantling the sections.
If there is no bypass or taps, you will have to turn off the entire heating system. This is not difficult to do in a private home. In an apartment building, for this, contact the employees of the housing office, housing and communal services or a regular plumber. In some houses (especially new ones) you can turn off the heating only in your apartment.
Options for leaks and searching for section damage
In this situation, two options are possible (see figure).
Options for radiator side wall leaks.
If an aluminum heating radiator leaks from the side of the section that is located further from the supply pipe, you must do the following:
Using a nipple wrench, unscrew the nuts located between the leaking section and the intact one located further from the pipe (see figure);
Places for unscrewing the nipple nuts of the section located further from the water supply.
If a leak appears from the side of the section located closer to the supply pipe, proceed as follows:
- Using a nipple wrench, unscrew the nipple nuts located between the leaking section and the intact one located closer to the pipe (see figure);
- Unscrew the damaged section;
- Turn it so that the wall on which there is a leak is located further from the pipe;
- Install the damaged section using a nipple nut and wrench.
Places for unscrewing the nipple nuts of the section located closer to the water supply.
After these manipulations, you need to completely seal the radiator:
- Screw the bottom plug;
- Install the Mayevsky tap in the upper hole of the radiator and unscrew it two turns;
- Open the water supply and close the bypass slightly.
After this, the radiator will begin to fill with water, and the air will exit through the Mayevsky tap. When water comes out instead, turn off the tap. There is now fluid in the radiator that is under pressure.
At the site of a crack or break in the radiator wall, water will begin to leak out. It's done - you've found a leak.
Important! If the joints between the nipple nut and the radiator were treated with sealant, you will also need to use it. This also applies to the places into which the plugs and Mayevsky tap are screwed.
Why did the heating battery burst?
In early September, he returned home and saw a stunning picture. The entire snow-white living room was covered in rust stains, and there was an ugly hole on the white radiator. He was never able to understand the reason for this incident. The radiator was closed with two ball valves. No external pressure could influence him in any way.
Let's go back to the story we started with. Did you notice that before leaving, the victim closed the ball valves in front of the batteries? It was this fact, coupled with the situation described in point number 2, that caused the explosion of the heating radiator.
Interesting: Free Rehabilitation After Stroke Provided