Warm floors are an effective and comfortable option for heating a home. It can be used as a main or additional heat source, capable of providing the necessary microclimate in any room and conditions.
Water systems are considered the most effective underfloor heating designs, which have many advantages over alternative types of heating modules. They are economical, capable of automatically maintaining the heating mode and maintaining the necessary microclimate during short-term outages. Let's take a closer look at water heated floor systems.
Operating principle of a water heated floor system
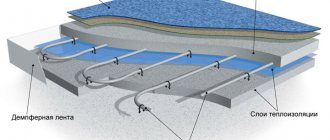
Water heated floors are a new independent room heating system, a modern alternative to common radiator and convector types of heating. The device of a water heated floor is a network of built-in pipelines filled with hot water between a concrete or wooden base and the floor covering.
The water floor consists of polymer pipes through which warm liquid supplied from the central heating system or gas boiler circulates. From the heated floor surface, the air warms up and rushes upward, ensuring uniform heat distribution over the entire area. At the same time, the lower layer of air near the floor warms up more than the upper layer near the ceiling, creating ideal conditions for comfortable human living.
Please note that water heated floors can only be installed in private homes. For city apartments, this type of heat supply is prohibited due to the possible consequences of pipe damage.
Design Features
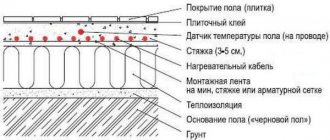
A water heated floor is a pipeline laid on a layer of heat insulation in a certain configuration. A coolant circulates through the pipeline, heating the pipe and, accordingly, the floor covering.
In fact, a warm floor is a kind of radiator that occupies the entire area of the room and is located under the finishing coating.
However, it is distinguished from a conventional radiator by its low-temperature operating mode - the temperature of the heated floor does not exceed 40-45 ° C (sometimes it is raised to 50 ° C if operating conditions require it). If you apply a standard temperature of 70-80 °C to the heated floor loops, it will become impossible to walk on the floor or even be in the room.
To ensure low-temperature conditions, two methods are used:
- setting the heating boiler to supply water with an operating temperature of about 50 °C;
- using a mixing unit.
Both of these options have their own specifics and require a more detailed description.
Low temperature boiler
Using a boiler with a special heating mode allows you to reduce the composition of the equipment for heated floors.
The coolant enters the loops directly from the boiler outlet, often without even using a collector. As a rule, this option is used to power one loop, since it is almost impossible to ensure equal temperatures for several circuits under such conditions. Most often, heated floors of this type are found in small houses or in bathhouses, where it is necessary to heat the rest room or washroom.
This option is rarely used because it is unreliable and does not stand up to criticism. The coolant cools down even before it enters the heated floor loops. The only option for its use may be to place the boiler in close proximity to the system so that the liquid does not have time to release thermal energy. At the same time, adjusting the operating mode becomes significantly more complicated - you have to change the boiler settings, which is very difficult and always gives the expected result.
Mixing unit
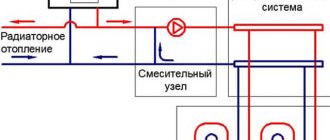
This is a design that provides regulation of the temperature of a heated floor by connecting a fresh hot flow with cooled water from the return flow (as they say in everyday life - with the return flow). The difference between them is not too great, but it completely allows us to obtain the necessary reduction in the initial temperature to the required values. At the same time, the mixing unit does not just connect two flows - it can regulate their ratio by changing the temperature of the floor surface.
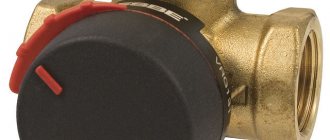
The main part of the mixing unit is a three-way valve. The supply line is connected to one of its inputs, and the return line is connected to the second. The output is a stream with a given temperature. The ratio is adjusted manually, or using a temperature sensor and servo drive. This option is preferable, since it allows automatic adjustment and does not require responding to any change in weather or climate conditions.
There are models of mixing units that operate on two-way valves. They operate more simply - a specified amount of return flow is mixed into the forward flow. This option is more primitive and does not save fuel - in any case, the maximum amount of water will have to be heated.
Loops
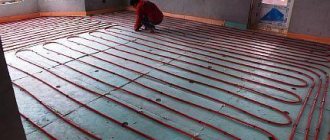
Since the coolant releases energy and cools, there is a limit on its length - up to 100 m. For a more uniform distribution of heating, not one long pipeline is used, but several shorter sections - loops. They are connected to the coolant source in parallel and laid on the subfloor as independent elements.
Heated floor loops must be the same length. This is not a strict requirement, but it is very important for organizing the uniform distribution of thermal energy.
If the coolant passes through two loops of different lengths, it will have a different temperature at the outlet. This is ineffective and impractical, since the consumption of thermal energy with equal opportunities will be completely different.
The loops are laid so that the distance between the turns is approximately the same at all points in the room.
Different schemes are used:
- spiral;
- snail;
- zigzag;
- single and double laying.
The last option is pipe laying methods that provide different options for distributing thermal energy. In the first case, the direct flow enters the loop, passes along its entire length and returns to the return. The second option is somewhat more complicated - the pipe is folded in half, the ends are connected to the direct and return lines, and then the circuit is laid with two pipes at once. As a result, hotter areas are located between cooler ones, which gives optimal heat distribution.
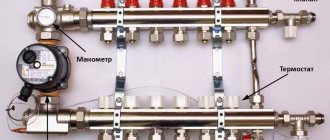
Collector
For connection, a special device is used - a collector. It is made in the form of a piece of pipe, to which a supply (or return) pipeline with coolant is connected at one end. The second end is usually plugged, or a thermometer (pressure gauge, etc., different options are possible) is installed.
There are holes with connecting elements along the entire length of the collector. Heated floor loops are connected to them. At the same time, the holes are through - hinges are attached to the bottom, and valves or servos are installed on top for automatic adjustment. The number of outputs can be different, which allows you to select a collector of one type or another for each design option for a heated floor. At the same time, the collectors can be connected to each other, increasing the number of outputs.
The ability to adjust each loop individually allows for more precise and fine-tuning of the heating mode. If the room is temporarily not in use, you can turn off the loops installed in it and not waste thermal energy in vain. In addition, you can set different temperatures in living rooms and corridors, which allows you to obtain more economical fuel consumption for the preparation of coolant.
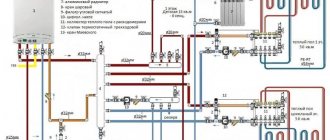
Each loop is connected to two collectors - forward and reverse. A mixing unit with a circulation pump is installed between these collectors. You can purchase all the elements separately and connect them yourself, or buy a ready-made collector group for the required number of outputs. The first option requires skill and experience in assembling such systems, the second is more expensive, but provides a guarantee against possible errors.
Pipes
Heated floor loops require pipes that can withstand operating loads and are resistant to corrosion.
For this purpose, you can use the following options:
cross-linked polyethylene pipes;
corrugated stainless steel pipes;
polypropylene;
copper.
The most common are polyethylene or polypropylene pipes. This popularity is due to low prices and ease of installation - you can use regular compression fittings with them. No less popular are stainless steel corrugated pipes, which bend well and do not require the installation of a large number of fittings, which is typical for copper pipes.
Multiple soldering points make structures vulnerable to leaks. Moreover, if the installation of a copper pipe is done with high quality, the durability of the system will be maximum (sometimes it exceeds the service life of a building, for example, a frame house).
There are no fundamental requirements for the choice of material. Usually they proceed from the magnitude of the loads and the possibility of repairs - if it is planned to pour into the screed, they try to ensure maximum reliability in order to eliminate the need for repairs.
Advantages and disadvantages of water heated floors
The water heated floor system has a number of undeniable advantages in comparison with radiator and convector heating systems:
- Economical . Reducing energy consumption by 20−30% in residential buildings due to the low temperature of the coolant (30−50°C). When installing a water floor in rooms with a large area and a high ceiling, heating savings reach 60% due to air heating only 2-2.5 m from the floor level.
- Comfort . Uniform heating of the room from the floor over the entire area allows you to create optimal temperature conditions for human health (+22° C at foot level and +18° C at head level). It is pleasant to walk on the heated floor barefoot and comfortable to play with children.
- Safety . Heating elements hidden from access make the space safe even for small children, eliminating the risk of injury or burns from contact with coolants.
- Interior aesthetics . The absence of visible parts of heating systems and appliances makes it easier to implement remodeling and room design projects. There are no obstacles in the form of radiators, which, if the appearance does not match the interior concept, must be hidden behind decorative panels or completely replaced with new ones.
Along with the advantages, water heated floors have inherent disadvantages :
- The complexity of installing a heated water floor system. The water floor structure is mounted on a prepared surface and consists of several layers of different materials.
- Possibility of pipeline leakage . The malfunction is eliminated by searching for the place where the liquid is leaking, and therefore, you have to completely lift the floor covering.
- Duplicating the water floor system with additional heating devices in the room. Experts do not recommend using a warm water floor as the only source of heat in the house. It can serve as the main type of heating only in well-insulated buildings with high-quality double-glazed windows and tight doors. However, in places where it is not possible to install heated floors, such as stairs and small corridors, or convectors is additionally required
Installed in compliance with all technological requirements and safety standards, a warm water floor serves as an optimal additional source of heat in the room.
Floor installation methods
When installing the system on a floor, which is most often wooden, you need to choose a method for installing it. The installation procedure is as follows:
- inspect the condition of the flooring;
- raise the floorboards;
- check the condition of the joists and, if necessary, replace damaged ones;
- lay thermal insulation;
- laying heated floors along joists;
- pipeline laying.
Tip: you can nail a wooden beam to the joists for additional placement of insulation.
The floor must be laid strictly according to the instructions.
Installation of water heated floor
Before proceeding with the installation of a warm water floor system, it is necessary to carefully prepare the surface. Debris should and the base should be leveled; there should be no significant differences in the height of the horizontal plane (no more than 5 mm).
There are 3 options for installing a water floor:
Concrete system
a cement-sand screed is used as the base and distribution layer . A layer of waterproofing coating is laid on a pre-leveled concrete surface, on which a layer of thermal insulation is laid on top. Then the heating pipes are laid and secured. For large rooms, reinforcing mesh is additionally used when laying pipes. If the area is small, it will be enough to secure the pipes over the thermal insulation with special plastic brackets, fastening strips or dowel hooks.
Next, the supporting layer is poured, which is a sand-cement mixture supplemented with a plasticizer . The final stage is laying the flooring on top of the heating system. Ceramic tiles, decorative stone, and laminated parquet are ideal as the top layer of a heated floor.
Polystyrene system
The design, which is easier in terms of installation, is based on the use of special heat-insulating polystyrene boards. The shape of the slab pressing is in the form of convex circles of small diameter intended for convenient and quick pipe laying. The slabs along the edges have locks for reliable adhesion to each other and allow you to create a monolithic insulating shield over the entire surface of the floor.
Laying heating pipes on a base made of polystyrene plates does not require the use of fasteners . Installation is carried out by pressing and fixing a piece of pipe in the grooves between the bulges of the slab. The next layer is laid metal heat distribution plates. Then the finished floor covering is installed
Wood system
In a wooden system, the supporting layer for pipes is an edged board, wood board, plywood, MDF, etc. Wooden boards are cut into narrow strips of 130-180 mm and laid at intervals under the pipes on the base (wooden floor or joists). Special thermal distribution plates with omega-shaped grooves for heating pipes are attached to the top with screws. The grooves of the metal plates are lowered into the recesses between the wood boards. The heating pipe is fixed in omega-shaped grooves without the use of fasteners.
After laying the pipes, the entire surface is covered with plastic film. Then, using self-tapping screws GVL sheets , serving as a thermal distribution layer and the basis for finishing the floor.
is designed to distribute the coolant over the heating circuits . The supply and return pipes are connected to the manifold cabinet. A distribution manifold is installed to the supply pipe with hot water, and the manifold for the cooled coolant is connected to the return pipe.
Guarantee
The durability of the structure depends on the quality of the materials, the novelty of the technologies, the professionalism of the installation of the system and the correctness of the design.
If the warranty period for the operation of an electric heated floor is designed for a period of 25 years, then for a water system it will be longer; the duration depends on the selected pipe manufacturer and the quality of the pipelines.
The warranty for equipment and materials is provided by the manufacturer. It is important to comply with the technical conditions. Please review the list before use.
The installation is guaranteed by the installers. Warranty obligations will be considered valid subject to compliance with the operating conditions that are listed in the annex to the contract.
The warranty period for work performed is from 12 months to 5 years from the date of drawing up and approval of the work completion certificate. Its duration depends on the elements used.
After the expiration of the warranty period for service, a contract may be concluded to extend the service on individual terms.
When using a water floor, attention is paid to its effectiveness (do not place it under furniture, cabinets, sanitary equipment), insulation of floors or the foundation of the 1st floor.
Features of the operation of water heated floors
The water heated floor should be connected as soon as the first cold days begin. Warming up the room can take quite a long time. After all, first the floor is completely heated, then the walls, and only after that the air is heated and a constant temperature is established.
If the surface of a warm water floor is covered with laminate or wood, it is recommended to increase the temperature of the circulating liquid gradually . This approach will extend the service life of the coating.
If necessary, you can heat the room with a warm water floor all year round. In summer, it is worth connecting heating branches separately under ceramic tiles, which can be cold even in the heat.
Thanks to its large heat transfer surface, underfloor heating ensures a healthy, bottom-to-top and even distribution of heat in the room. The main advantage of water heated floors is safety and durability.
A modern approach to heating helps create an atmosphere of comfort and coziness in the home.
How to calculate pipe length
For water heated floors, three main pipe sizes are made: 16x2, 17x2 and 20x2 millimeters. The first and third types are most often used.
It is very important to carry out sizing calculations before purchasing a heating cone. If you doubt your own abilities, then you should seek help from professionals.
To do this, you need to have a layout of the water heated floor and areas of the floor where furniture and plumbing will be placed. It is important to consider that pipes are not installed under furniture.
It is important that for a product with a diameter of 16 millimeters the contour length does not exceed 100 meters, and for a product with a diameter of 20 millimeters - 120 meters. Accordingly, each of them will occupy no more than 15 m², otherwise the system will not be able to provide the required pressure.
If the area of the room is much larger, then it is divided into several such circuits. It is important that they are the same size. The difference should not exceed 15 meters. If there is good thermal insulation, then the standard laying step is 15 centimeters, but if desired, it can be reduced to 10 centimeters.
In the first case, 6.7 meters of pipes will be needed per square meter, and in the second - exactly 10 meters.
Also, when calculating the size of the system, you should take into account the material of the pipes, heat loss, power of the system and floors, flooring, etc.
To determine the size of the outline, you can use a standard formula. That is, the heated area (m²) must be divided by the laying step (m). The size of the curls and the distance to the collector are added to the resulting value.
Reviews of the water field
I made a warm water floor myself in the toilet and bathroom. I wanted to get rid of the constant dampness. I connected it to a heating pipe, using polypropylene pipes soldered together. I poured a layer of concrete screed on top and laid out tiles. The result of the work pleased me; it became noticeably warmer and more comfortable . The main advantage of the design is savings. When compared with electric heated floors, the costs of using a water floor in the house are much lower.
Victor
After the baby arrived in the house, we started thinking about additional heating . We have individual gas heating in our house, but the problem is that the room in which the child is located is large and warms up unevenly. Where the heating pipes pass is hot, and in the opposite corners it is cool, the floor is cold. The oil heater did not suit us, as it dried out the air too much. We decided to install heated floors in the room. We read that electric floors may not be safe, so we chose a water floor. The flooring was laid by specialists, since in my opinion it is better to pay professionals than to save money and do repairs. They did it quickly in 2 days, first they laid special sheets, ran pipes along them and covered them with a layer of insulation. We have laminate on top. A small manifold cabinet is installed to supply water; turning on and adjusting the temperature is easy. Now the room is warm, the child can safely play on the floor without the risk of catching a cold. I'm delighted - installation is quick, the cost of use is lower than a conventional heater, and the air does not dry out.
Olga
Minuses
A water floor is suitable for furnishing private houses and cottages. For multi-apartment buildings with central heating, such a system will not be suitable, since it will be necessary to collect a lot of documents to obtain permission.
Other design disadvantages include:
- The need to perform complex calculations for installation;
- The need to raise the floor level by a few centimeters, reducing the height of the doors.
- If there are leaks on a concrete floor, you will have to open the base. The system is heavy and not suitable for old objects.
Therefore, first familiarize yourself with the advantages and disadvantages. It is better to install the floor in a house under construction, making the necessary calculations during the design, which will reduce installation costs.
Which is more reliable?
There are certain advantages and disadvantages for each type of underfloor heating. Electrical cable - quality products from some domestic and European manufacturers have a lifetime warranty. Even a relatively inexpensive wire will work for 20 years without problems. Most often, the temperature sensor or power regulator fails.
Water circuit - the pipe itself has a long service life, but the fittings fail within 10-15 years. The comparative characteristics of water and electric floors in this case are not in favor of the former. Even professional installation teams cannot always accurately determine the location of the leak, so repairs may require dismantling the screed.
Malfunctions and repairs
The water floor structure is simple in structure, which causes few problems. Heating may deteriorate as a result of:
- no noise from the circulation pump when power is supplied;
- lack of system functioning. The distribution panel should be checked on each circuit where the shut-off valves should be in the open position;
- air intake.
Troubleshooting:
- Removing air from the heating structure. The operation of underfloor heating may be defective even with high-quality installation.
The main problem is airing due to a sharp drop in pressure in the heating circuit, excessive heating, leaks and leaky connections, and improper installation.
The manifold may be installed incorrectly, the pipes may be sloping, there may be no valves to eliminate excess pressure, or air may not be pumped out of the manifold assembly during initial start-up. The system will not heat up due to the small thickness of the pipelines.
The problem is solved by overlapping all and leaving one contour, after which each branch is run separately.
In this case, the circulation pump turns on at low speeds, the pressure in the system increases to 1 kg and operates in this mode for some time at a temperature of 55 degrees.
By lowering the flow meter, the performance of the structure improves. A separator can be used to automatically remove air from pipes.
- Setting up the system. To set it up correctly, you should study the principles of operation of the collector that directs the flow of waste and warm liquid. Typically, the operation of the circuits is adjusted in accordance with the balancing table.
At the same time, the cap is removed from the valve and it is closed. Using the table, the speed in each circuit is determined by turning the valve so many times.
- Low temperature due to insufficient boiler power , which needs to be cleaned, preventive maintenance carried out or temperature sensors checked.
Heat transfer is reduced in the presence of furniture and carpets or due to poor insulation (rework and installation of high-quality insulation may be necessary).
- Uneven heating. If the system has been de-aired, but the floor does not warm up, the reason may be an inadequate vapor barrier or its absence. You can check this factor by gluing polyethylene to the floor.
If condensation appears on it within 24 hours, the system must be replaced.
- Mechanical damage (during covering installation) . First, the water is turned off, the damaged area is protected, and access to the pipeline is cleared.
The damaged area is cut, the ends are unraveled, a press coupling is put on the pipe and secured with press pliers. The tightness is checked using internal hydraulics.
- Incorrect installation.
Incorrect installation of the floor is possible with low door openings, incorrect location of the collector, installation using the “snake” technology, increased pipe spacing, and incorrect calculation of heat loss.
This is possible with an unprepared base, insufficient insulation thickness, or short pipeline length.
